


Easy WordPress Guide 2024 – Create Your First Website (Step by Step)
Want to create a WordPress website but feel overwhelmed by the process? You’re not alone. Many beginners find the idea daunting. And if you plan on hiring a web developer to build one for you, it may cost you an arm and a leg. However, setting up a WordPress website is more straightforward than you might think.
Start building your WordPress website by buying web hosting and a domain. Prepare your brand elements like logo and brand colors. Select a fast and lightweight theme like Blocksy. Use a website builder like Elementor to build your website step by step. Customize your site using themes and plugins.
This beginner-friendly step-by-step guide will allow you to quickly create a WordPress website that looks professional and does the job.
How to create a WordPress Website
1. Get web hosting for your WordPress website
First, choose a web host to set up web hosting and find a domain for your WordPress website.
| Ferdy’s Fundamentals – What is web hosting and domain name? Web hosting is a service that stores your website files on its servers, making your site accessible to the world via the Internet. The domain name of your website is its unique web address. |
Since there are many web hosting providers, choosing the right one might feel overwhelming for a beginner. For this reason, I recommend Hostinger as my top web hosting provider. It’s my favorite and the best (literally).
Let’s discuss the different Hostinger web hosting plans and find the right one for you!
Ferdy Kopershoek x Hostinger – Exclusive web hosting plans
Here’s a quick breakdown of Hostinger web hosting plans exclusively available for the readers of my blog:
| Most Popular | ||||
| Features | Single WordPress[Get This Plan] | WordPress Starter[Get This Plan] | Business WordPress[Get This Plan] | Cloud Startup[Get This Plan] |
| Monthly pricing | $9.99/mo | $11.99/mo | $13.99/mo | $24.99/mo |
| 12-month pricing | $2.99/mo | $3.19/mo | $4.99/mo | $9.99/mo |
| Renews at | $5.99/mo | $9.99/mo | $11.99/mo | $23.99/mo |
| 24-month pricing | $2.29/mo | $3.09/mo | $4.49/mo | $9.49/mo |
| Renews at | $4.99/mo | $8.99/mo | $9.99/mo | $22.99/mo |
| Pricing per month (48 months payment) | $1.99/mo | $2.99/mo | $3.99/mo | $8.99/mo |
| Renews at | $3.99/mo | $7.99/mo | $8.99/mo | $19.99/mo |
| Websites | 1 | 100 | 100 | 300 |
| Custom Domain | No | ✓ | ✓ | ✓ |
| SSD storage | 50 GB | 100 GB | 200 GB | 200 GB |
| Email Account | 1 | 100 domain-based email addresses | 100 domain-based email addresses | 100 domain-based email addresses |
| Managed WordPress | ✓ | ✓ | ✓ | ✓ |
| WordPress Acceleration | ✓ | ✓ | ✓ | ✓ |
| WordPress Multisuite | No | ✓ | ✓ | ✓ |
| Bandwidth (Website speed) | 100GB | Unlimited | Unlimited | Unlimited |
| Databases | 2 | Unlimited | Unlimited | Unlimited |
All of the plans above are feature-rich, affordable, and come with a 30-day money back guarantee.
Plus, to make your day, use the following code to get additional discounts on Hostinger’s plans: FERDY.
| Pro tip: Go for the WordPress Starter plan if you want to build a WordPress website for a small business. This plan offers sufficient storage, unlimited bandwidth, and a free domain for the first year. |
2. Set up your domain
It’s time to set up your domain name and get access to the WordPress Dashboard. In this guide, I’ll use the Hostinger web hosting service for demonstration.
Follow along with this step-by-step guide to set up your domain name and customize your WordPress settings:
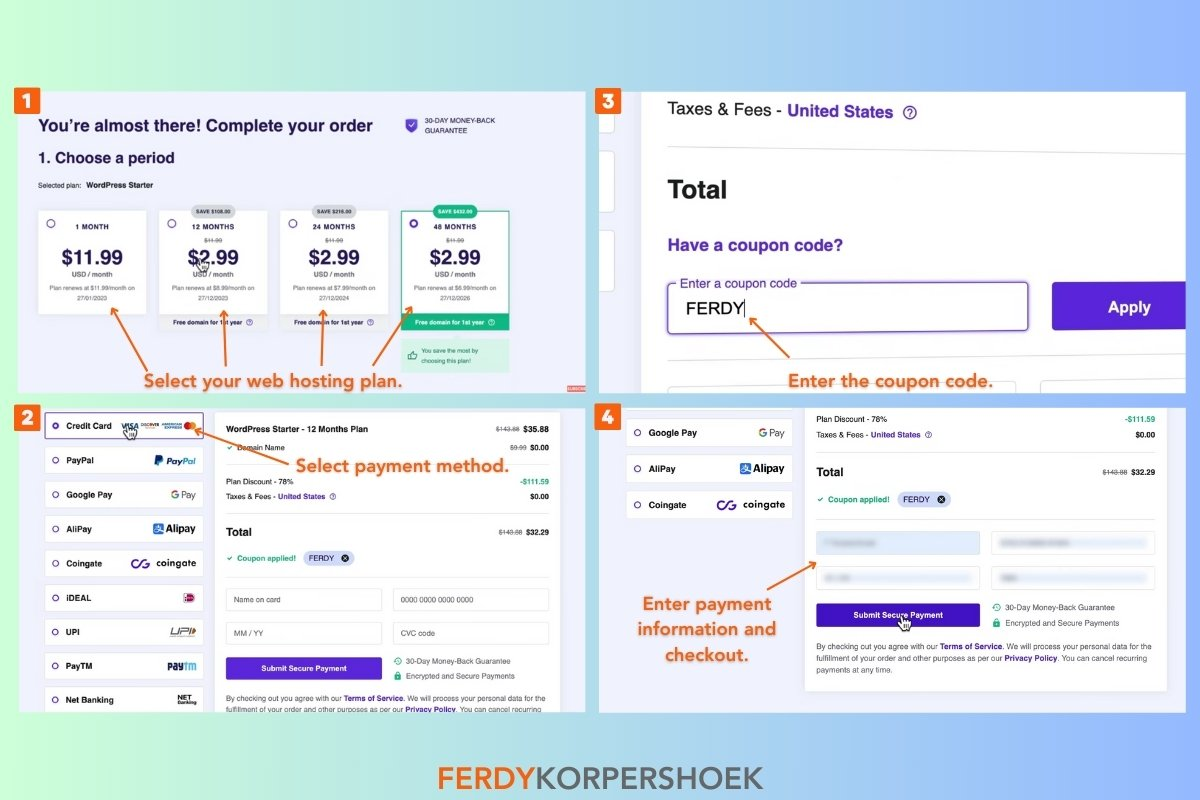
Step 1: Select a Hostinger web hosting plan and enter the coupon code FERDY to apply additional discount on your purchase. Select the payment method of your choice, enter your email and payment information. Then hit the “Submit Secure Payment” button. A pop-up will appear. Create your password and sign up.
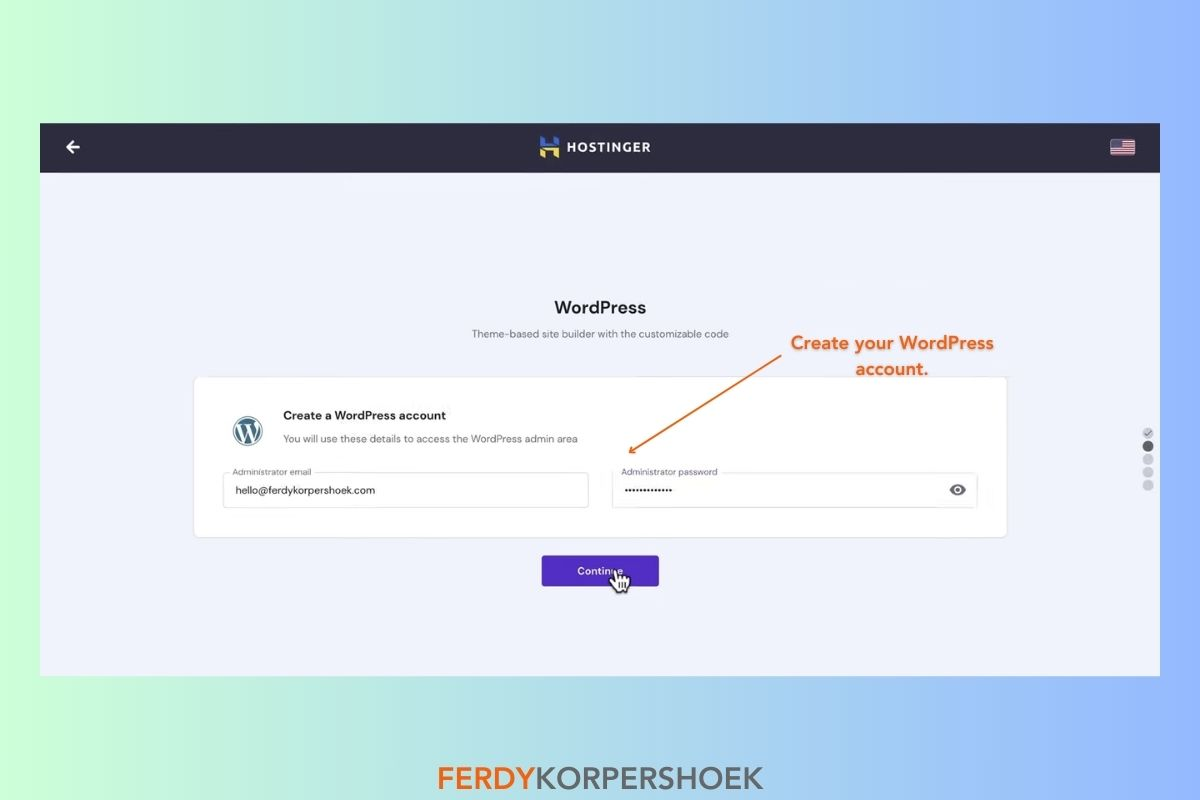
Step 2: Skip the initial set-up prompts. Create a WordPress account by setting your admin email and password.
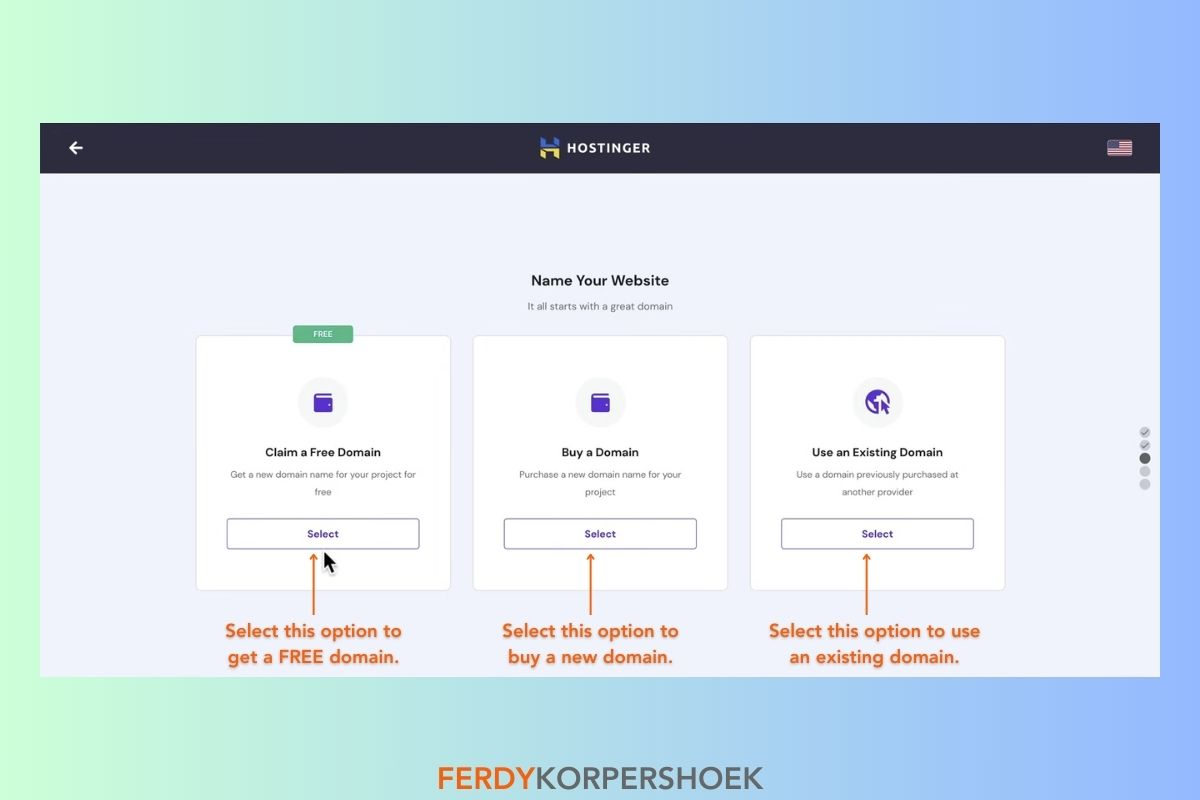
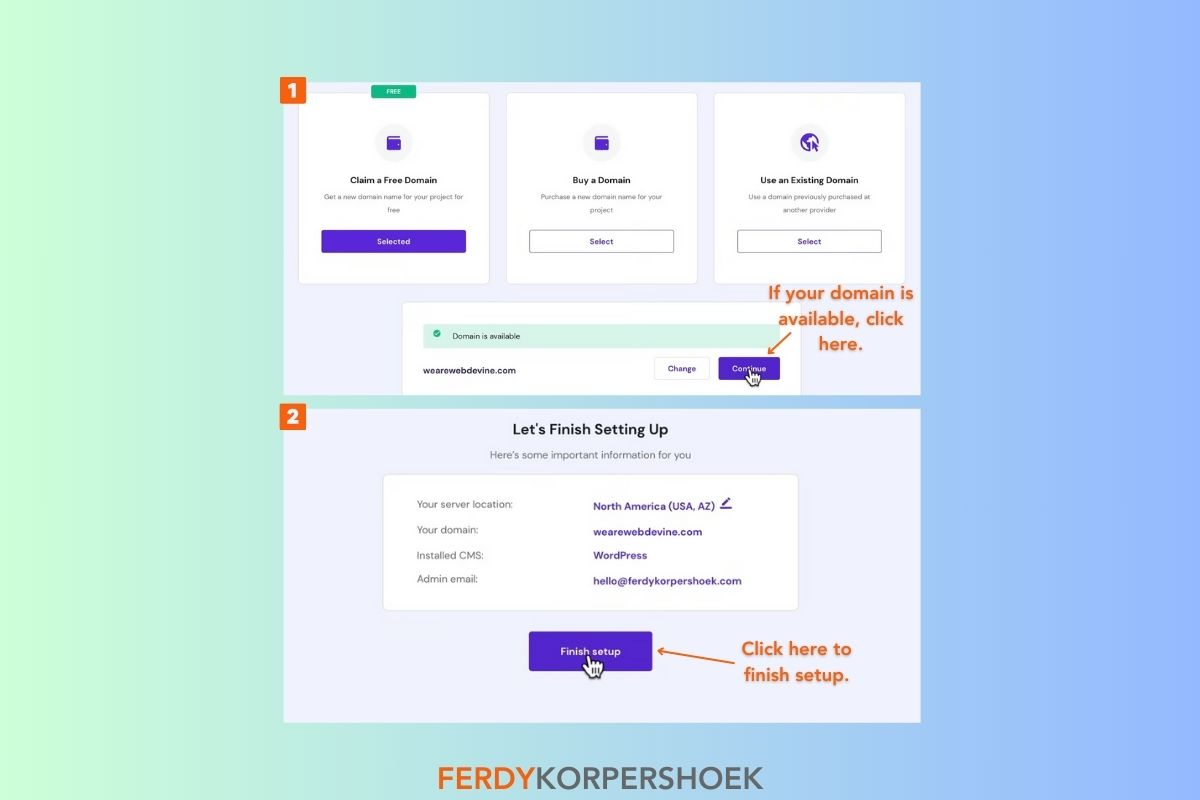
Step 3: Upon logging in, you will find that WordPress has a set of prompts to help you start with your new website, including a set of plugins and installing a WordPress theme. Pick a domain name for your WordPress site before configuring these. The domain setup of your WordPress website has three options:
- Claim a free domain (not valid for the Single WordPress package)
- Buy a domain
- Use an existing domain
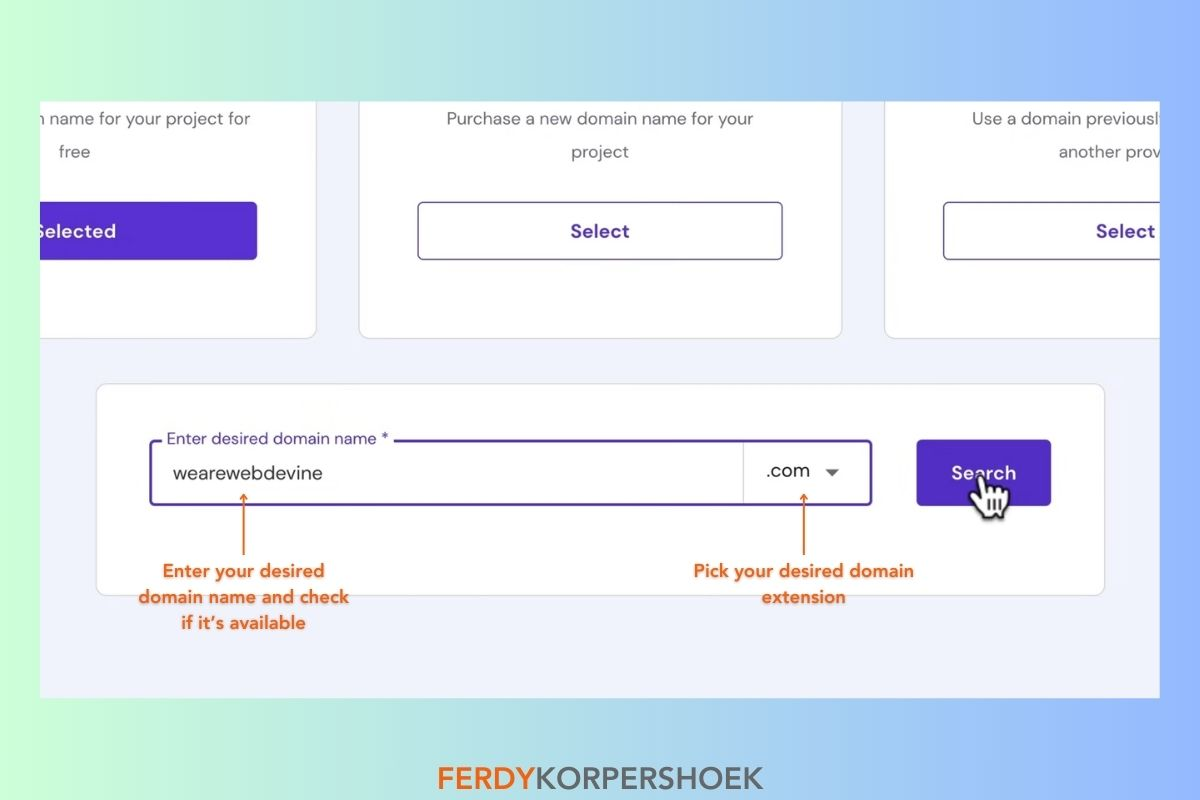
Step 4: Select the first option to claim a free domain name for your WordPress website. Select the desired extension from the drop-down menu on the domain setup (.com, .net, .me, etc.) Enter the desired domain name for your WordPress website and check its availability by clicking “Search”.
Step 5: If the domain name is available, you get two options: Change and Continue. If your desired domain name is unavailable, try different variations until you find one. Once you do, click “Continue” and “Finish Setup”.
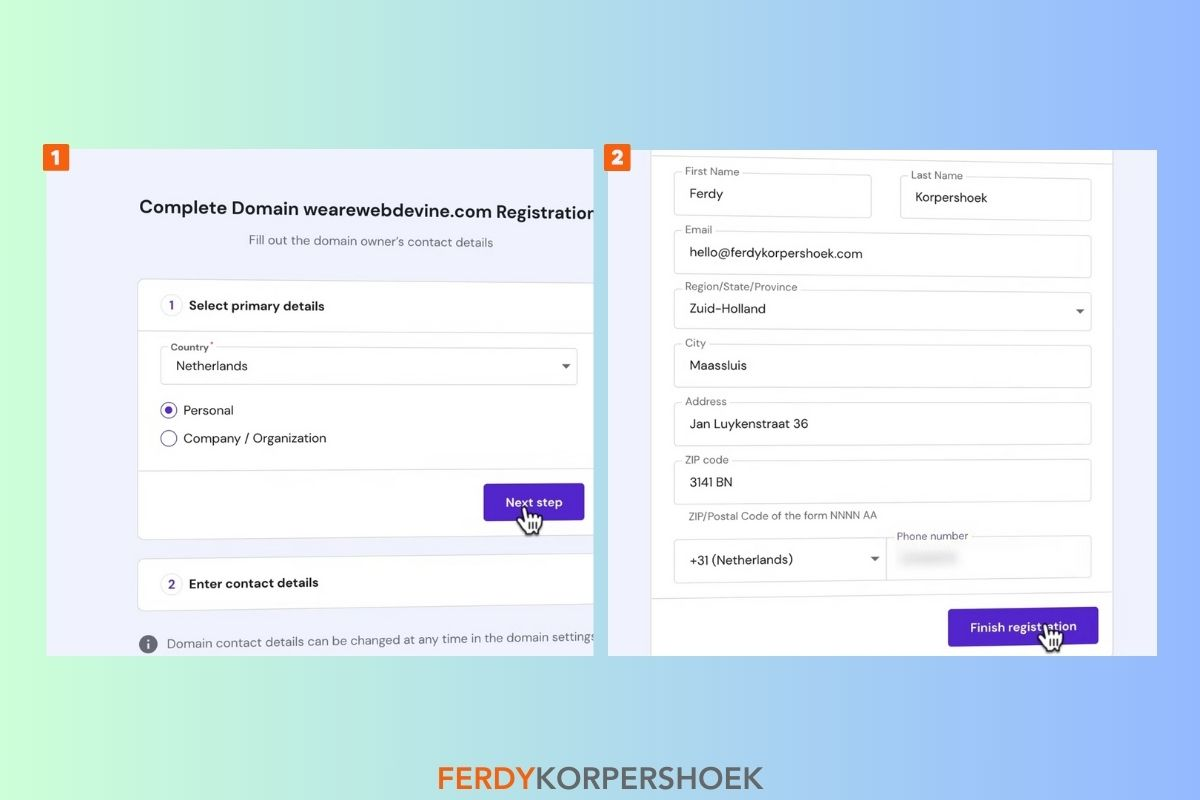
Step 6: Enter the required details, including location, name, address, and phone number to finish the domain’s registration for your WordPress website.
After the domain registration, you can start setting up your WordPress website. But before that, installing the SSL certificate to secure your website is important. This is an important step. Don’t skip it!
| Ferdy’s Fundamentals – What is an SSL certificate?An SSL certificate adds a security layer to your WordPress website, safeguarding collected data like email addresses and payment information from cybercriminals.Even if you don’t collect user data on your website, an SSL certificate boosts your site’s trustworthiness, enhancing visitors’ confidence in your website and, by extension, your business. |
How to install an SSL certificate?
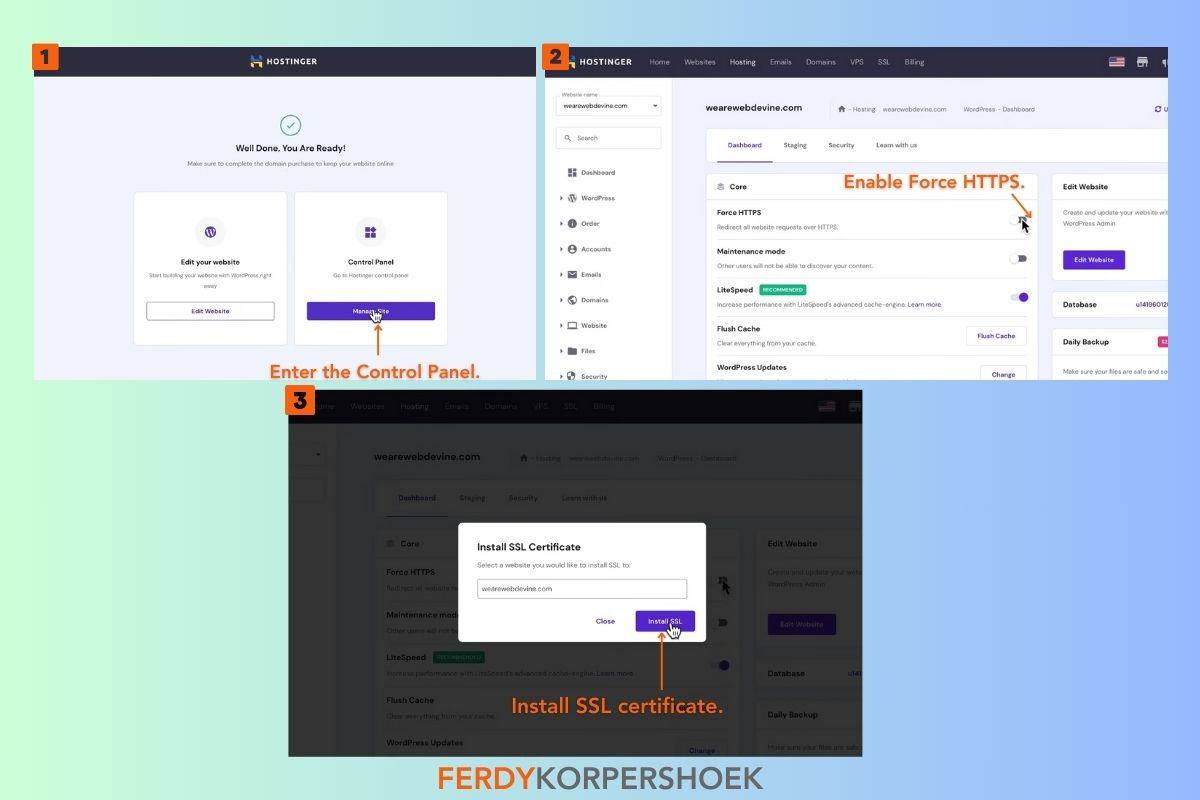
- To install the SSL certificate for your WordPress website, head to the hosting Control Panel on Hostinger.
- Click on “WordPress Dashboard” and turn on the “Force HTTPS” feature visible at the top.
- Click “Install SSL” to install the SSL certificate on your chosen domain name.
3. Configure your WordPress dashboard

It’s time to configure your WordPress dashboard now.
Note that you don’t need to install WordPress with a WordPress hosting package from Hostinger.
- Click on the “Edit Website” button on the right side of the control panel. This will open up your domain with web hosting and WordPress installed.
- Click the WordPress logo on the top left. Then click “Dashboard” from the menu on the left.
This pulls up the backend of the WordPress website, where you are ready to set the stage.
Instead of exploring the options and getting confused, I recommend clearing the dashboard and starting from scratch.
Remove the widgets from your WordPress site
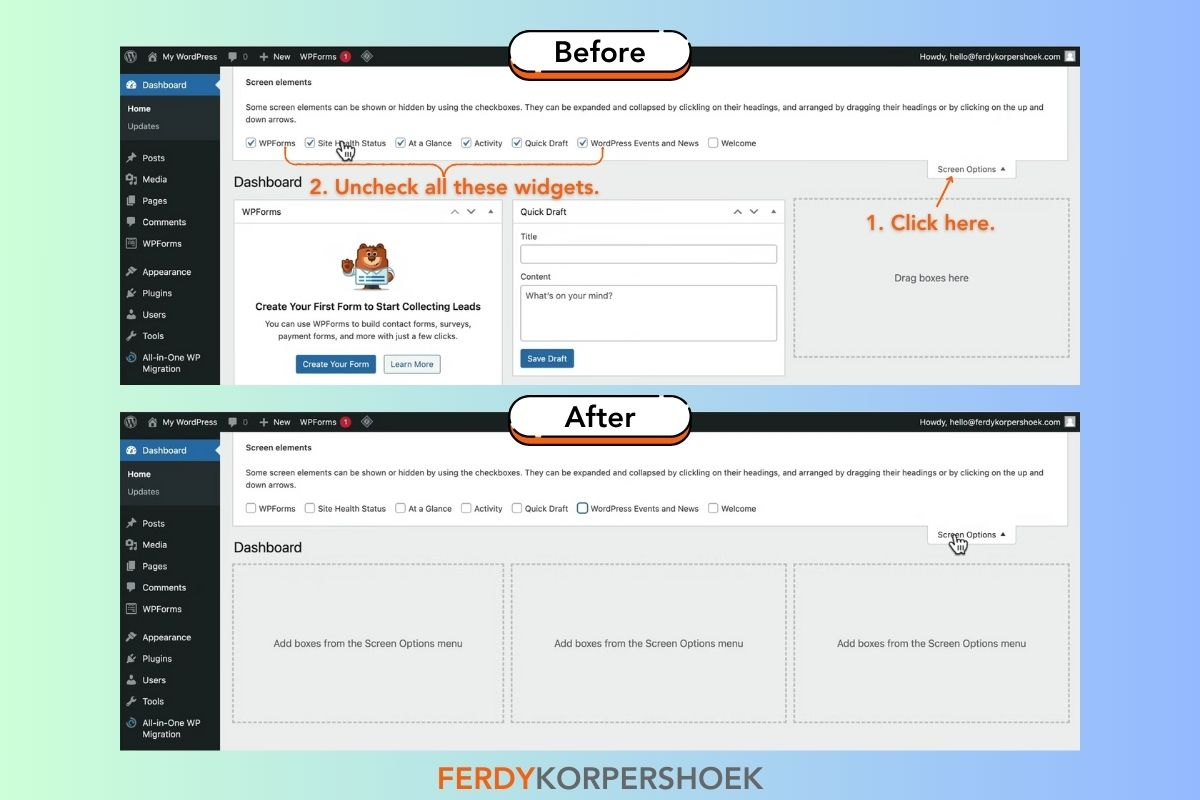
On your dashboard, you will find multiple widgets that you can use to draft content and create forms quickly. But as a beginner, these widgets are going to confuse you. Click “Screen Options” and uncheck all the widgets.
Remove plugins from your WordPress site
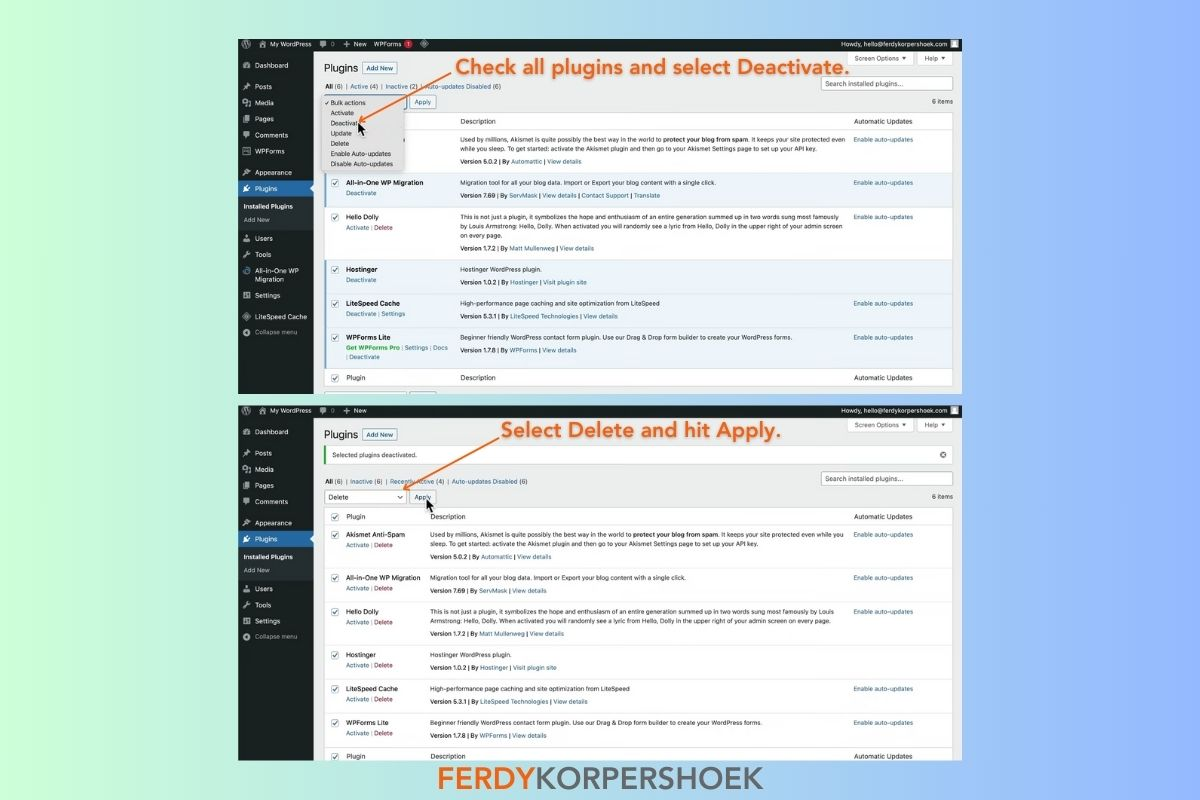
Next, head to the plugins section from the menu on the left. Deactivate and delete all the default WordPress plugins.
These are not essential plugins and will not affect your website in any way at this point. Doing this is beneficial because installing plugins manually later will allow you to understand the functionality of each plugin better.
Change the settings
Once you have cleared the dashboard, head to the settings to set the following:
- Site title
- Tagline
- Site’s language
- Time zone
- Date format
- Time format
| Pro tip: Ensure that the site’s title and tagline represent your website to rank on Google for your target keywords. |
4. Finalize brand elements
The first element of your brand you already have is your domain name. But there’s more to a brand than just the name. Some branding essentials include a unique but simple logo, a distinct color palette, and a theme that conveys the look and feel of the brand.
Select a color palette
The color palette of your website can have a significant impact on your website visitors.
For example, red exudes excitement and passion, while blue symbolizes trust, dependability, and strength.
Take your time to pick the right colors for your website as they lay the foundation of your professional-looking website and your brand identity.

While the color emotion guide above can help you pick colors, you can also get inspiration from competitor brands and those in the same industry. Doing so can help you choose colors that are popular in your industry and familiar to your prospects.
Coolors is a great resource to set a color palette. This website has a range of color combinations that you can choose from. You can also pick your colors by locking a primary and a secondary color and looking for other colors for the palette.
Design a logo
When you’ve picked a color palette, you can start designing your brand’s logo and favicon. The favicon is a small icon on the web browser’s tab and is usually the smaller version of the logo.
Here’s a tutorial demonstrating how I use a simple online logo creator to design a logo:
Make A Logo For Free (With Transparent Background)
But that’s not your only option. You can also use professional graphic design software like Adobe Illustrator for the job.
If you’re not using an online template logo maker, design your logo on a graphic design tool that allows you to download it in SVG and PNG formats. For example, Canva.
| Pro tip: If you’re not a pro at logo designing, do not have the time, and want a professional-looking logo that will be associated with your brand for the years to come, you could consider outsourcing this task to a freelancer. |
Select a theme
A great thing about WordPress is that it has amazing free and premium themes that you can use to optimize your website.
However, because we’re doing this from scratch and want a customized look, you would want to select a theme that offers tremendous functionality and is easy to work with.
In the next section, I talk about one such theme and how you can use it to create a customized WordPress website quickly.
5. Select a WordPress theme
After finalizing your WordPress site’s brand elements, the next step is to install the Blocksy WordPress theme before starting the design process.
| Ferdy’s Fundamentals – What is Blocksy? Blocksy is a feature-rich, popular free theme on WordPress. Blocksy’s free version surpasses typical WordPress free themes in functionality. It also comes as a premium theme, which is ideal for e-commerce websites. |
Once downloaded, upload the theme to WordPress and start using it to build your site further.
Alternatively, you can head over to the “Appearances” section from the left menu and go to “Themes” to find the Blocksy plugin and install it without downloading it into your system.
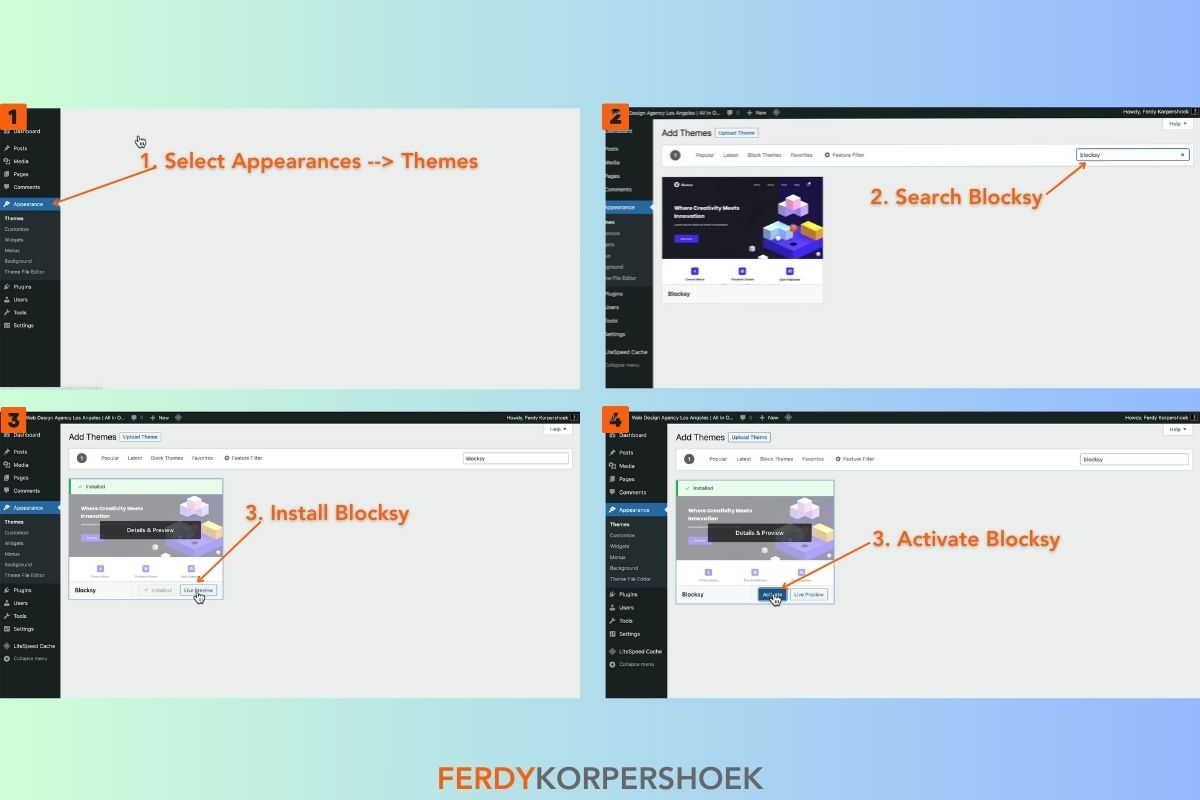
Once installed, activate the new theme. I recommend installing the Blocksy Companion plugin within the Blocksy theme for a perfect combo.
6. Set the website header
The header of your website sets the tone. It contains your logo, your menu, and, in some cases, icons for your social media handles. Here’s how to set it up:
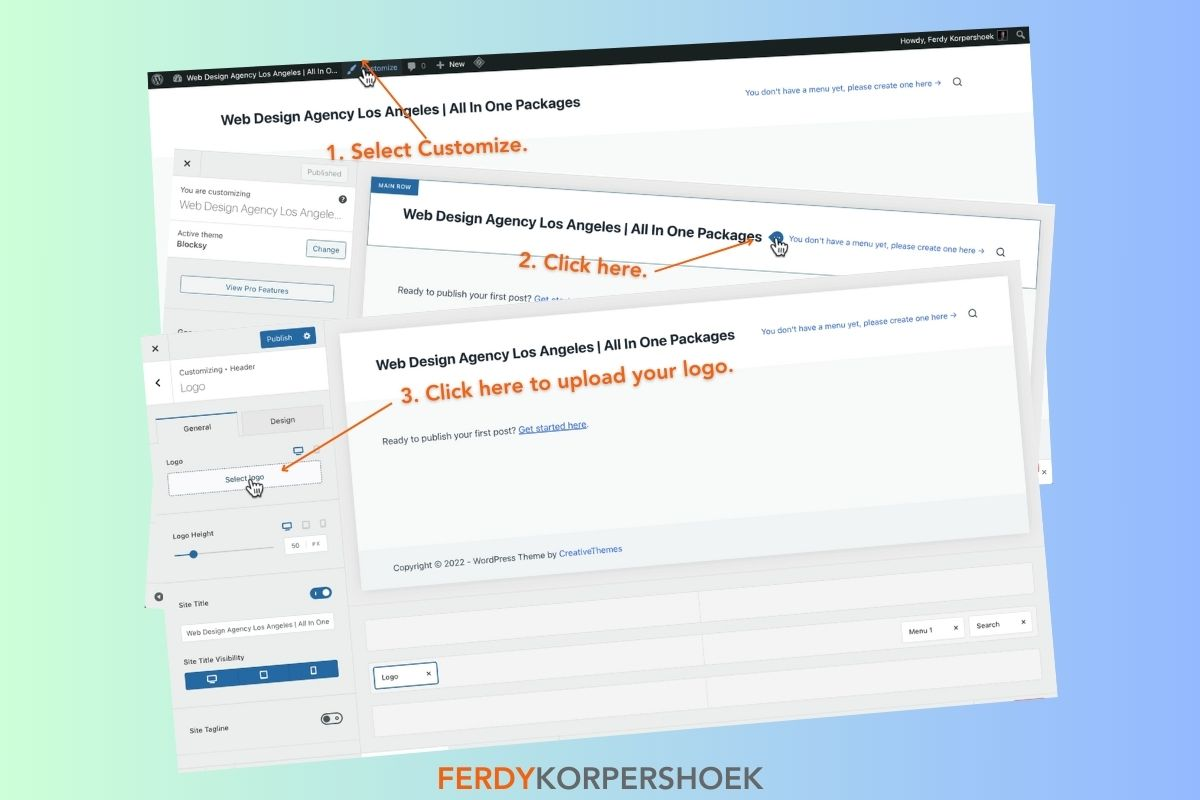
- To set the header, click the “Customize” option from the top ribbon on your website.
- Right now, you will only see the website title and subtitle. Click the three dots in front of the title to go to the logo area and select your logo.
- The logo appears on top of the title. Since the logo will have the name of your personal or business WordPress website, you can turn off the visibility of the website title from the same editor window.
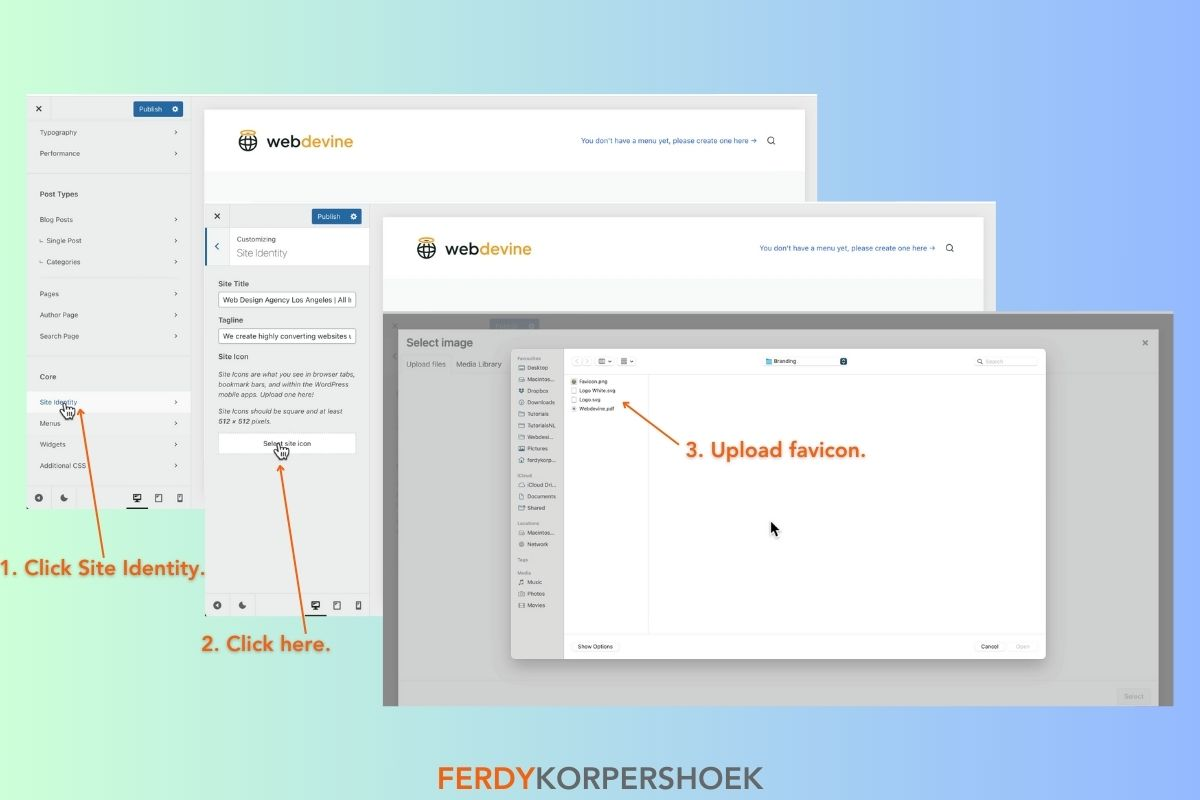
- To set the favicon on your site, go to Core → Site Identity and set the favicon.
Next, you can set the site’s menu, which is usually displayed on the right side of the website. However, depending on your preferences, you can also display it in the center of the header.
But before we dive in, it’s important to consider a few key questions. Reflect on these points to ensure your site’s menu effectively guides your visitors:
- What essential pages does my website need to navigate my visitors properly?
- What are the common elements or information my ideal customers seek on similar industry websites?
- How can I structure my menu to make finding important information intuitive and quick?
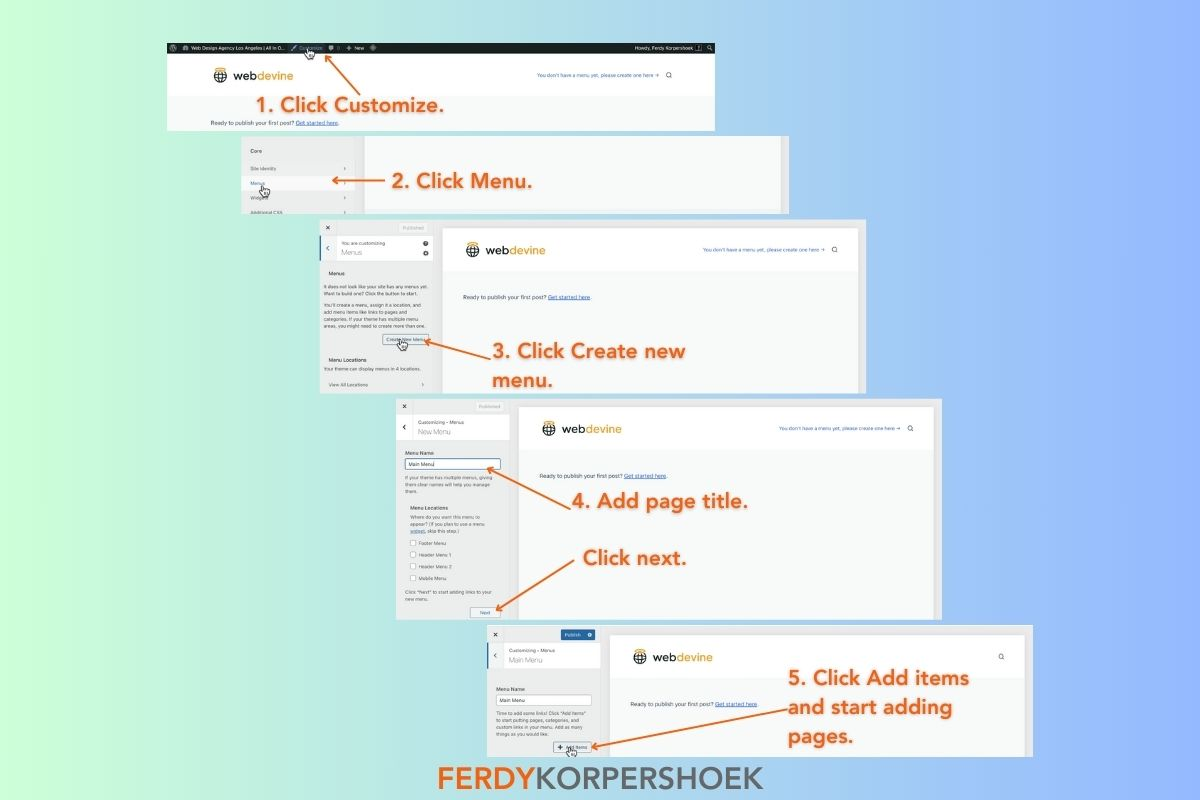
Once you’ve figured out what your menu should look like, follow the process below to set your site’s menu on WordPress:
- Go to the menu editor by clicking “Menu” underneath the “Core” section on the left menu.
- Name the menu and link it to the main menu area.
- Add menu items such as Home, Services, Blog, and Contact page. Consider adding menu items based on your website’s main intent.
- To create drop-down menu items, simply drag the menu item blocks on the website builder to the right so they form a sub-section.
Set the header for mobile devices
On the customize editor window, you will see three icons at the bottom. One icon depicts the desktop view, and the other two are symbols for the tablet and mobile view, respectively. To view your website’s appearance on each device, click the icon.
You can change the header’s look and the menu for different devices. I suggest creating a trigger (a simple three-line button) to activate the menu for mobile devices.
7. Set the homepage on your WordPress site
Once you’ve set the header, you can add elements to your homepage.
Since WordPress started as a content management system (CMS), every new WordPress website shows the blog page as the homepage by default.
However, to set your desired page as the homepage, go to Core → Homepage settings and select “Static page” rather than your latest posts.
Now that you have a header and a blank page, here are some tips to help you set up the homepage:
Change colors
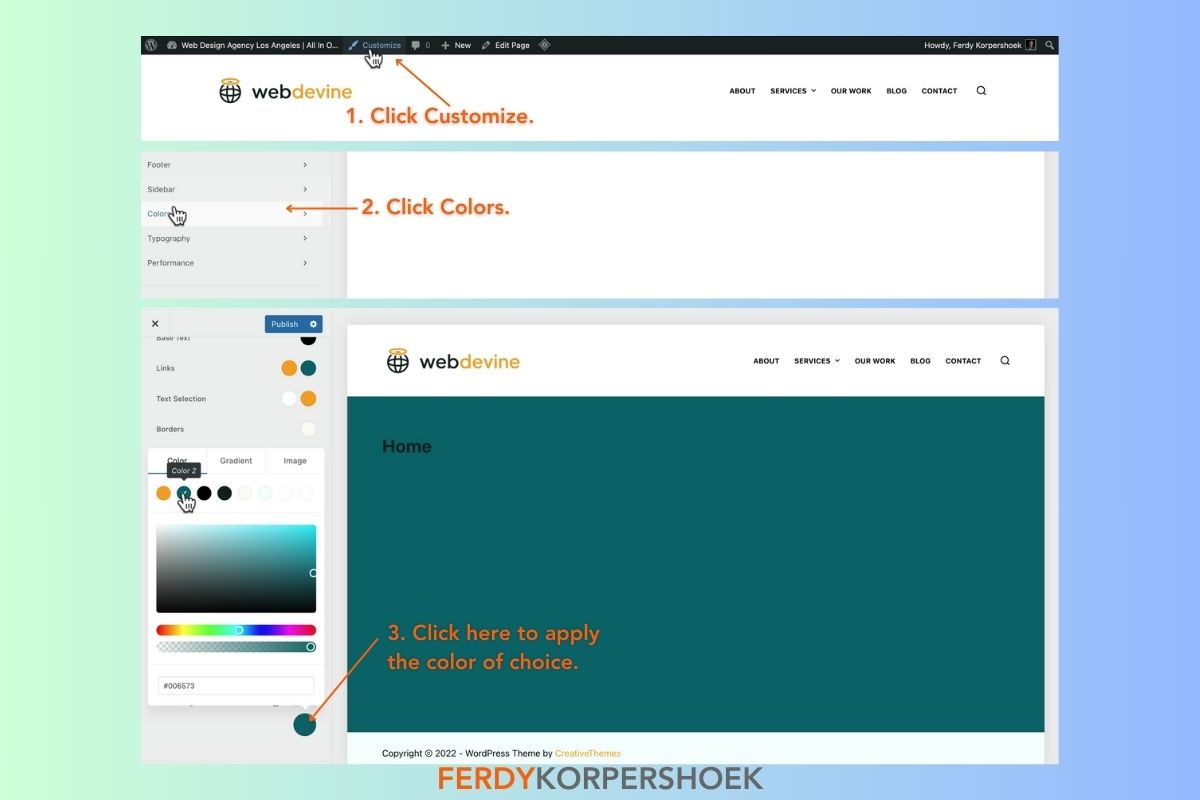
To add colors from your color palette on your home page, head to Customize → Colors and change colors from the site background option. You can further explore this section to adjust the height of the top row, add buttons, and change the look of your headings.
Hover colors
Hover color is what appears when a user hovers over a menu item. Hover colors can transform a simple website into a professional-looking one, similar to business sites.
In the color settings, especially for headers, you can customize button and menu item appearances, including font, background, and hover colors.
You can also adjust font size, line height, and letter spacing to achieve the perfect look for your WordPress website
8. Install the Elementor plugin
While most WordPress themes use sections and blocks, the Elementor plugin has containers that offer more flexibility in terms of formatting. To get Elementor for your WordPress website, head to the section where you can install plugins and search “Elementor”.
| Ferdy’s Fundamentals – What is Elementor? Elementor is a WordPress website builder that makes professional website building easy. The editor is quite intuitive. You can use it to design your website and format the web design elements on a simple drag-and-drop interface. |
Using Elementor on WordPress
Once you install the plugin, you will see a new button on the editor ribbon on your website named “Edit with Elementor”. Click on it to explore Elementor’s features and what you can do with them.
I will explore the Elementor plugin and its amazing features in a different blog post.
For now, you can watch this tutorial where I explore Elementor’s features in detail and how to use it for your WordPress website:
How To Create A WordPress Website In 2023 | Elementor Flexbox Container Tutorial
9. Optimize your website for SEO
You should be comfortable navigating the WordPress admin dashboard and customize panel at this point. However, before publishing content, ensure your website is optimized for search engine indexing.
While content plays a huge role in search engine optimization (which the SEO plugin can help with), some website elements are also important to get indexed.
Set a site Title
We have discussed that picking a domain name relevant to your business is necessary. However, your site title and tagline also play an important role in your website’s ranking.
Before setting the site title, quickly search on Google for competitor businesses in your area. You can learn from the websites that are already ranking on the first page of search engines. Look and learn what titles these businesses use and implement that for your business.
For this blog post, I set up a website for a web design agency called Web Devine. Now by default, my site title is “We Are Web Devine | Welcome To Our Website.”
For a moment, step into the shoes of a person looking for web design services. Now ask yourself this: would I search for phrases like “Web Devine” or “welcome to the website” when looking for a web design company?
Obviously not! These default titles don’t align with what potential clients might search for. To attract the ideal website traffic, optimizing the site title and tagline for SEO and relevance is crucial.
So, let’s refine it. A more effective site title for Web Devine could be “Professional Web Design Services | Web Devine.” This title is direct and incorporates key search terms that a prospective client might use, like ‘professional web design services.’
| Pro tip: If you are a local business, consider searching for businesses in your area and take inspiration from their site titles. |
Change permalink structure
The permalink structure of your website pages depends on your WordPress settings. By default, WordPress assigns a page number to the pages you add.
For instance, the permalink structure of a new blog post by default would be www.xyzbusiness.com/page=1.
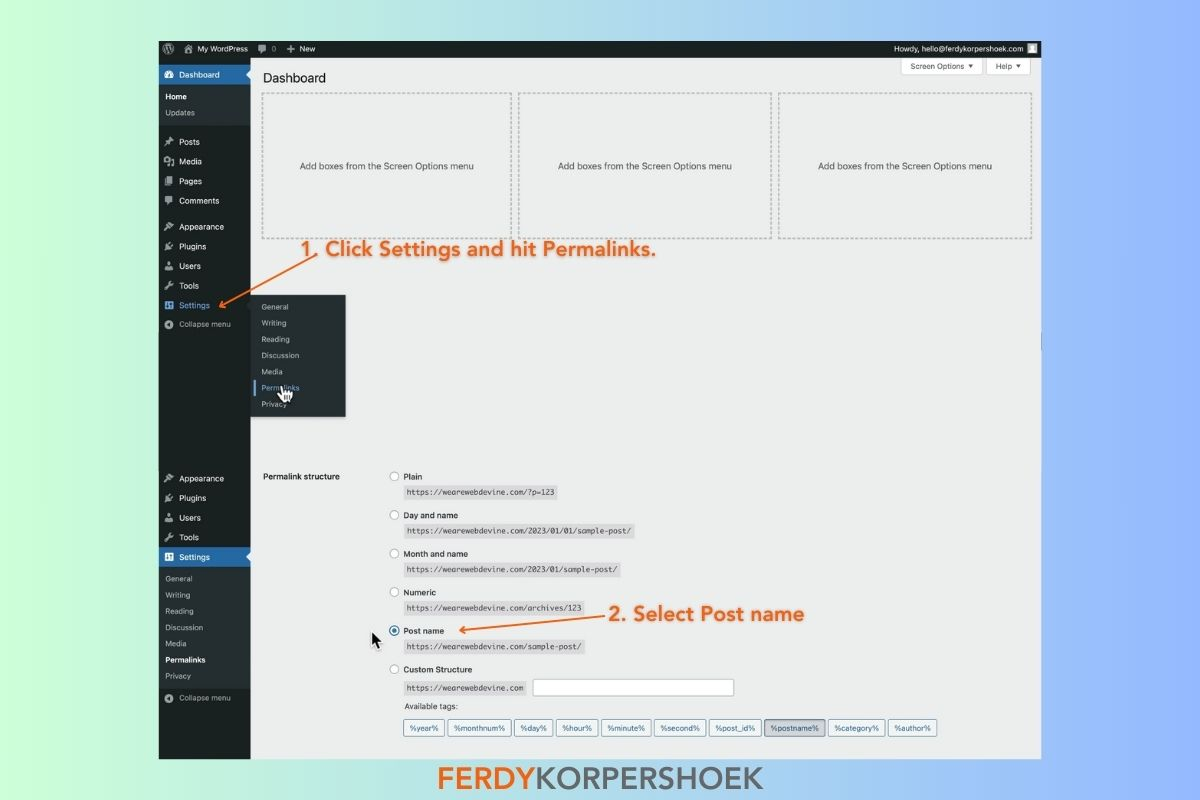
While this is quite simple, it is not good for web crawlers. To change the permalink structure, go to Settings → Permalinks → Permalinks Structure. You can change the structure from “Plain” to “Post name” or “Custom.”
I recommend selecting “Post name.” This way, any web pages you add will be assigned a permalink based on the post name.
Add your name
By default, posts on your blog page will show your email address for attribution. To change this, head to your profile and add your first and last name. You can also change the way your name appears publicly.
Add your profile picture
With WordPress, you can even add your profile picture. Gravatar is the official WordPress avatar generator that you can use to add a picture to your hosting account. This picture will appear next to your name on every post published on your website.
10. Add new pages and content
The last step to building your WordPress site is adding new pages and content.
Thankfully, WordPress has a simple and intuitive structure. To add a page, go to Pages → Add a new page. For adding content to the pages, use Elementor.
For additional guidance, you can watch my tutorial on how to write a blog post in your WordPress website. This tutorial covers how to add a featured image to your blog post, blog post styling & formatting, and much more!
How To Create A Blog In Your WordPress Website
Final thoughts
While there is much more to building a WordPress website, this step-by-step guide covers the basics, including getting a custom domain and web hosting, configuring WordPress, and working with Blocksy and Elementor to build your website.
Start building your first WordPress website following the steps outlined in this post. And if you have any questions, feel free to connect with me on Twitter, Facebook, or Instagram.
For comprehensive video tutorials, visit my YouTube channel, and consider subscribing for the latest in web design and WordPress tips.
Happy website building!


Peter
Great work Ferdy – once again.
David
Hi, through your through your tutorial on YouTube I am able to create my first blog website but I need your help in completing it. How can I get in touch with you