


Hostinger Tutorial 2024: Website Setup Made Easy (Step By Step)
Ever felt the excitement of starting your own online business only to hit a roadblock when selecting a web host? Setting up a website can feel like a complex puzzle, especially when you are just getting started. But what if I told you there’s a solution that simplifies this process?
Hostinger is one of the most cost-effective web hosts in 2024. With a Hostinger subscription, you can get a domain name and an SSL certificate for free. You can also create a sub-domain and an email account. If you’re using a different web hosting service, Hostinger offers free website migration.
In this guide, I’ll walk you through creating a website on WordPress using Hostinger. Whether you want to create a website from scratch or migrate your existing website to a new web host, this guide covers all.
1. Sign up for Hostinger
Setting up your website using Hostinger is a straightforward process that ensures a seamless launch.
Begin by visiting the Hostinger special deals page. You’ll find exclusively discounted web hosting deals here. Choose a plan of your choice and continue.

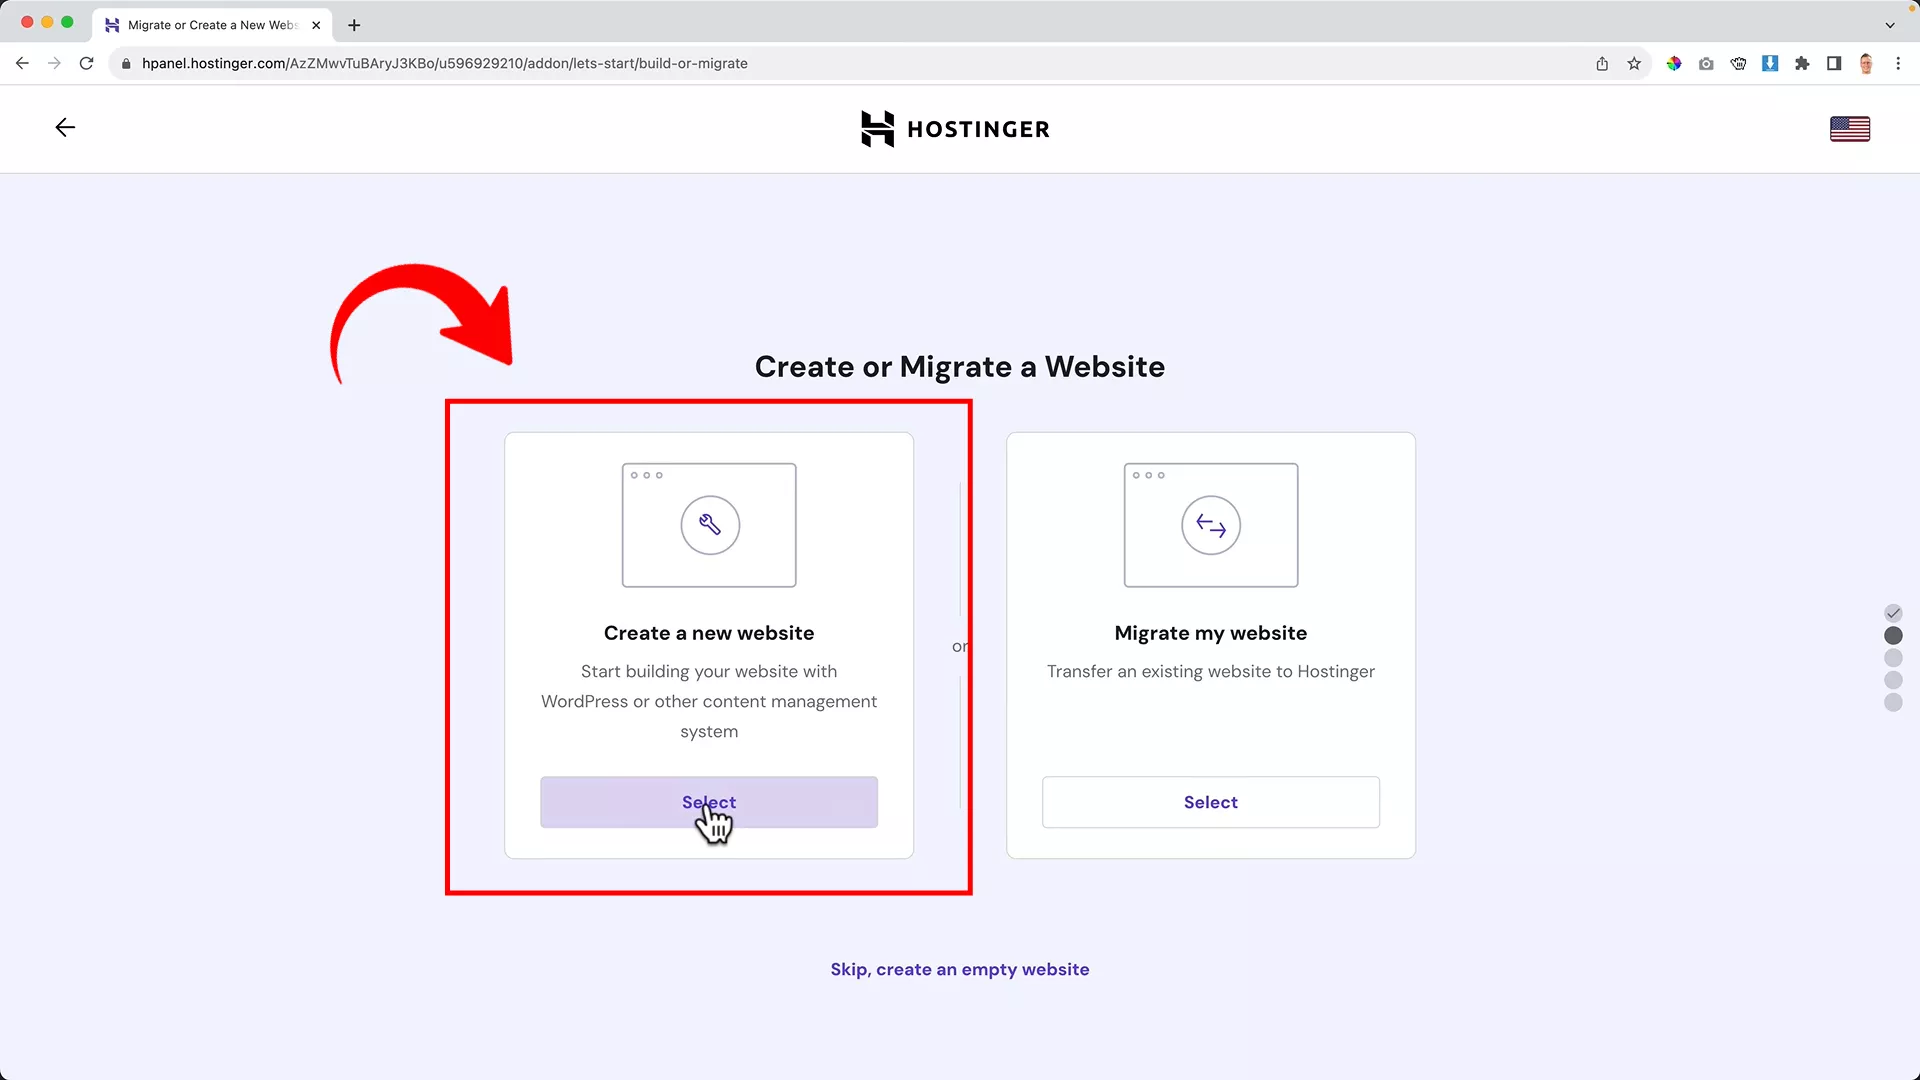
Choose “Create a new website.”

Opt for ‘Start from Scratch’ under WordPress with AI on the subsequent screen.

Proceed by naming your website and selecting “Claim A Free Domain.”
Enter your desired domain name/extension and click ‘Search’ to check availability. Experiment with various combinations until you find an available and suitable option. Click ‘Continue’ once you’ve found your ideal domain. I opted for freddiekorp.com.
Complete the necessary details to proceed with the registration of your website.
Move to the next step, providing the required information on the subsequent page.

Finalize the registration by clicking ‘Finish Registration.’

Your domain name is now registered. Click ‘Finish Setup’ to proceed.
If you go to your website now, you’ll see it’s already live. The only issue is that it isn’t secure. Notice the “Not Secure” sign at the beginning of the URL? Look at the image below for reference.

That’s the marker for sites that don’t have an SSL certificate. But worry not cause Hostinger has you covered!
Hostinger offers a free SSL certificate which is installed automatically. It might take a few mins but your site will be secure soon.
Ferdy’s Fundamentals – Understanding the type of website you want to create
Now that you’ve set up a website, it’s time to figure out what you want to do with it. Visit the home page of my website to find out the different types of websites you can create on WordPress.
You’ll find in-depth WordPress tutorials showing how to create a WordPress website for your busines, start your online course website, make a blog, or an online store. The sky’s the limit!
2. Install and configure WordPress
WordPress is the most popular website builder in the world. It’s easy to use, does all the heavy lifting for you, and offers many plugins and tools for website customization.
Here’s what you need to do to set it up on your website:

On the Hostinger dashboard, select Website -> WordPress from the left panel.

Next, select “Install WordPress.”

A pop-up will appear. Set up your admin credentials and add the website title.

Click “Next”. Here, pick the WordPress version and language of your choice and hit “Install.”
Awesome, WordPress is installed on your website!
Now, if you visit your website, you’ll view the front end – the part of your website visible to visitors. For example, whenever someone visits this website (freddiekorp.com), they’ll view this:

Notice the black bar at the top? It’s called the Admin Bar or Toolbar.
This bar serves as a quick-access menu with various useful links and shortcuts, making it convenient for site administrators when managing their websites.
The backend of your website, accessible through the “Admin Panel,” is where you can perform various tasks like setting up regular backups, writing posts, adding pages, uploading media, and monitoring updates for WordPress core, themes, and plugins.

However, the backend of your website is exclusive to you. Your website visitors can only view the front end of your website.
3. Validate your email and free domain
To ensure the completion of your email address verification and activation of your free domain, follow these simple steps:
Keep an eye on your email inbox for a message from Hostinger. Click on the link provided in the email. This link is essential to verify your email address and activate your free domain.
In case you haven’t received the verification email, don’t worry. Simply log in to your Hostinger account and navigate to the “Account Actions” section.

Within the “Account Actions” section, look for the option labeled “Resend Verification Email.” Clicking on this will prompt Hostinger to resend the verification email to your registered email address.
By following these steps, you’ll ensure your email address is verified and your free domain is activated smoothly. If the initial email doesn’t appear in your inbox, the option to resend the verification email from your Hostinger account is the best solution.
4. Create a subdomain
I find subdomains very useful for adding different kinds of content to your website.
Take my example. I have a main website (ferdykorpershoek.com) and a subdomain for FREE Elementor templates (elementor.ferdykorpershoek.com. People looking to enhance their website can explore my library of FREE Elementor templates by clicking on this subdomain.
Similarly, you can facilitate your website’s visitors by getting them to visit the subdomains that matter the most to them.
Maybe you run a marketing agency. You could create multiple subdomains for your most in-demand services. For example, subdomains for SEO and social media advertising.
To create a subdomain like mine, follow the instructions below:
Go to your Hostinger dashboard and click the Websites tab from the top. Navigate to the website you want to create a subdomain and click “Manage”.

From the left panel, click Domains -> subdomains to open the settings to create a subdomain.

Enter the name of the subdomain and click “Create”. This will activate a “List of Subdomains” below these settings.

Now head to Websites -> Autoinstaller from the left panel and install WordPress.

This time, click “Advanced” and set the installation path to the subdomain.

Add the title and set up admin credentials. Hit Next -> Install.
And that’s how you create a subdomain!
5. Set up your domain’s email address
A domain-based email address looks quite professional. It will be useful when you want to communicate with stakeholders and potential customers through email marketing.
Hostinger’s plans come with free domain email addresses. The Single WordPress hosting plan allows only one domain-based email address, while all other plans come with hundreds of them.
Pro tip: If you are setting up a personal website, the Single WordPress plan is enough. However, if you plan to hire employees on your team, I suggest that you go for a plan that allows you to set up multiple domain-based email addresses.
To set up your domain email address, click the “Emails” tab on your hosting dashboard.

Set up your free email service by selecting the domain name. This can take a few minutes, so be patient.

Click “Manage” to proceed.

Select the Titan email plan according to your needs. If you’re just starting, I recommend the free plan.

Fill in the details, including the name of the email account, password, and the password recovery email address.
I set up 2 email accounts for my website initially. One where website visitors could contact me for more information and another as a backup.
But you don’t necessarily have to do this. Some business owners prefer role-based emails, such as hr-head@businessname.com or ea@businessname.com.
Others differentiate their professional emails by function, for example, info@businessname.com, sales@businessname.com, or returns@businessname.com.
6. Configure email settings
You can access your email address through webmail, where you can import contacts from a connected email and customize your signature. Also, enable notifications to receive alerts for every new email in your inbox.
Additionally, the Titan email app allows you to manage your business emails on both Android and Apple devices. It offers synchronization of your mailbox and calendar with Exchange Online or Exchange Server accounts, providing seamless access to your communications.
Give it a try for streamlined email management!
Pro tip: Test email using your new account and an old one to get a hang of how the Hostinger webmail works. I always test out my new emails by sending multiple media messages to ensure everything is working perfectly. This is your chance to check if you like your emails grouped into a thread or stacked one on top of the other and change it from Settings -> Preferences.
Configure the desktop mail app
To make things easier, I recommend that you install the desktop app and even add it to your phone for quick access.

To install the desktop and mobile app, head to the Hostinger dashboard –> Emails –> Manage

By clicking on Configure desktop app, you will get the details to configure via IMAP. Go to iCloud Mail on Mac or Outlook on any other desktop and add mail. I have a Mac so I’ll show you how to do this on Mac Mail.

After clicking “Add Account” from the Mail tab at the top, add your email address and password.

Set your username and select IMAP as the account type. Copy the incoming and outgoing mail server from your Hostinger dashboard, then Sign in.
The mail on your desktop app and your browser is now synced.
Set up the mobile app
Similar to configuring the desktop app, you can add this email to your mobile app. Add the same IMAP incoming and outgoing mail servers on the mobile app and see the magic. Your mail will be synced across all the platforms!
Pro tip: To test your new email account, send an email from it to another account you own, and check if it’s received. Next, reply or send a new email from the other account to your new one, and check for its arrival. This is a quick hack for verifying new email accounts. It’s a great way to ensure that your email account is set up correctly and functioning properly.
7. Create a second WordPress website
Get a WordPress Starter, Business WordPress, or Cloud Startup plan to add more than one domain to your Hostinger account. The most popular WordPress Starter plan allows up to 100 websites on a Hostinger account.

To set up a second website on your Hostinger account, head to the “Domains” tab from the top and select one of the two options:
- Get a new domain.
- Transfer an existing domain.
Want to transfer an existing domain? Don’t worry, I’ll teach you how to do that later in this section. First, let’s explore how to create a second website from scratch.
Get a new domain

When you click “Get a New Domain,” you can enter your unique domain name. Note that your domain name’s yearly price will vary based on your chosen extension.
I almost always go for the .com extension because it’s moderately priced (compared to .net and .io) and perfect for appealing to a global audience.
Pro tip: You can use AI to get domain name inspirations. Just enter what your website is about. If it’s a local business, don’t forget to mention the area of business to get location-specific domain name ideas.

Once you select your domain name and complete the payment, you’ll see a “Pending Setup” tag in front of your new domain name under “My Domains.”
To activate this domain name, head to the Websites tab and select “Create a new website”.
Next, Hostinger will prompt you to select the platform. At this point, you should select “Skip, I will start from scratch.”

Lastly, choose the domain for your website on the next step to complete the registration for your chosen domain name.

Click the button “Manage Site” to get to access the new website’s dashboard.
Download WordPress separately for each domain and subdomain on your Hostinger account and install an SSL certificate for each unique domain.
Since you’re setting up a new site on a new domain name, you will first download the SSL certificate from the Security tab on the left panel and download WordPress from the Website -> Autoinstaller.
Transfer an existing domain
I’ve found Hostinger to be one of the best web hosting platforms because they deliver great speed at affordable prices. Because of these reasons many website owners decide to transfer to Hostinger. The transfer process is also amazingly simple.
For demonstration purposes, I’ll transfer an existing domain (davidkorp.com) I have on Siteground to Hostinger.
First, get an EPP code from your existing platform. Where you can get this code varies from platform to platform. On Siteground, you can get your EPP code from here:

If you use a different web host, simply Google how to get an EPP code for that particular web host.

Next, log in to your Hostinger account. Go to the “Domains” tab at the top and select “Transfer an Existing Domain”.

Proceed by entering your existing domain name on the bar to see how much it will cost you before making the payment.

Next, enter the secret EPP code on the pop-up. Select “Keep existing nameservers” to retain the domain’s management with your previous web hosting service (this is also transferrable).
Finally, hit “Transfer Domain” to proceed. The transfer process takes 5-7 days, after which the transferred domain name will be listed under the “My Domains” list on Hostinger.
Switch web hosting
To switch to Hostinger for web hosting, it is important to create a website backup.
To do this, go to the WordPress dashboard of your website, install and activate the following plugins:
When you install and activate these, you will find an All-in-one WP migration tab and a WPvivid tab added to the left menu. Using the All-in-one WP migration plugin, export the website to a file. Through the WPvivid plugin, create a backup and download the file on your system.
Go to the website you want to transfer > log in & go to the backend> Plugins in the left menu. Now on the resulting screen search for the Plugins mentioned above and make backups of the website and emails. This way, if anything goes wrong during the migration, there’s no need to worry.
Pro Tip: Having a backup WordPress website is a great idea in case one doesn’t work. I have always found All-in-one WP migration to work perfectly, but it’s best to download a second backup to be safe.
- To finalize the transfer, add your website on Hostinger through the Websites tab -> Create or migrate a website.
- Now, instead of clicking on “Migrate my website”, click on “Create a new website”.
- Install WordPress on this website using the Autoinstaller and go to the Admin Panel.
- Delete all media, posts, and pages from your website.
- Go to plugins to install and activate the All-in-One WP Migration plugin.
- Head to the All-in-One WP Migration tab from the left panel and click “Import.”
- Import the file you downloaded on your system.
Doing this will create a temporary website display because your domain still points to the older web hosting service. The final step that completes the transition is transferring the nameserver.

Go to the My Domains list on the “Domains” tab and click “Manage” on the right.

The “Domain Information” will reveal that your nameserver is still connected to the old hosting.

To change it, click “Change” in front of the nameserver details and “Use Hostinger nameservers”.
The complete hosting transfer might take up to 24 hours. But since you have already created a website copy, nothing will change.
Transfer email accounts
Your email account, linked to your web hosting provider, needs transferring when you switch to Hostinger. Here’s what you need to do:
Log in to your email via a desktop app and export both your inbox and outbox. This creates files with a .mbox extension.
In your Hostinger account, choose ’emails’ and establish a free email service using your transferred domain. Follow the previously outlined steps for email account setup.
On your Hostinger account, select emails and set up a free email service using your transferred domain.
Follow the same steps that I outlined above for setting up all your email accounts.
Pro tip: To recheck if the transfer is successful, go to any DNS lookup website. On the email, there’s Titan and on nameservers, there’s CloudFlare which is Hostinger.
Final Words
Hostinger truly simplifies the website setup process. In this guide, I’ve shown you how effortlessly you can start or move your site to Hostinger. Its user-friendly approach, combined with affordable plans, makes it ideal for anyone embarking on their online journey.
Whether you’re setting up a new site or transferring an existing one, Hostinger’s versatility and ease of use stand out. Give it a try, and you’ll see why it’s my go-to for web hosting!


0 thoughts on “Hostinger Tutorial 2024: Website Setup Made Easy (Step By Step)”