

Divi Theme Tutorial 2024: Complete WordPress Website Setup
Ever wondered how to create a stunning website without getting tangled in complex coding? Enter the world of Divi and WordPress.
To create a WordPress website using the Divi Theme: select a hosting service, install WordPress, and choose a domain. Next, leverage Divi’s Visual Builder for its drag-and-drop interface, advanced styling, and efficient design tools, suitable for beginners and experienced web designers.
In short, this article has everything one needs from knowing nothing about building websites with WordPress and Divi to mastering them like a pro leading towards a standout online presence. Ready? Let’s dive in!
Create a WordPress website using the Divi theme 2024 – Video tutorial
Get started on your WordPress site
My long-time followers know that I always begin my tutorials from the ground up, ensuring everyone, regardless of experience, can follow along. That’s why, before Diving into the Divi theme tutorial, it’s crucial to first walk through the fundamental steps of setting up your website.
Setting up a basic WordPress website comprises three essential steps: selecting a web hosting service, installing WordPress, and picking a domain name. Let’s get started.
Step 1: Select a web hosting
Web hosting is the first step on this journey of website creation. Think of it like renting space online where all the content of your site gets stored, ready to go live any time an internet user keys in your domain name.
Hostinger stands out as one of the best web hosting platforms with affordable plans that meet varying customer needs and ensure excellent results with a 99% uptime guarantee.

All three of Hostinger’s web hosting plans offer a free domain name. But for your first website, I suggest you go for the Business plan.
Why I recommend the Business plan for first-timers
- Affordable pricing
- Free CDN and object caching for global audience speed optimization
- Daily backups to secure Divi builder progress against glitches
- Includes a free staging tool for safe website edits and publishing upon satisfaction
As a reader of this blog, you gain exclusive access to special Hostinger web hosting deals unavailable to the general public.
Plus, to make your day, enjoy an additional 5% discount on Hostinger when you use coupon code “FERDY” at checkout!
Step 2: Set up WordPress
Follow along the steps as you purchase web hosting on Hostinger. You’ll see a set of prompts to help you set up an account on WordPress. I recommend skipping these as I’ll guide you how to start from scratch.
Choose the options to your liking and set up your WordPress account as a foundation to build your website.
Step 3: Choose a domain name
A domain name is your online address. Your preferred domain should uniquely and clearly reflect what you do, making it memorable and easy to remember to help drive more traffic to your site.
I never rush when choosing a domain as it is crucial in making my site trustworthy and credible.
Lucky for you, Hostinger offers a free domain for the first year so you won’t have to spend extra.
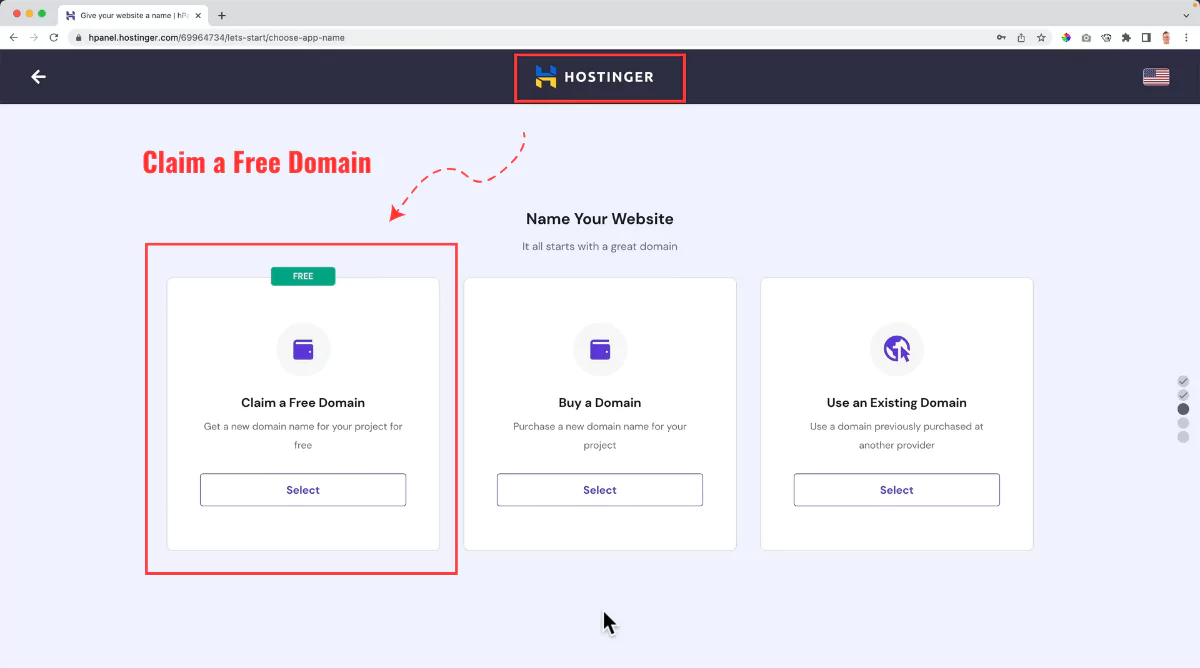
Simply select “Claim a Free Domain” on the Hostinger dashboard to proceed.
Select a .com extension for your domain and don’t be afraid to get creative to get a name that is available and perfectly reflects your business.

As a rule for all my tutorials, I will create a website using the Divi theme to walk you through the process step by step. The domain I chose for this website is divi5.com.
Once everything is set, Hostinger will guide you through registering your chosen domain name.
If you need more guidance on how to do these steps in detail, check out my easy WordPress guide. In this guide, I walk you through setting up a basic WordPress website from scratch.
Getting started with the Divi theme
A WordPress theme shapes your site’s appearance, covering color schemes, page layouts and typography. The appropriate theme can effectively transform your site to accurately reflect its purpose and ethos.
Although WordPress has a huge range of free and premium WordPress themes, each of which have different features, today I will talk about the Divi theme.
The Divi visual page builder features a drag and drop interface like most popular WordPress themes. But what sets it apart from other themes is the layout packs, custom templates, and advanced styling options.
I bought the Divi theme 8 years ago and now use it for all my website projects.
The Divi theme is my first choice because it gives a professional look that even the most popular free WordPress themes cannot match.
Plus, Divi’s speed with its copy-paste feature makes my workflow super efficient.
Divi’s premium plans
Divi is a feature-rich, low-cost theme by Elegant Themes. When you sign up for a premium plan, you get access to 300+ website packs, 24/7 premium support, and the Extra, Bloom, and Monarch themes by Elegant Themes!
The best part – with a premium plan, you can use the Divi builder and theme on unlimited websites without paying for each additional website.
To sign up, you have two options: the simple Divi plan and the Divi Pro plan.
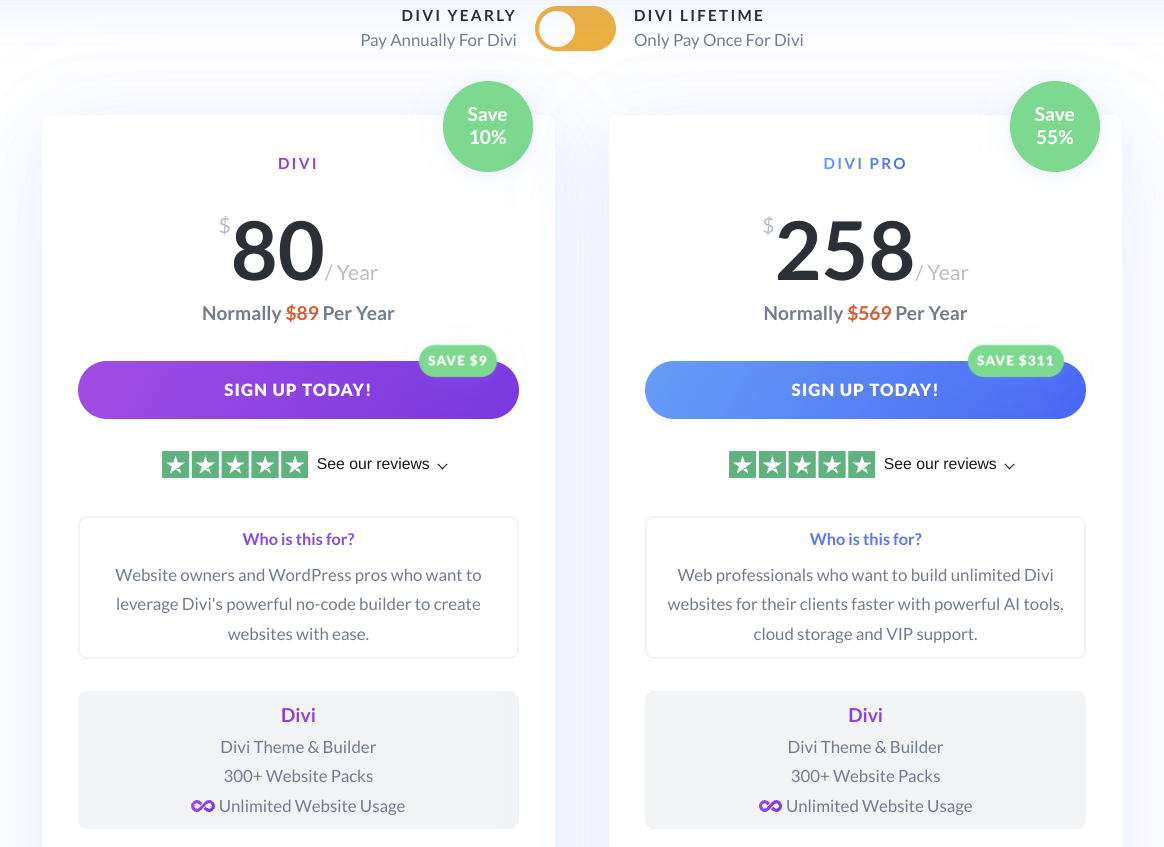
Here’s what I think having used both plans:
- Divi plan: Ideal for personal projects and people just starting as digital entrepreneurs.
- Divi Pro plan: My top pick for web designers looking to create multiple websites swiftly. The plan also offers artificial intelligence (AI) tools alongside cloud storage services.
Both these plans offer great value! Many of my students use Divi to create websites for clients, earning much more than the initial Divi investment.
I know you’re eager to check out Divi, but before you do so, you should know that you can avail a 10% discount on Divi and other Divi products only within 24 hours of your first visit to the site.
You also have the option to sign up for Divi and Divi Pro for life at a 10% discount and get access to updates and premium support forever!
Installing and activating the Divi theme
Divi’s intuitive functions make website building simpler than you may think. Let’s start at the beginning.
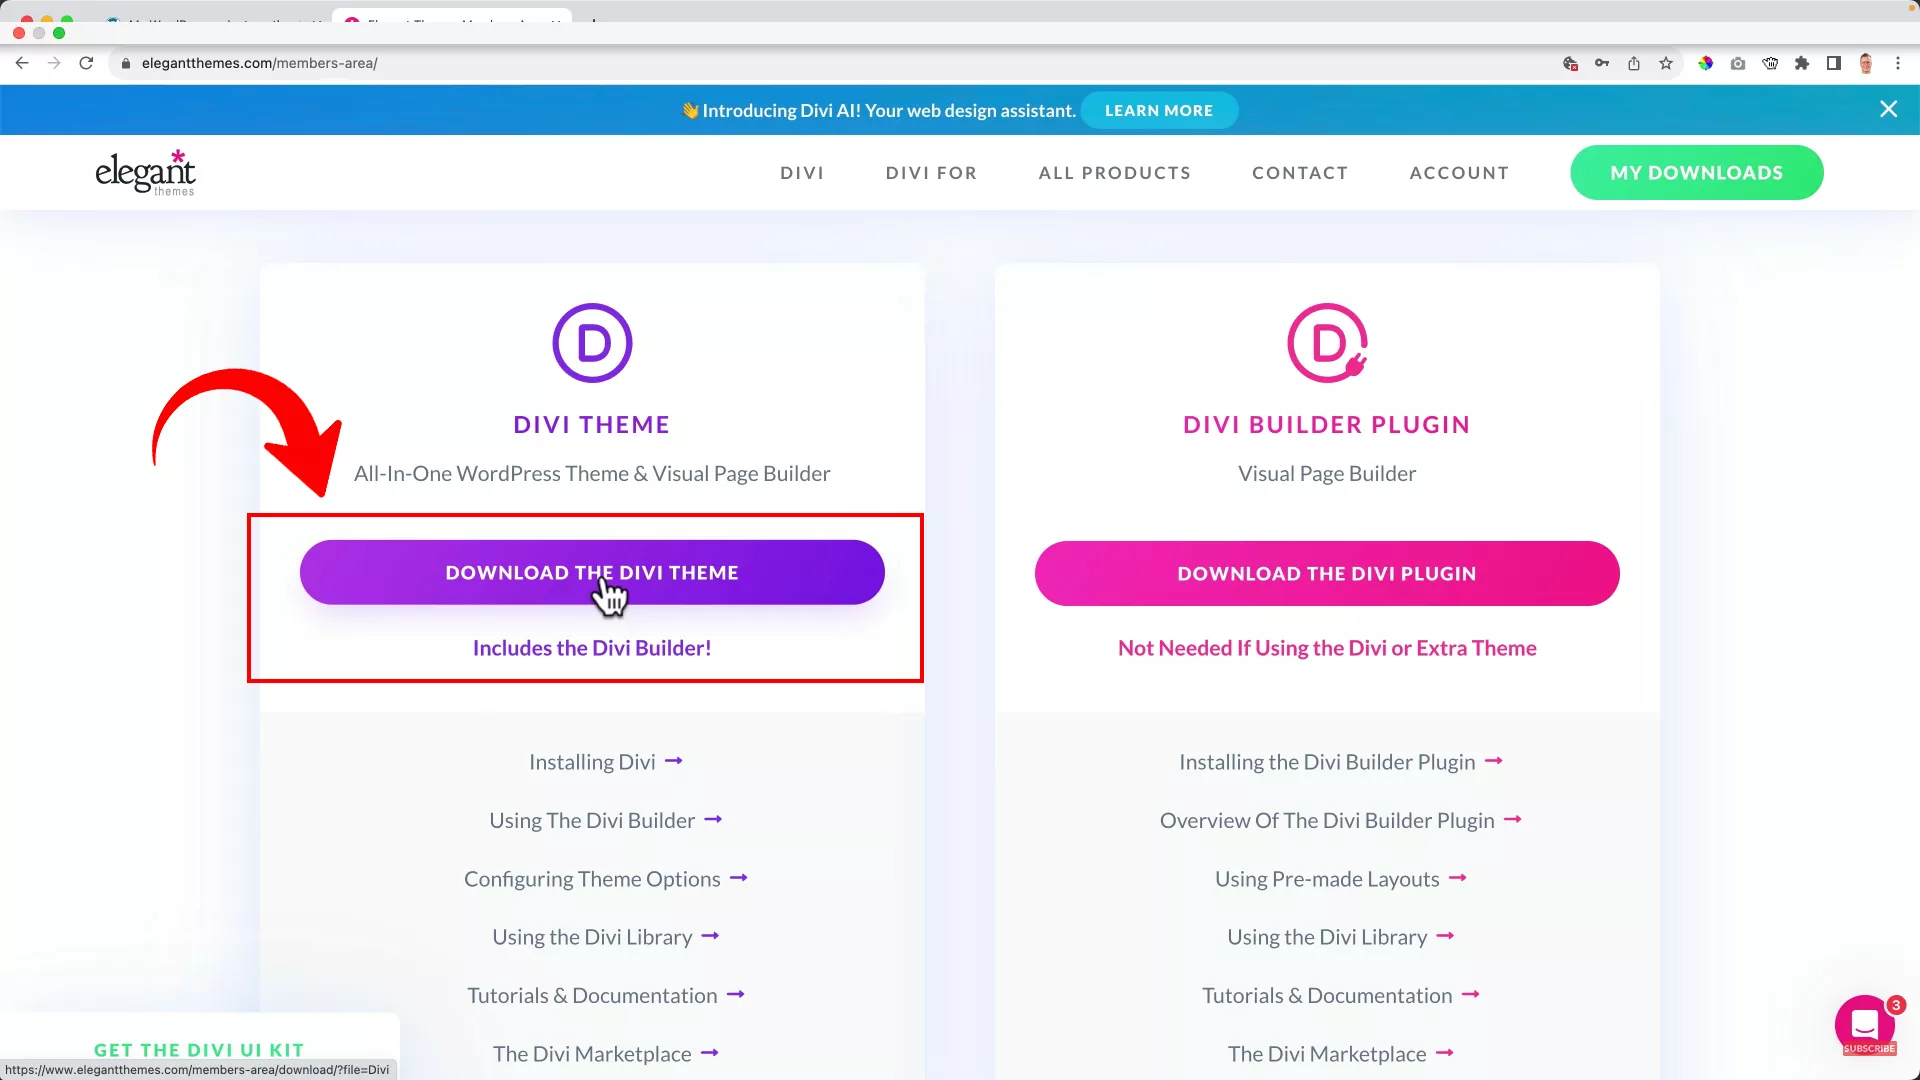
First things first; you need to select a plan which will lead you to a member’s area from where you can download the Divi theme.
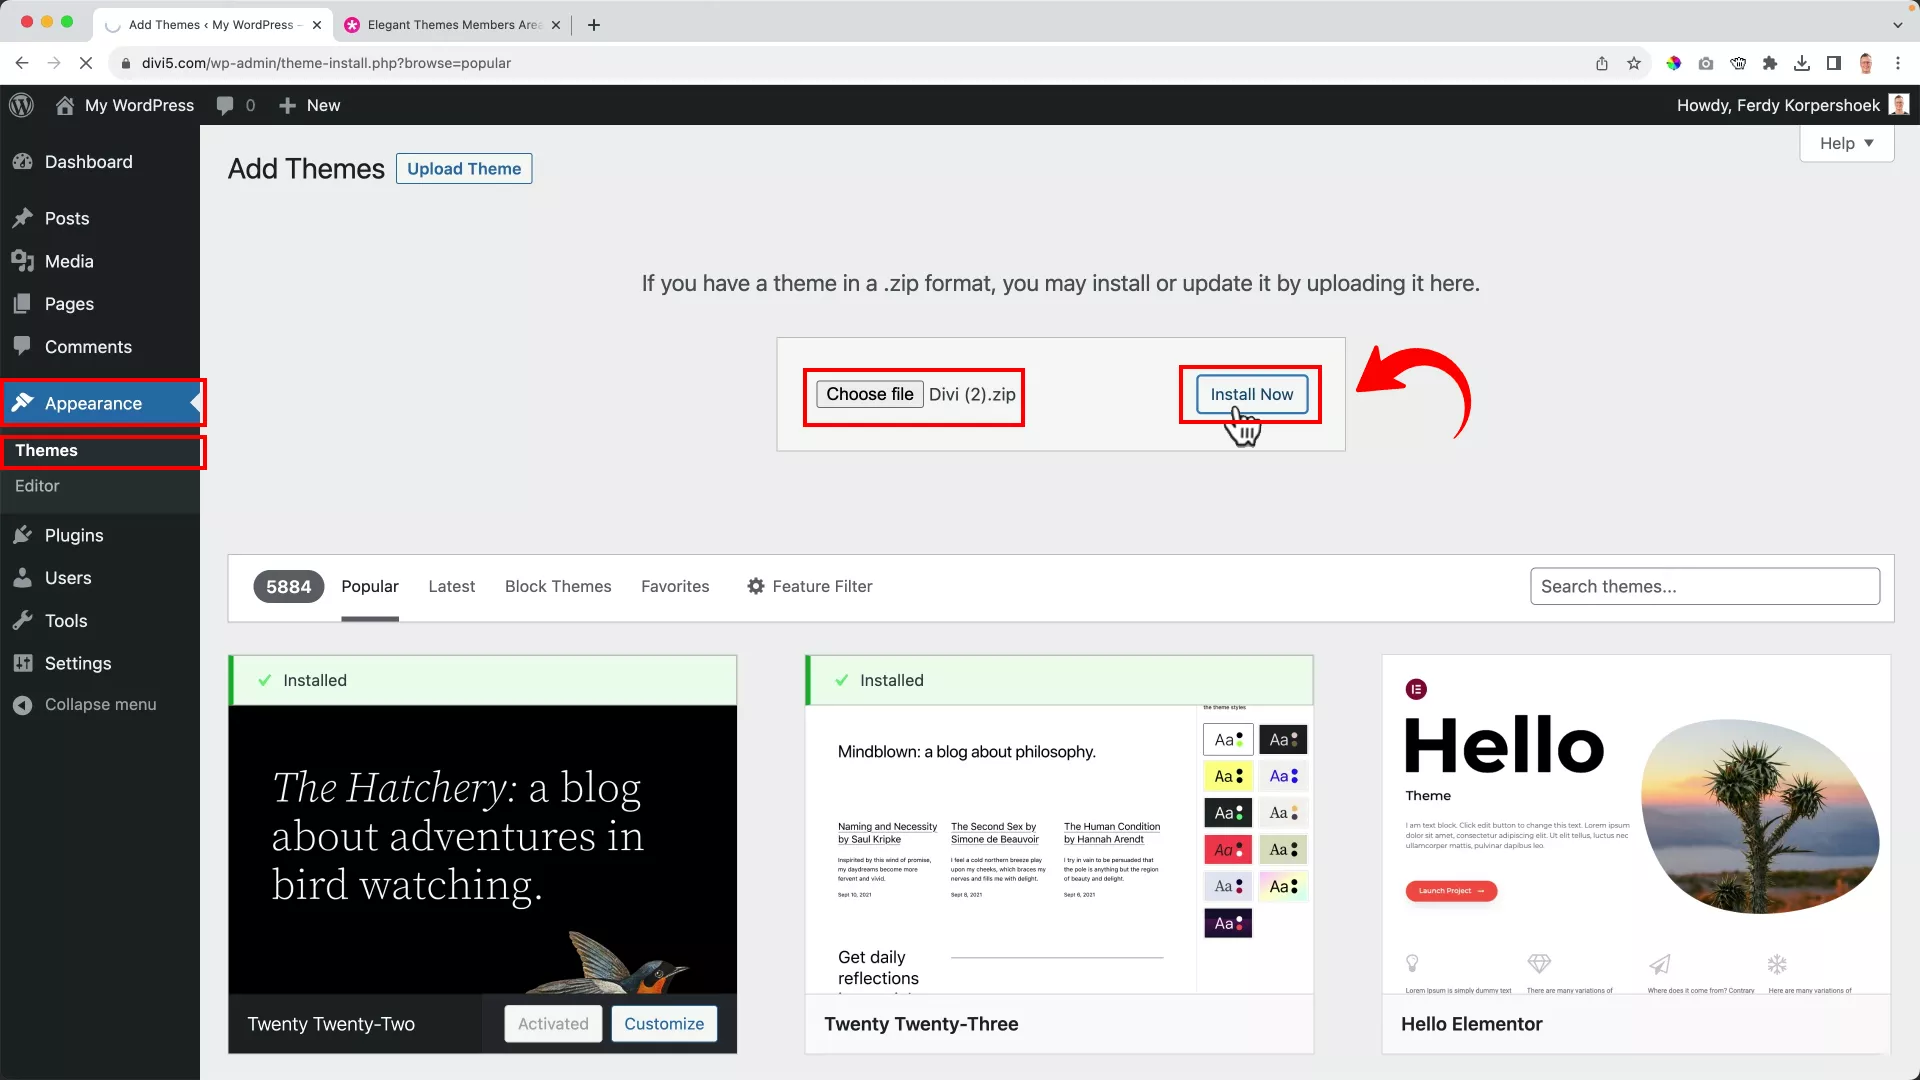
Once you’ve downloaded the zip file, hop over to your WordPress dashboard. Seek out Appearance > Themes > Add New > Upload theme. Upload the Divi zip file then hit the Install Now button.
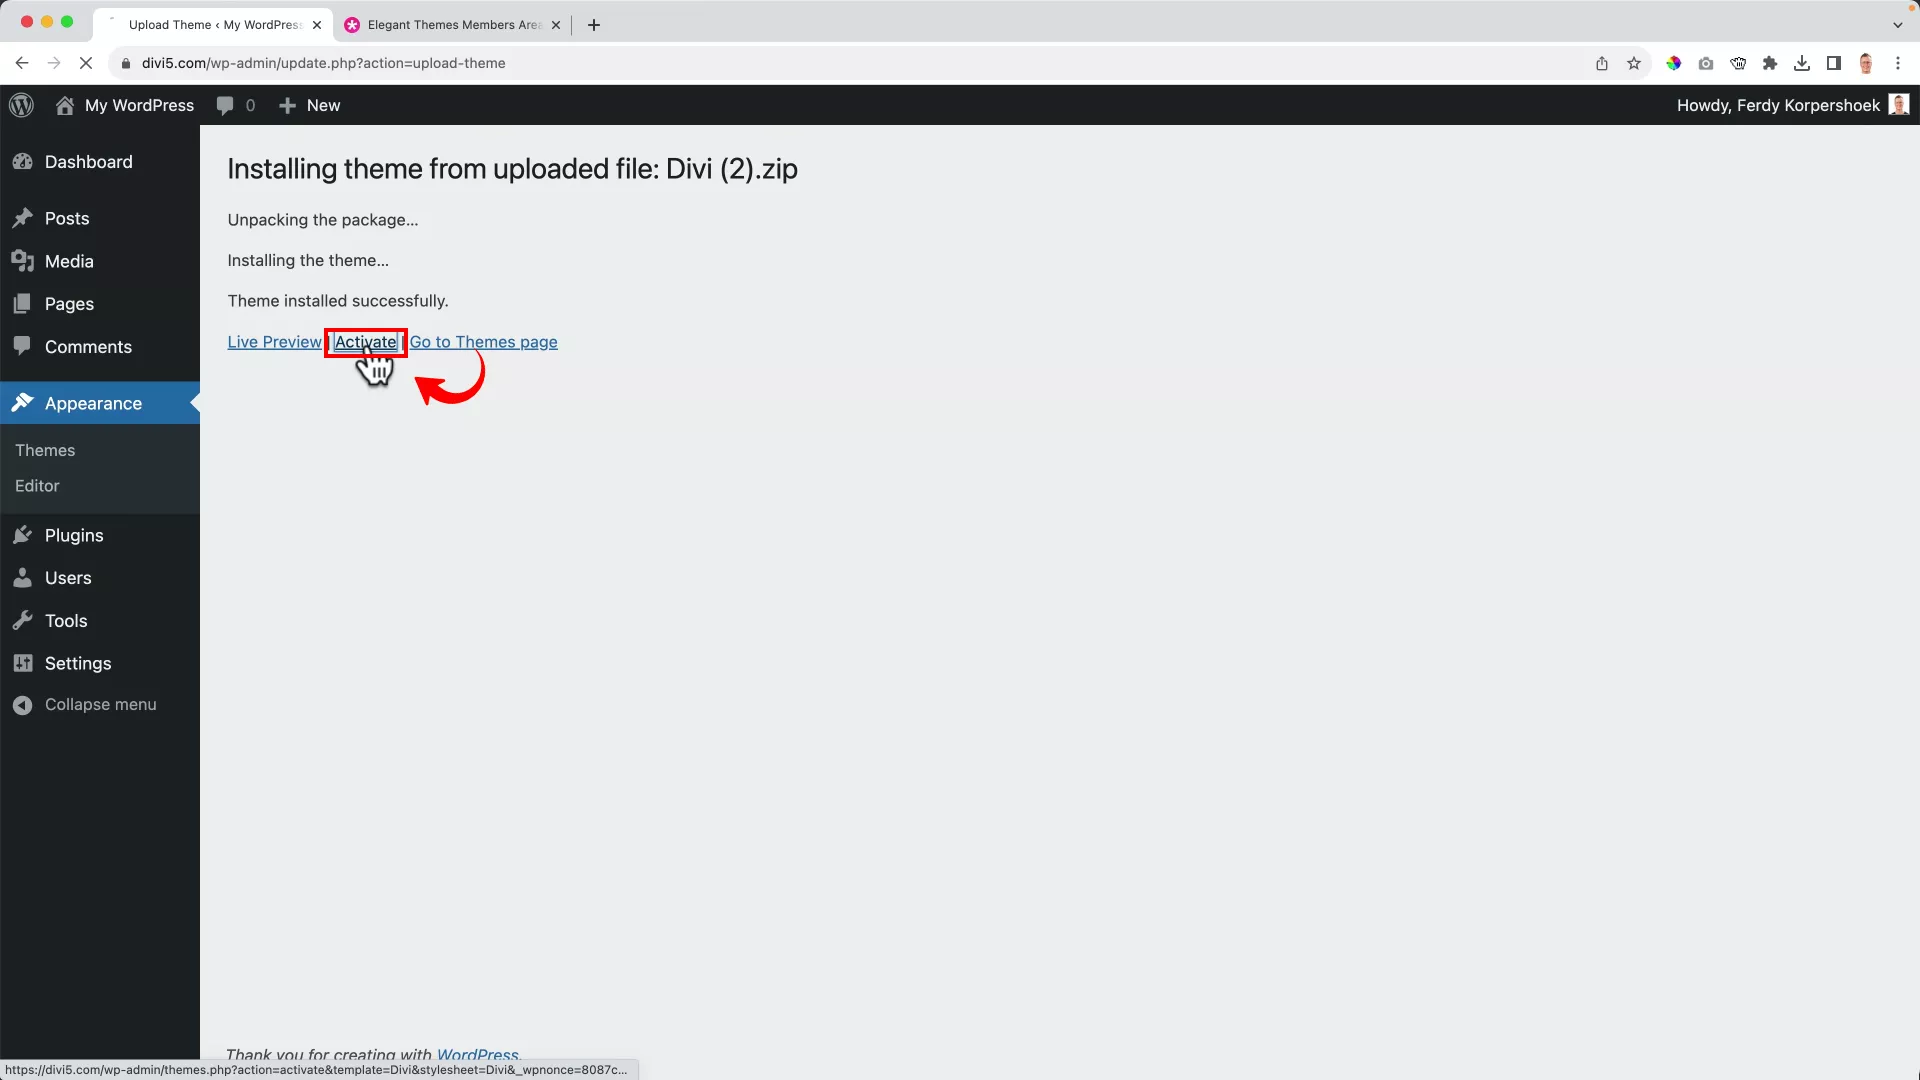
After Divi is installed on your WordPress, activate it by clicking on Activate.
You’re good to go after this step, but I always sync WordPress with Divi theme updates so it can get automatically updated like any other WordPress theme. This way you don’t have to upload a new zip file for the theme every time Divi has a new update.
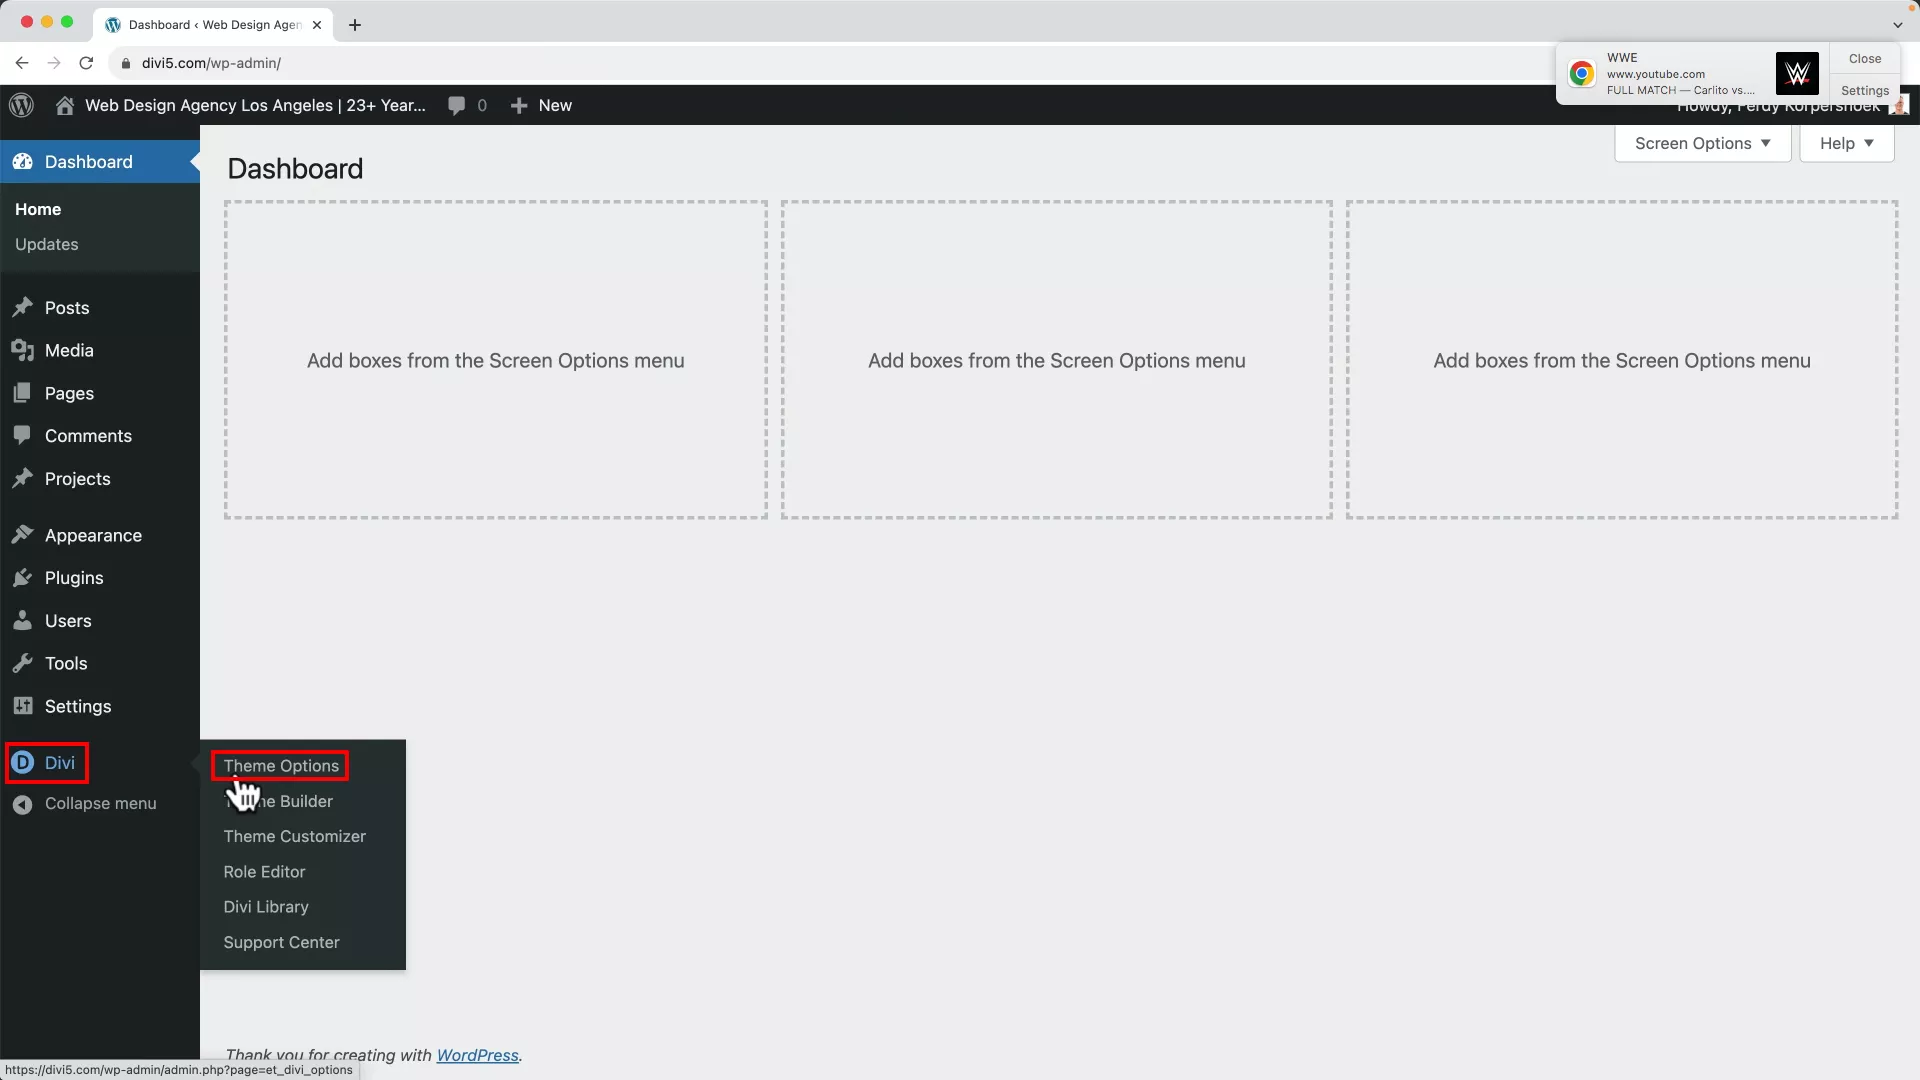
You can do this by using the API key from your Elegant Themes account. Head to Divi > Theme options from the left panel on WordPress.
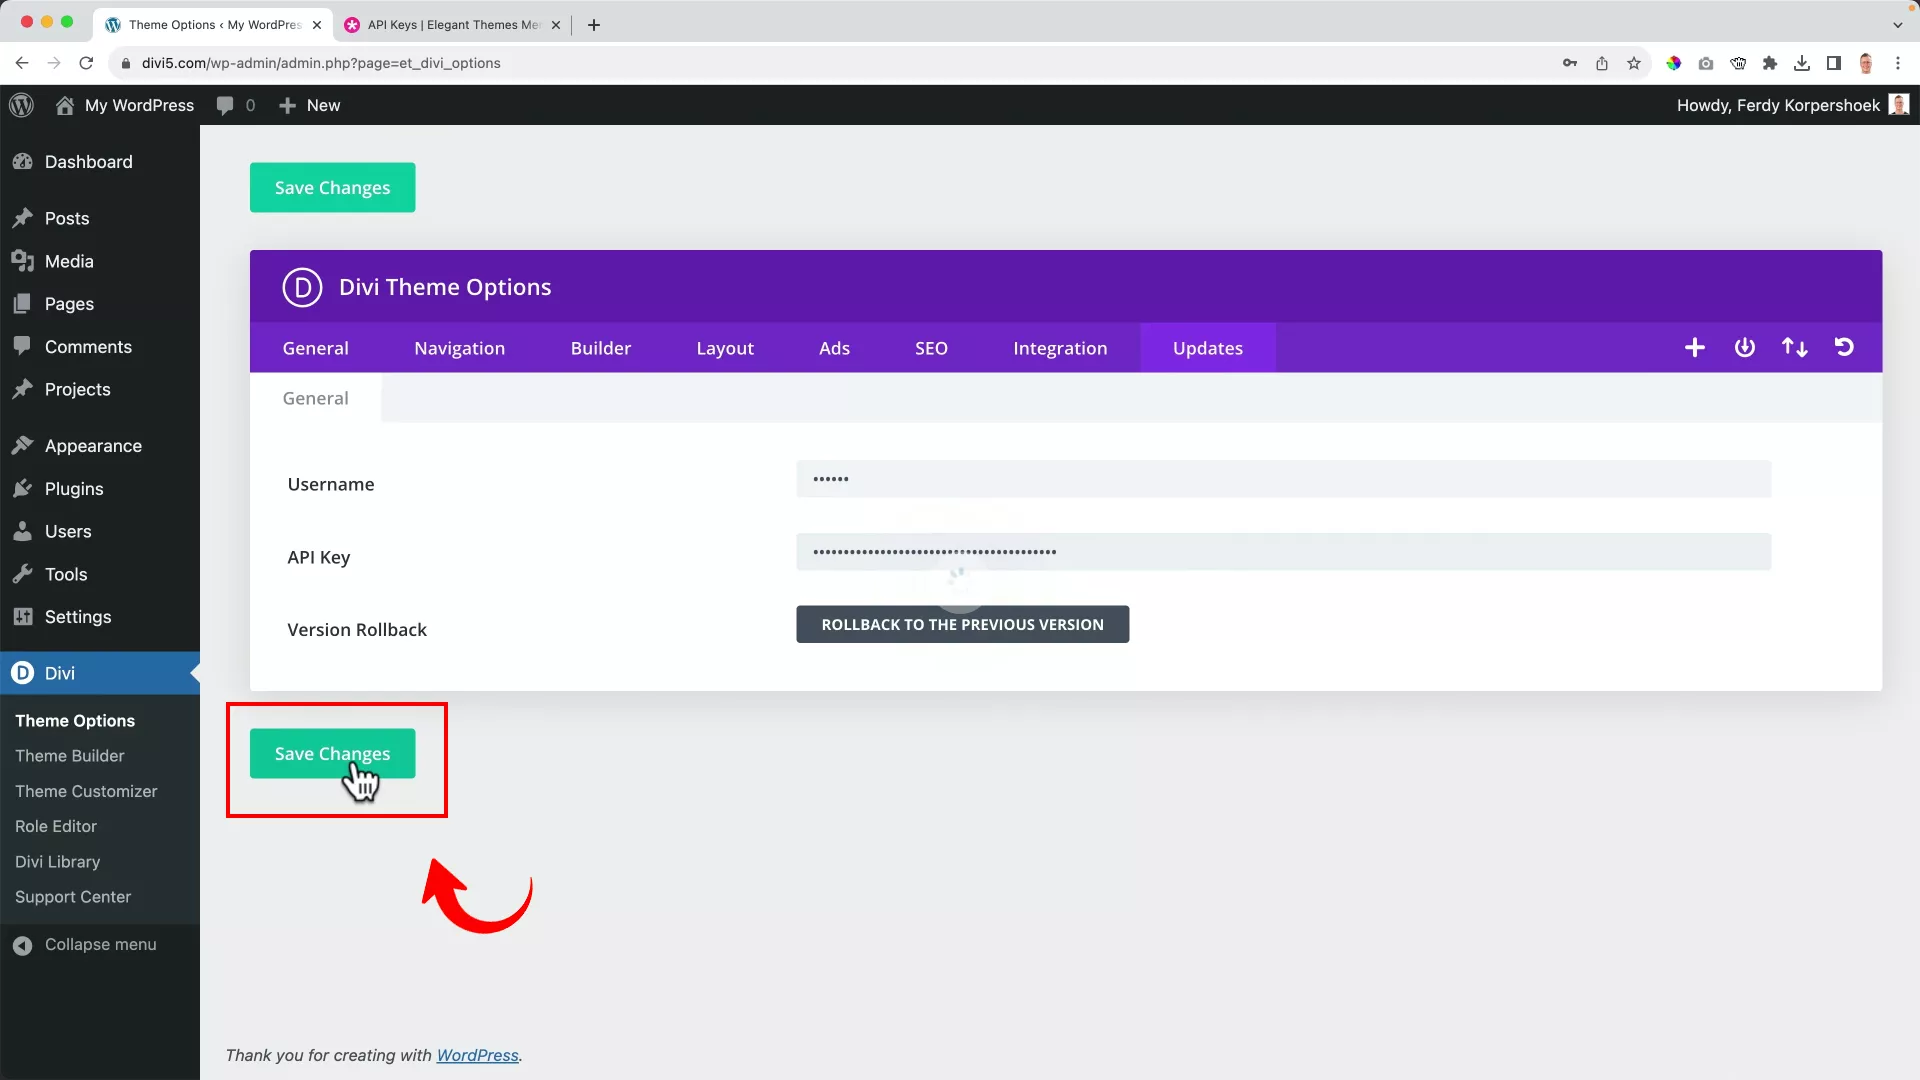
On the Updates tab, enter your Username and API key that you’ll find on the Account section of your Elegant Themes portal. Click on Save Changes to authenticate the Elegant Themes subscription.
Starting with the Divi builder
Before you start building your website using Divi, there are a few important web page elements that you need to set up. First up, we have the site title and tagline.
Step 1: Set the site title and tagline
As a website owner, your primary goal is to get your website to appear in search results for your targeted search terms. This starts with setting a strong SEO site title and tagline.
A good site title is short yet catchy because it has two jobs: grabbing users’ attention and letting search engines know what a particular website is about.
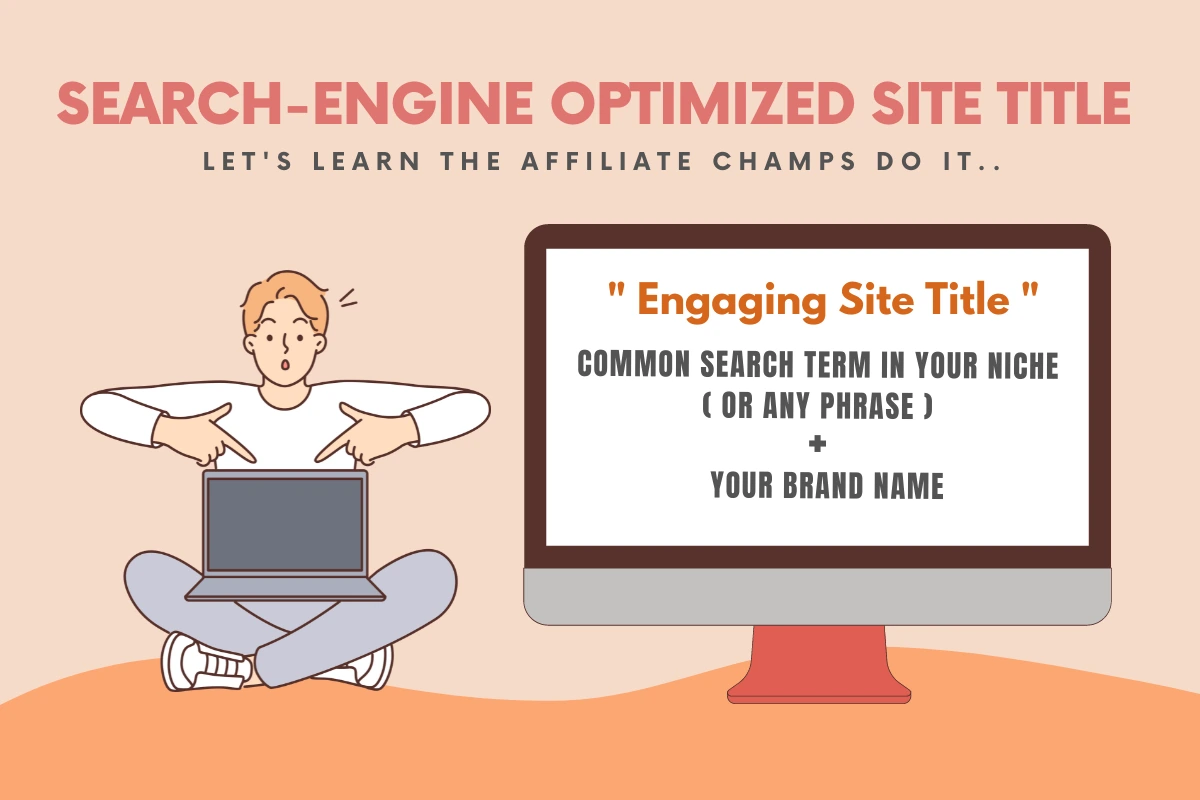
As visible in the image above, I have created a simple yet effective formula for creating engaging and SEO-friendly site titles.
Step 2: Build the website menu
Next comes another task – building a site menu. Think of the site menu as a map that guides your website visitors to specific pages and subdomains on your site.
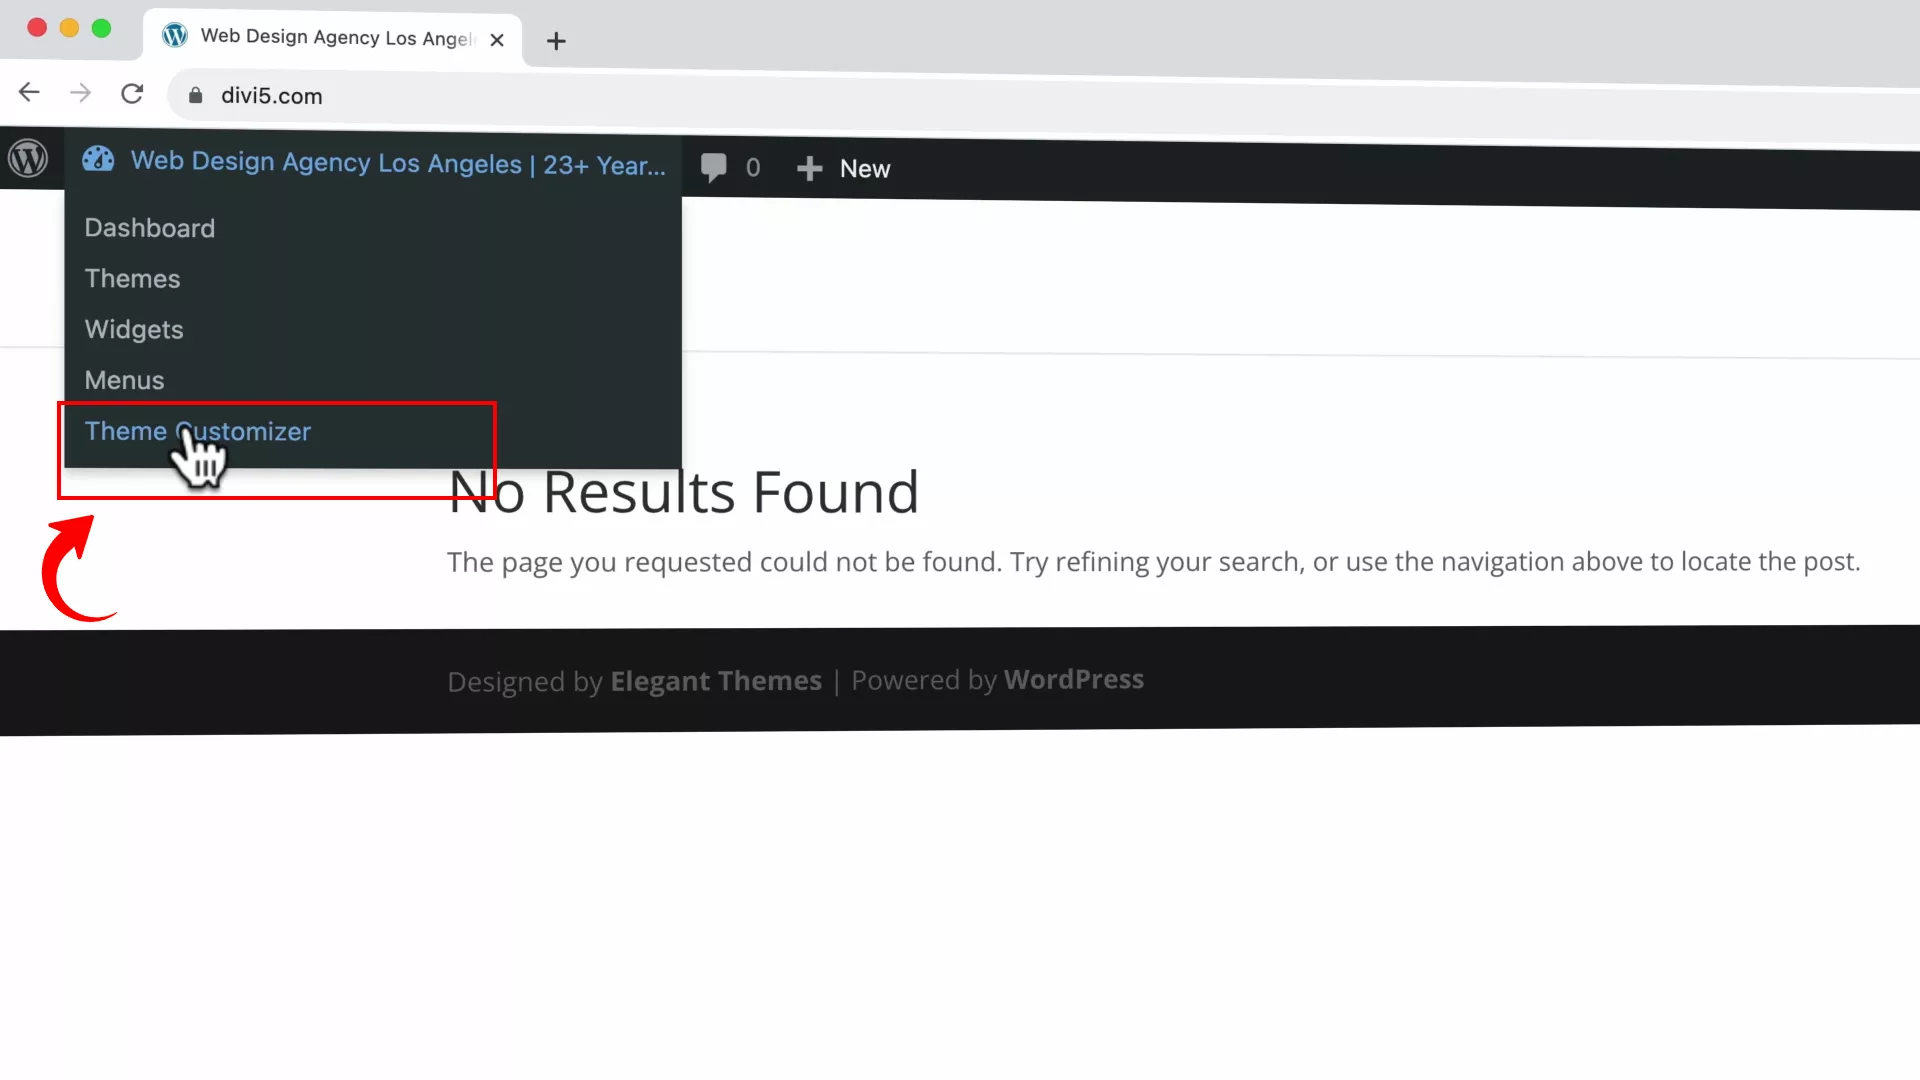
To set the menu on your WordPress website, select Theme Customizer from the toolbar at the top. This will open up a panel on the left to add a menu and pages to your website.
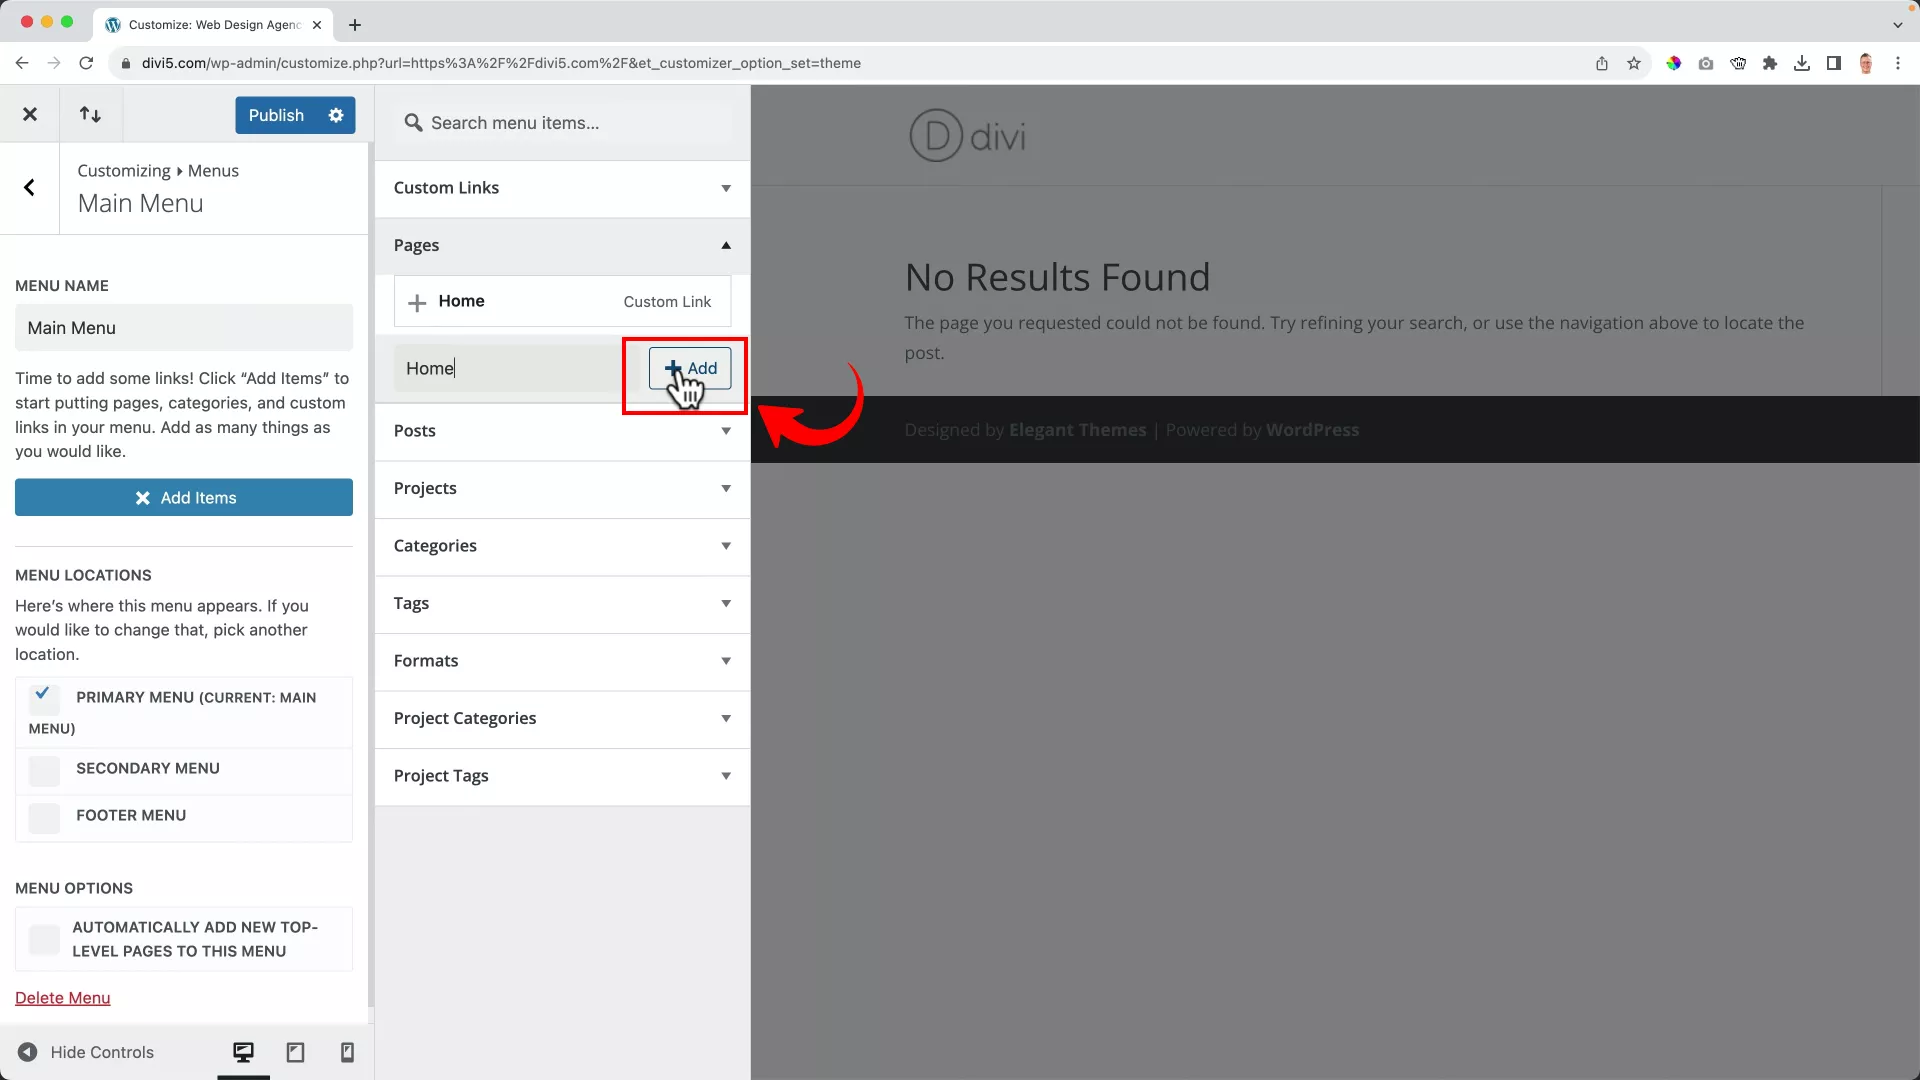
Add the menu items by clicking Create a new menu > Add items.
To add drop-down items in the menu, drag the desired pages or categories slightly to the right under their parent menu item.
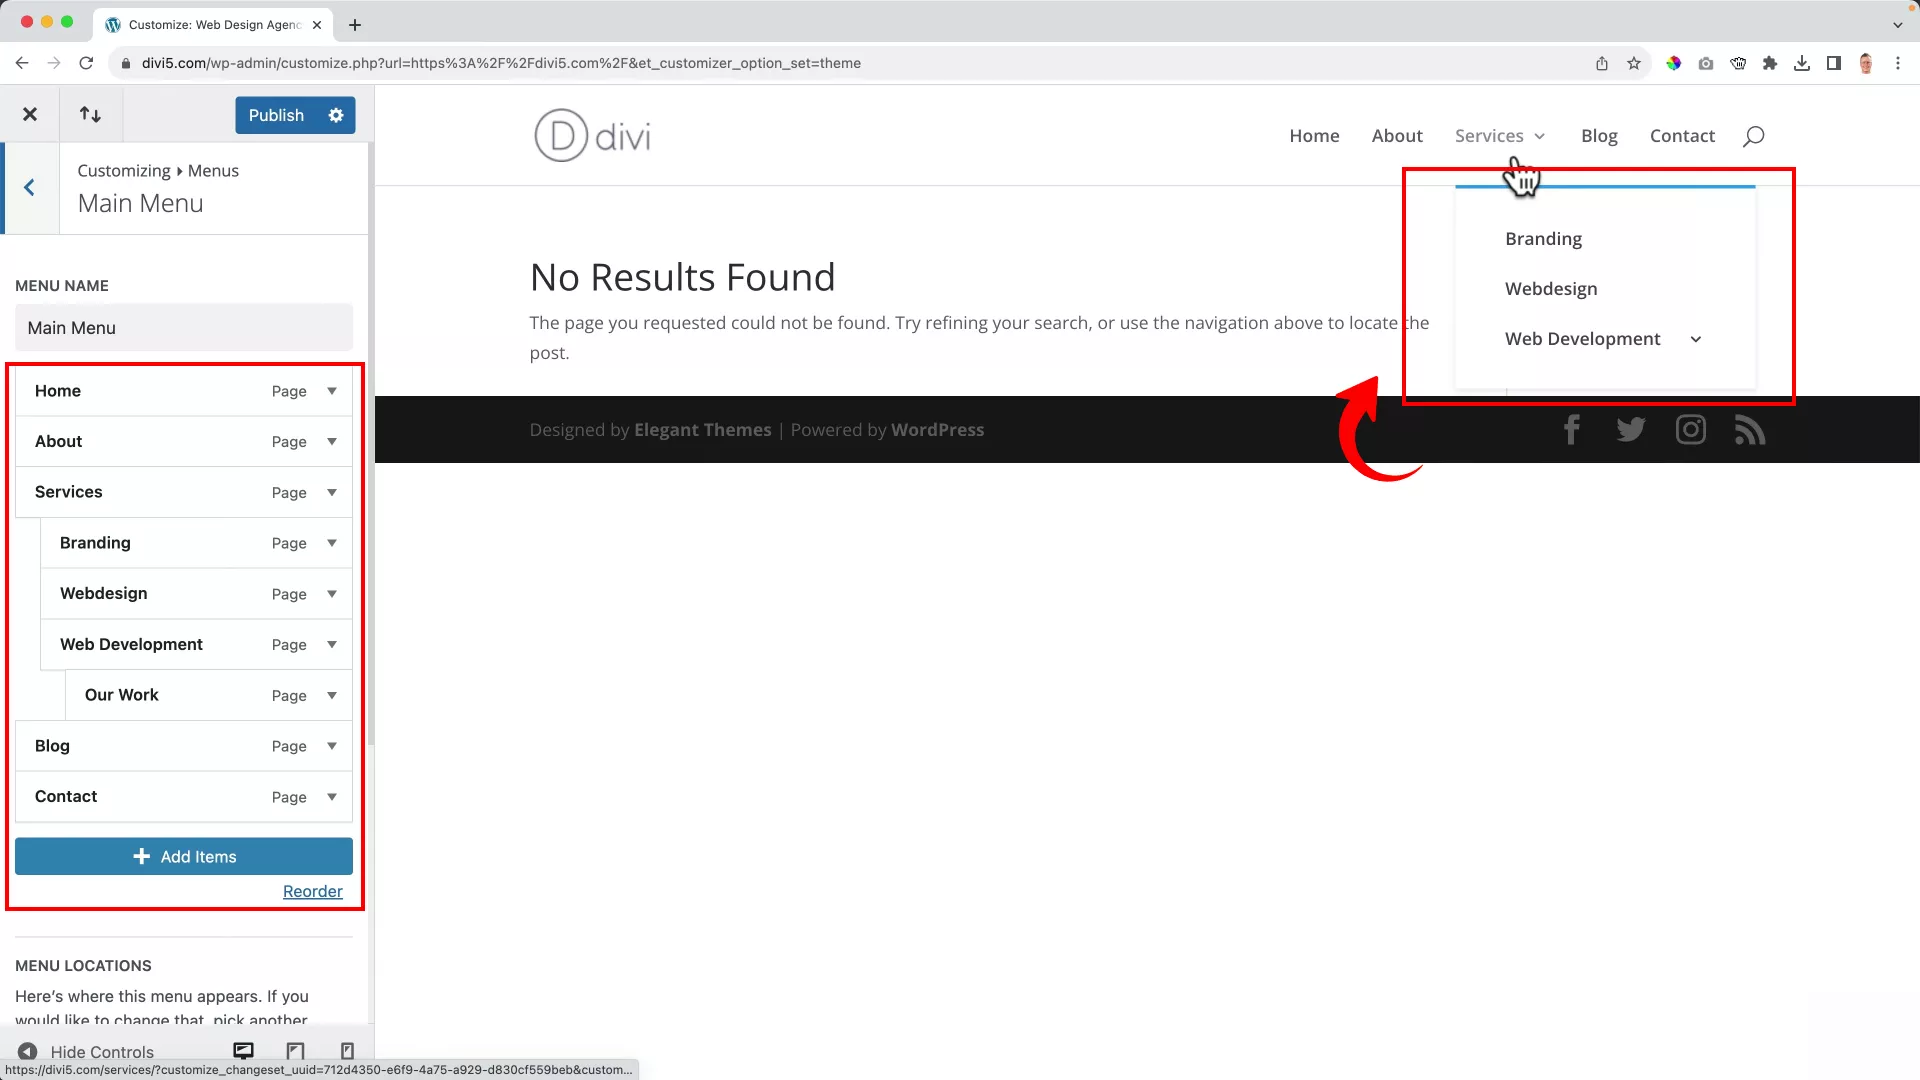
Step 3: Set the homepage to a static page
After setting up your menu, the next step is to establish the look of your homepage.
Currently, if you visit your website, you’ll likely encounter a “No results found” message like the one below.
This default setting occurs because WordPress, primarily a content management system, is configured to display blog posts on the homepage.
But you can prevent this by changing the home page display to a static page.
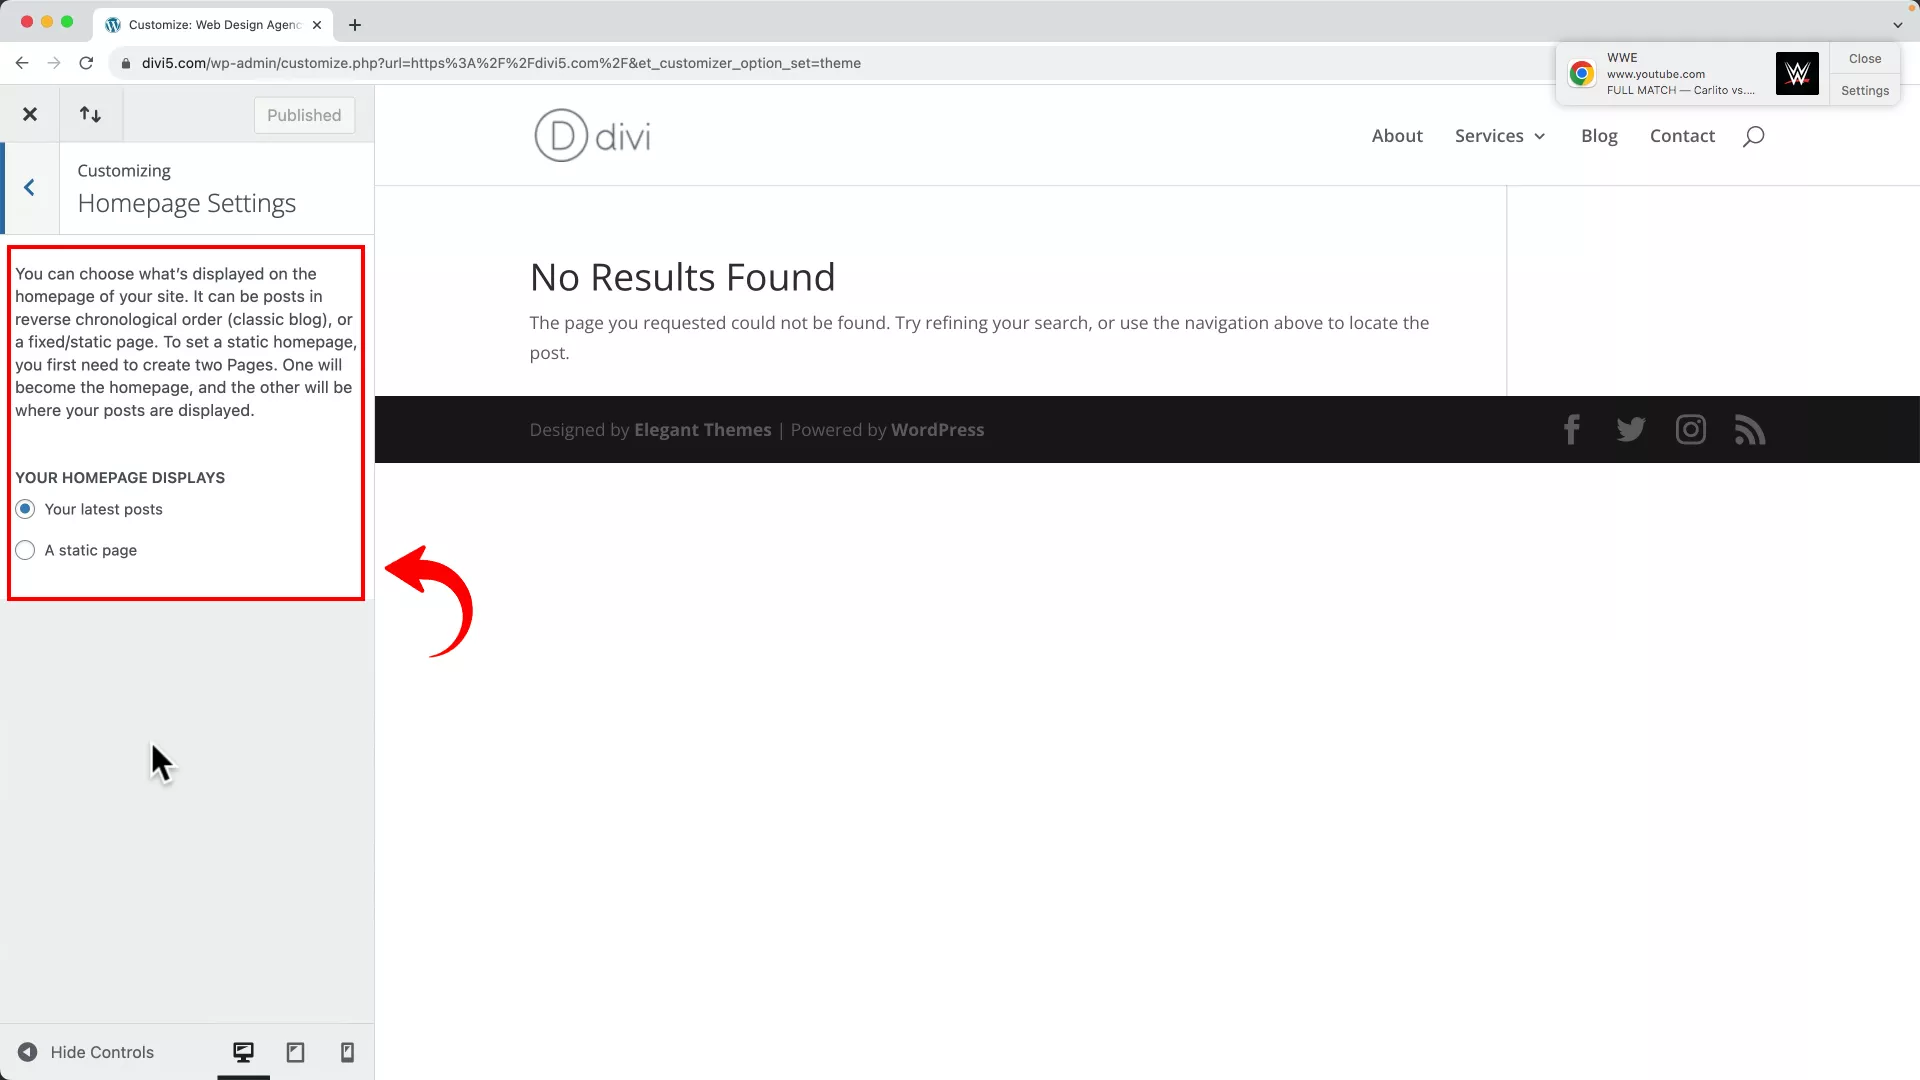
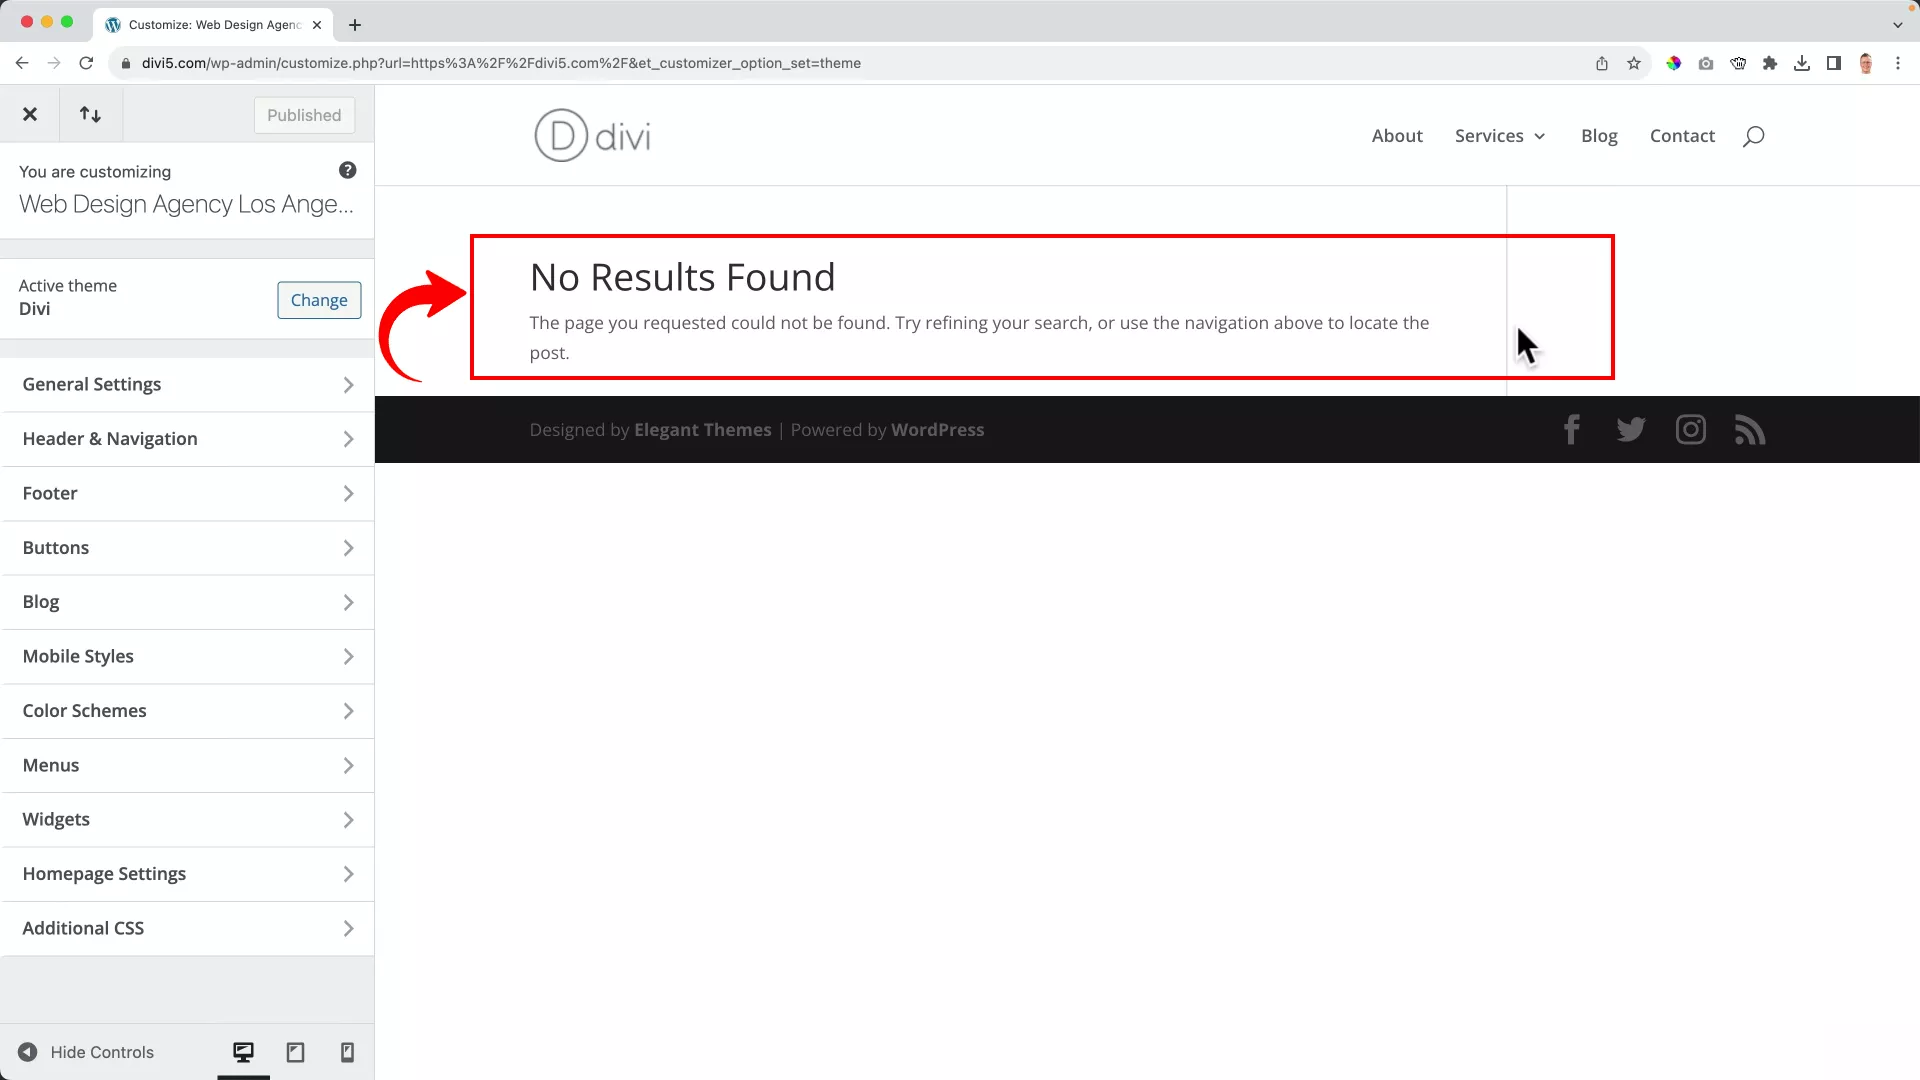
Under the Theme Customizer menu, navigate to the Homepage Settings.
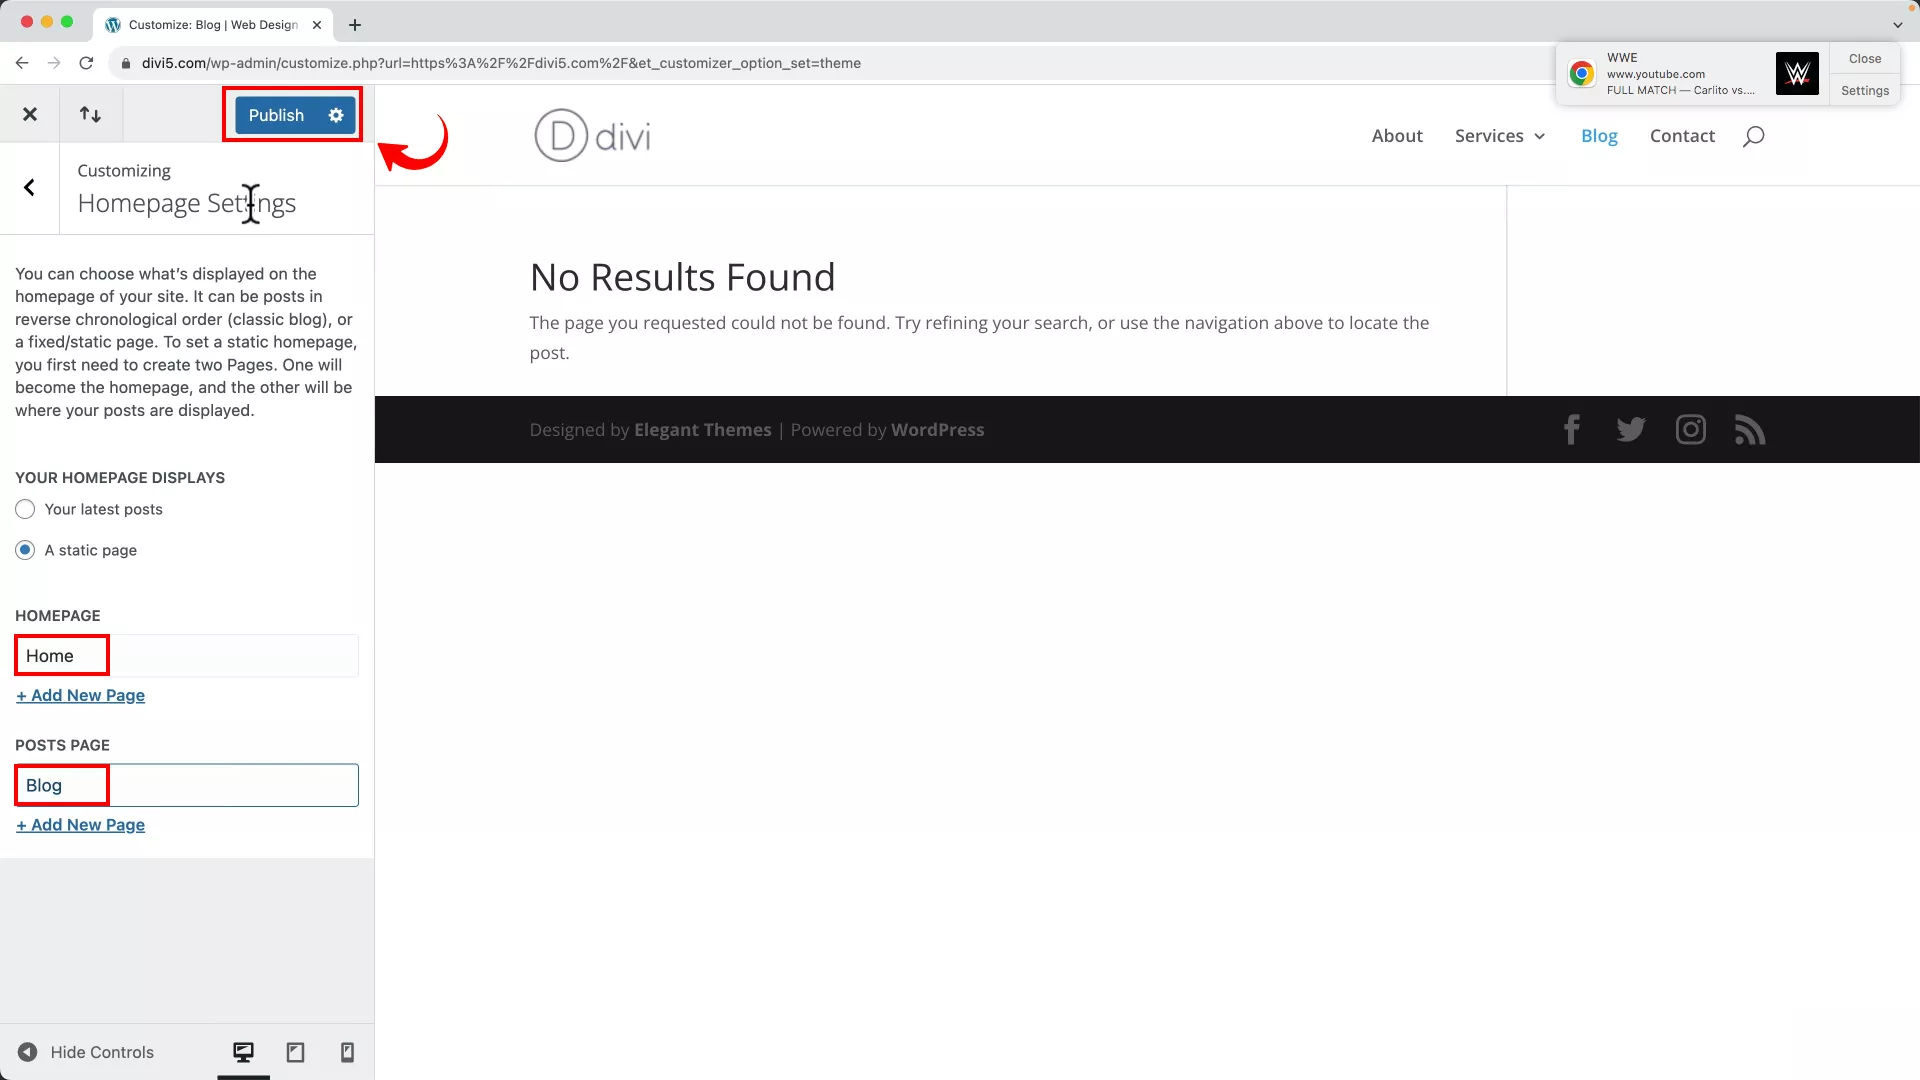
Go to the home page settings on the Theme Customizer and change the home page display to ‘A static page.’ Proceed by selecting ‘Home’ and ‘Blog’ for the HOMEPAGE and POSTS PAGE tabs. Save the settings by clicking the Publish button.
Step 4: Add your logo and favicon
Your logo is an important part of your brand identity. The last step before we start playing around with Divi is uploading your logo and favicon to your WordPress website (the small icon that appears on browser tabs).
Don’t know how to create a logo? No problem! Check out my in-depth YouTube tutorial below. It’s me walking you through creating a logo and favicon for your website from scratch.
I prefer researching my competitors before I create anything, be it my website’s color palette or the website’s look and feel.
I suggest you do the same before you create your logo so you get a sense of what works in the industry you’re operating in.
Once you’ve created a high-quality logo for your site, go to Divi -> Theme Options from the left panel and upload the logo.

To upload the favicon, select Theme Customizer -> General Settings -> Site Identity. Click the Select site icon button and upload your favicon.
Exploring the Divi Visual Builder
Ready to get your feet wet in Divi? Let’s explore what you can do with it!
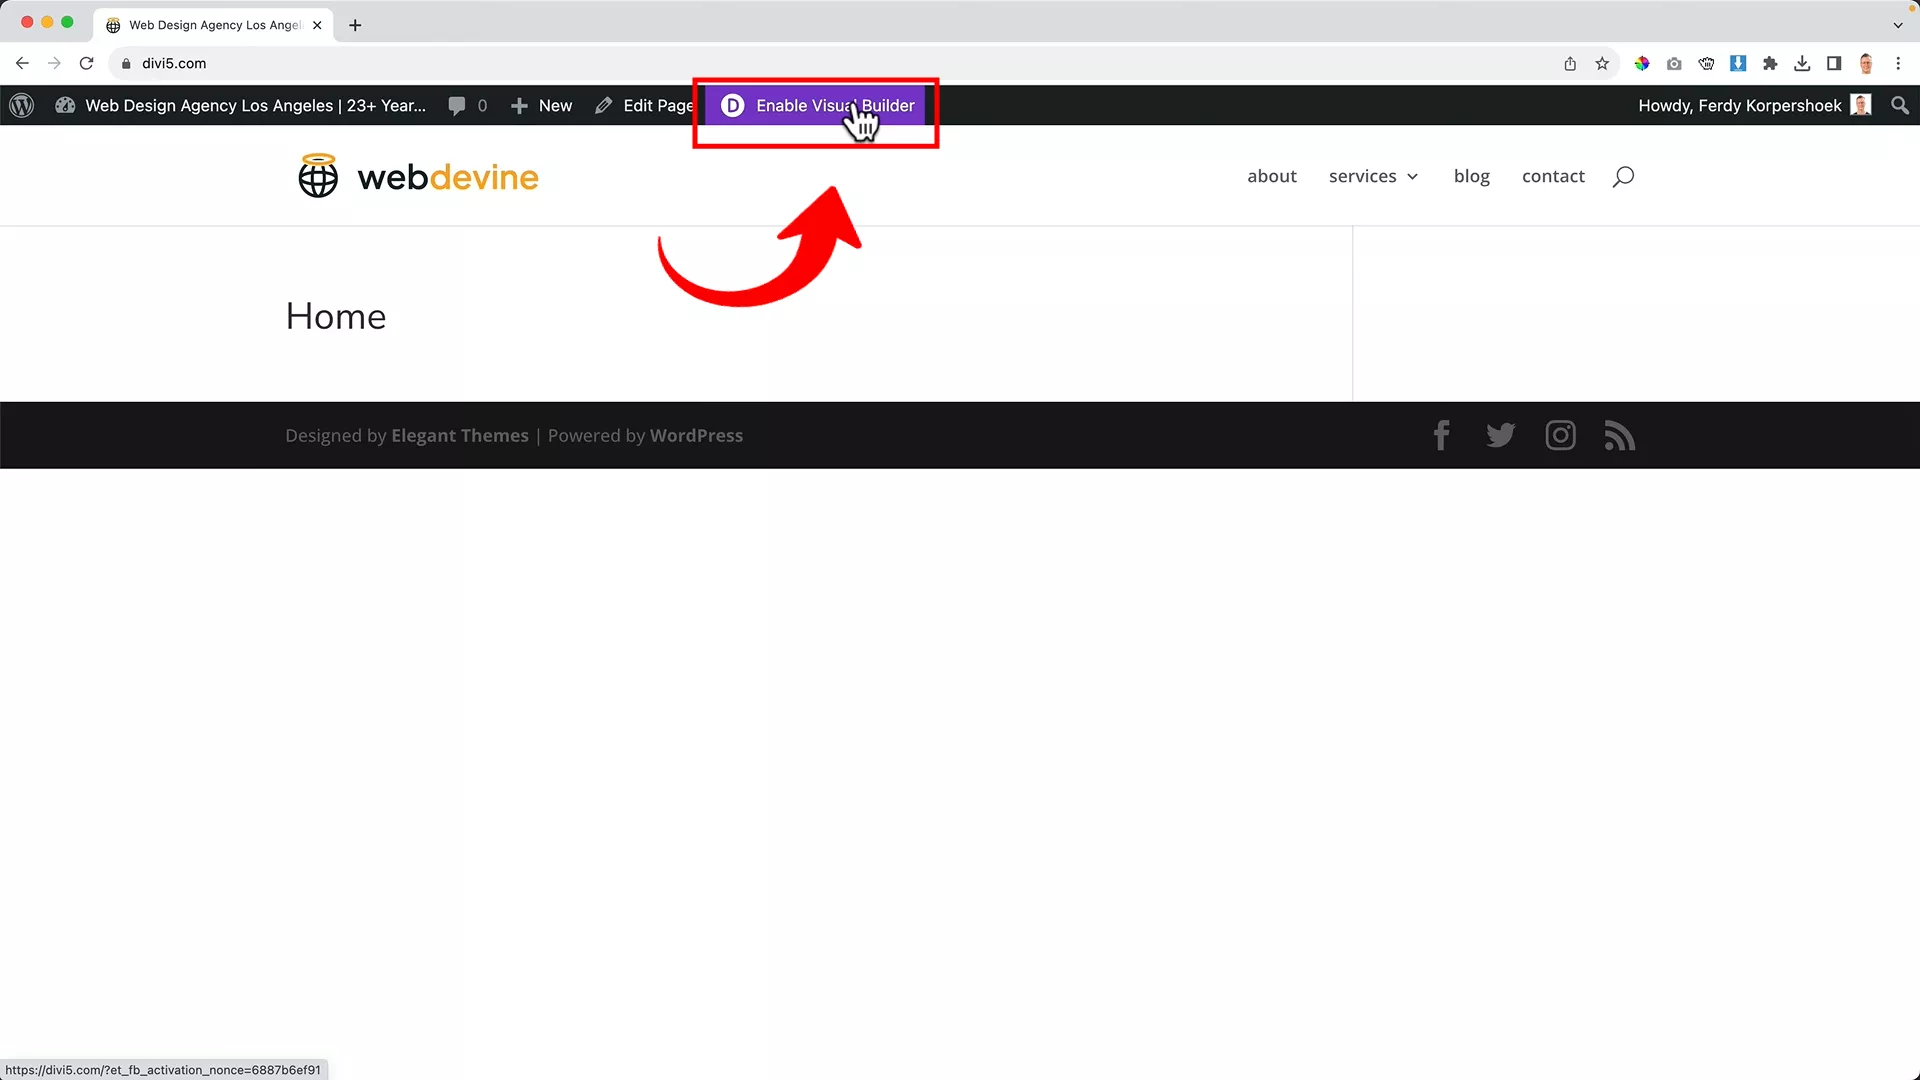
To access the Divi Visual Builder, click the Enable Visual Builder button on the toolbar at the top. This will pull up the Divi interface.
Even though the visual builder lets you see changes to your website as they happen, you can click on the same button to exit the visual builder and look at your website without the toolbars and widgets.
There are three prominent options. You can select from hundreds of pre-made layouts from Divi’s template library, clone an existing page, or work on your webpage from scratch.
I will teach you how to create a page from scratch with a blank template to give you a full tour of the Divi page builder.
The Divi Builder interface
Since Divi is an intuitive drag-and-drop page builder, I’ll guide you through its various functionalities. With this knowledge, you can dive in and experiment, unleashing your creativity!
So, the first step in this learning journey is the theme-building interface.
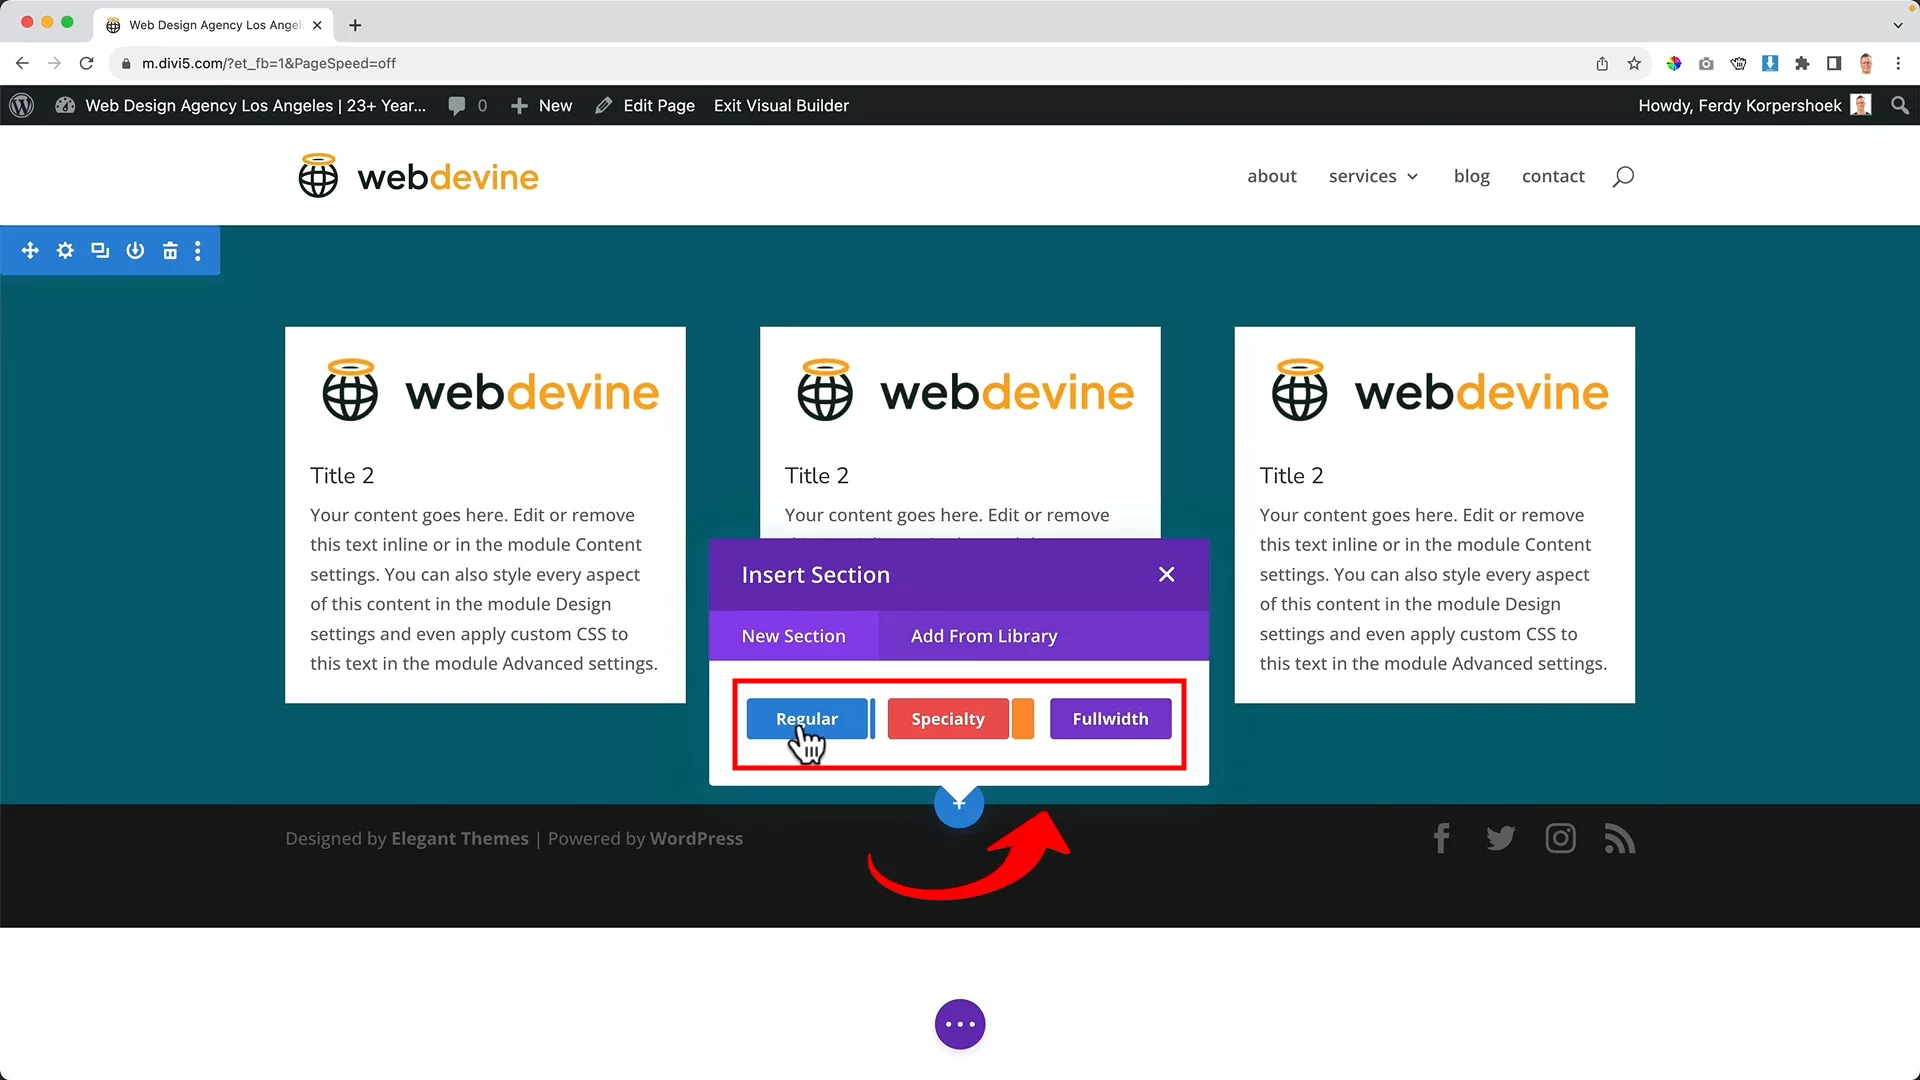
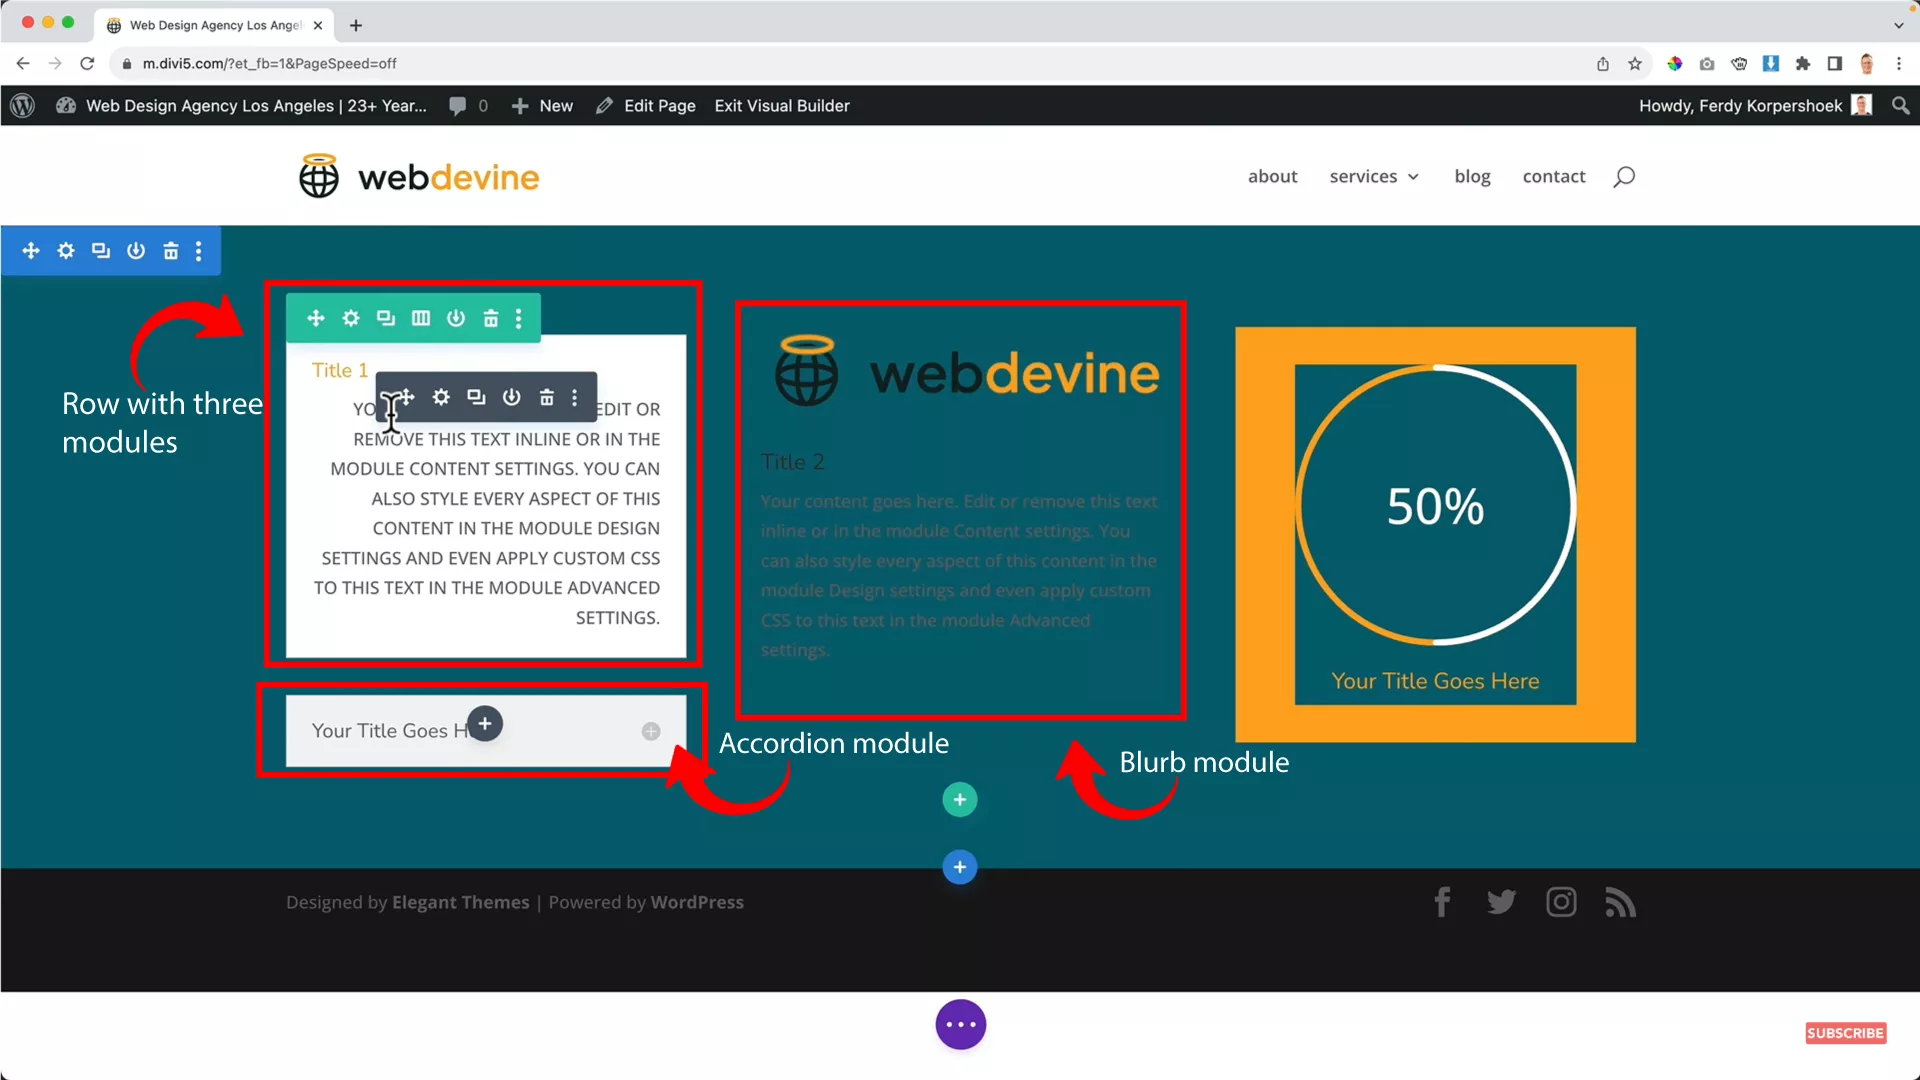
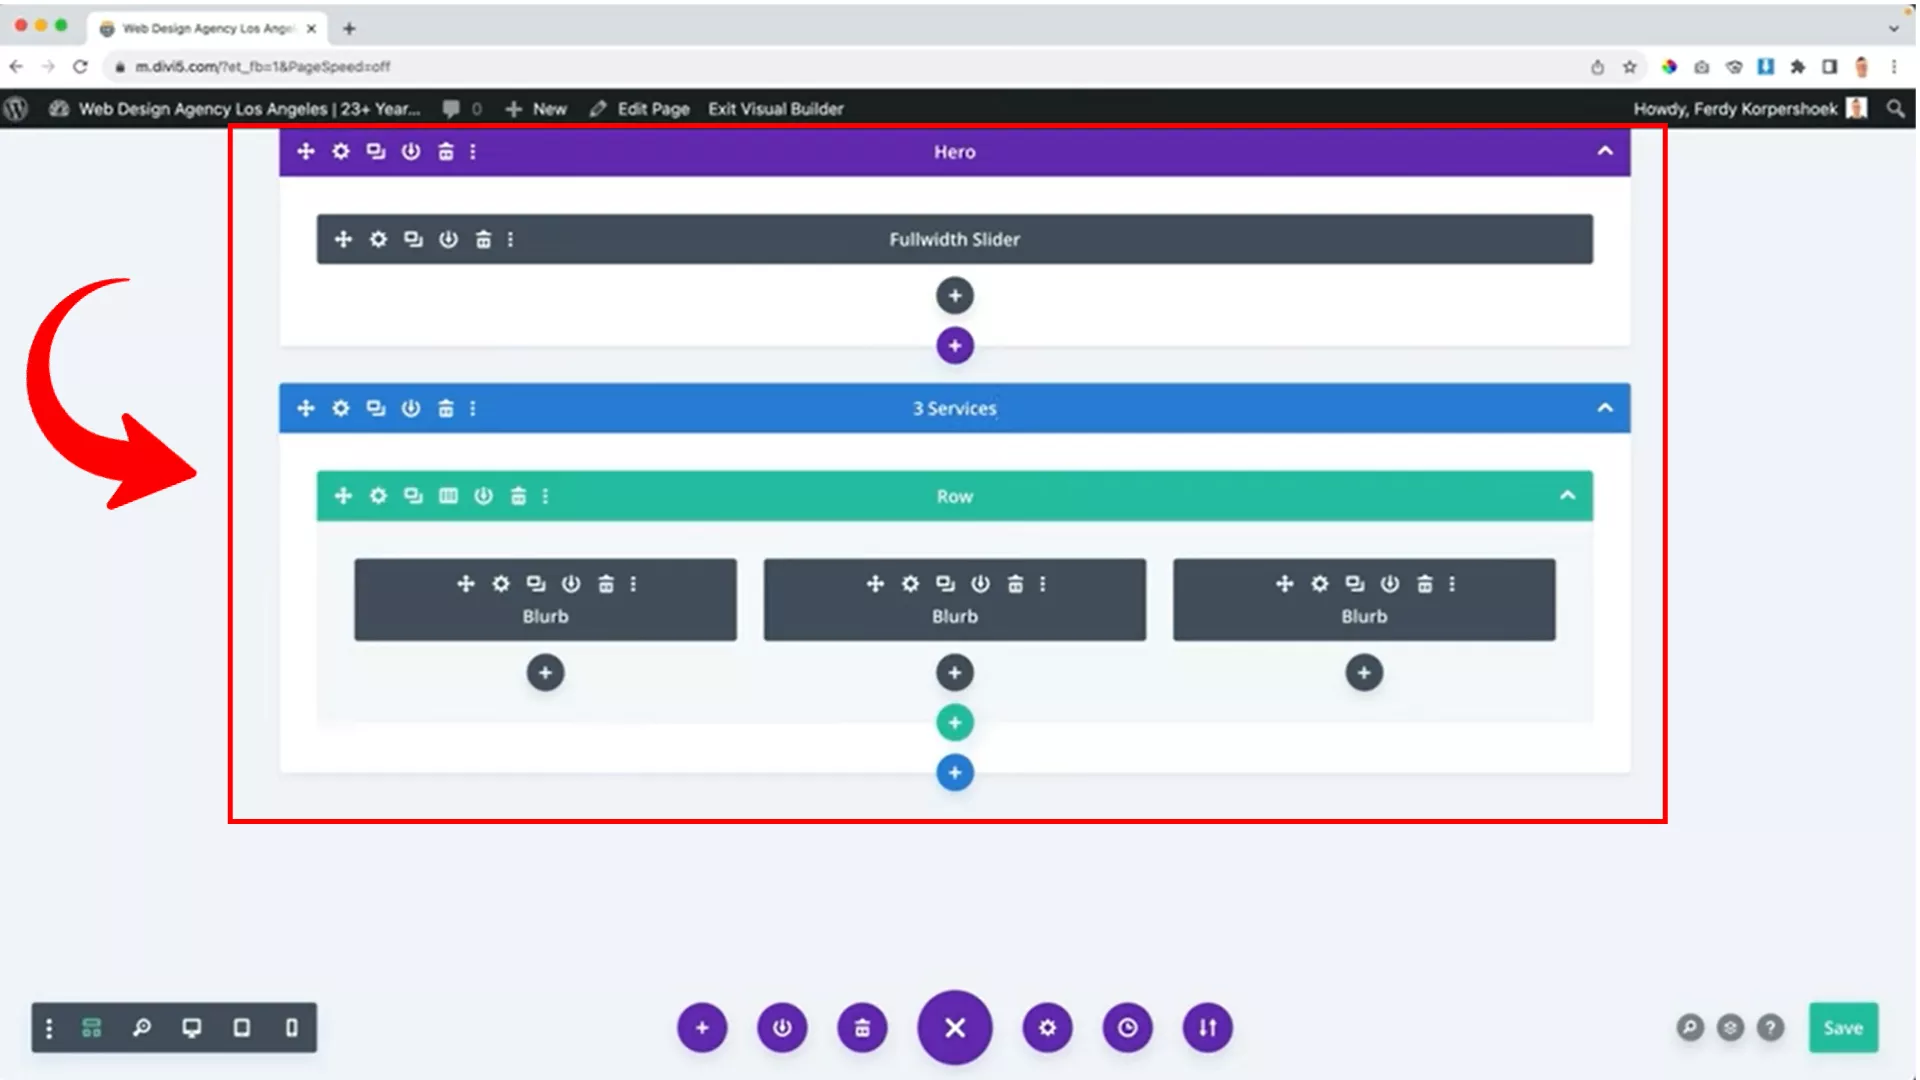
The Divi Builder’s strength lies in its flexible layout system comprising sections, rows, and modules. Each section you add can contain various rows. Within these rows, you can place different modules.
This flexibility allows for diverse layouts:
- Sections: Regular, specialty, and full-width, each offering unique module arrangements.
- Rows: Customize the number of rows and their sizes within each section, ranging from single to multiple rows, allowing for varied content display.
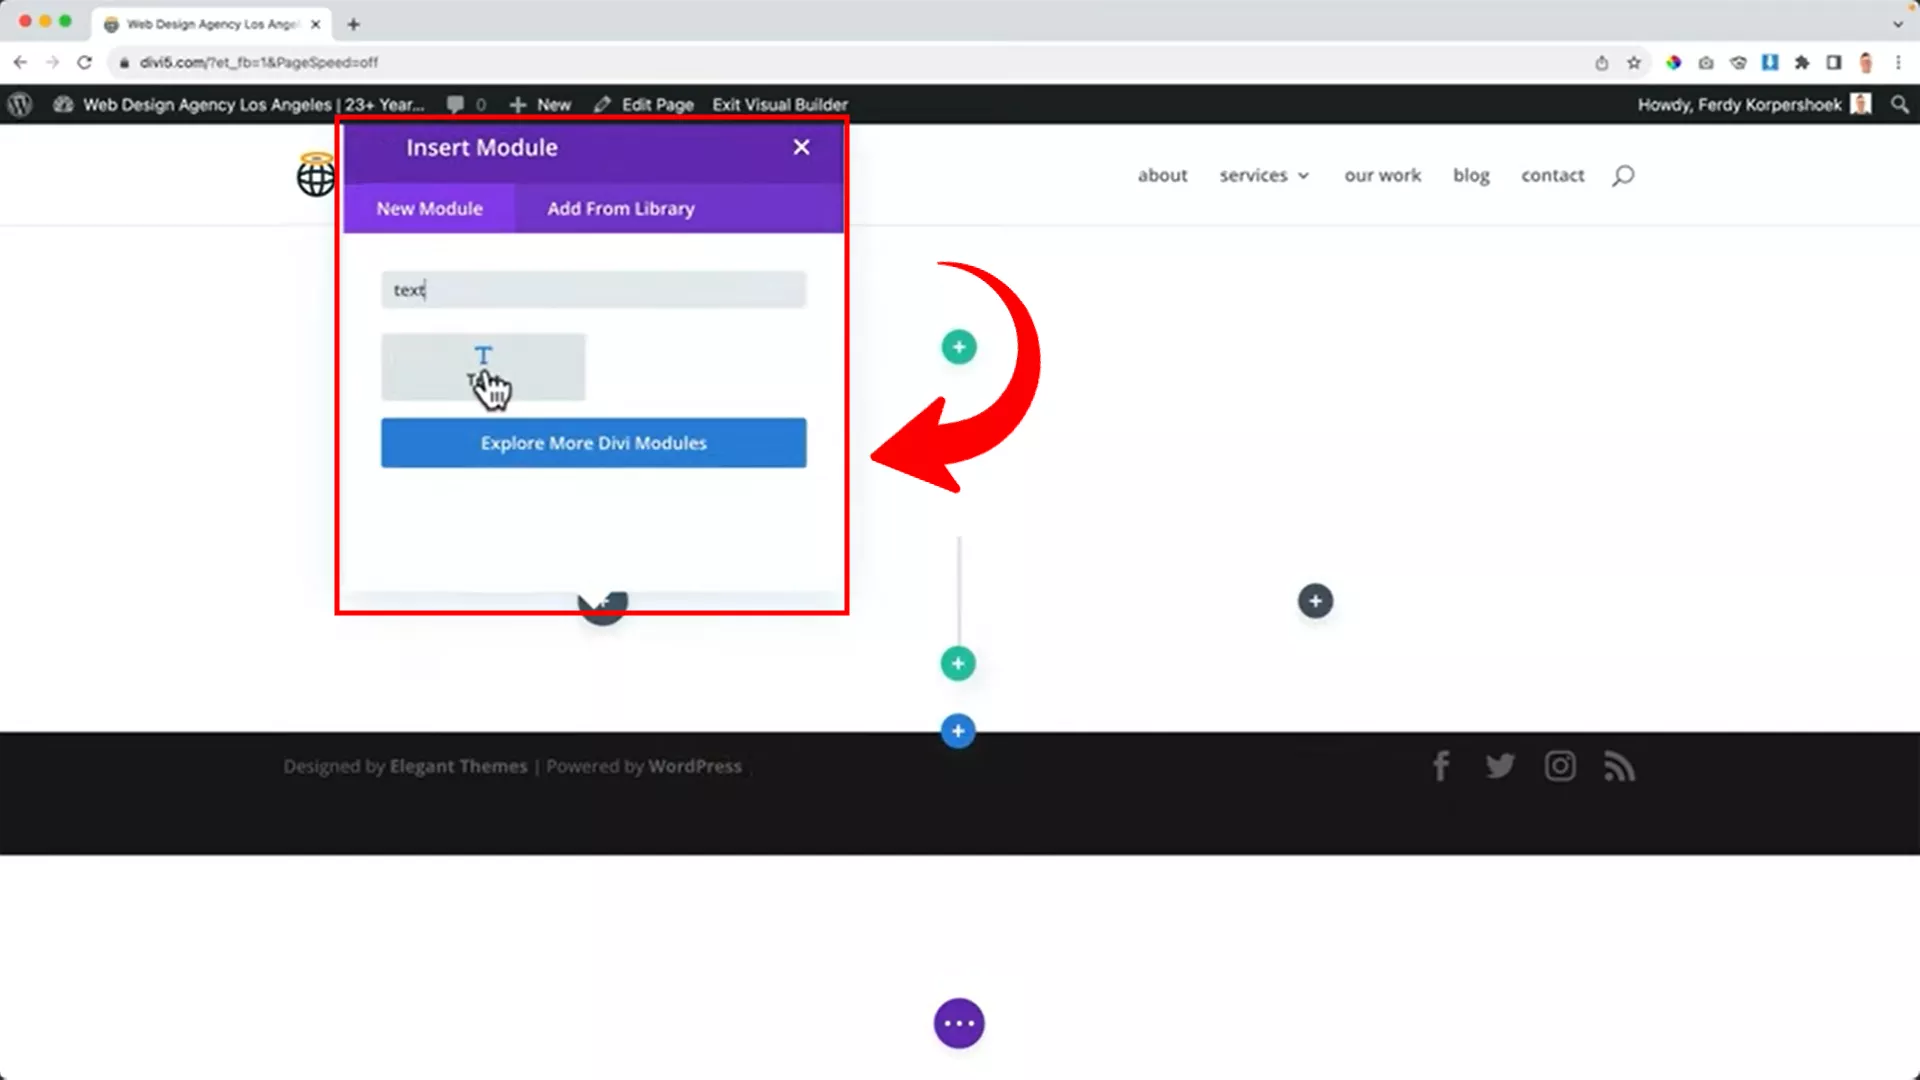
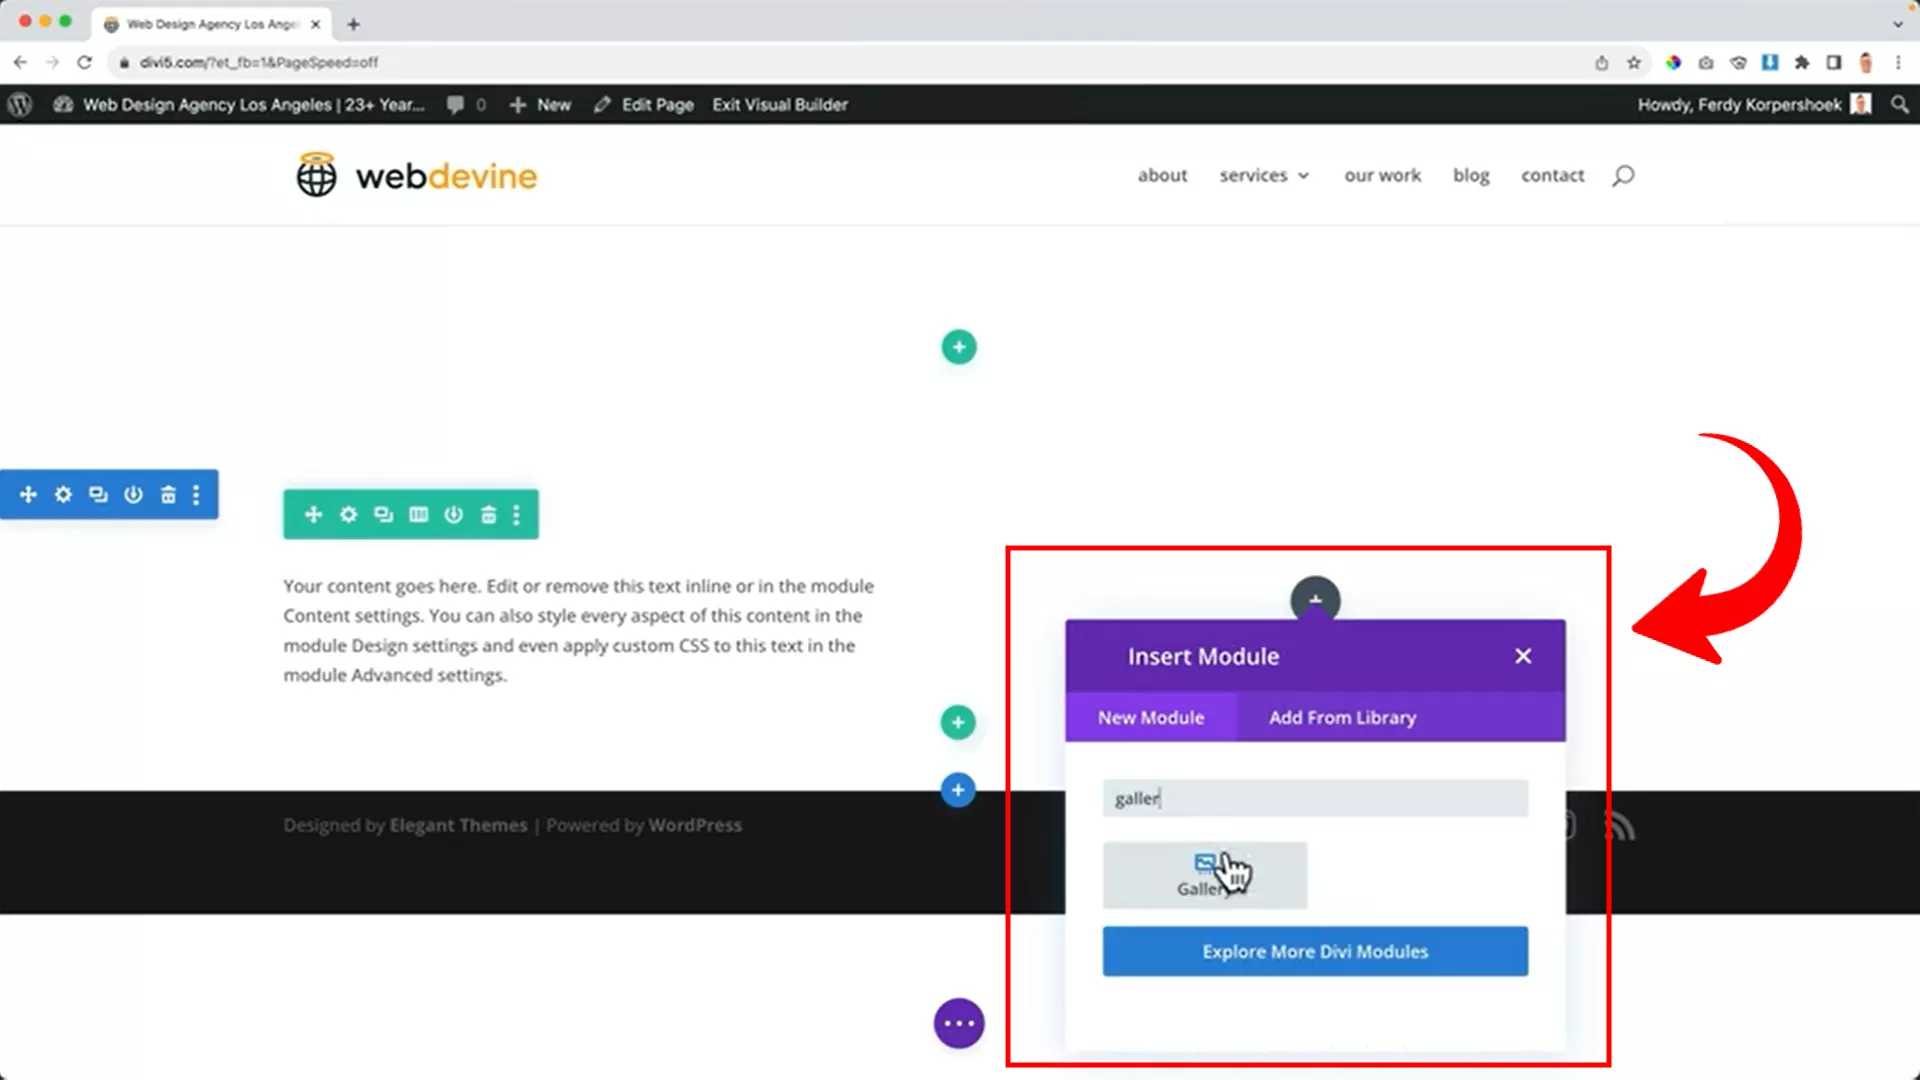
- Modules: A wide array of elements like text (Accordion), images, CTA buttons, audio and more, each with its distinct settings.
Once you select the element you wish to add to a module, it opens a toolbar with various settings you can modify.
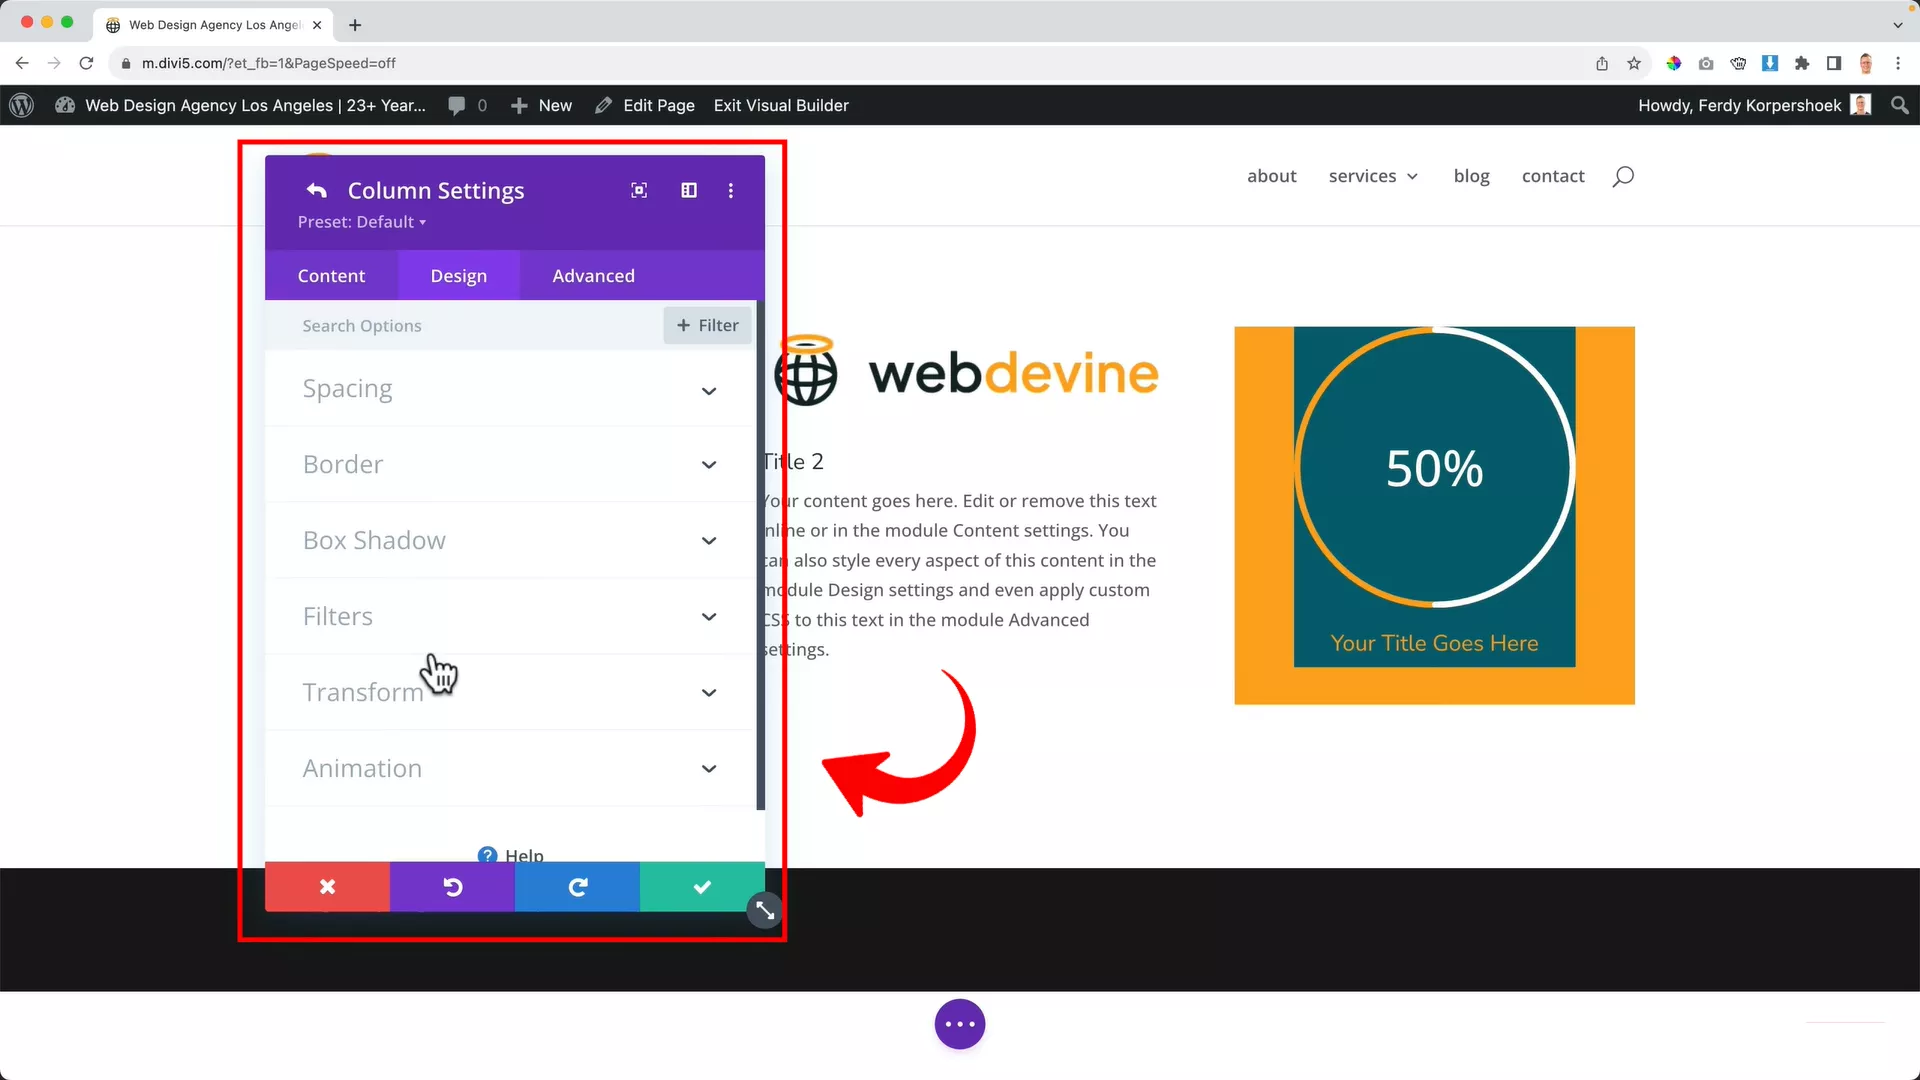
These settings include spacing, border, shadowing, visibility, transitions, and custom CSS codes. I encourage you to explore the different functions available for each module element.
You can move the toolbar around or stitch it to the side by clicking the option on the top left for easier navigation.
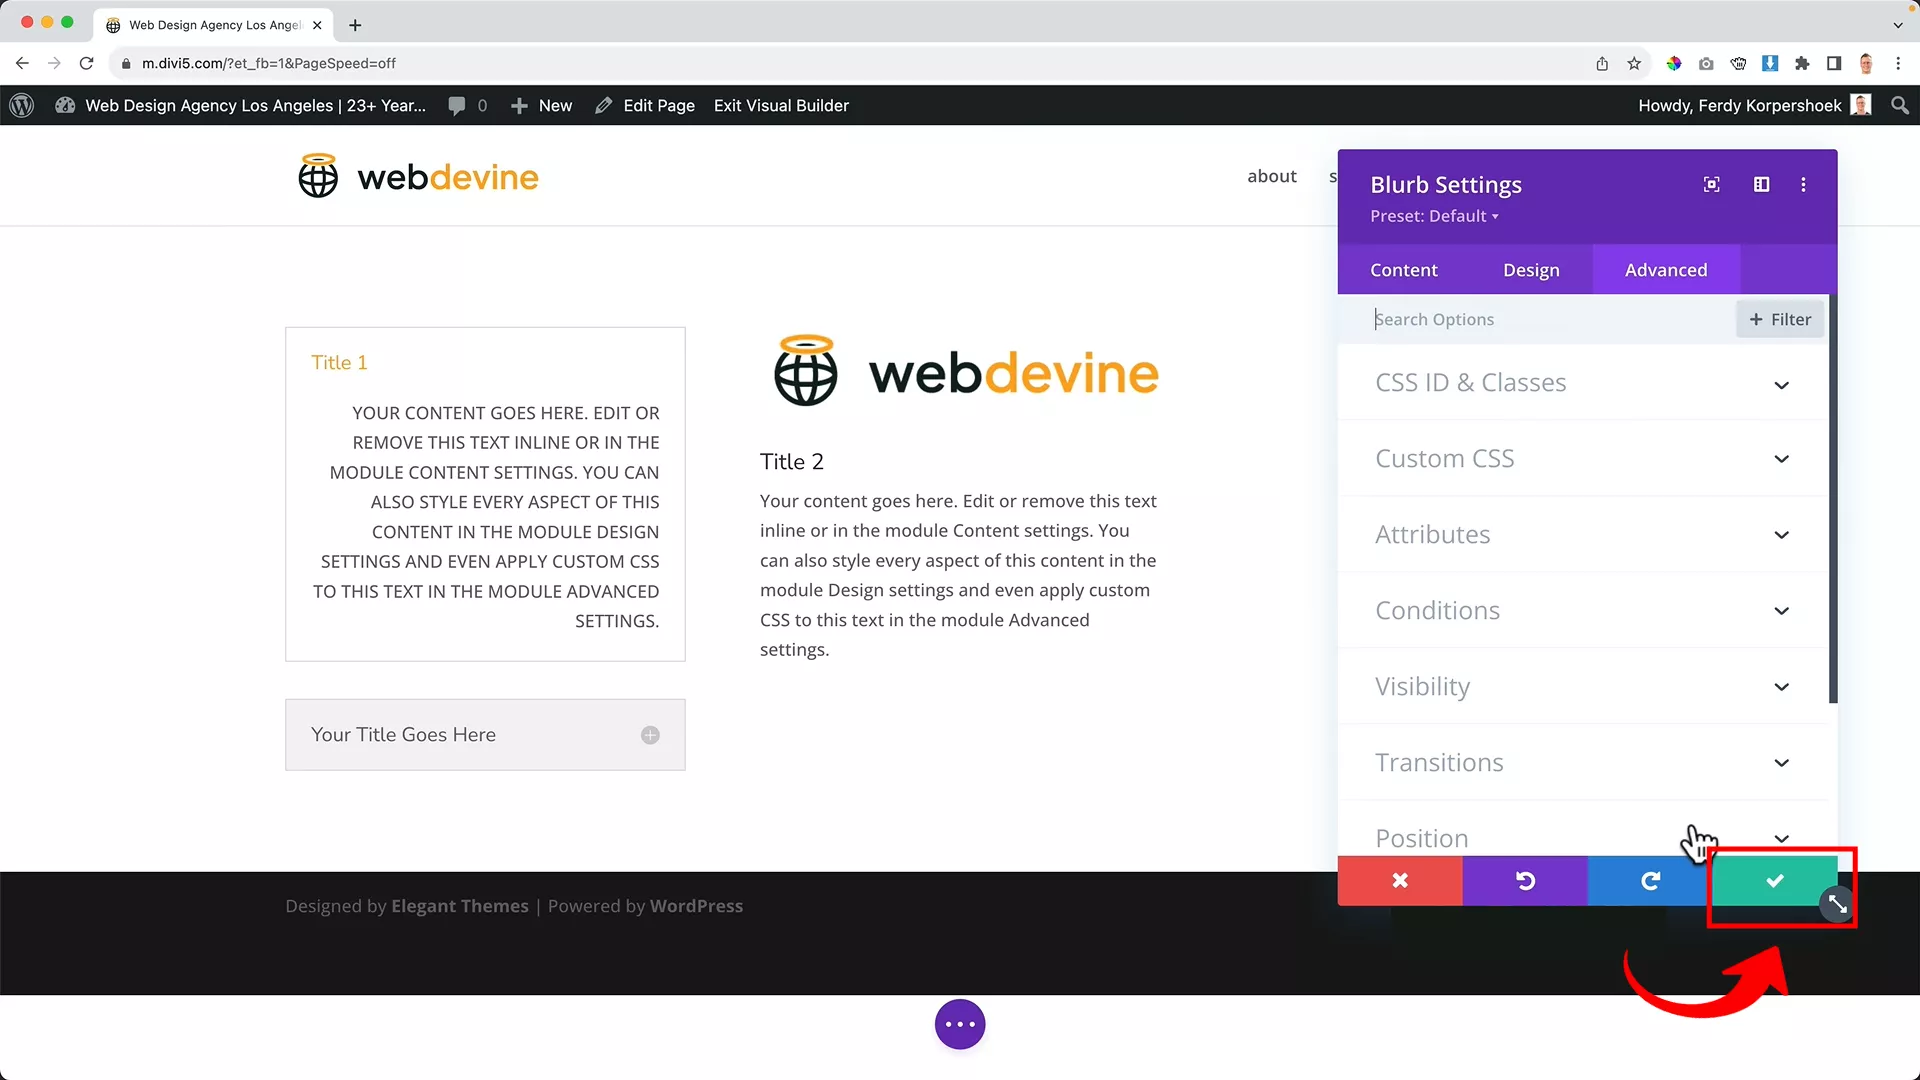
To close this toolbar, click the green check button on the bottom right. You can reopen the toolbar by selecting the module and clicking the gear button from the hover options.
One of Divi’s features I particularly appreciate is the copy-pasting function. You can access this by clicking the copy icon in the hover options. This allows you to drag and replicate a module anywhere on your webpage effortlessly.
Pro tip: You can use combinations, such as Ctrl + S, to save pages or Ctrl + Shift + S if you decide that saving it as a draft better serves your goals at that time. If you want to exit, simply press Ctrl + E and you are free to exit the builder.
Using the purple button
Divi’s drag-and-drop editor sets it apart from other page builders. And the magic starts with the quirky purple three-dot button at the bottom of the builder.
This button’s features make designing with Divi a walk in the park.
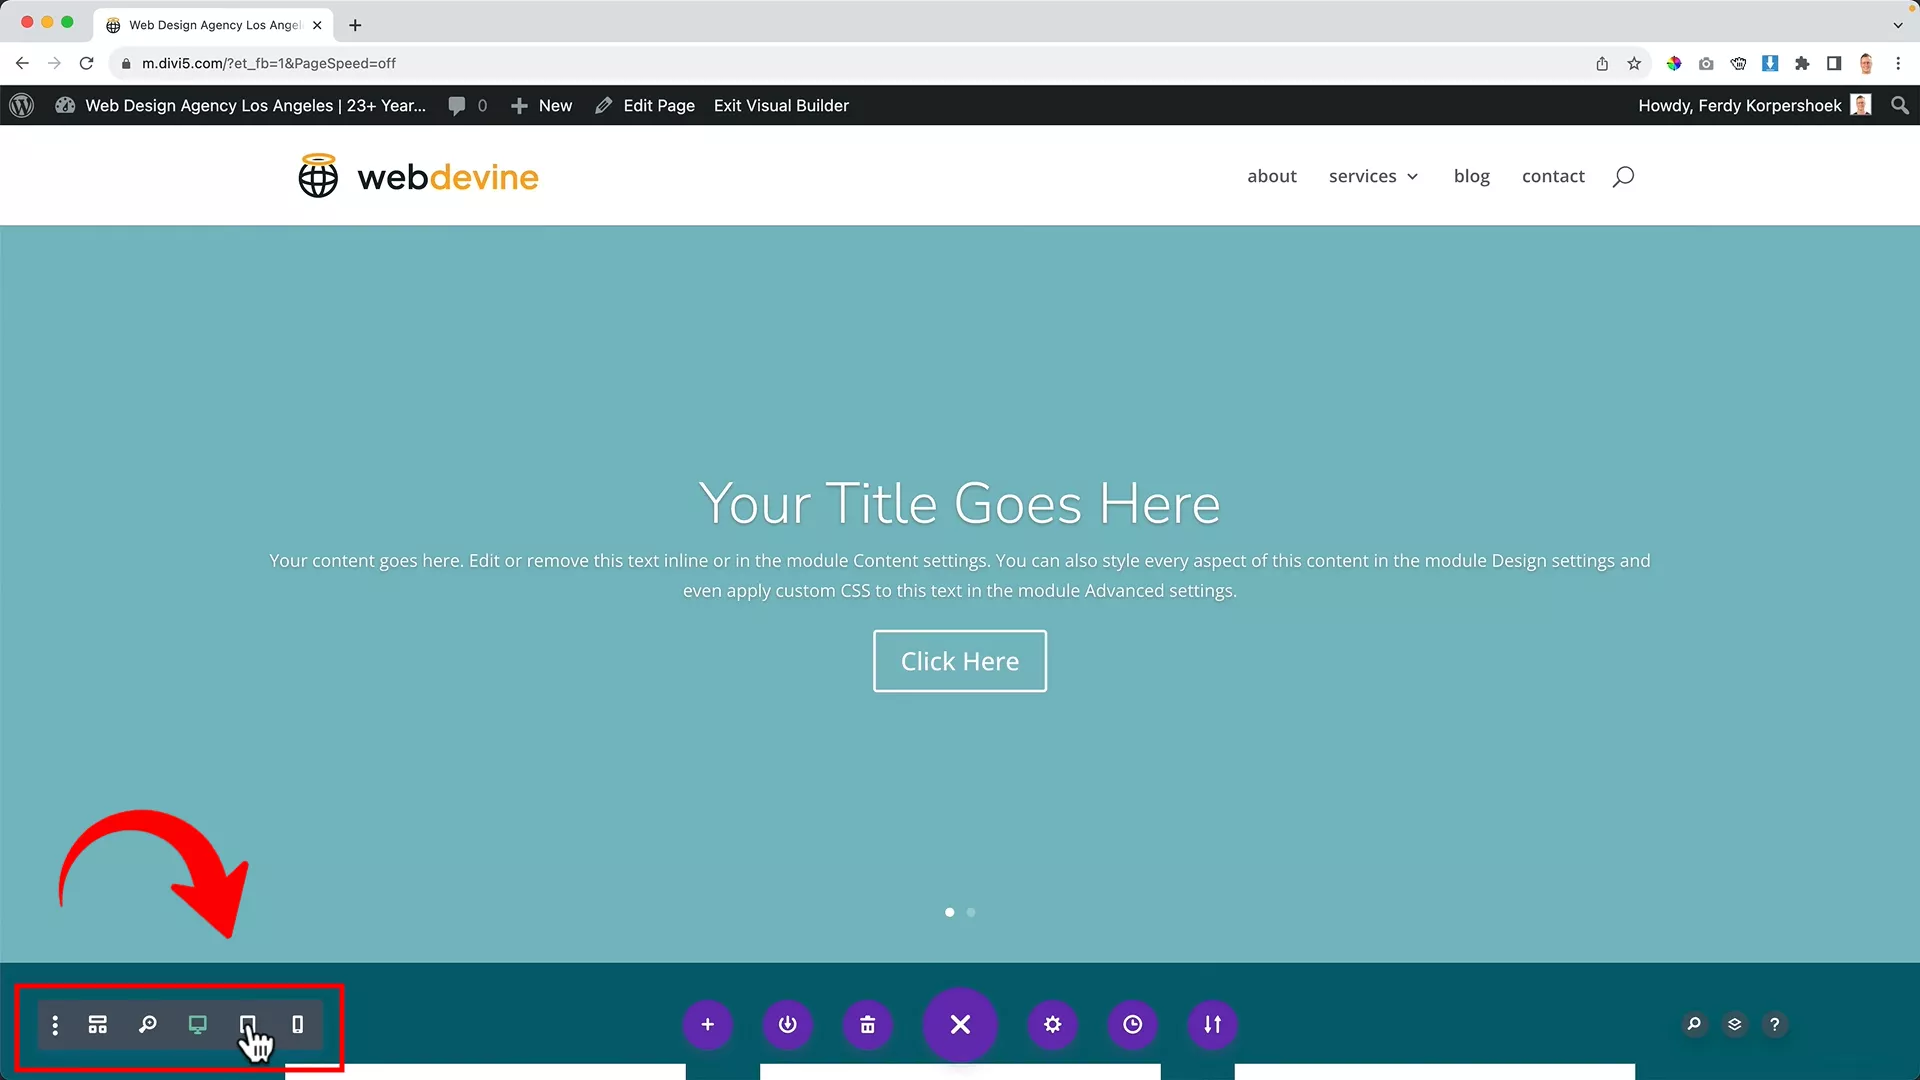
Want to see how your site looks on different devices? Just one click on those nifty gray options to the left of the purple button, and bam! You’re checking out your site on desktops, tablets, and smartphones. It’s that easy.
On the opposite side, the gray icons at the far right of the purple button serve multiple purposes. They enable you to search your webpage, examine the layers of your page, and access the Divi builder helper.
This helper is a valuable resource, offering a list of shortcuts to accelerate your workflow and enhance your efficiency in using the Divi Builder.
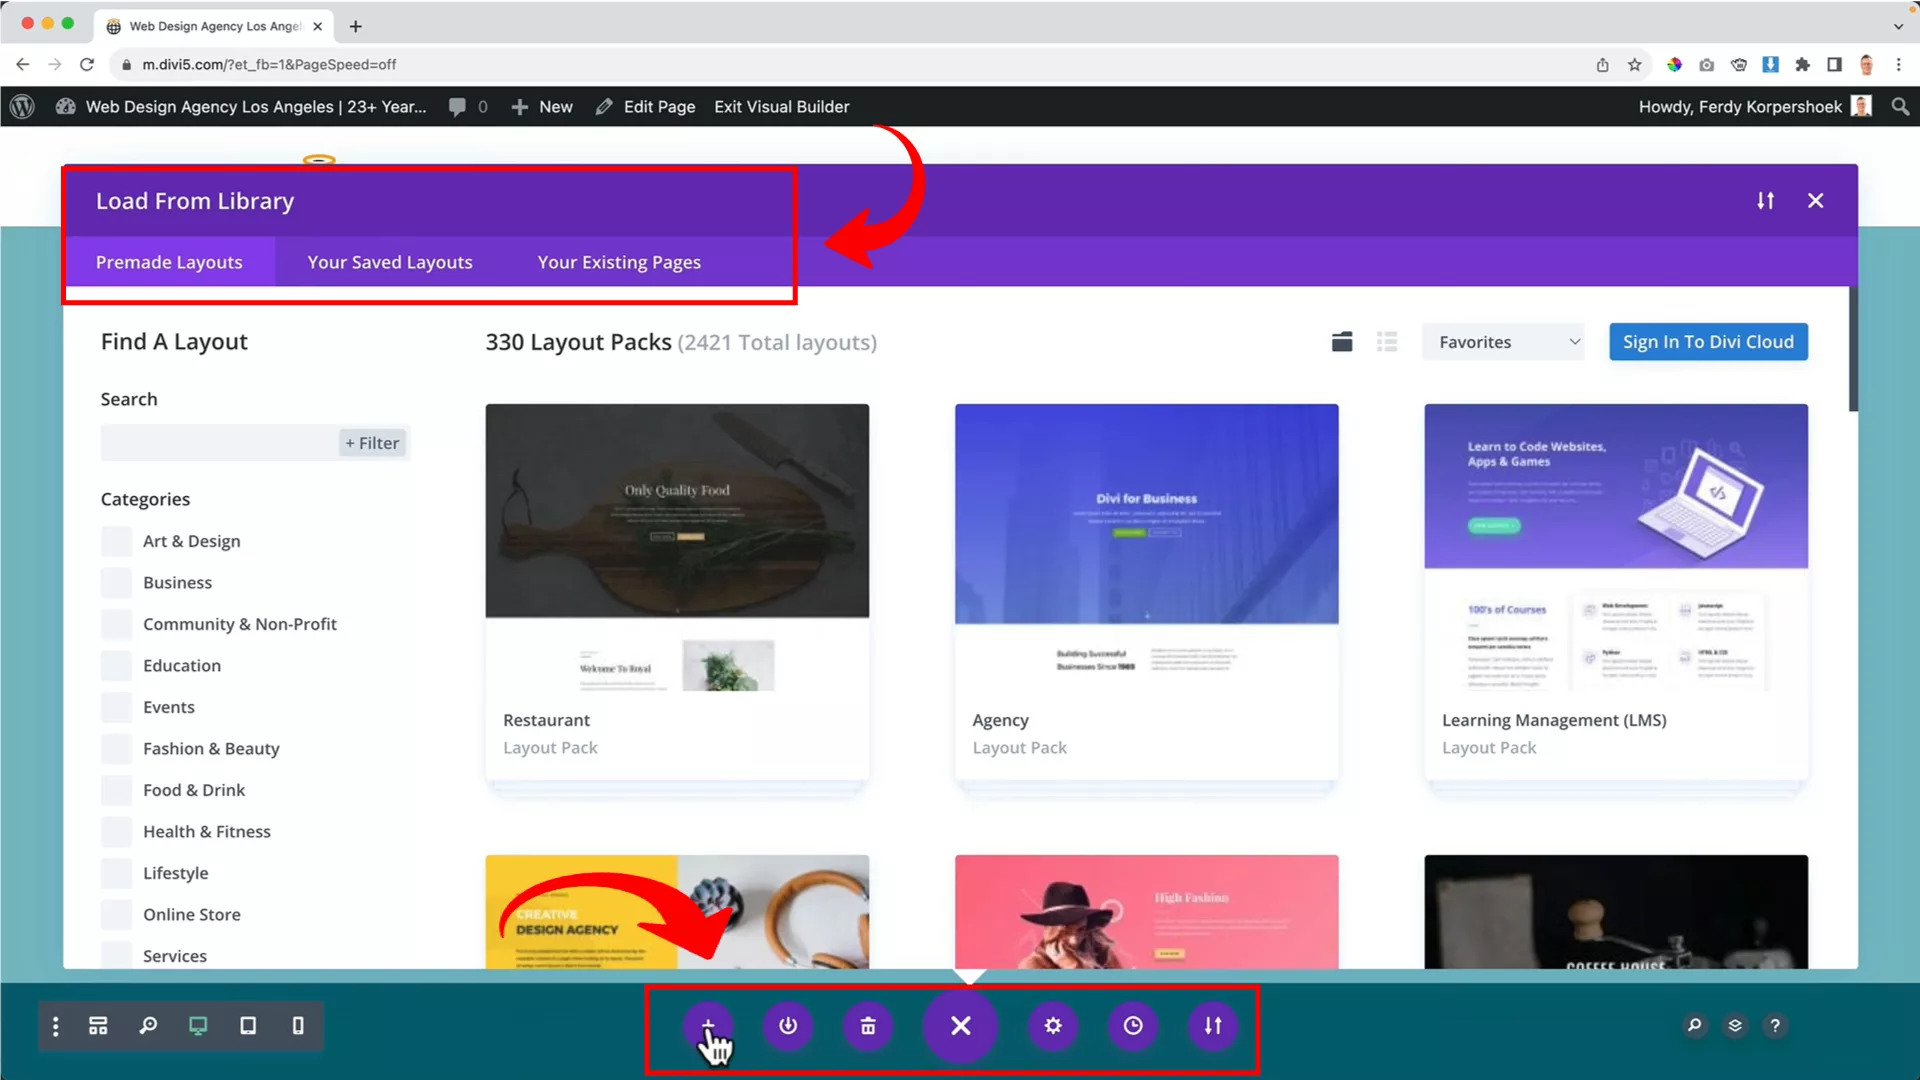
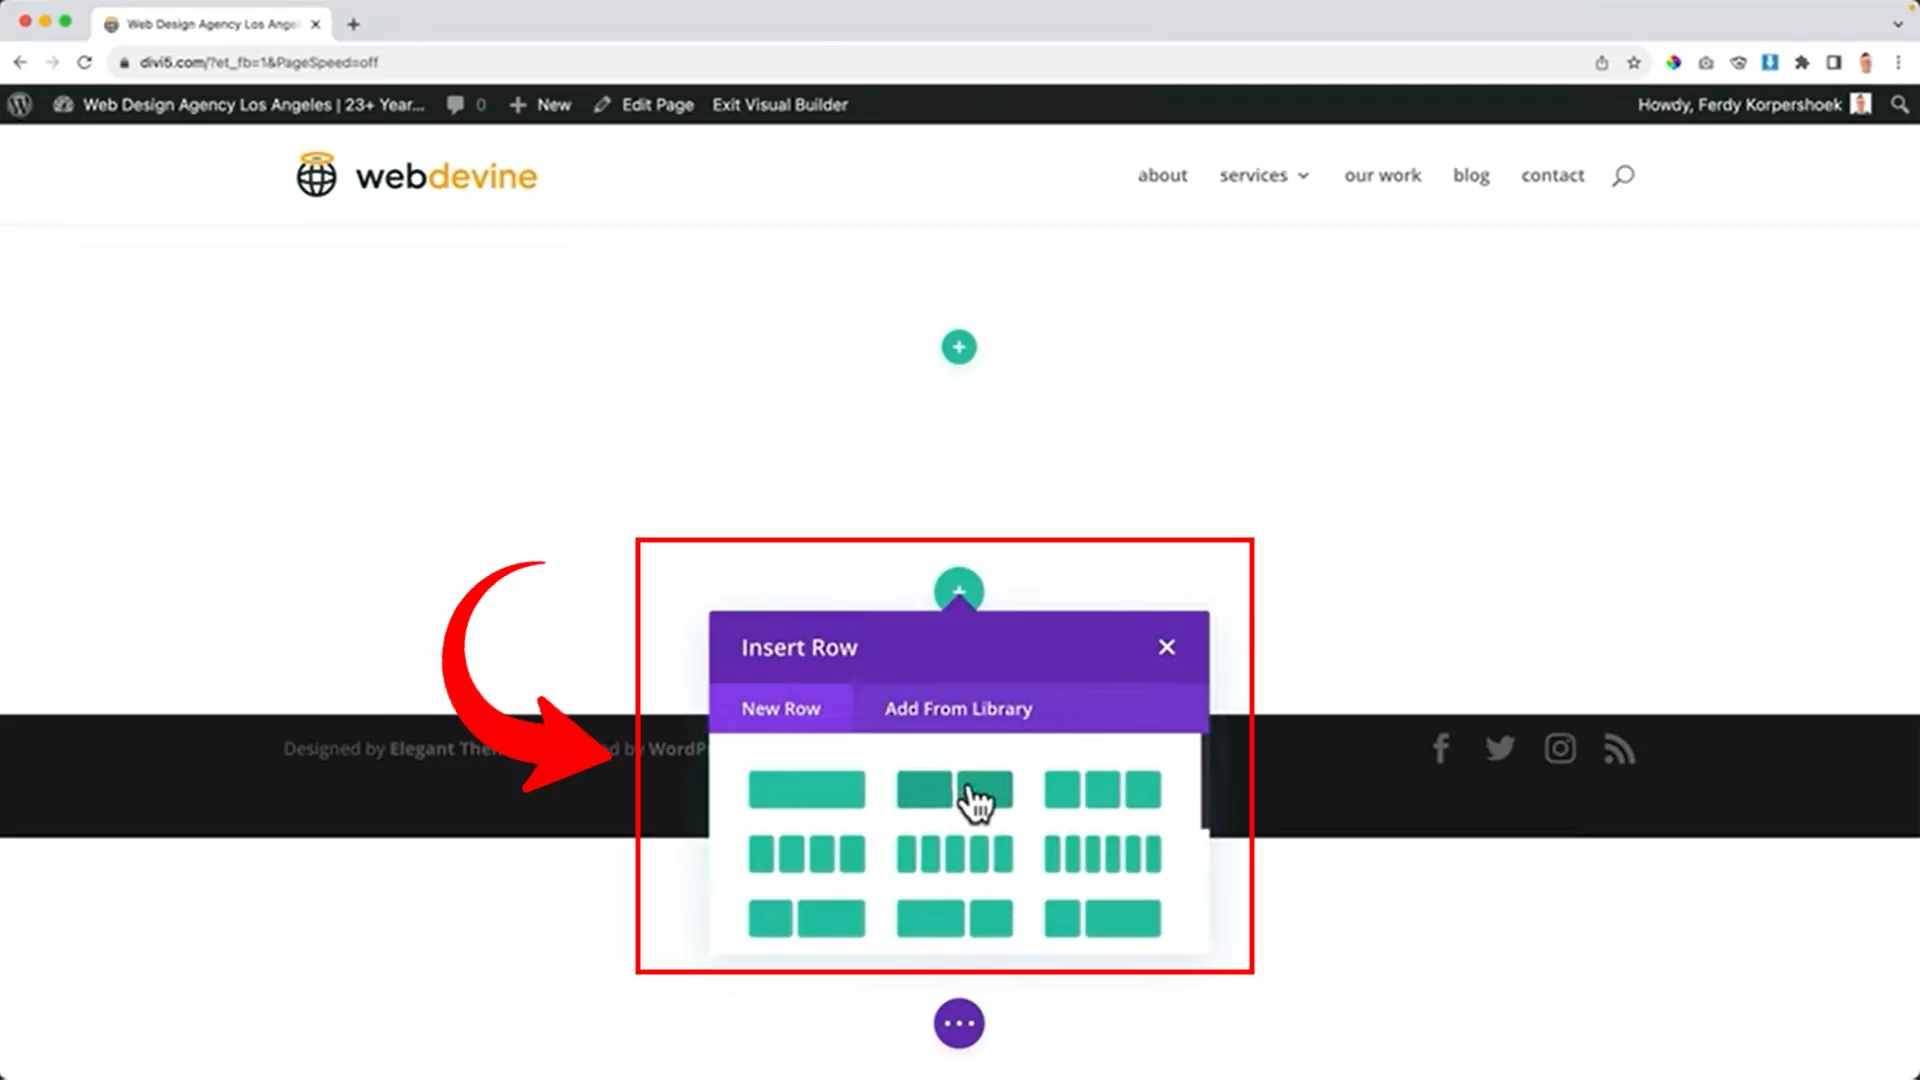
By clicking on the + sign that comes up when you click the purple button, you can load readymade layouts from the template library.
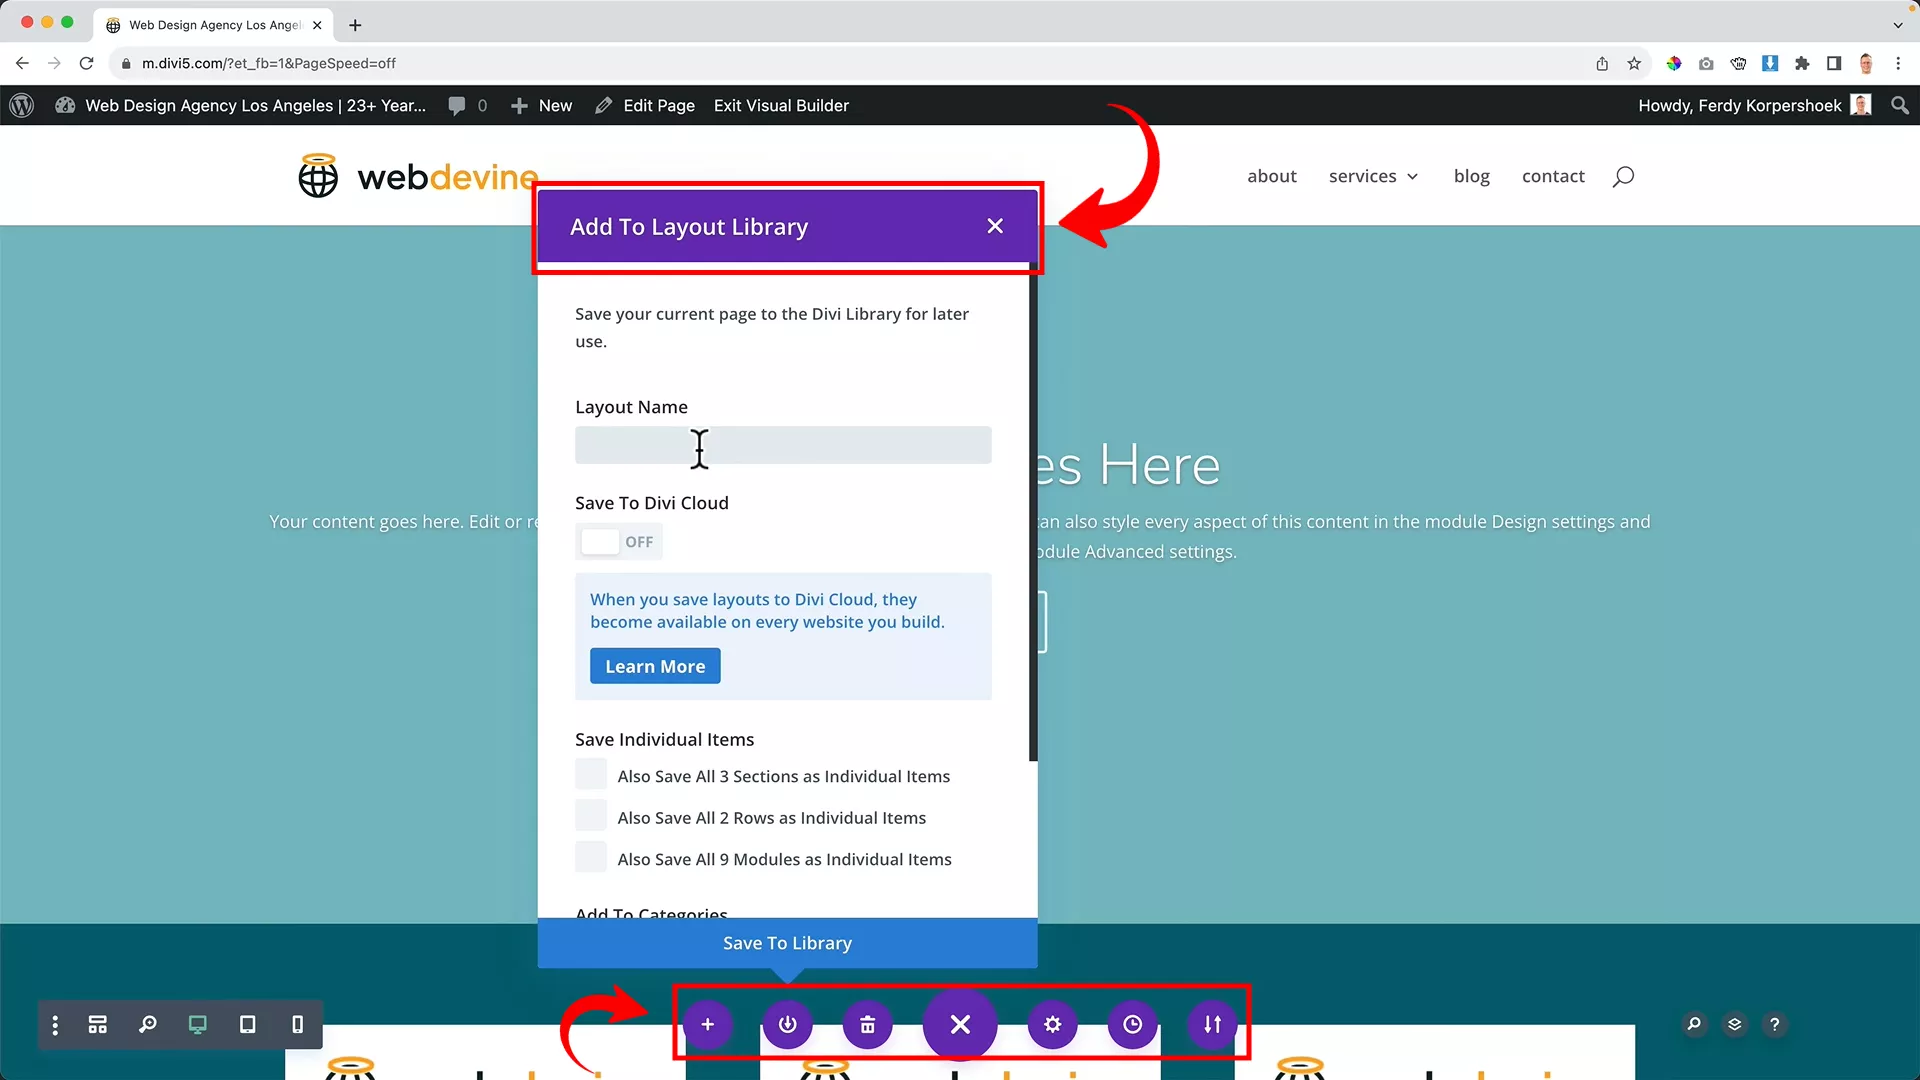
You can also save your current layout to your library for easy access while creating multiple pages. To access these saved layouts, click on the + sign again.
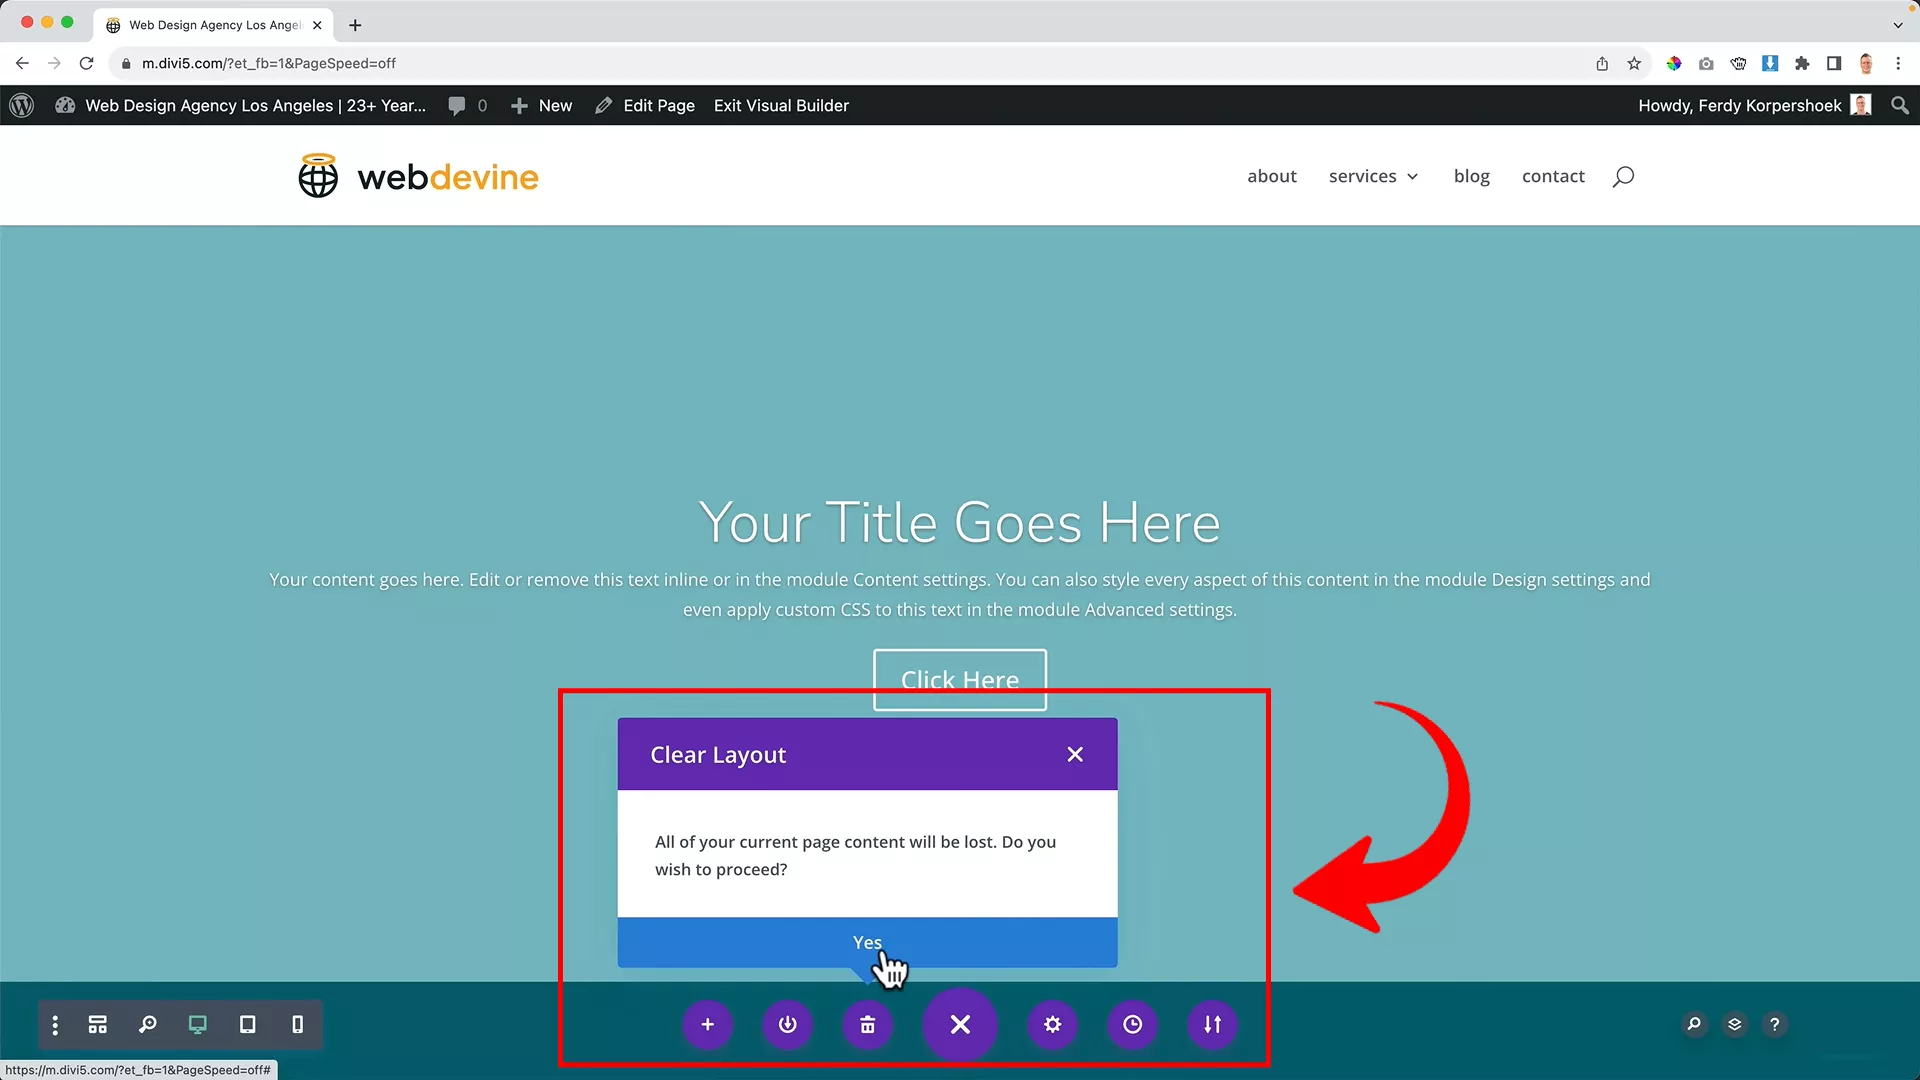
In case you want to start over, click on the purple trash icon to delete everything and start on a blank canvas.
There’s a handy clock option, which diligently tracks all your changes. Made a mistake or accidentally deleted a page? No worries! Simply revert to an earlier version from the History States list. It’s like having a time machine for your website edits.

The double arrow button at the far right of the purple button is for importing and exporting pages. If you’re a professional website designer, this feature can come in handy to create multiple websites using the same template.
Wireframe view

Clicking the button. shown in the image above, takes you to the Wireframe View, offering a sneak peek at your page’s structural blueprint. Think of it like previewing a new house’s layout before installing the walls.
With this view, you can:
- Rename specific sections and rows
- Select or remove various elements with ease
Pro tip: Dive into experimenting with Divi’s features once you’re comfortable with the basics. Its intuitive interface flattens the learning curve, enabling you to quickly master the theme. Start playing around with Divi and you’ll be crafting professional-grade websites effortlessly in no time!
So far, I’ve delved into the foundational features of the Divi Visual Builder. These are good enough for beginners to start creating websites.
Next, I’ll explore Divi’s advanced functionalities – tools that can truly transform and elevate your website’s aesthetic to new heights of sophistication and style.
Create the hero section of your WordPress website using Divi
It’s time to roll up our sleeves and start the real work. We’re about to create a hero section for your website. But no, not the kind of hero you see in movies (haha!)
In web design, the ‘hero’ is the first thing your website visitors see when they land on your site. It’s your first impression.
In this part, I’ll take you through building a hero section using the Divi Visual Builder. We’ll aim for something that not only looks great but encapsulates what you’re all about. Think of it as your website’s welcoming committee, setting the tone for your visitors’ journey.
Building the hero section
The website (divi5.com) I am creating to help demonstrate the process is for a web design agency. So I need to ask myself: What is this website about? That’s the first question you should ask yourself when creating the hero section for your website.
So, my website is all about helping people create websites optimized for conversions and growing their business. And that’s the first thing my prospects should see on my home page.
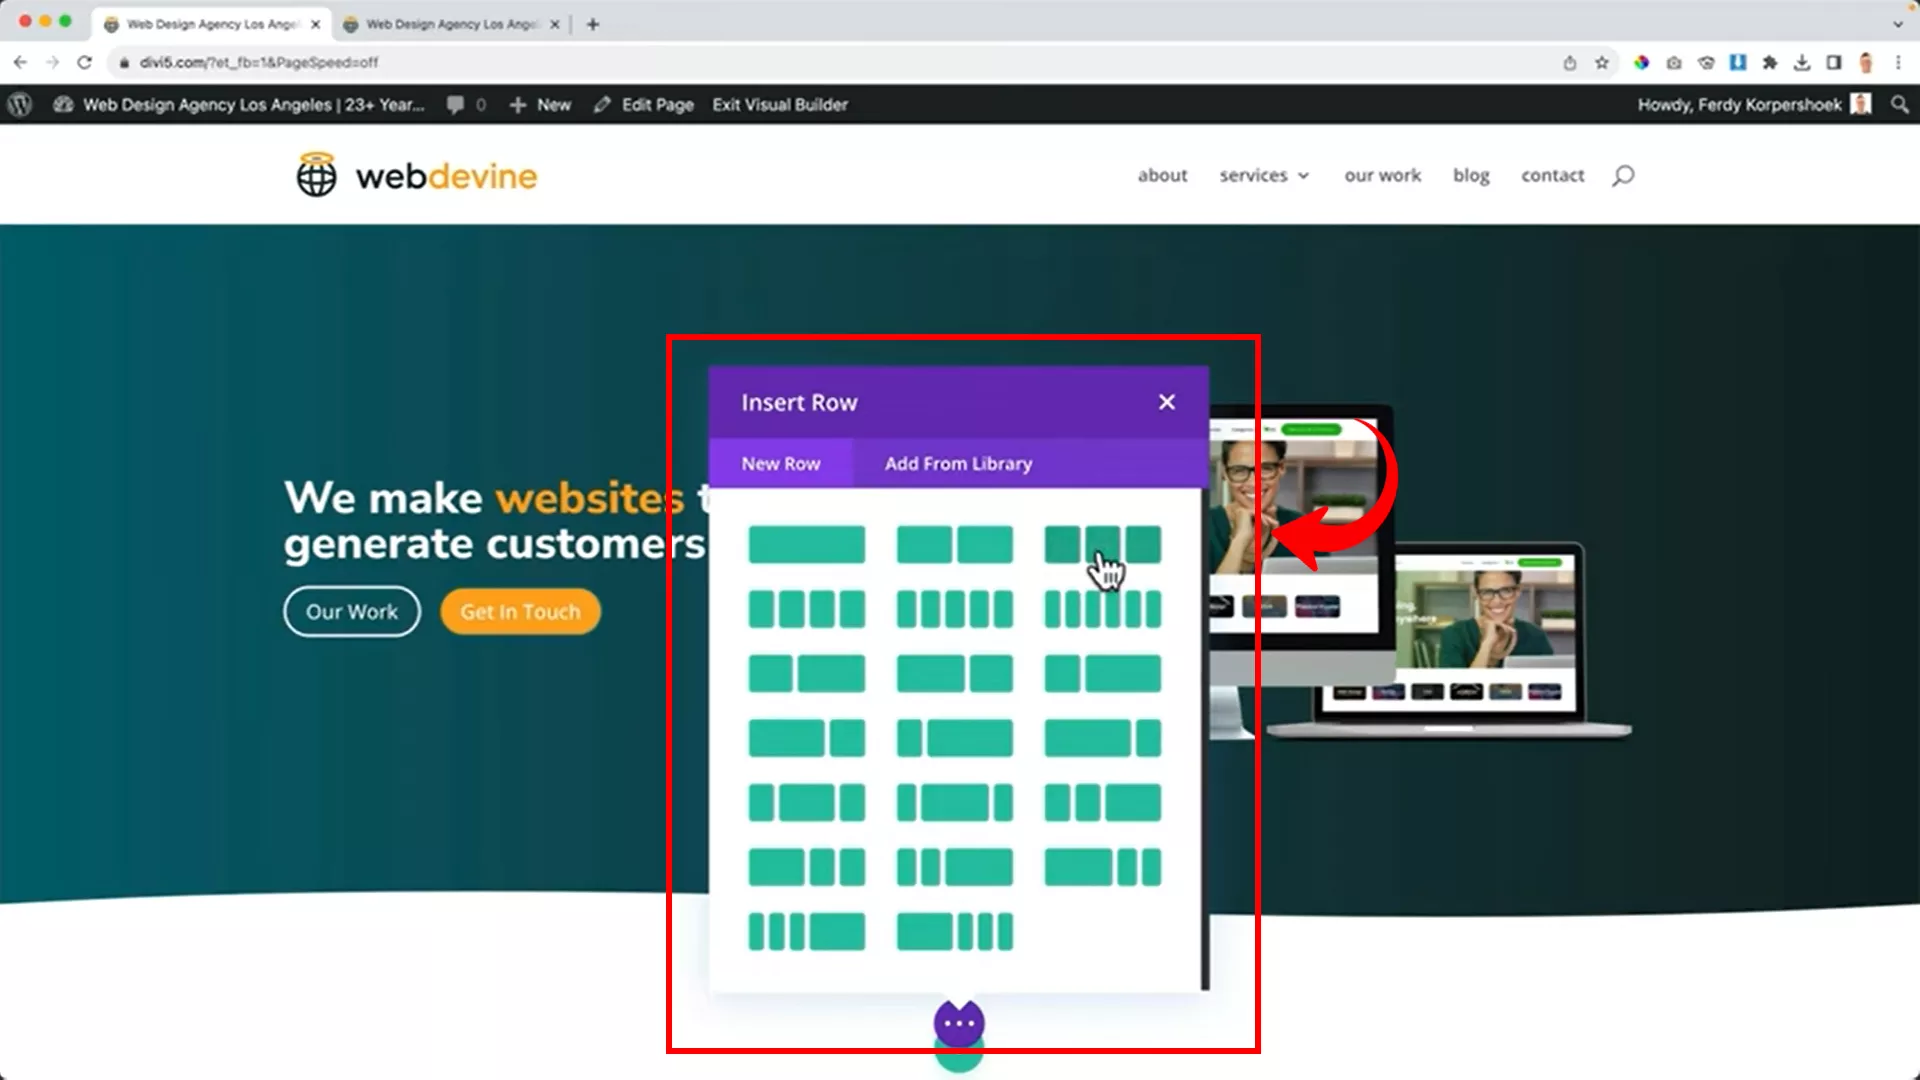
That said, I’ll start by adding a new regular area with two columns.
On the left, I’ll add a text module for my message.
On the right, I’ll incorporate a gallery to showcase my work.
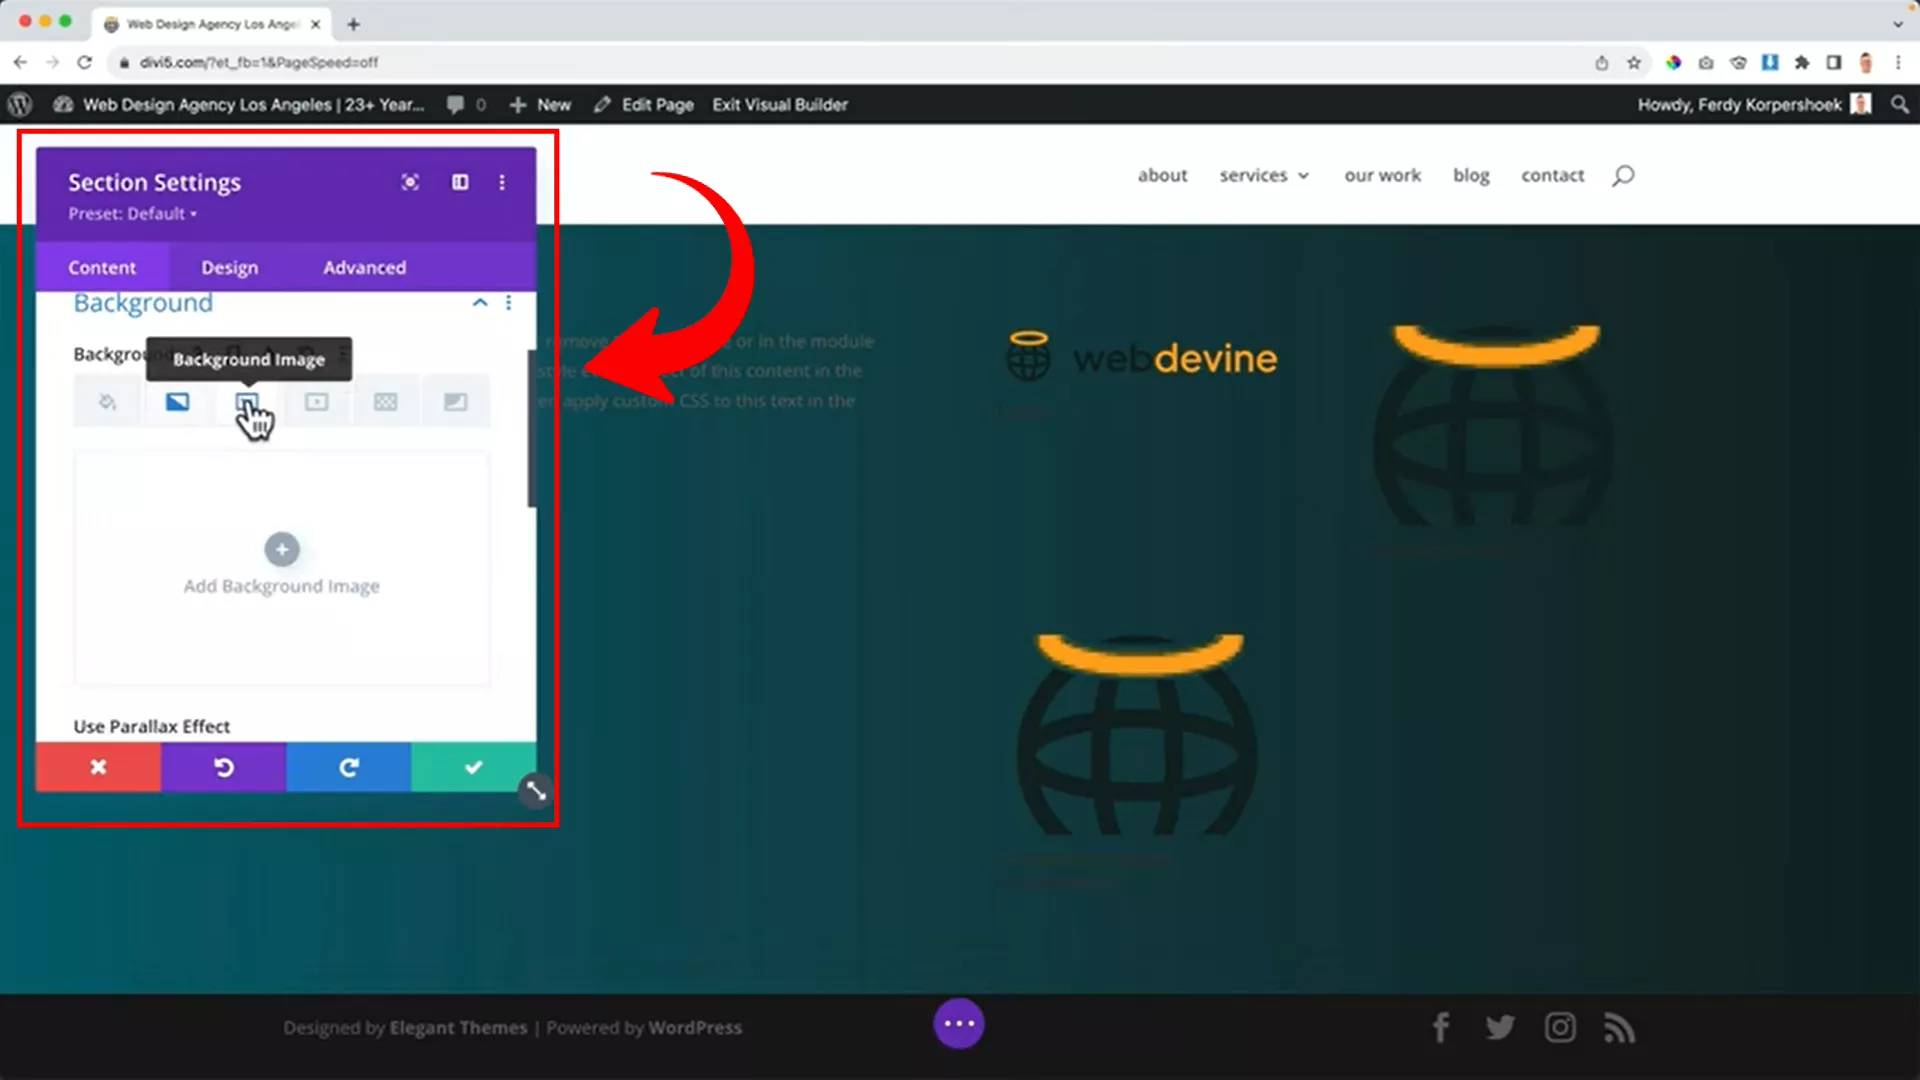
I like gradient backgrounds. So, I’ll apply a background gradient for a visually appealing look. You can adjust colors and gradient direction or mix it with images if necessary.
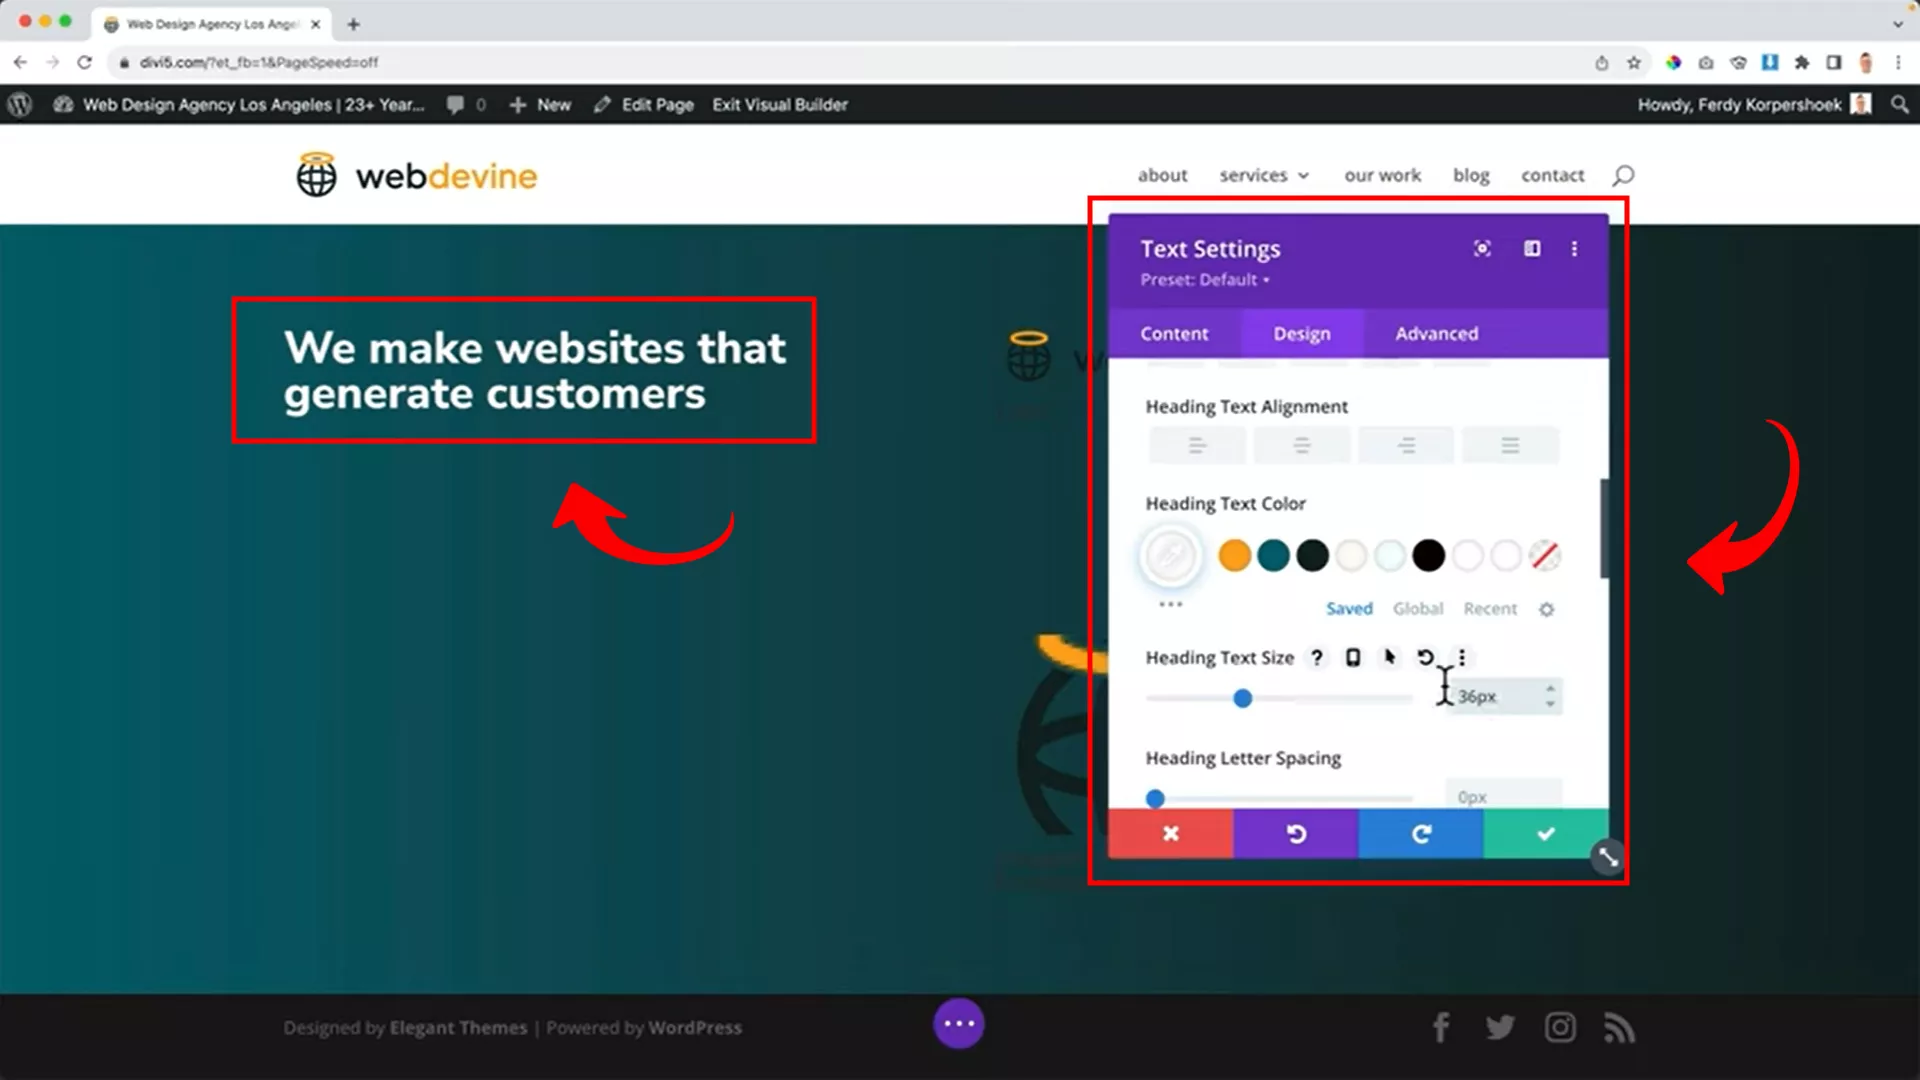
Make your text stand out by adjusting its color and size.
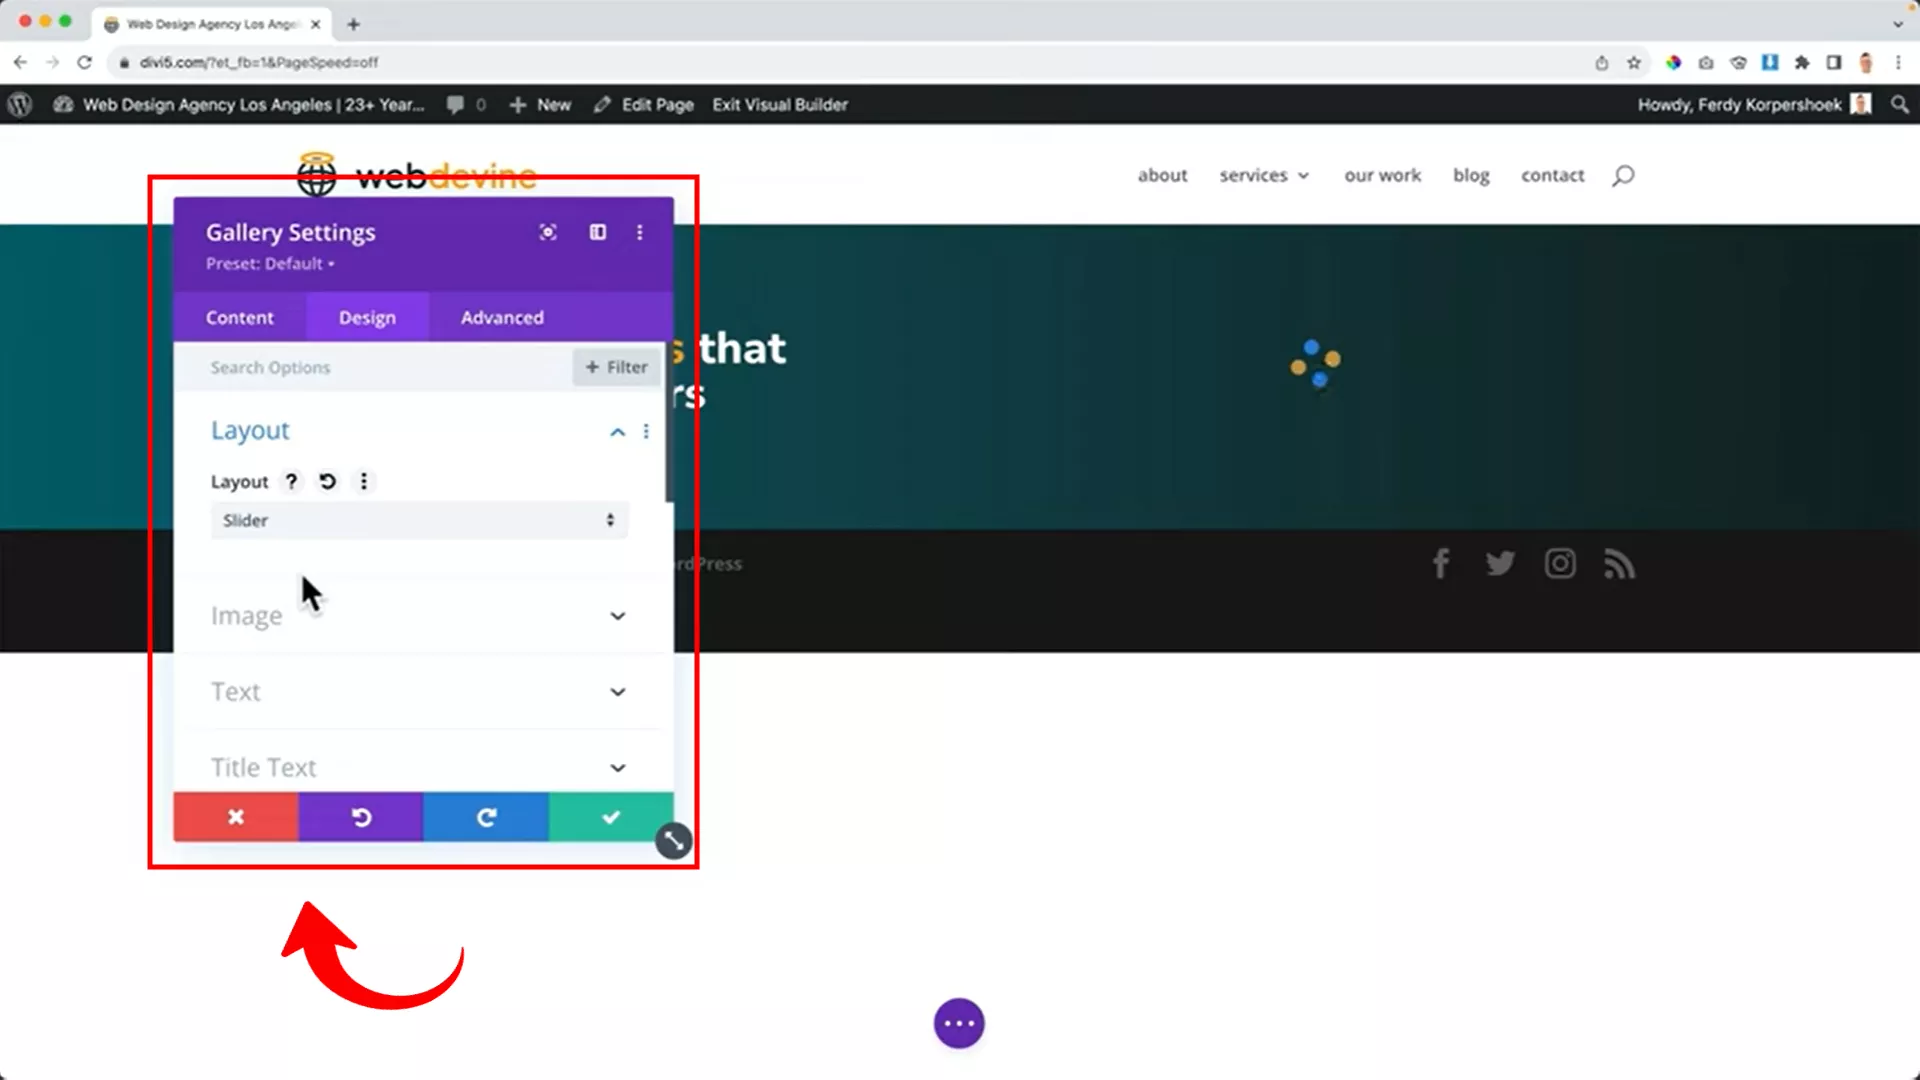
For the gallery, set the image count to one and choose a slider layout for a dynamic display.
Pro tip: Name your images strategically for SEO. This helps in boosting your visibility on search engines. For example, if the image displays the best ATVs in 2023, name it something like ‘best-ATVs-2023, ” not ‘IMG_001.” Otherwise, you’ll end up in the dungeon of millions of similar random images.
Create a business features section
Moving on to the heart of your business presence online: the business features section. Here’s where you unpack what your business does best.
I’ll guide you through setting up a neat area, divided into columns, where each element tells a part of your business story.
We’ll add text, an image gallery, and, most importantly, a background that aligns with your brand’s theme. It’s all about creating a visual narrative that resonates with your audience.
Layout and content
For the business features section, I’ll go for a regular area with three columns to display different business features. You can go for more columns if need be.
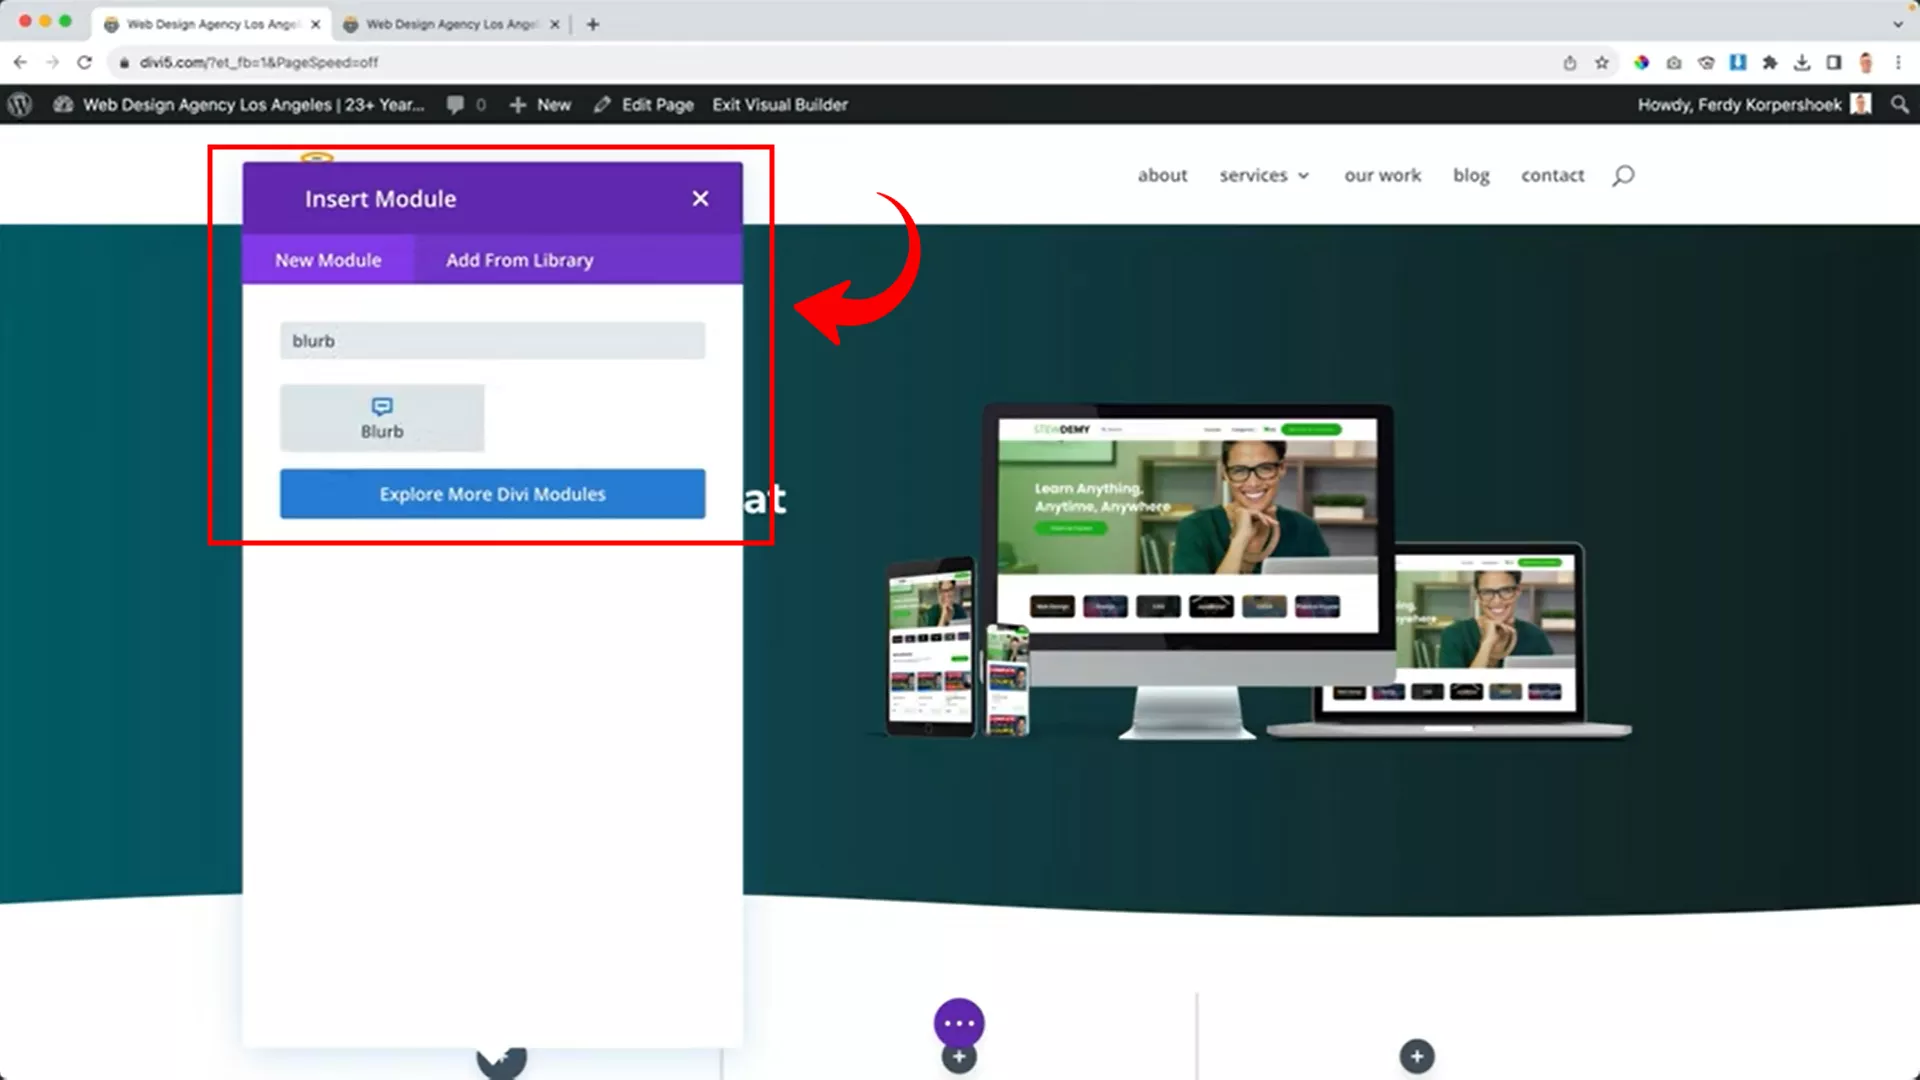
For each column, I prefer adding a blurb module. It’s ideal for highlighting key business aspects like customer service, innovation, or speed.
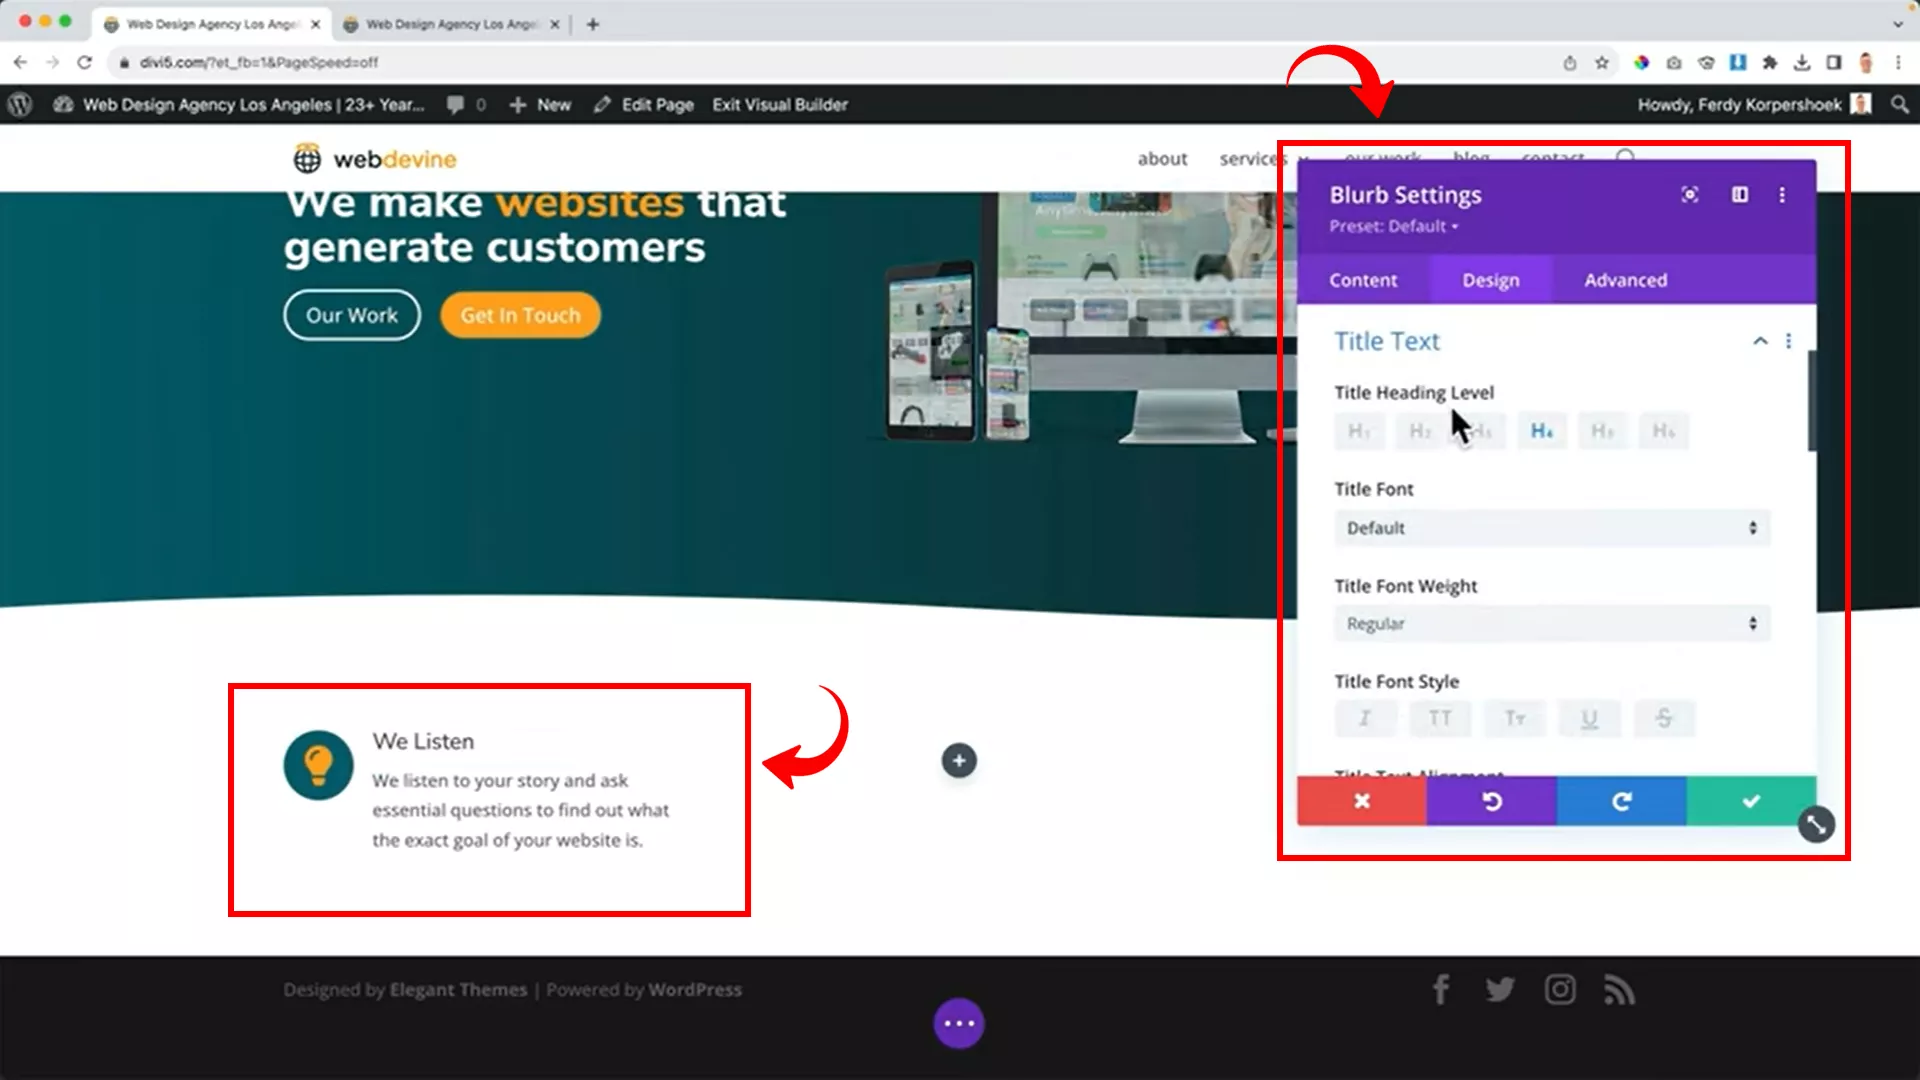
Next, I recommend customizing each blurb with relevant icons, titles, and descriptive text that aligns with your business values.
Visual enhancements
The best part about using Divi is that everything is customizable. You’re never short of options.
I want to customize the look and feel of the business features section and I have a plethora of options.

Changing the background is always a good starting point. You can tweak the background to match it with other sections or contrast to make it prominent.
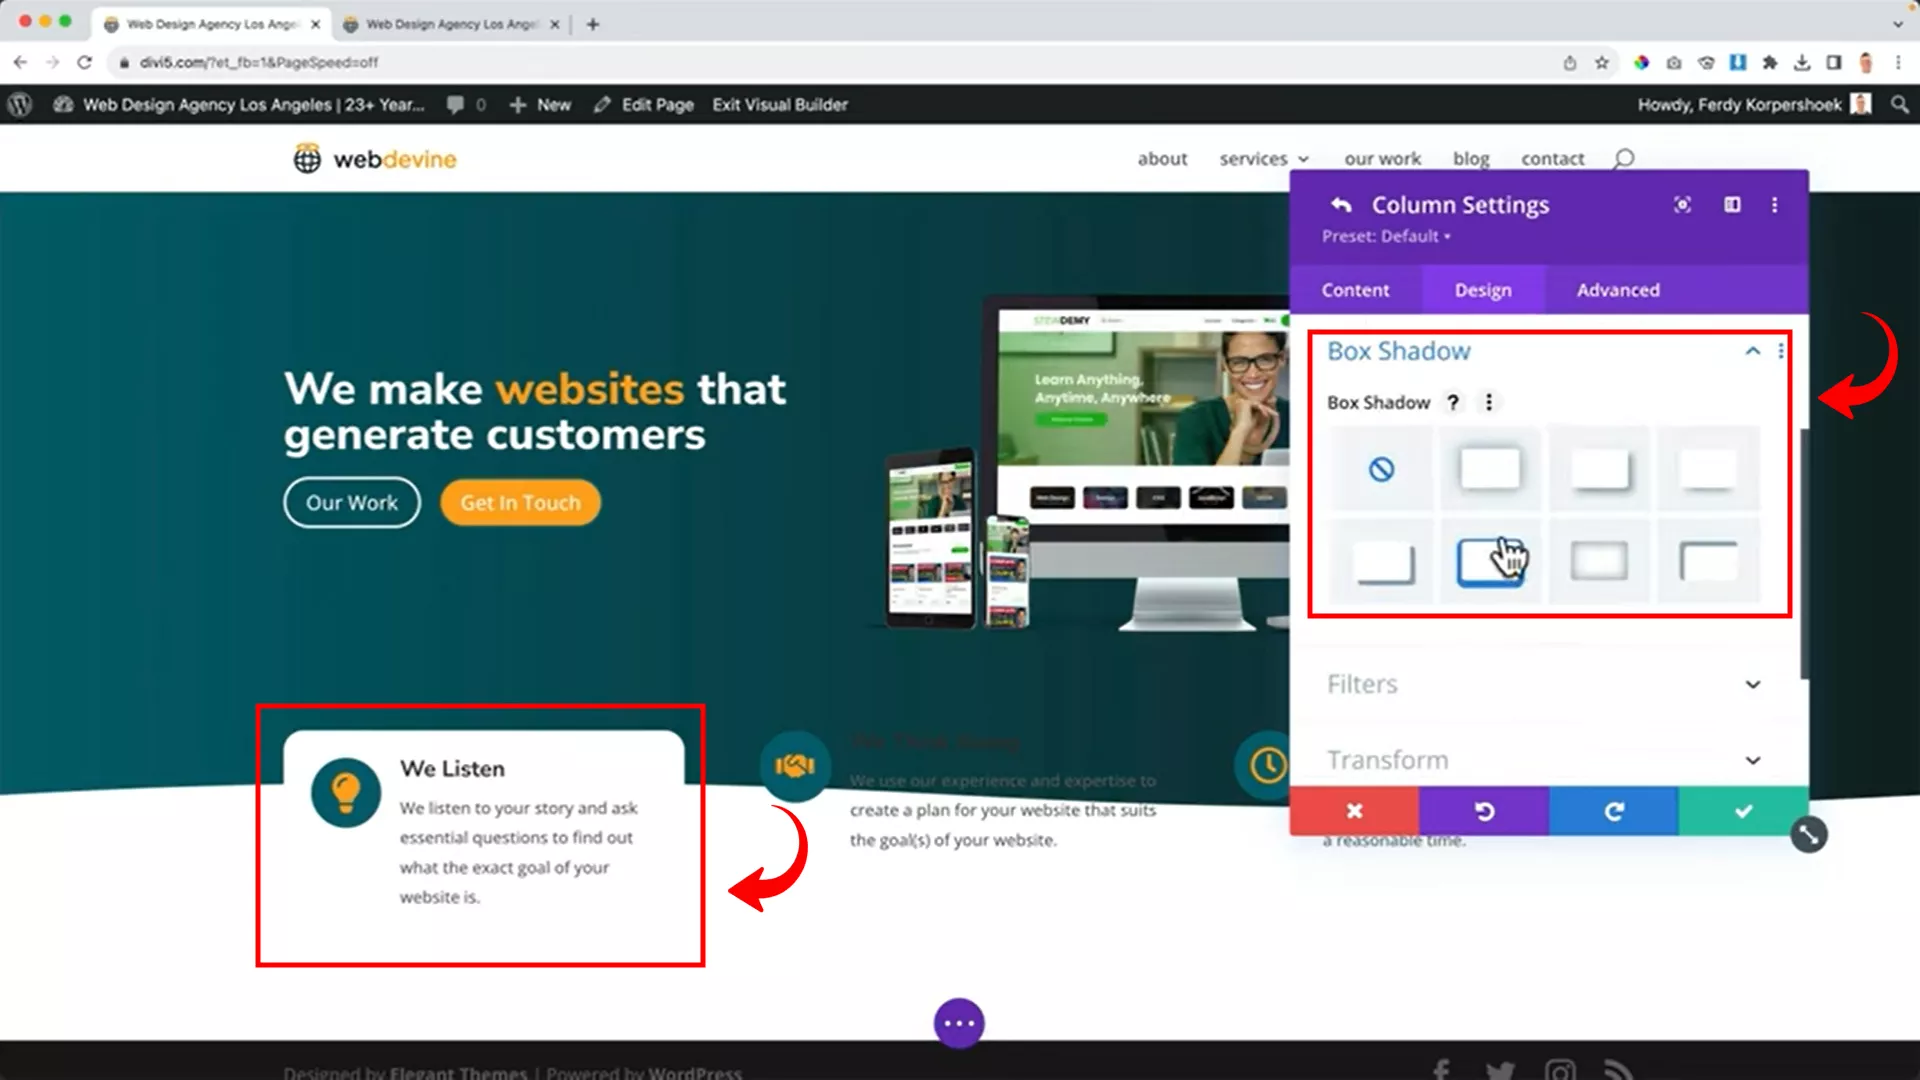
You can also add animations for dynamic effects and align content for a polished look. Just like I did.
Tell more about your business
Now, let’s dive deeper and get personal. This section is all about the essence of your business. It’s where you share your story, your ethos, and what sets you apart.
I like to use a combination of text and visuals here. For example, a gallery can visually represent different aspects of your business journey.
For this section, I’m going with the regular area with two columns.
Here, you can add any module you choose, depending on what you want to display. But mostly, the gallery module works well.
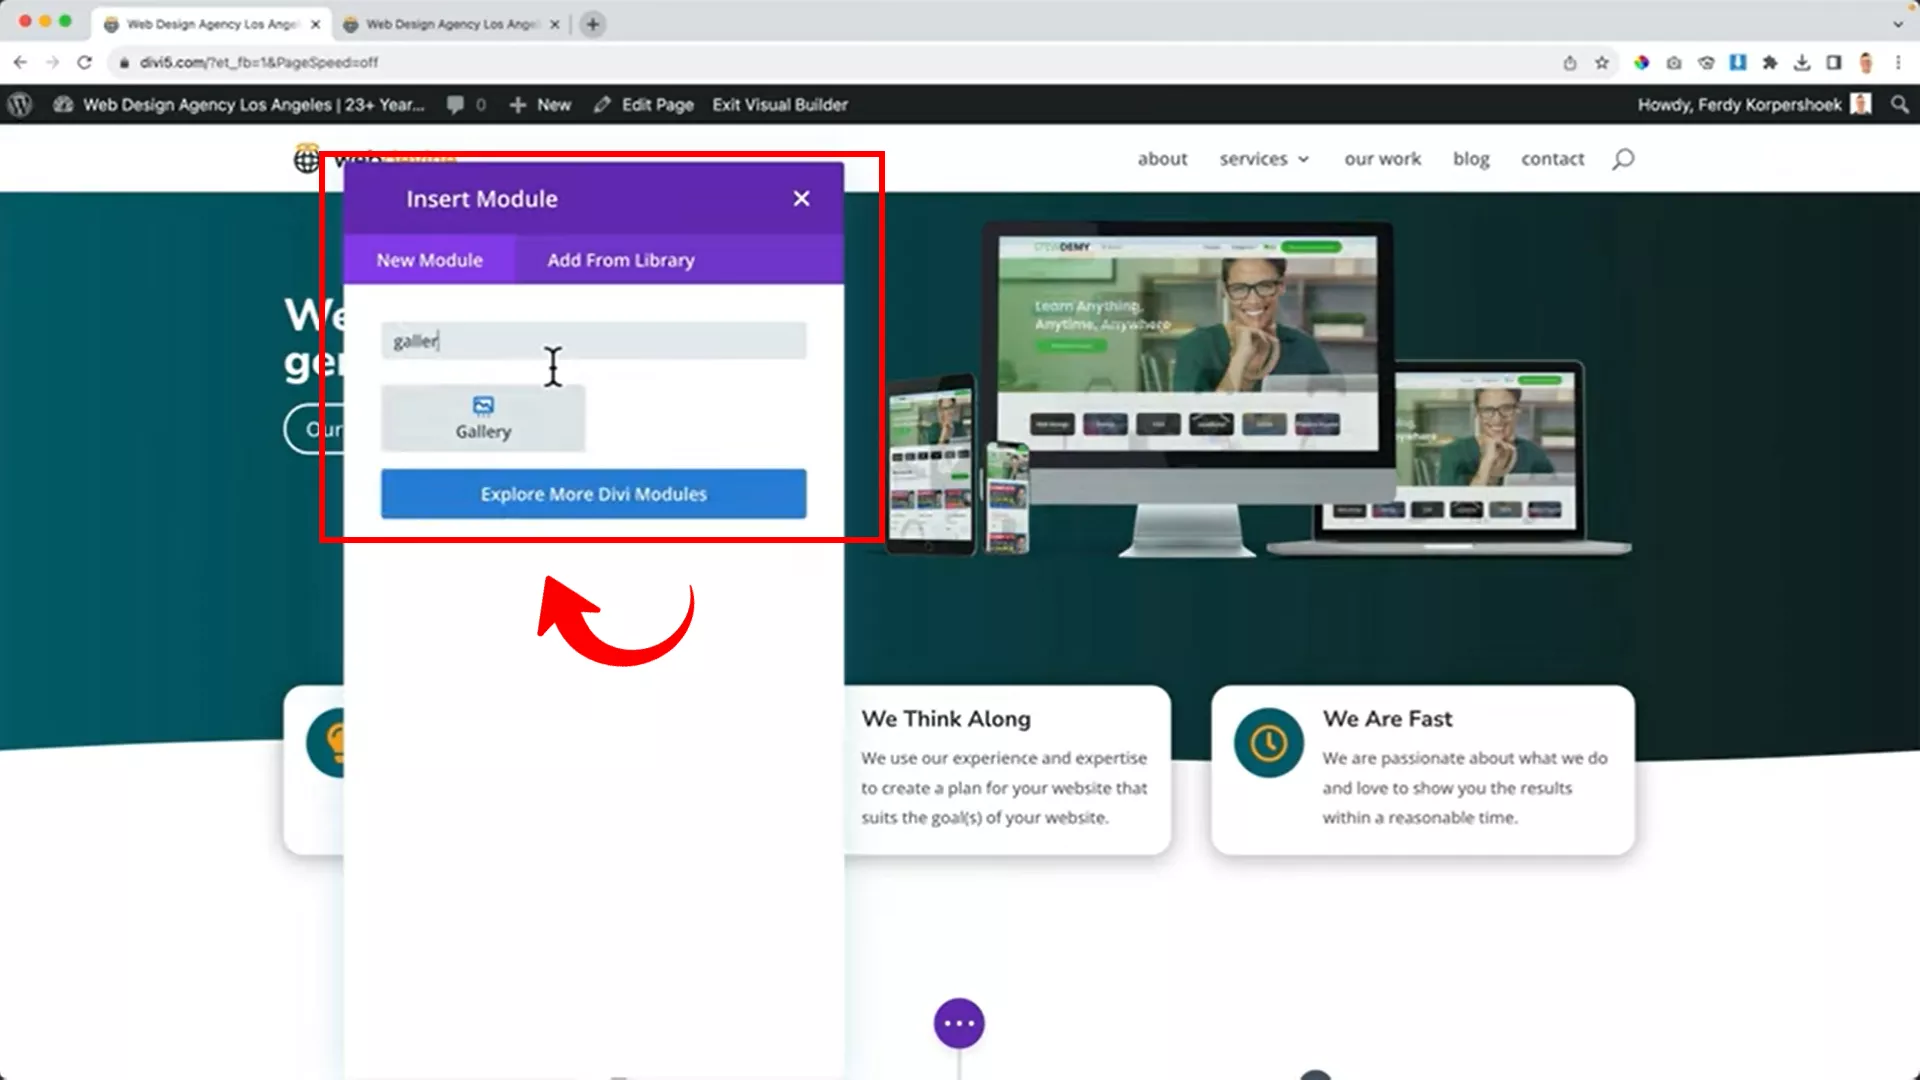
Add a gallery module to display images representing your business ethos or achievements in one column. You can add your images or download stock images from platforms like iStock.
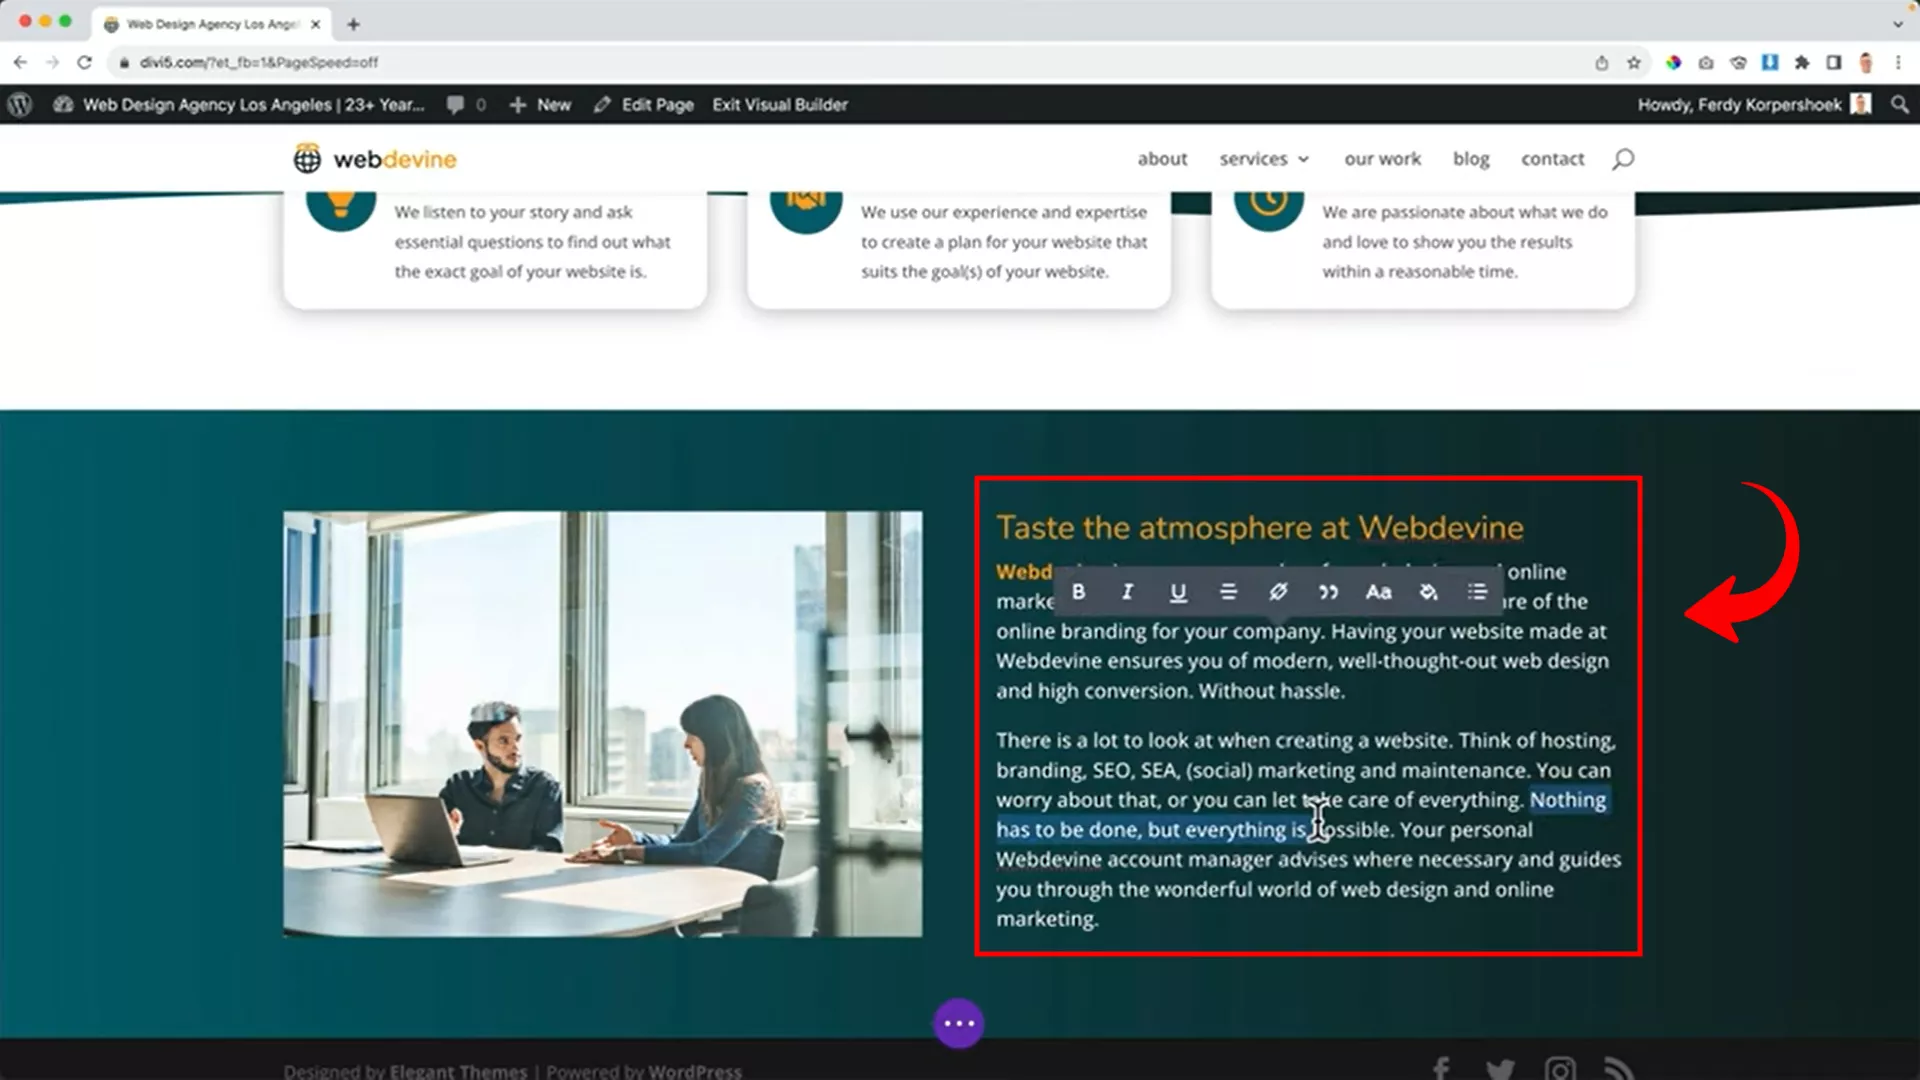
Use the adjacent column to provide detailed information about your company, using headings and body text for clarity.
If you’re an established business, you can add awards or recognitions your business has won in the past.
To do this, create a new section with multiple columns, each showcasing an award or recognition your business has received.
Here’s how the one I created for this website looks:
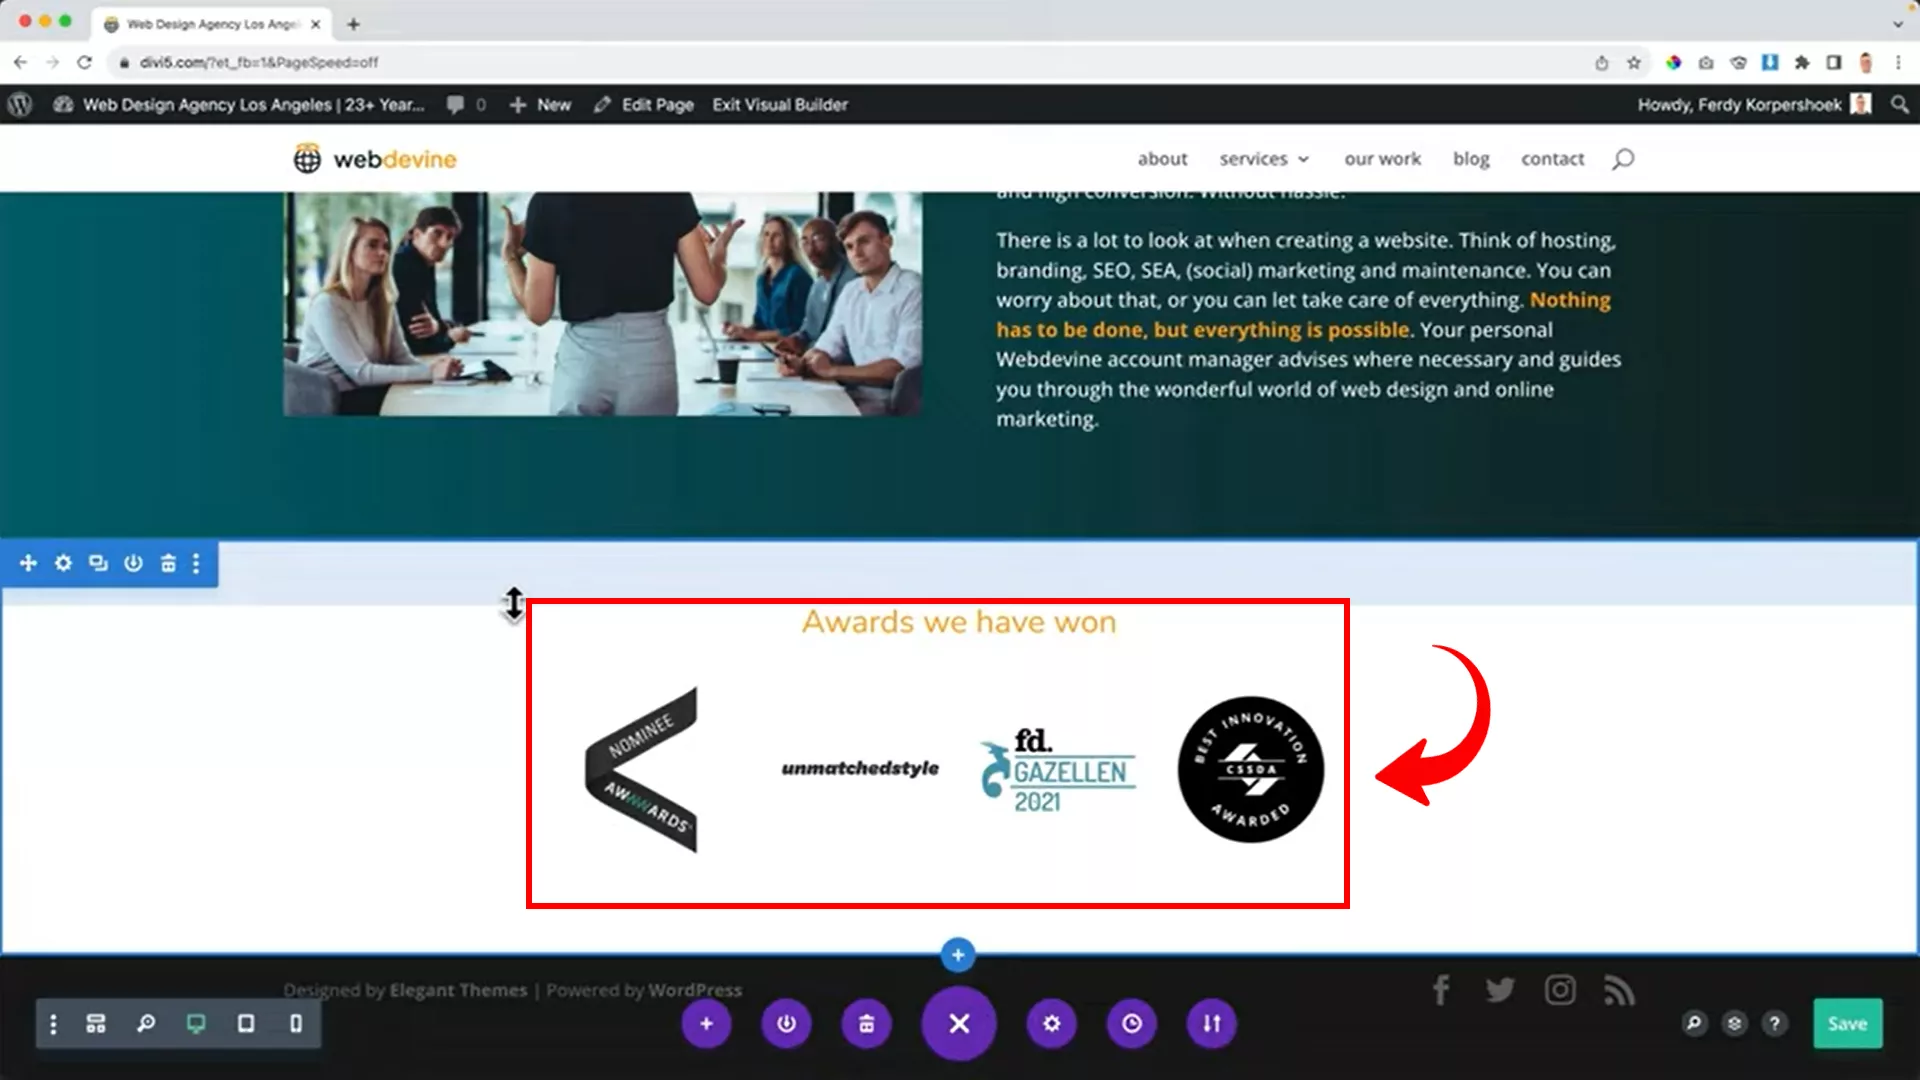
Upload award images and adjust their sizes for uniformity.
Ensure all images are visually cohesive.
Do more with Divi using advanced customization options
Being proficient with Divi requires practice and operational knowledge about its customization options for confident adjustments on all platforms.
Wondering how to achieve this? The answer lies in Divi’s advanced customization capabilities. I’ve distilled these into key elements that are crucial for your toolkit.
So, let’s delve into these transformative features and unlock the true power of Divi.
CSS customizations
Transform your website into a standout masterpiece. That’s the power of the Divi theme, offering advanced customization options through CSS. Your web pages won’t just function smoothly – they’ll shine with a unique and captivating style.
However, most of you probably don’t know CSS. Luckily, I have compiled all the resources for CSS that you can apply on your website that the Divi theme does not yet offer.
I tried to cover as many queries as possible. If I missed any, just do a quick Google search for ready-made CSS codes. They’ll do the job.

To input CSS, exit the visual builder and navigate to the Theme Customizer on the WordPress toolbar at the top of your screen.

Next, select Additional CSS on the left panel.

Enter the copied code on the left CSS window. Copy the code. In my case, it will be “pa-inline-buttons”. Hit Publish.

Go to the Divi Visual Builder again. Open the element’s (CTA buttons in my case) toolbar, and paste the assigned code in the CSS Class field.
Section dividers
Ready to add a splash of creativity to your pages? Let me introduce you to the world of Section Dividers in Divi. These nifty tools let you inject fun patterns and unique separators into your page layouts with ease.

Head over to the toolbar of any section and play around with a variety of borders and shadows to craft that perfect, eye-catching look.

Craving a touch of animation? The Divi theme has you covered. Use its built-in Custom CSS Inputs, compatible with the CSS Grid, to breathe life into your page with animations. They’re also great for fine-tuning your Column Layouts.
And don’t worry if you’re not a CSS wizard. A simple Google search can lead you to a trove of ready-to-use CSS codes. Just copy, paste, and watch your design come alive!
Divi global sections
Divi’s global sections are a game-changer for maintaining consistency across your website. These are rows, modules, or sections that, once created, appear uniformly on any page they’re added to.
The beauty lies in their interconnectedness. Any change you make in one global section automatically updates across all other pages where it’s used.

Adding a global section is straightforward. Simply hover over the desired section and click the icon shown in the picture above. Remember to give your section a distinct name to avoid confusion with others.
Enhanced features in Divi Theme
Divi also has other unique and additional features that will boost workflow, improve ranking on Google, and help market your product through Email and Affiliate marketing.
Streamlining workflow with Divi AI
In my journey with Divi, particularly with the Divi Pro plan, I’ve unlocked the potential of Divi AI. This tool is revolutionary—it’s like having a digital assistant that streamlines content creation.
It’s not just about crafting words; Divi AI also assists in code development and image creation. What’s more fascinating is its ability to learn from your site’s data, crafting content that resonates with your audience.
SEO optimization and email list building
Divi also helps in SEO optimization. How does it work? With WordPress plugins such as RankMath, Divi becomes SEO-friendly. This combination furnishes features like Dynamic Module Framework and Dynamic CSS, boosting your Google PageSpeed scores.
In addition to this, another bonus of using Divi is email list building. A major part of growing an online business is having targeted subscriptions. The beauty of the Divi Email Optin module lies here.
The module provides appealing signup forms and integration with the top 21 popular email software companies, making it easy to grow your business.
Final Words
The Divi Theme is not like any other WordPress theme. It’s a full-scale web design platform designed for ease and functionality. The visual editor enables you to craft your website without coding or technical skills.
I’d choose Divi over other WordPress themes any day for its continually updated features and its intuitive, user-friendly interface.
Try the Divi Visual Builder and share your experience in the comments below. If you have any questions, feel free to reach out on my Instagram.


Developer
Hi, Do you have any detailed paid course from where I can learn Affiliate Marketing in detail ?
Developer
Hey Ferdy, when I download your templates for Elementor Pro then try to insert it into theme builder it says invalid data. What can I do about it ?
Developer
Hey Jerome, Elementor is in transition from the section builder to the container builder. It is not possible to insert sections into the container builder. This week I will update all templates and make them section-ready!