

NitroPack Review 2024: Is it Worth the Hype? (Real Test Data)
I came across the NitroPack plugin when I was searching for ways to improve the performance and speed of my WordPress website. However, the tool, although effective, raised multiple questions about its legitimacy, functions, price, and more.
NitroPack plugin significantly boosts WordPress website speed and performance, confirmed by Google PageSpeed Insights analysis, without employing black hat SEO tactics. It optimizes via CDN use, image conversion, and script minimization, enhancing site access and efficiency globally.
Today, let’s discuss how the NitroPack plugin optimizes websites and the features that make it an outstanding choice.
Is NitroPack legit?
After implementing NitroPack on various websites, ranging from image-heavy sites to online stores, I conducted a thorough analysis using the Google PageSpeed Insights Tool. The comparative results observed before and after applying NitroPack were remarkably impressive.
However, some WordPress users have expressed concerns about NitroPack possibly employing black hat SEO tactics to enhance page speed.
Ferdy’s Fundamentals – What is black hat SEO?
Black hat SEO is the process of adding illegitimate strategies and manipulating search engines to rank higher in the SERPs.
Judging from the extraordinary results, their doubts about the tool’s legitimacy are not unwarranted!
Having said that, I put on my detective glasses and started digging deep for some information. And I can confidently conclude that Nitropack is not cheating the system.
Firstly, I observed no change in my site’s visitor volume, ranking, and performance after implementing the NitroPack plugin.
Secondly, NitroPack is one of the most reliable site speed optimization plugins endorsed by Google, As seen in the photo below, in their Core Vitals Technology report, Google ranks the plugin as one of the best tools for site speed optimization.

Delving deeper into NitroPack’s collaboration with Google, it’s not just about ranking on the Core Vitals Technology report. Google actively collaborates with NitroPack, hosting webinars and insightful events aimed at enhancing page speeds and improving INP (Interactivity to Next Paint).
It’s a symbiotic relationship pushing the boundaries of site speed optimization. This partnership is a testament to NitroPack’s commitment to playing by the rules while innovating.
How does NitroPack work?
Now that I have confirmed the legitimacy of the NitroPack plugin, let’s look at how NitroPack works and the features that make it a trustworthy resource for webmasters. And that, too, without compromising the functionality of your website.
Look, NitroPack isn’t just your average site speed optimization plugin. It compresses your website and hosts it on a Content Delivery Network (CDN) so it’s quickly accessible to a global audience, regardless of their geographical location.
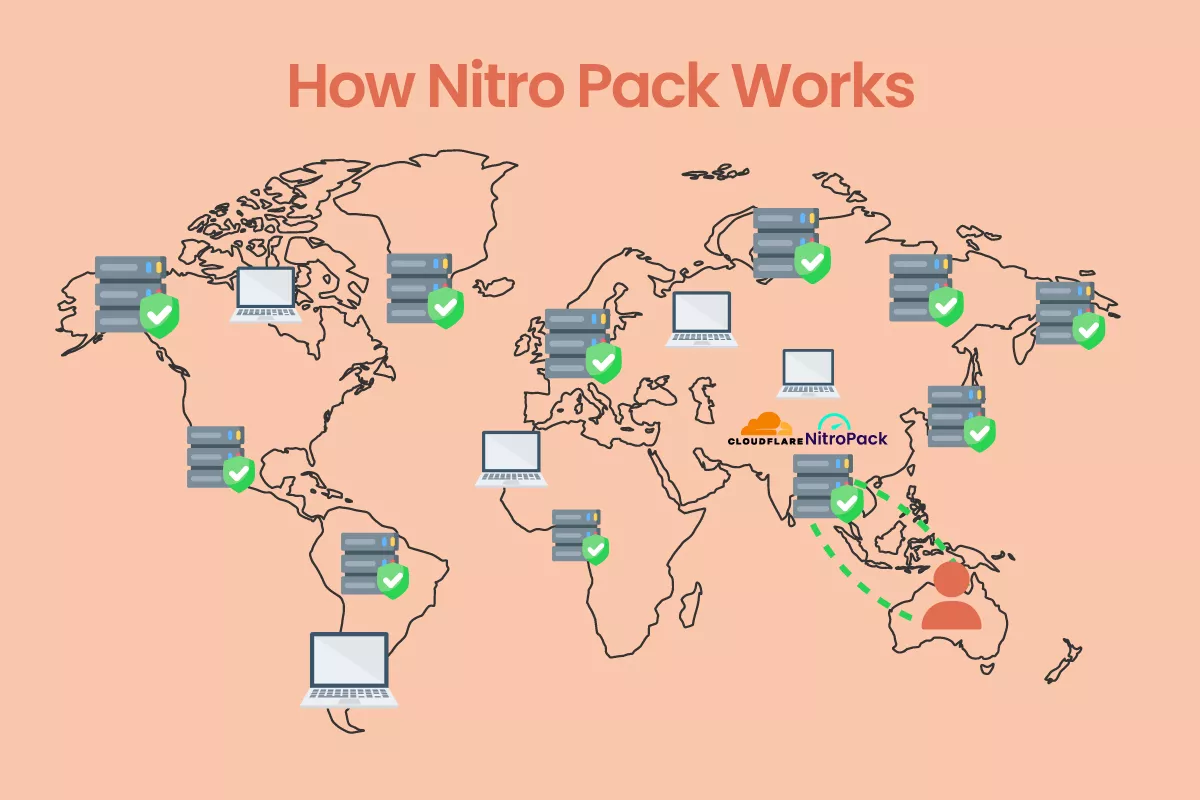
For instance, consider a visitor from Australia accessing your website. With NitroPack, they won’t need to establish a connection to a distant server in America. Instead, NitroPack smartly directs them to the nearest CDN server located in Australia.
This is because NitroPack has strategically distributed your website across global servers, ensuring faster and more efficient access for visitors, no matter where they are.
They use CloudFlare CDN, which, combined with NitroPack, gives your WordPress website a significant speed boost.
Ferdy’s Fundamentals – What is a CDN?
A CDN places your website on multiple servers around the world. The webpage is then delivered to the visitor from a server location closest to their physical location, thus, boosting the page load speed.
NitroPack’s site speed optimization features
Let’s not forget the other tricks up NitroPack’s sleeve. It’s a powerhouse, optimizing your website through advanced optimization techniques, including:
- Lazy loading: It loads images only when they are visible on the screen, reducing initial load time. It’s like NitroPack knows exactly when to show an image, keeping your pages light and speedy.
- Automatic PNG to WebP image conversion: The latest image format type, WebP compresses images more efficiently than the standard PNG and JPEG. NitroPack converts images to WebP automatically. It’s about getting the best quality at the smallest size – a real win-win.
- Unused CSS and Javascript removal: NitroPack’s meticulous removal of unused CSS and JavaScript is like a spring clean for your website, ensuring everything runs smoothly and swiftly.
Pro tip: Despite being an excellent tool, it is recommended that you check the functions on your website after installing the NitroPack plugin to ensure everything is working as you require.
I went through my website and rechecked all the buttons to verify there was no glitch. If you find any trouble with your website, you can change the ‘Optimization Mode’ from your WordPress admin dashboard.
The NitroPack plugin lets you choose between five Optimization Modes:
- Standard
- Medium
- Strong
- Ludicrous
- Manual
It’s crucial to remember that while Ludicrous mode is a speed demon, it might not play well with websites heavy on JavaScript. In such cases, I recommend switching to the Strong optimization mode as it’s better suited.
It’s all about finding that sweet spot where speed meets functionality. Always remember, after tweaking the settings, hit that ‘Purge Cache’ button to let NitroPack work its magic on the new configurations.
Experimenting with NitroPack’s free plan
I started out experimenting with NitroPack using their free plan.
With the free plan, I received the plugin support for:
- 3 websites
- Up to 5,000 page views
- 1 GB CDN Bandwidth
I experimented with three websites on my free plan.
Test #1: Light-weight WordPress website
The first website is my main Ferdykorpershoek.com page. Before integrating with NitroPack, my website had poor performance and a ‘laggy’ load speed.
However, the change was evident on the Google PageSpeed Insights report after I connected my website with the NitroPack plugin.
| Speed Factors (Mobile) for ferdykorpershoek.com | Site Performance Before Installing NitroPack | Site Performance After Installing NitroPack |
| Performance | 69 | 99 |
| Accessibility | 96 | 96 |
| Best Practices | 73 | 100 |
| SEO | 93 | 93 |
| First Contentful Paint (FCP) | 3.0s | 1.1s |
| Largest Contentful Paint (LCP) | 6.5s | 1.9s |
| Speed Index | 4.6s | 1.1s |
Just like me, you must also be surprised with the results! And again, all this is happening without employing any illegitimate tactics.
The first website I experimented with contained simple pages and few images or JavaScript. It also runs on the WordPress editor Guttenberg, which is already very lightweight.
Therefore, I decided to dive deeper and connect a heavier website to the free version of NitroPack.
Test #2: Heavier WordPress website
For the second test, I chose divi5.com, a heavier website loaded with JavaScript. To accurately assess NitroPack’s impact, I deactivated all other plugins.
Here’s a quick breakdown of the before and after results:
| Speed Factors (Mobile) for divi5.com | Site Performance Before Installing NitroPack | Site Performance After Installing NitroPack |
| Performance | 39 | 100 |
| Accessibility | 70 | 100 |
| Best Practices | 100 | 100 |
| SEO | 91 | 92 |
| First Contentful Paint (FCP) | 3.2s | 1.0s |
| Largest Contentful Paint (LCP) | 7.9s | 1.7s |
| Speed Index | 5.9s | 1.0s |
As you can see from the table above, the results are extraordinary! And remember, my website doesn’t have any WordPress optimization plugins connected except for NitroPack.
Okay, so NitroPack passed this test as well. What about online stores and eCommerce websites? Can NitroPack handle that? Let’s find out.
Test #3: eCommerce Website
Let’s explore further by testing Nitropack’s performance on an eCommerce website. For this test, I chose my online store, gameconsolez.com. This site is powered by WordPress and WooCommerce.
It’s worth mentioning here that this website contains a lot of image data and complex eCommerce functionalities that primarily affect the website’s loading speed.
However, the before and after results with the NitroPack plugin are simply unbelievable.
| Speed Factors (Mobile) for gameconsolez.com | Site Performance Before Installing NitroPack | Site Performance After Installing NitroPack |
| Performance | 62 | 90 |
| Accessibility | 89 | 100 |
| Best Practices | 100 | 100 |
| SEO | 93 | 93 |
| First Contentful Paint (FCP) | 4.0 | 1.2s |
| Largest Contentful Paint (LCP) | 8.7s | 2.4s |
| Speed Index | 5.5s | 3.0s |
The beauty of NitroPack is its versatility. It’s not just about speeding up simple sites; it handles complex e-commerce sites with ease too. My experimentation with gameconsolez.com, powered by WordPress and WooCommerce, is a case in point.
This site, laden with heavy images and functions, saw dramatic improvements in speed metrics post-NitroPack. It’s compelling evidence that NitroPack can handle diverse website types without breaking a sweat.
After this final test, I can finally say that the NitroPack WordPress plugin is not only safe but also effective for all types of websites.
The plugin improved every aspect of the website’s performance without making any changes to the existing layout – leaving me to worry only about the SEO (haha!).
Should you upgrade to the premium plan?
If you’re a new website owner or your website receives less than 5,000 visitors per month, the free plan is a great choice.
However, for sites with heavier traffic and greater bandwidth needs, a premium plan becomes necessary.
But what exactly sets apart the free version from the paid ones?
Well, there’s more to it than meets the eye!

In the free version, as shown in the image above, a discreet banner is displayed at the bottom of your webpage. This label signifies that NitroPack is enhancing your site’s optimization.
If you’re trying to establish a brand, having this banner on your site may give off an unprofessional look. Opting for any premium plan removes this tag, giving your site a cleaner look.
And of course, each premium plan comes with additional benefits and features, offering more robust capabilities tailored to your website’s growing needs.
How to upgrade to a NitroPack premium plan?
To upgrade to a premium plan, visit NitroPack and log in to your account (sign up if you’re a new user).
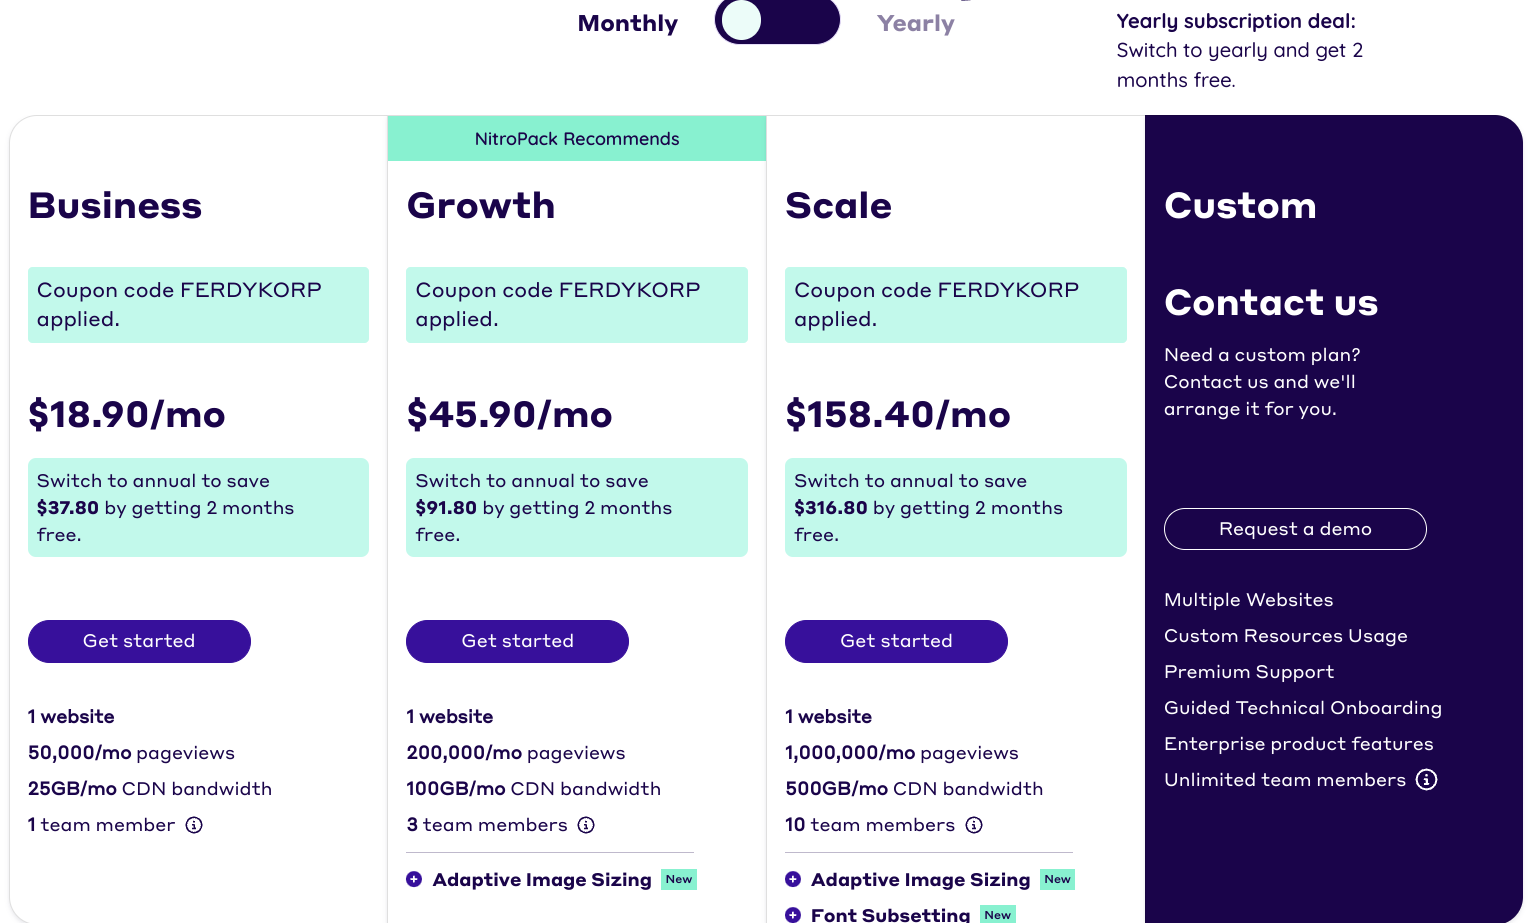
NitroPack currently offers three premium plans along with a custom plan. You can choose between them according to your website’s requirements. Don’t forget to use the free coupon code ‘FERDY’ at checkout and enjoy 10% OFF on your purchase.
Switching from the free to a premium plan, I noticed several benefits:
- Increased monthly page views limit.
- Enhanced bandwidth capabilities.
- Additional access for team members.
- Option to remove the NitroPack badge from your site.
For those with over 1,000,000 monthly page views, NitroPack also offers tailored plans. Contact their team for more information.
Besides these, the features that really stand out in NitroPack’s Growth and Scale plans are Adaptive Image Sizing and Font Subsetting.
- Adaptive Image Sizing: This feature smartly adjusts image files to suit the viewing device (mobile, desktop, tablet), optimizing pixel count without burdening your website.
- Font Subsetting: This removes all unused fonts and symbols from the WordPress site database so they don’t interrupt loading speed.
I chose the Business Plan for my website (ferdykorpershoek.com). To link it to NitroPack, I:
- Logged into my NitroPack account.
- Visited the Billing section to review available plans and their details.
- Selected the Free Plan, clicked on ‘Manage’, then ‘View Websites’, and chose the site for the upgrade.
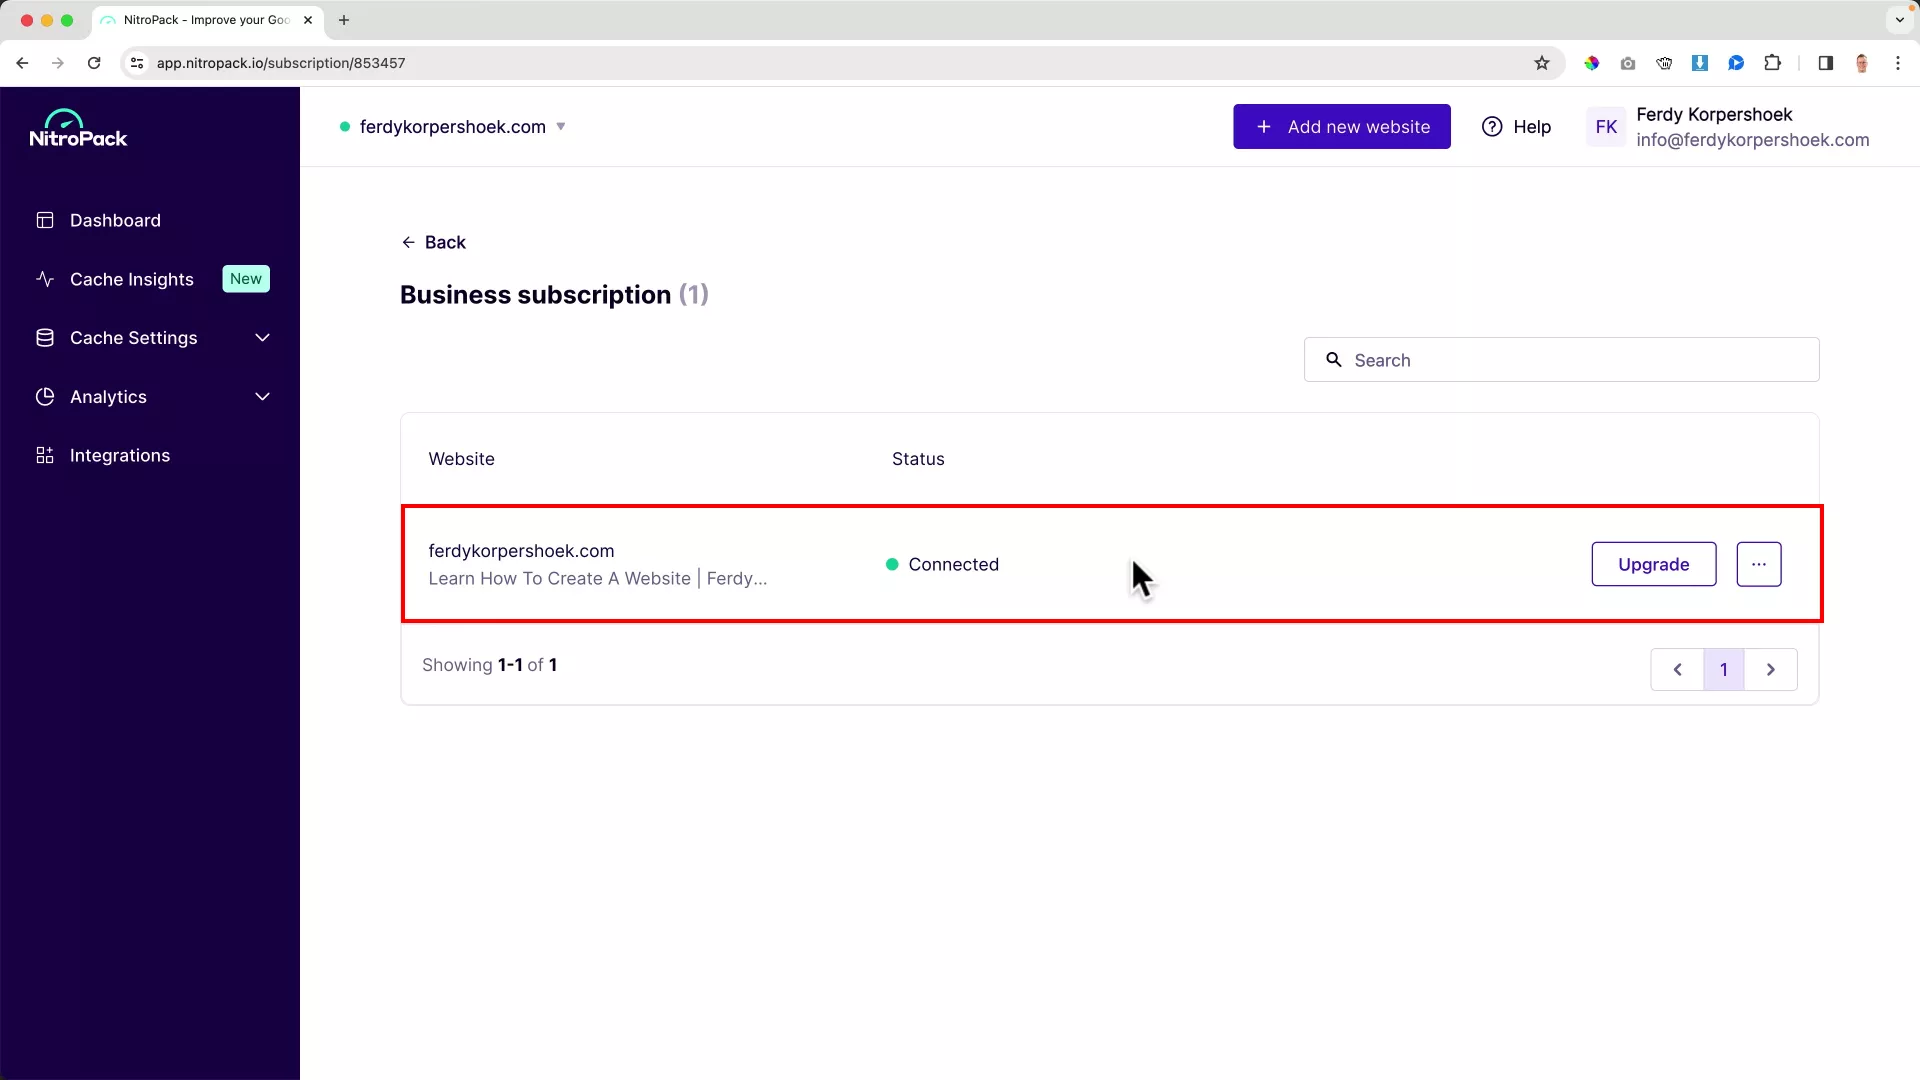
After these steps, my main website (ferdykorpershoek.com) was successfully connected to NitroPack’s Business Plan.
In the same way, you can connect more websites. But remember: NitroPack paid subscriptions are limited to one website for each plan. So for each additional site you want to connect to NitroPack, you must purchase a separate subscription.
Navigating NitroPack’s dashboard
Curious to see what NitroPack’s dashboard looks like, I took a deep dive into the NitroPack dashboard for my primary website. Let me walk you through some of the insights and features I discovered.
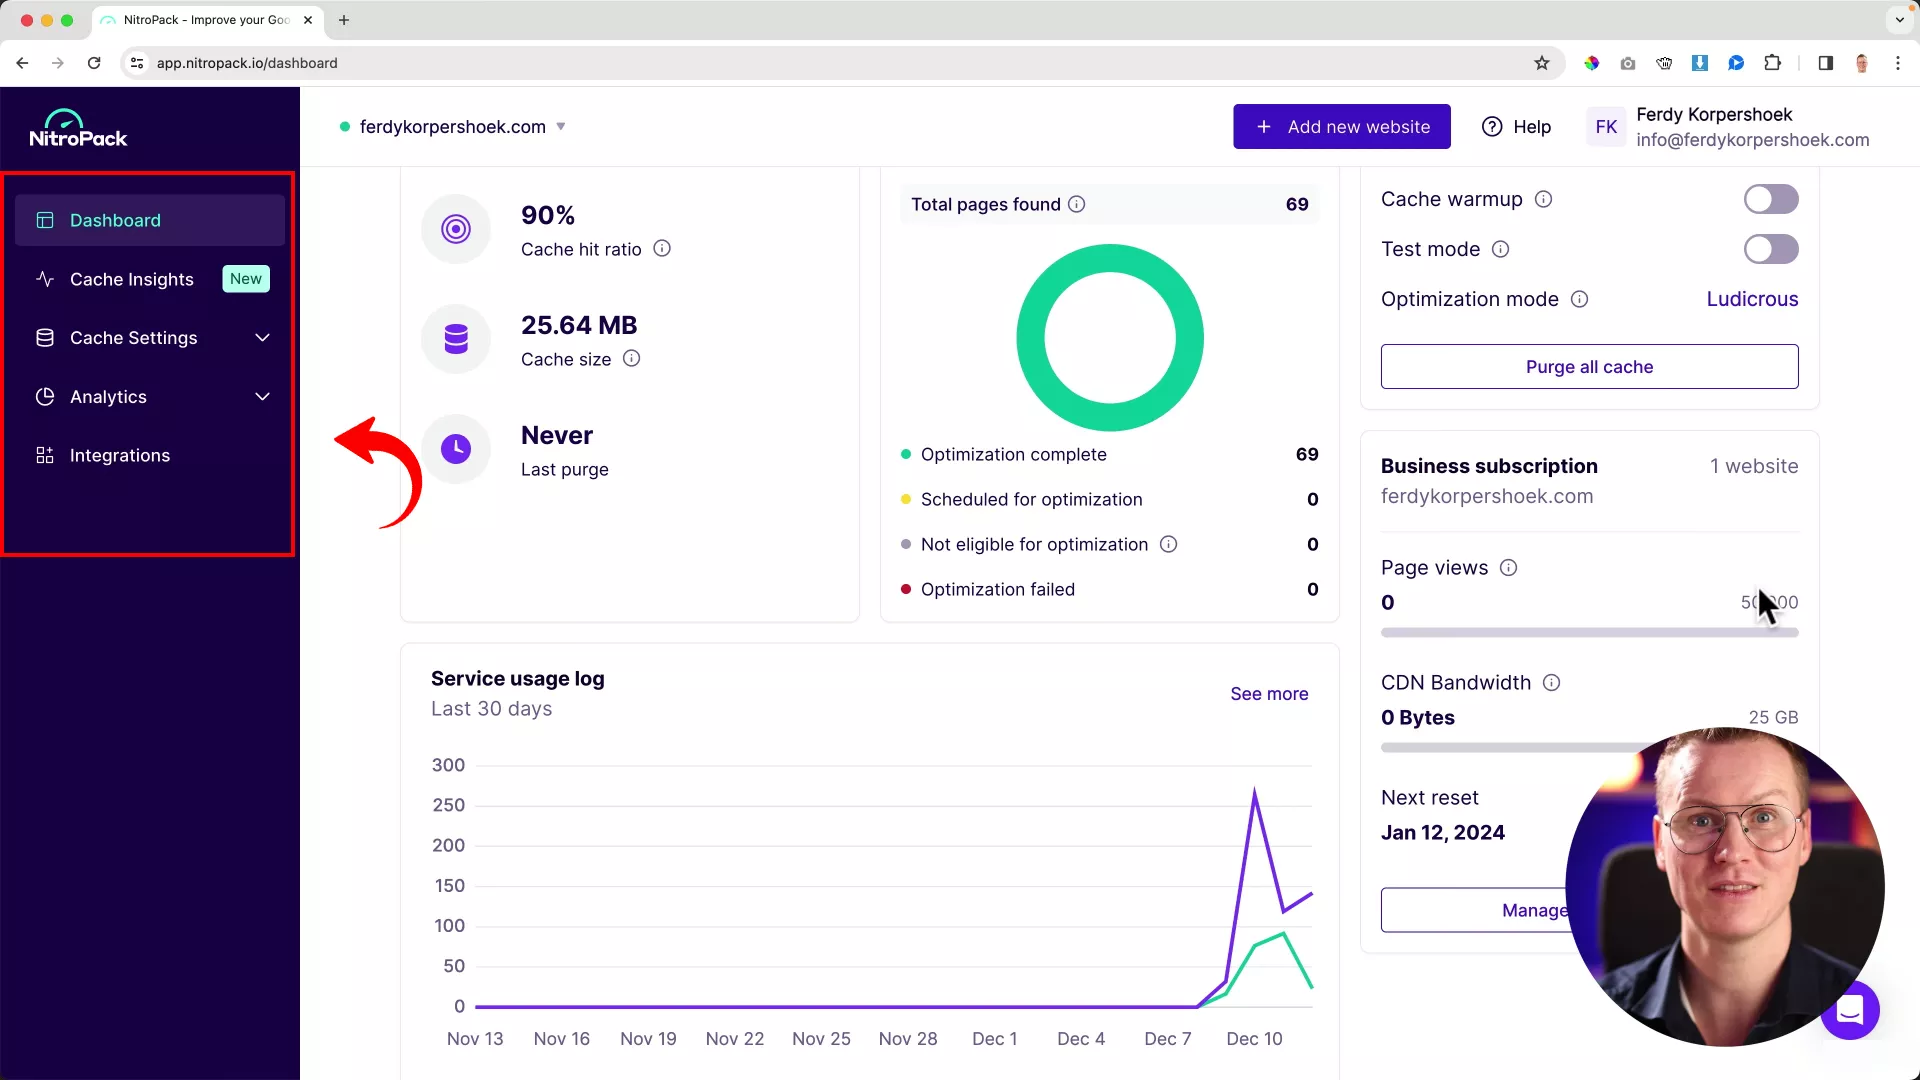
When you land on NitroPack’s main page, you’re greeted with tabs like Dashboard, Cache Insights, Cache Settings, Analytics, and Integration. I like how everything is laid out clearly.
Check out the image below. You’ll see my Dashboard displaying the Service Results for my site. It’s fascinating stuff!

Just a day ago, I purged my site, and now it’s sitting at a cache size of 25.88MB. That’s the total size of my website in HTML. Pretty impressive, right?
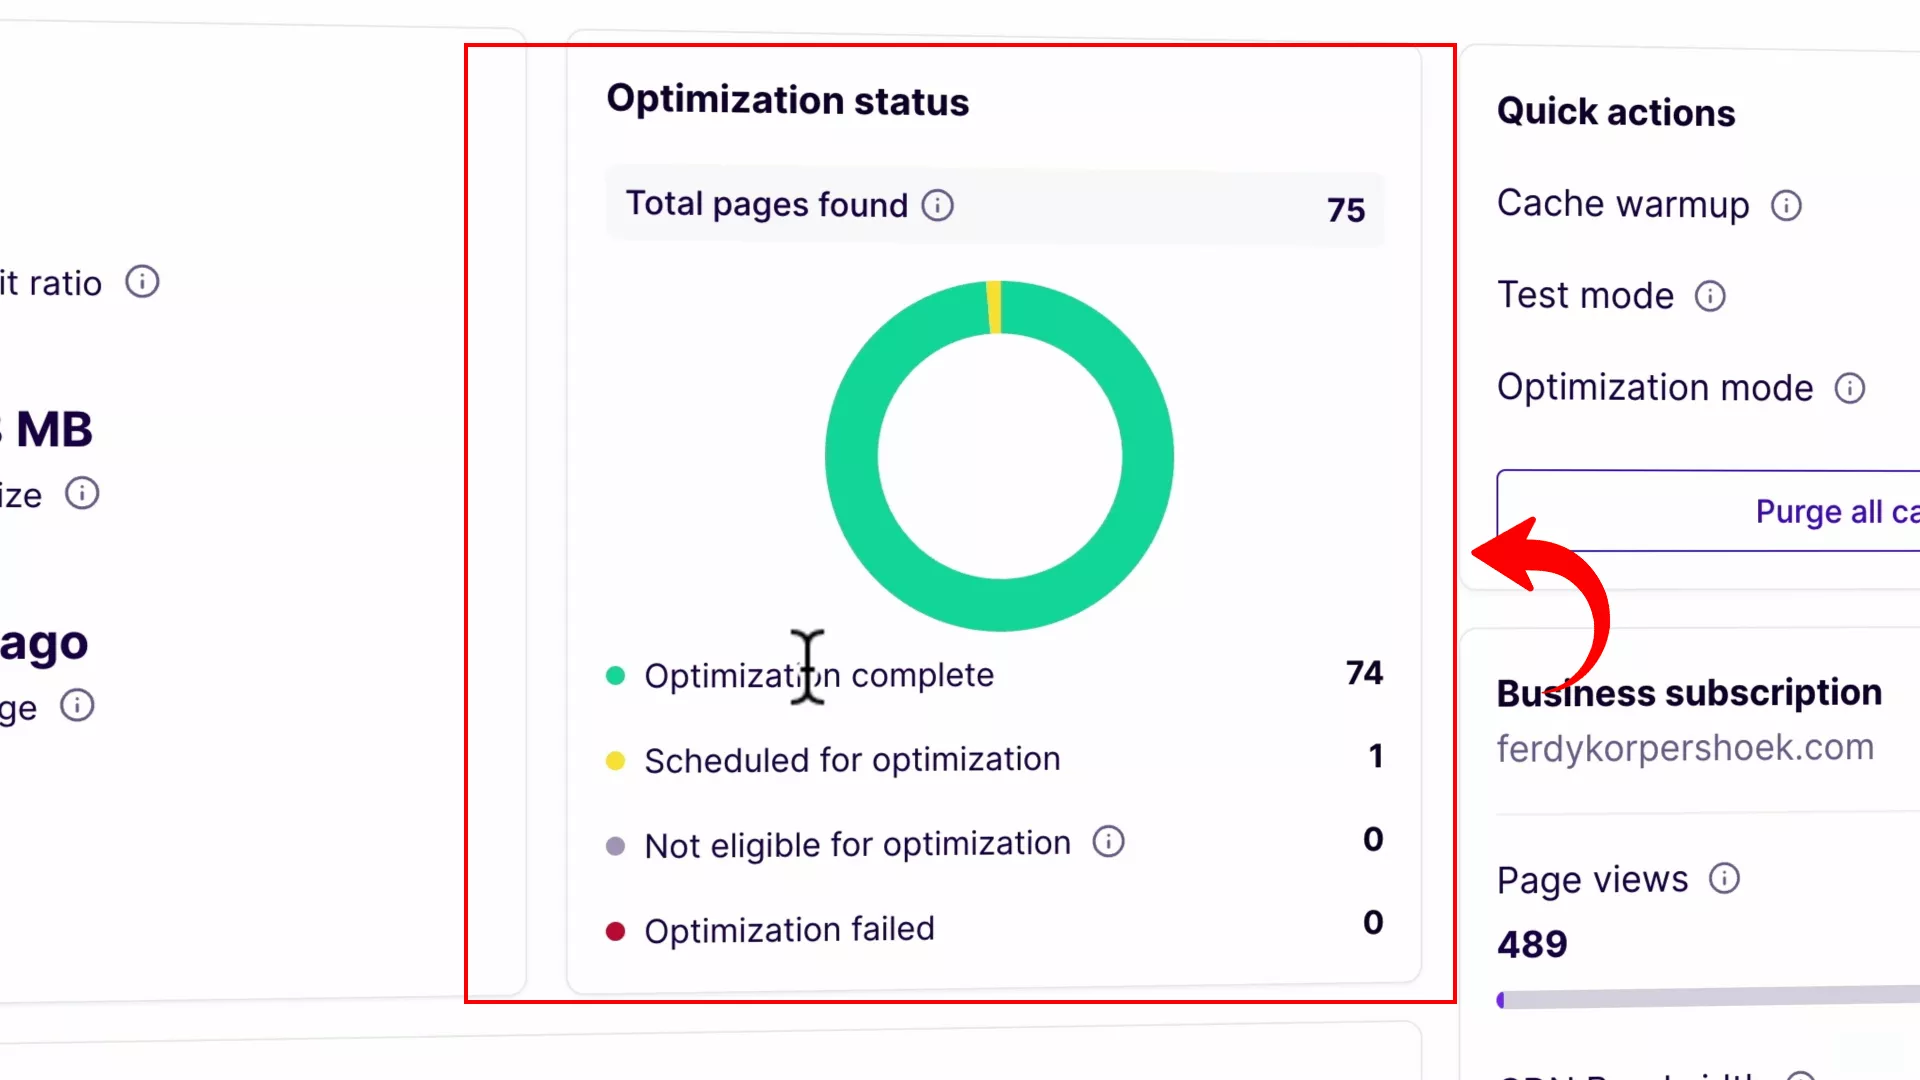
Under the Optimization Status tab, there’s a clear view of the total pages on my site, the ones NitroPack has optimized, and those in line for a makeover. I find this incredibly handy for keeping track of the optimization process.
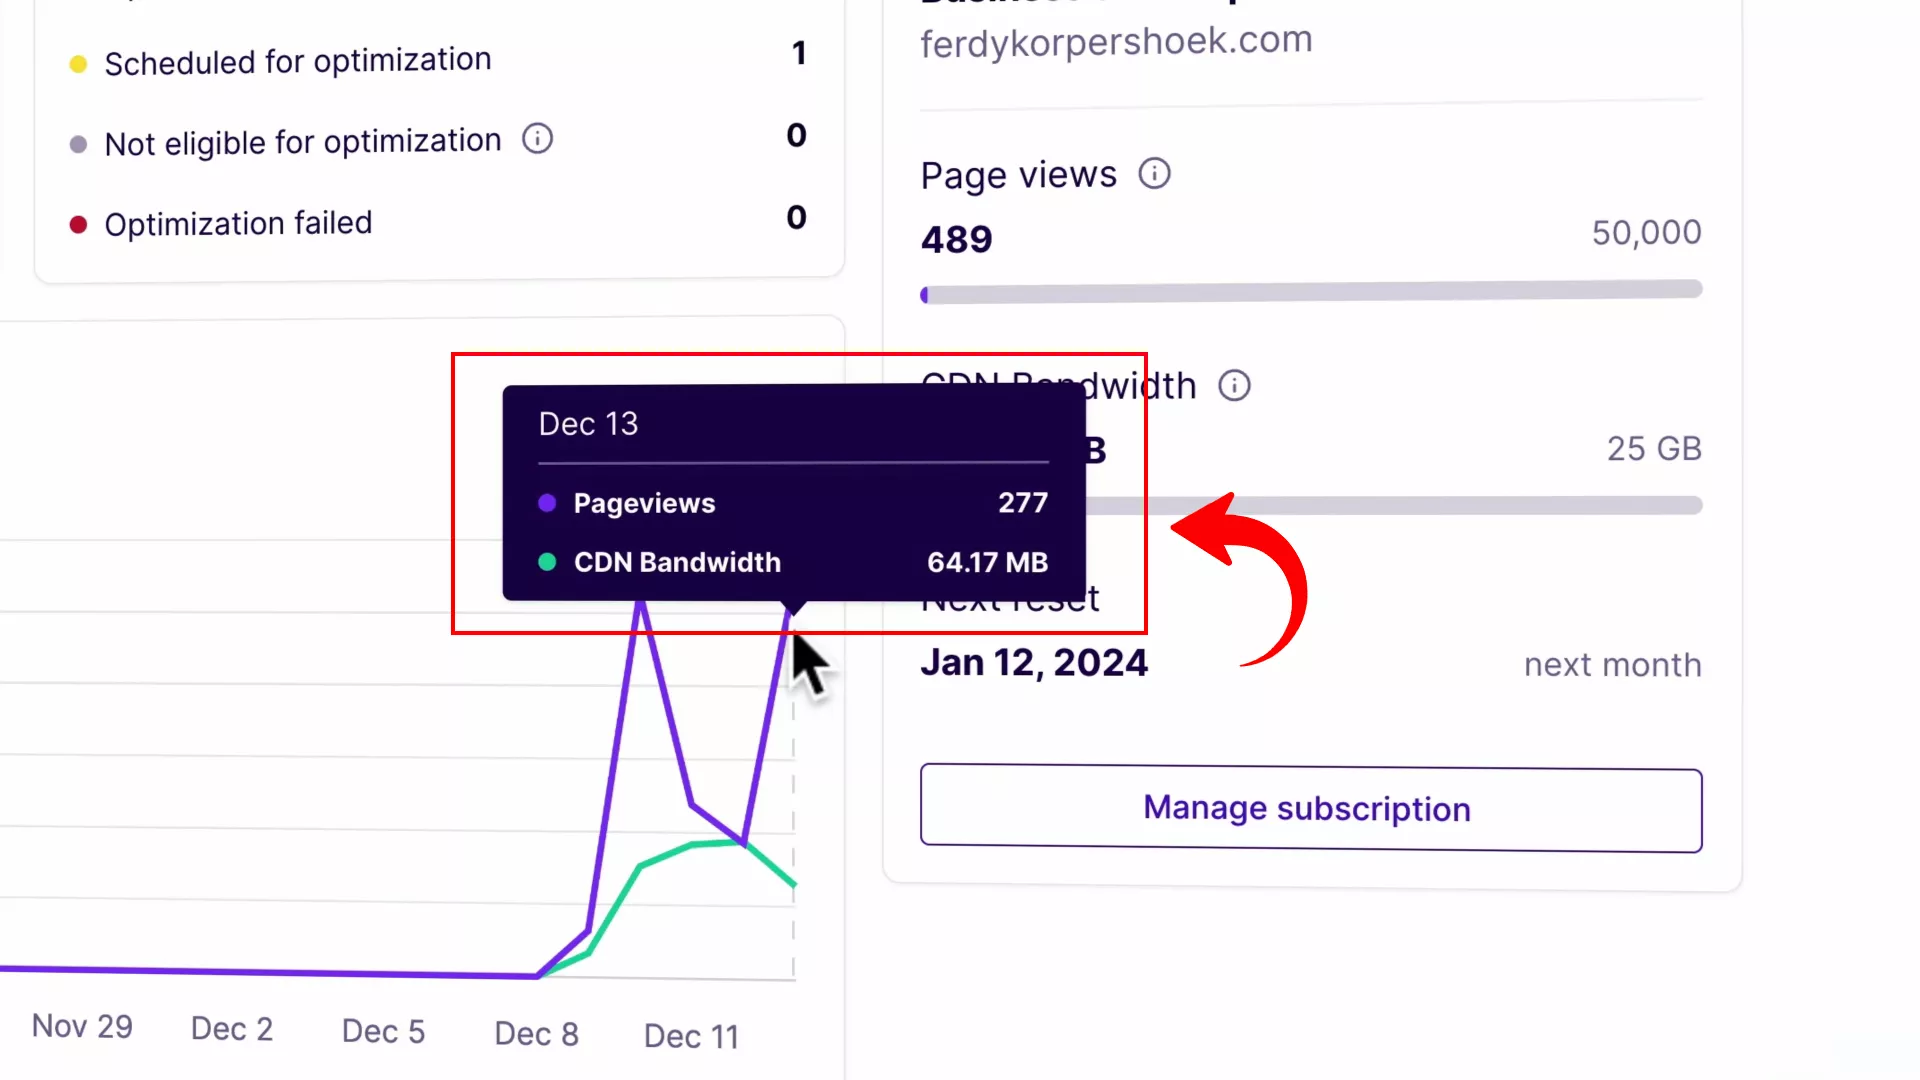
And here’s something essential for anyone on a free plan or just keeping an eye on usage – the same page shows metrics for page views and CDN bandwidth. It’s useful for monitoring how much of those resources you’re using.
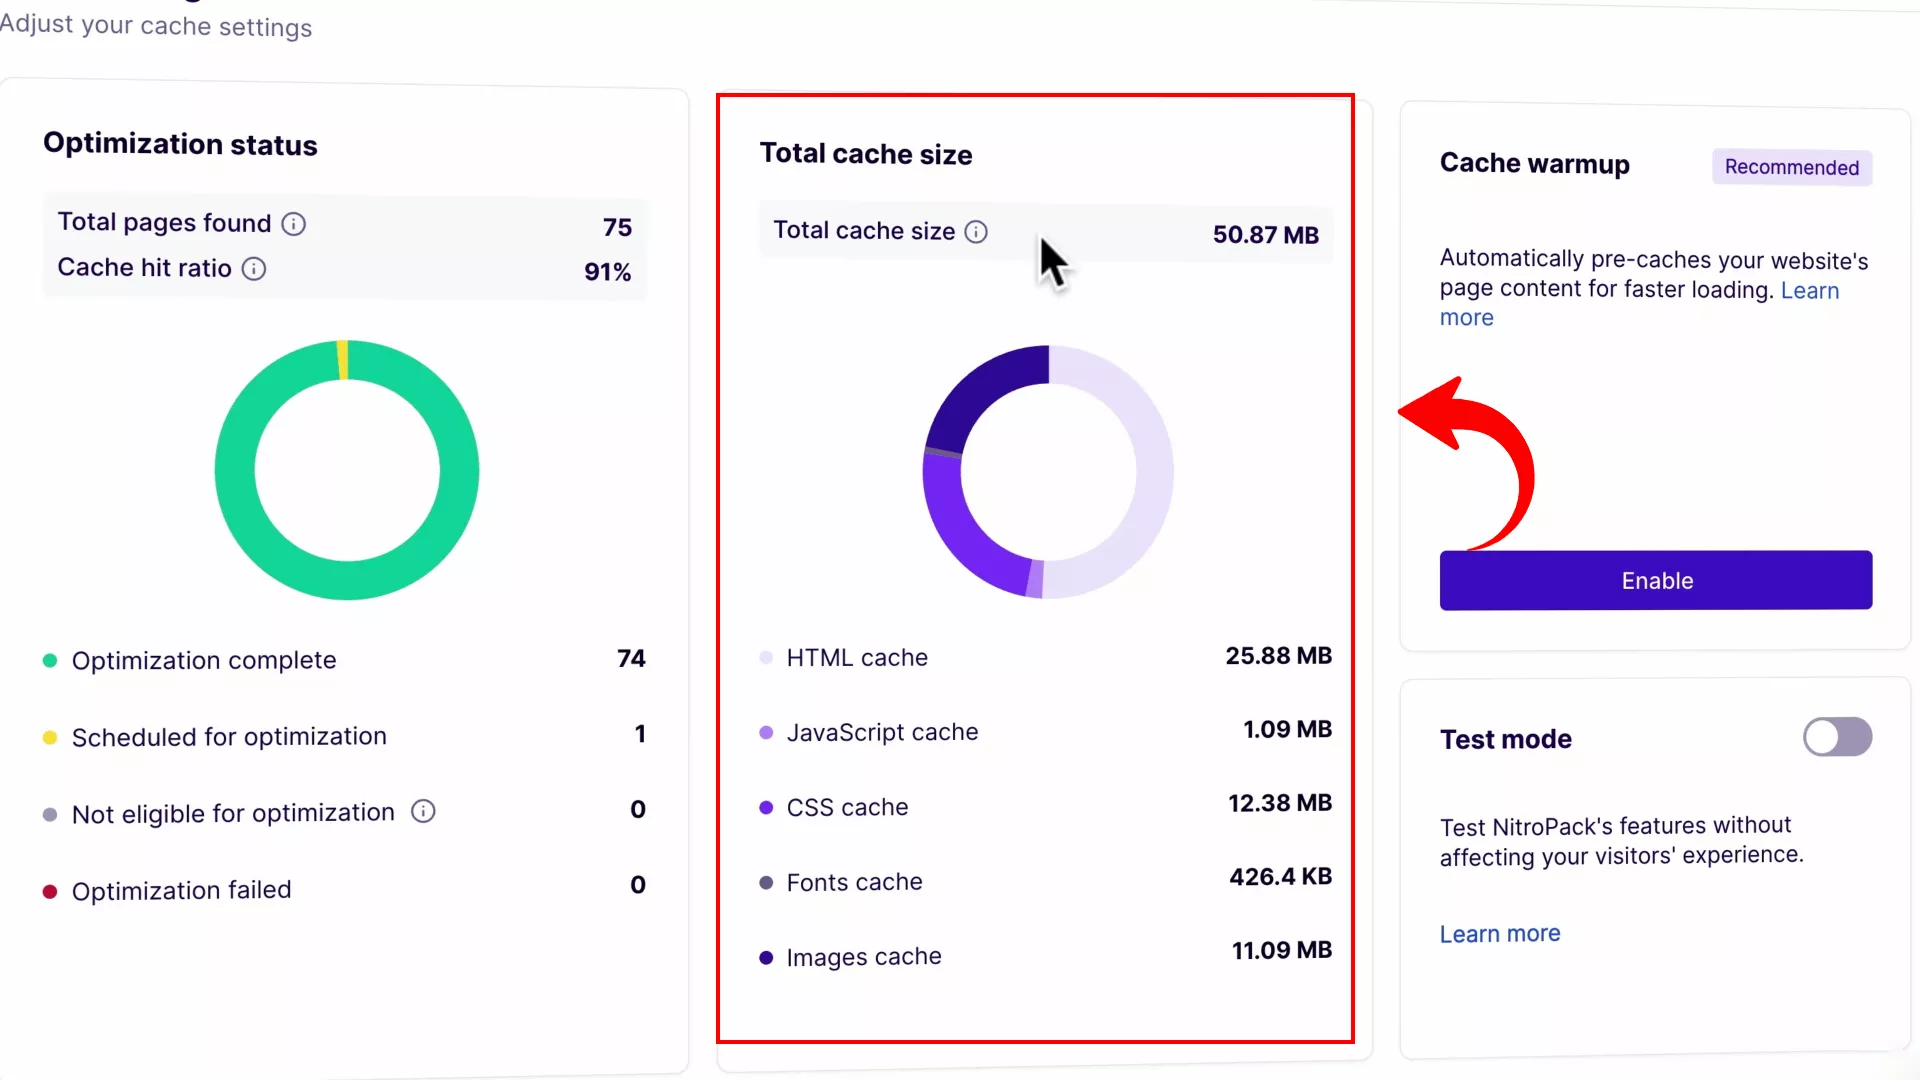
Now, onto the Cache Insights tab. This is where the magic happens! It shows the breakdown of cached pages on your site by NitroPack. We’re talking everything – HTML, JavaScript, CSS, fonts, images – all neatly cached by the plugin.

As I scrolled further, I stumbled upon a list of web pages NitroPack optimized, complete with their metrics. The best part? You can see how each page performs on Google PageSpeed Insights right from this dashboard.
It’s a game-changer for pinpointing pages that might still be lagging behind and figuring out how to boost their performance.
So, that’s a quick tour of what NitroPack’s Business plan brings to the table for my site. It’s like having a supercharged toolkit at your fingertips, making sure your website is not only running smoothly but also blazing fast!
Fine-tune your website’s performance with cache settings
Moving on from the dashboard, I clicked on the Cache Settings tab. Let me tell you, this is where NitroPack really flexes its muscles with some of the most critical settings for your site’s optimization.
Let’s talk about the Optimization Mode first. You might remember me mentioning the ‘Ludicrous’ mode earlier – that’s NitroPack’s default powerhouse setting.
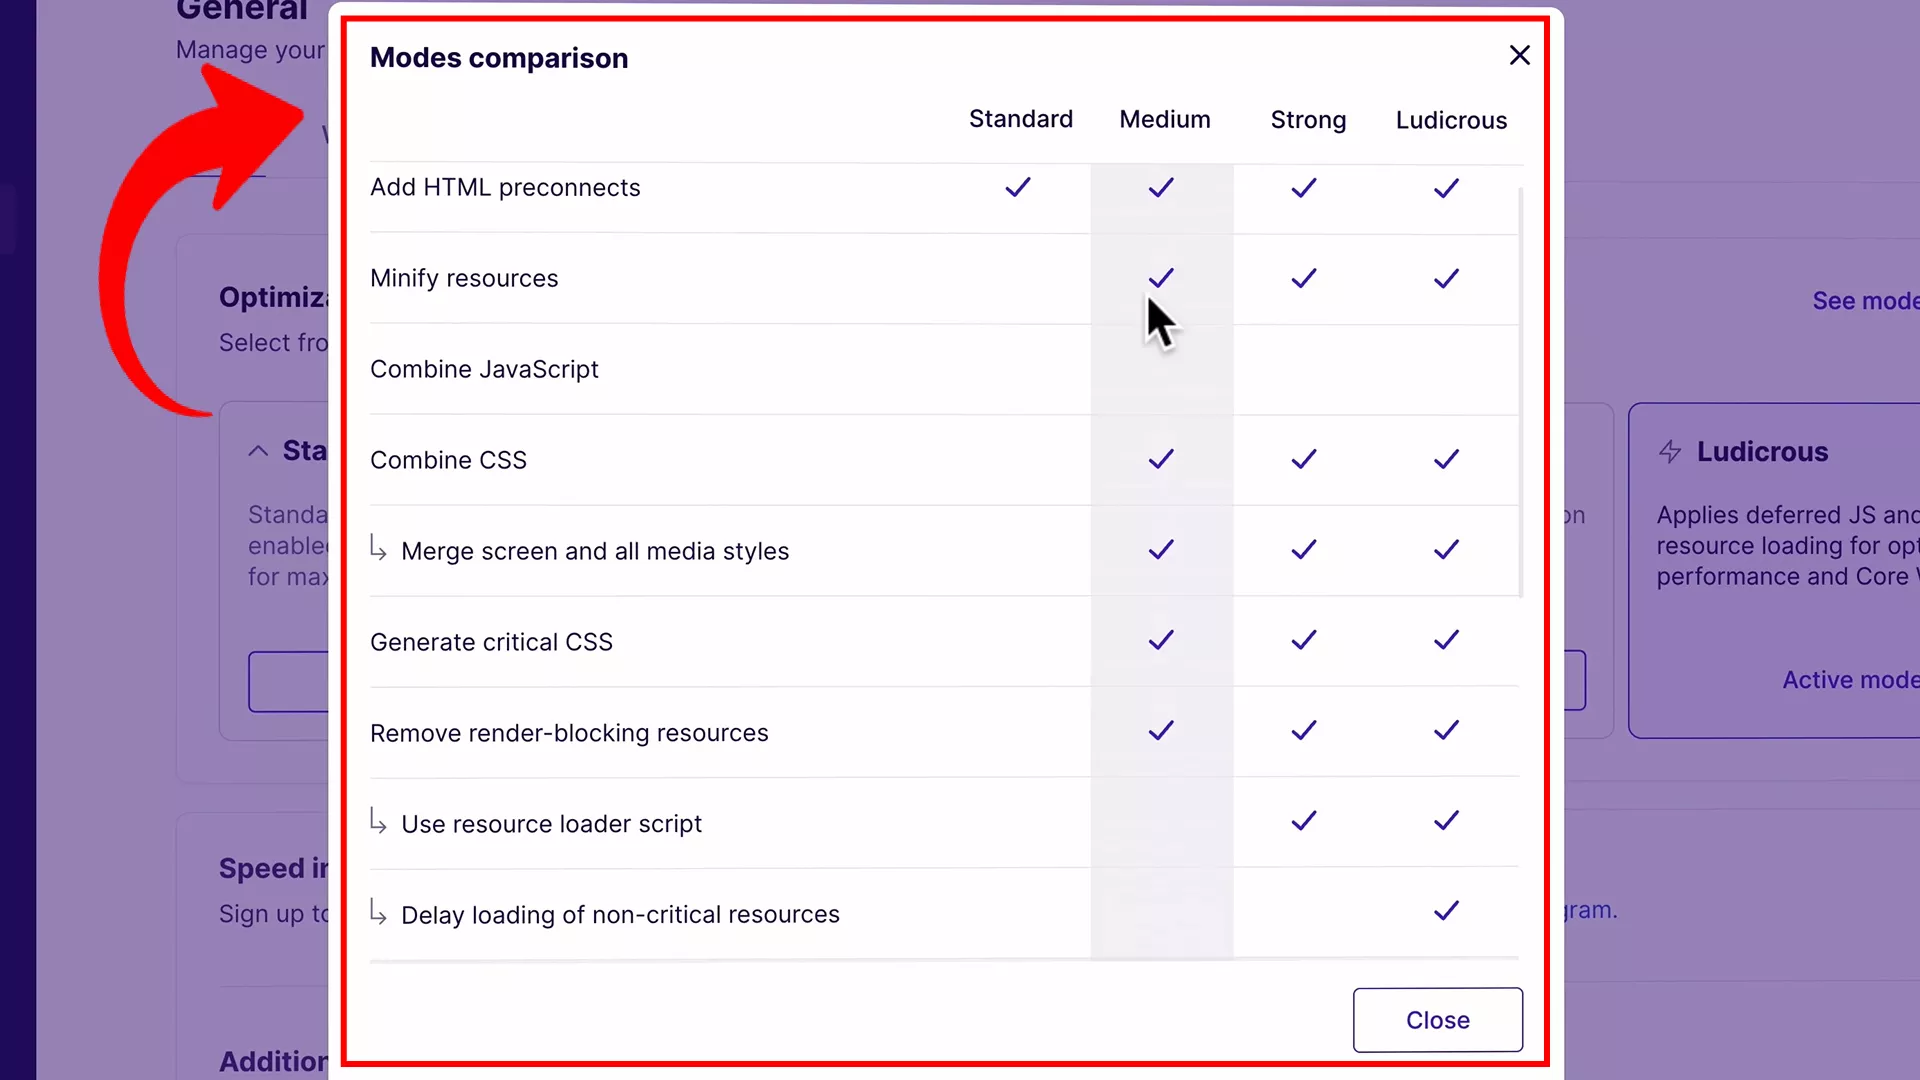
On their website, there’s a handy comparison of the different modes. From what I’ve seen, both Ludicrous and Strong modes are the real MVPs in NitroPack’s lineup.

But hey, customization is key! You can tweak these settings based on how your site performs. There’s a whole buffet of options in the drop-down bar, covering everything from images and JavaScript to fonts.
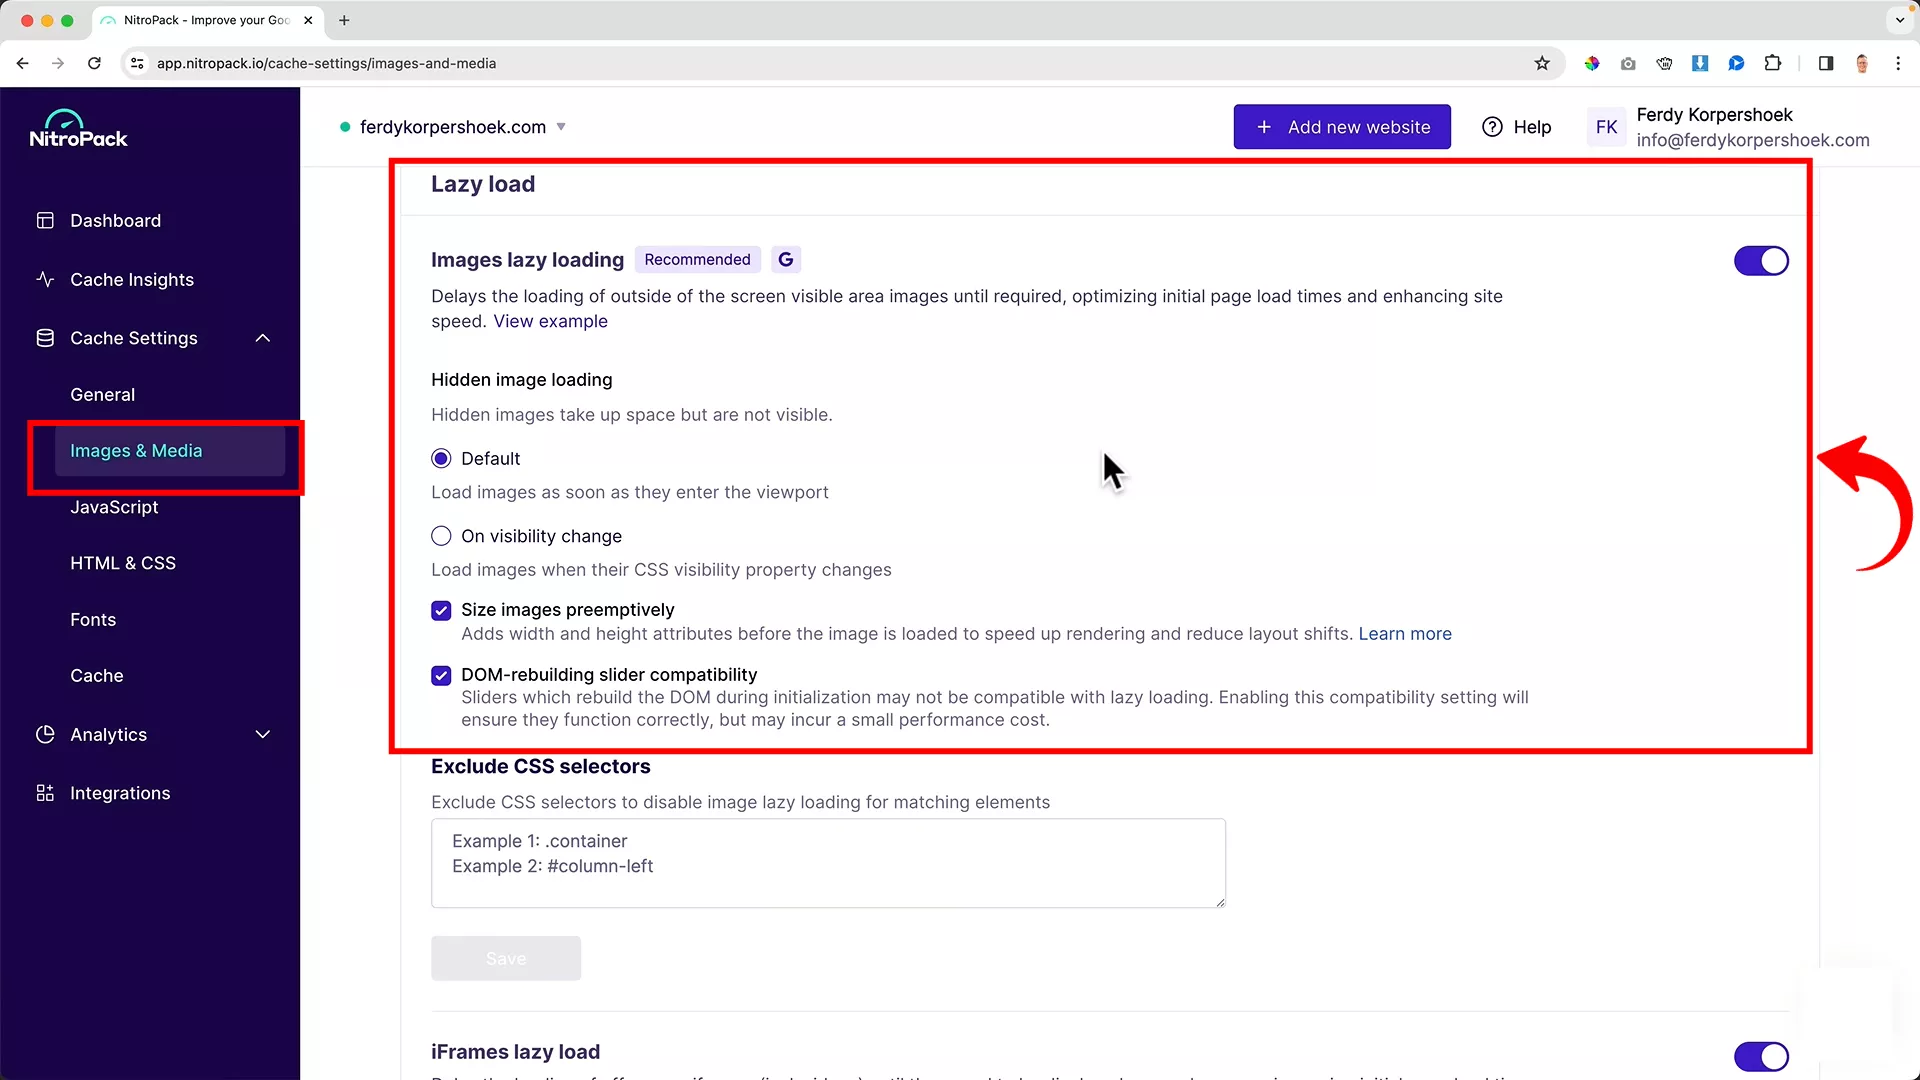
Take the Images tab, for example. It’s got powerful features like toggling lazy loading on or off, and other nifty tweaks to compress your images just right.
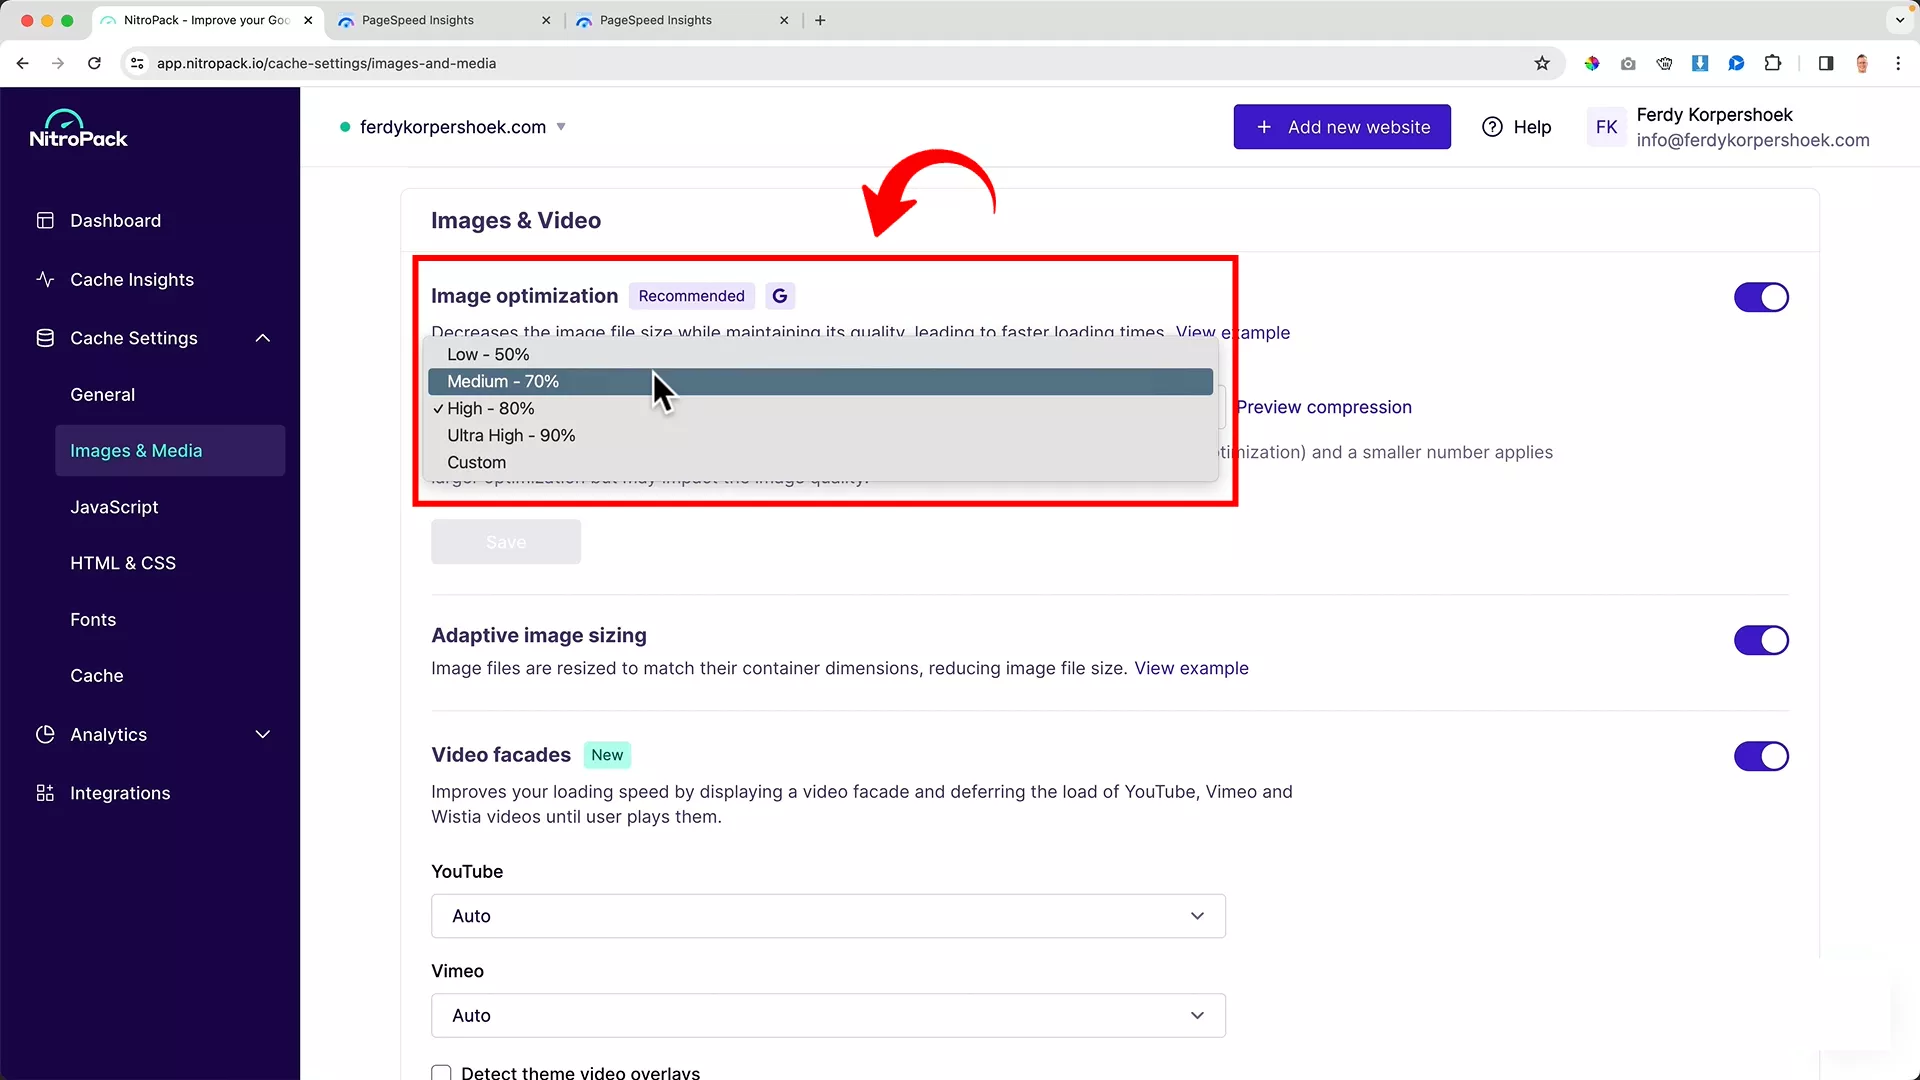
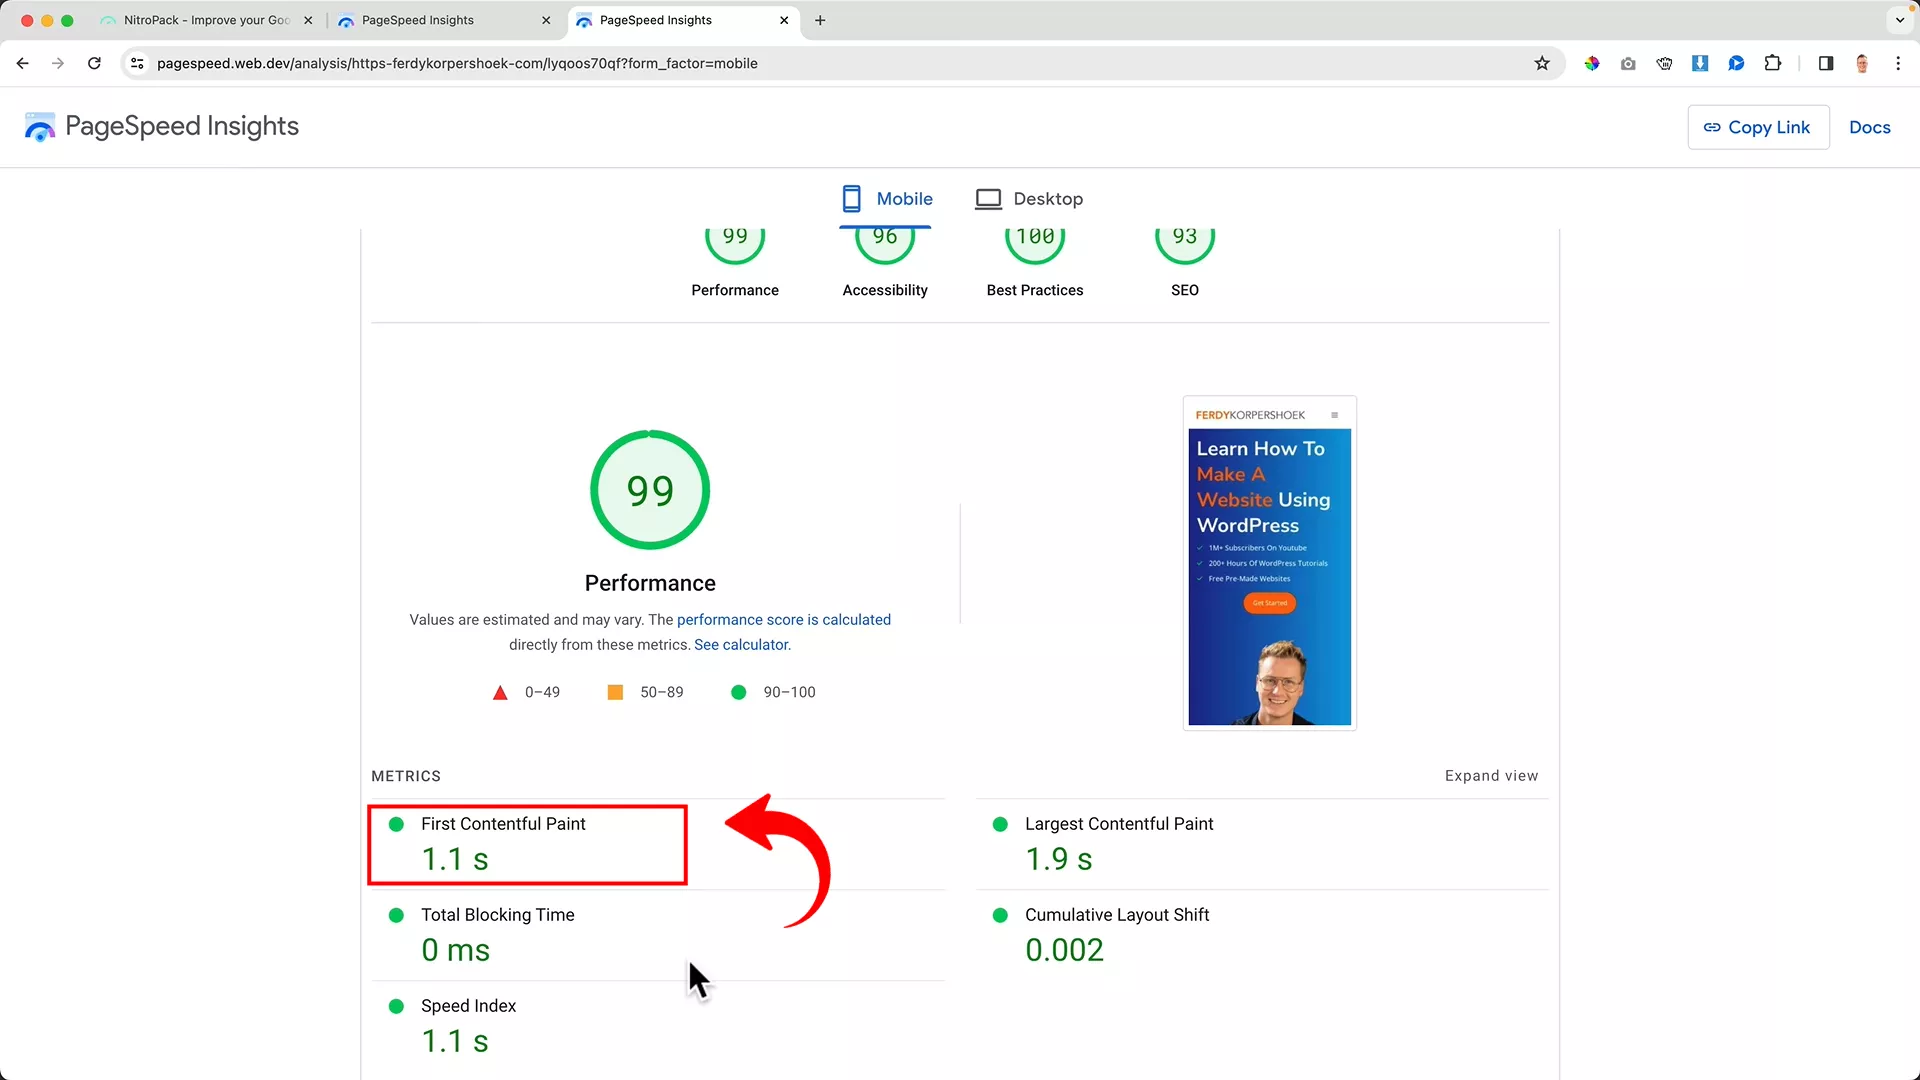
Now, I’m a curious soul, so I couldn’t resist playing around with the settings. I switched the Image Optimization from high to low, just to see what would happen.
As proof, I’m attaching the screenshot of the Google PageSpeed Insights report for my website prior to making this change:
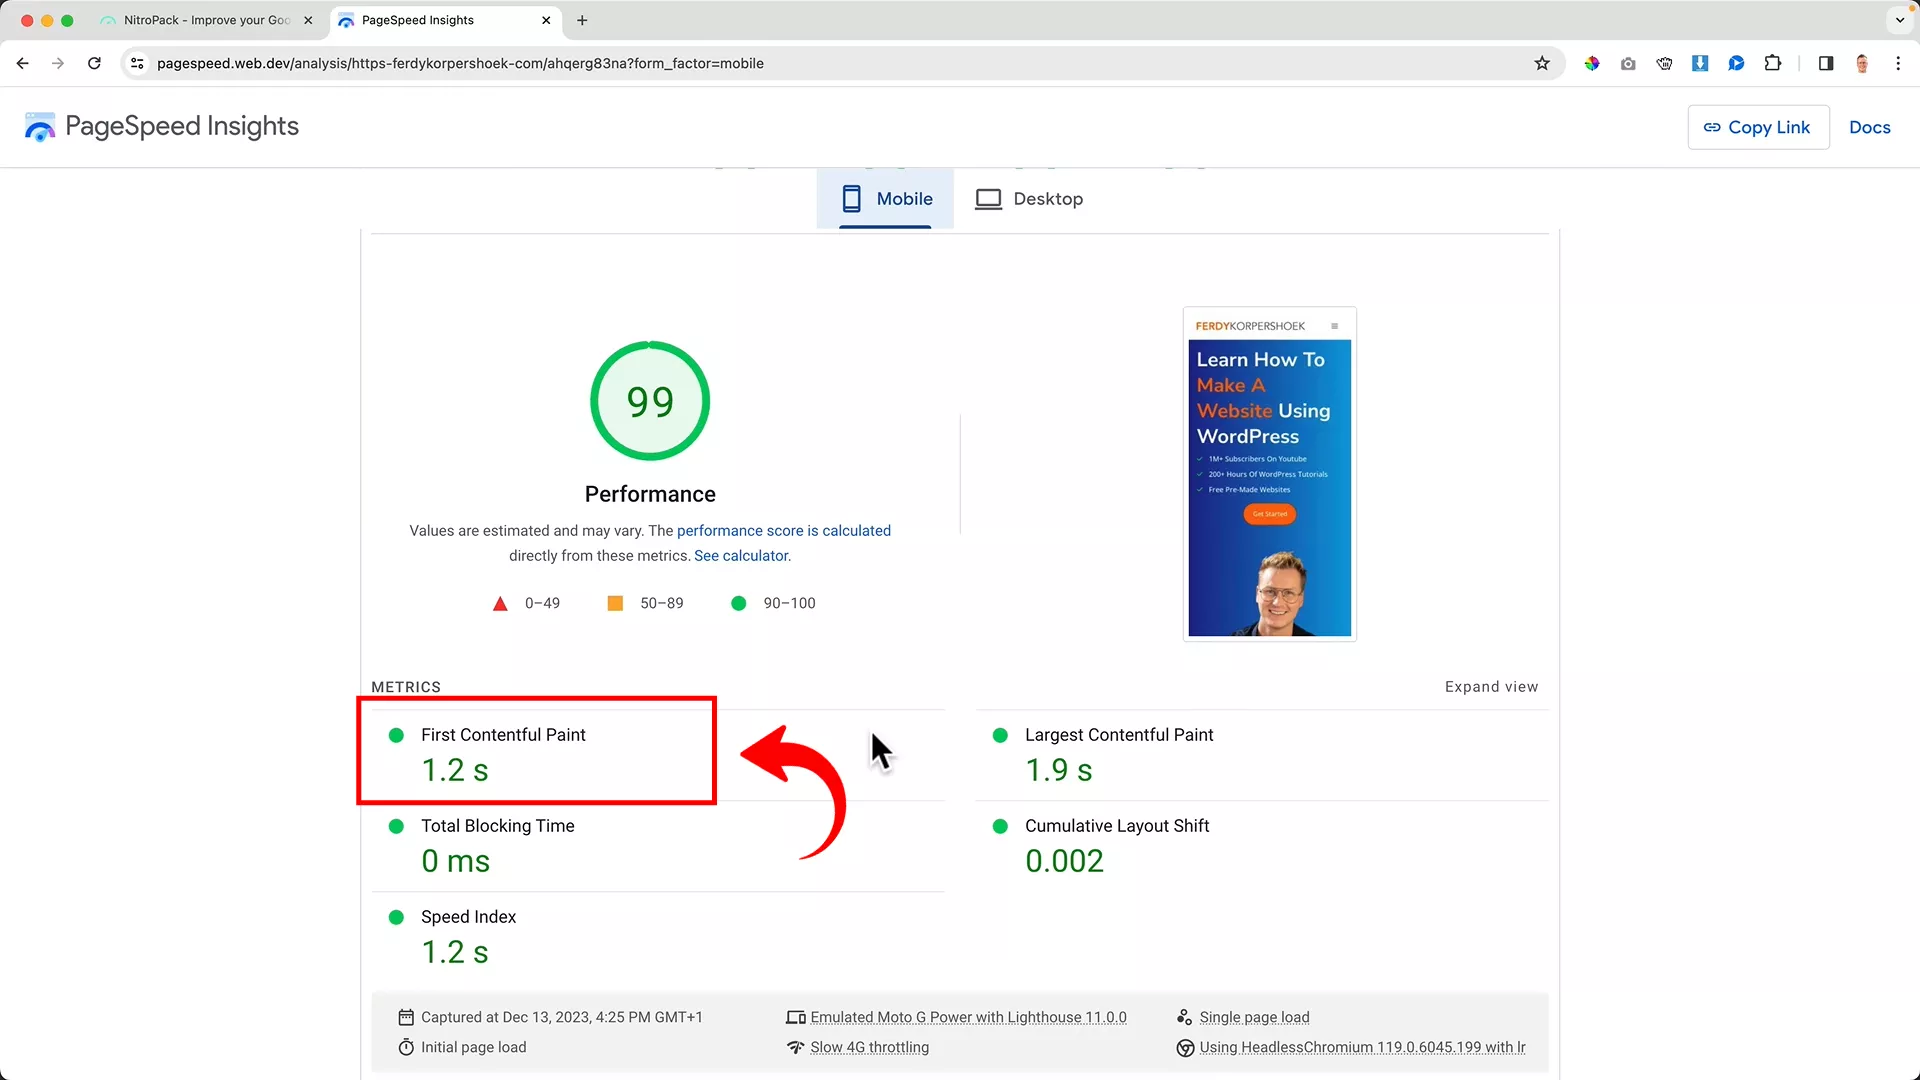
The difference was subtle when I ran my site through the PageSpeed Insights Tool again, but it was there. As shown in the image below, notice that the FCP of my website has increased to 1.1s (1.2s previously).
This is where you can get experimental. Play around with these settings and watch how they transform your site. Each option even comes with a brief description and examples, making it super easy to figure out what’s best for your site.
The beauty of NitroPack is that it understands every website is unique. There’s no cookie-cutter approach here. You have the freedom to adjust the settings to match your site’s specific needs.
And remember, with every tweak you make, keep a close eye on how your site is doing. A mix of manual checks and insights from Google’s tools will help you nail that perfect setup for your site’s unique digital identity.
Final Thoughts
Wrapping it up, I can confidently say that NitroPack is a game-changer for website speed optimization. It’s safe, efficient, and wallet-friendly.
Don’t just take my word for it, give it a try on different types of websites and see the remarkable improvements for yourself. Plus, you can start for free.
I’m thoroughly impressed with this plugin’s capabilities on WordPress, and I’m sure you will be too! Check out my YouTube channel for more insights and tips on WordPress and the tools that make it shine.
Happy optimizing!


0 thoughts on “NitroPack Review 2024: Is it Worth the Hype? (Real Test Data)”