

How to Start Dropshipping in 2024 – Set Up Your Dropshipping Business (Step by Step)
Dropshipping is a lucrative business opportunity that many aspire to avail. However, for beginners, the process can seem daunting. With tons of paid Dropshipping tools available, you need to know the process and the right tools to invest in.
To start your dropshipping business, set up your e-commerce website first. Look for a reliable supplier and load the products to your store. Set up pricing, payment, and shipping next. Modify your store and use an effective marketing strategy to drive traffic to your online dropshipping store.
In this comprehensive, beginner-friendly guide, I will teach you how to start dropshipping by setting up and automating your online store within a few days.
How to start a dropshipping business – video tutorial
Setting up a dropshipping business from scratch in 7 simple steps
For me, launching a dropshipping business has multiple steps and processes that you must follow. I have compiled and segmented it into 7 comprehensive yet straightforward steps.
Like any other online venture, launching a dropshipping business starts with creating a website. I am a big fan of WordPress for its flexibility and user-friendliness and I recommend it for any online venture. Let’s dive in and transform your business idea into a thriving online store.
1. Create a website
While it’s true that you can start dropshipping without a website, I wouldn’t recommend it. Why? Because in the digital world, visibility is key.
The internet is an ocean of eyeballs. No matter the nature of your business, your primary goal should be to capture as much attention as possible.
And it’s no different for dropshipping.
Ferdy’s Fundamentals – Why is a website essential for dropshipping?
Your website is the digital asset of your dropshipping business model. A dedicated dropshipping website allows you to attract visitors, display your products, and let them know more about your business.
To set up a website, you need three things:
- A platform
- Web hosting
- Domain name
Let’s get started.
Get web hosting for your dropshipping website
Setting up a website for your dropshipping business starts with the right web hosting and domain name. For beginners, especially those with a tight budget, I highly recommend Hostinger for its user-friendly and cost-effective plans.
Why Hostinger? In my experience, their service is affordable, reliable, and easy to manage – a perfect fit for beginners.
Exclusive Hostinger web hosting plans for you
Here’s a quick breakdown of exclusive Hostinger web hosting plans available for the readers of this blog:
| Most Popular | ||||
| Features | Single WordPress | WordPress Starter | Business WordPress | Cloud Startup |
| Monthly pricing | $9.99/mo | $11.99/mo | $13.99/mo | $24.99/mo |
| 12-month pricing | $2.99/mo | $3.19/mo | $4.99/mo | $9.99/mo |
| Renews at | $5.99/mo | $9.99/mo | $11.99/mo | $23.99/mo |
| 24-month pricing | $2.29/mo | $3.09/mo | $4.49/mo | $9.49/mo |
| Renews at | $4.99/mo | $8.99/mo | $9.99/mo | $22.99/mo |
| Pricing per month (48 months payment) | $1.99/mo | $2.99/mo | $3.99/mo | $8.99/mo |
| Renews at | $3.99/mo | $7.99/mo | $8.99/mo | $19.99/mo |
| Websites | 1 | 100 | 100 | 300 |
| Custom Domain | No | ✓ | ✓ | ✓ |
| SSD storage | 50 GB | 100 GB | 200 GB | 200 GB |
| Email Account | 1 | 100 domain-based email addresses | 100 domain-based email addresses | 100 domain-based email addresses |
| Managed WordPress | ✓ | ✓ | ✓ | ✓ |
| WordPress Acceleration | ✓ | ✓ | ✓ | ✓ |
| WordPress Multisuite | No | ✓ | ✓ | ✓ |
| Bandwidth (Website speed) | 100GB | Unlimited | Unlimited | Unlimited |
| Databases | 2 | Unlimited | Unlimited | Unlimited |
My two cents on each web hosting plan:
- Single WordPress: Ideal for personal projects.
- WordPress Starter: My top pick for your first dropshipping site – it offers ample storage, unlimited bandwidth, and a free domain for the first year.
- Business WordPress: Scale your business with advanced features.
- Cloud Startup: For those planning to expand quickly.
All the plans are feature-rich, affordable, and have a 30-day money-back guarantee.
Special offer: Use the free coupon code ‘FERDY’ for additional discounts on these plans!
Choose a domain name
Selecting a domain name for your dropshipping store is a critical step. And it begins with having a clear idea of your niche.
For this article, let’s walk through the process using a practical example where I build a dropshipping website from the ground up.
In this case, my chosen niche is ‘green living,’ focusing specifically on eco-friendly decor items.
- This niche defines the range of products I plan to offer and guides me in picking a domain name that resonates with the target audience.
- The domain name I choose must reflect the essence of the green living ethos, making it instantly relatable and memorable for those interested in sustainable living and decor.
With this in mind, I opt for ‘greendecormarket.com’ as my domain name. Note that this domain name aligns with my niche and instantly sets the right tone for my prospects.

I recommend you follow the same approach and develop at least 5 domain name ideas.
For those of you who chose the WordPress Starter plan or above, you have the option to claim your free domain name.
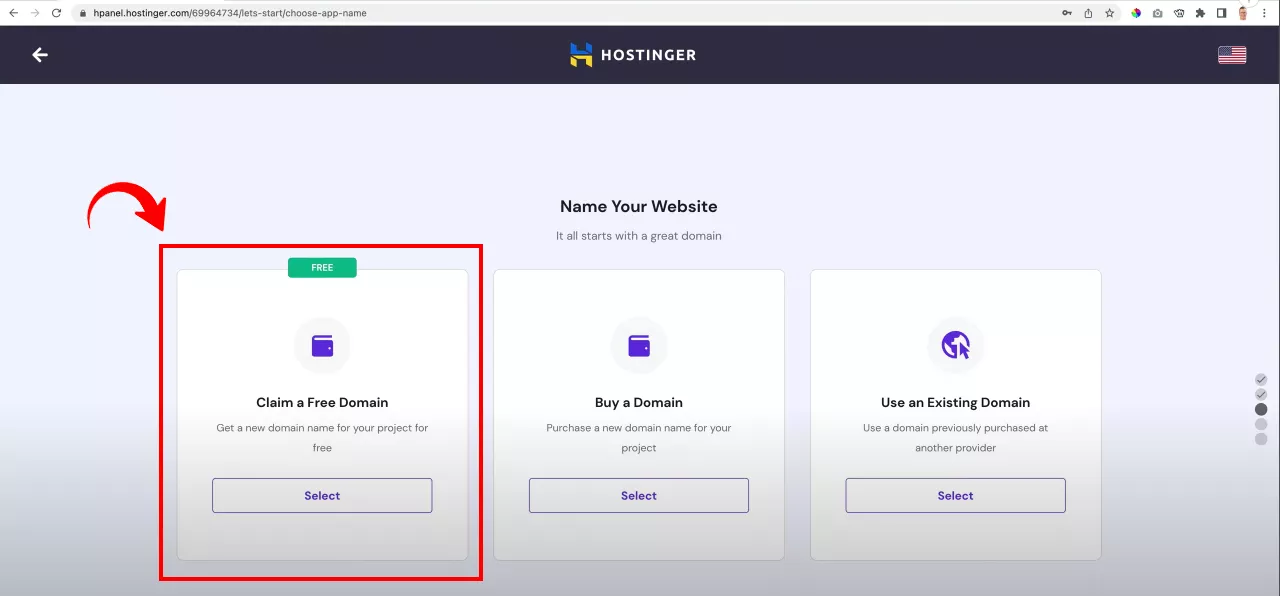
To claim your free domain name on Hostinger, select the “Claim a Free Domain” option.
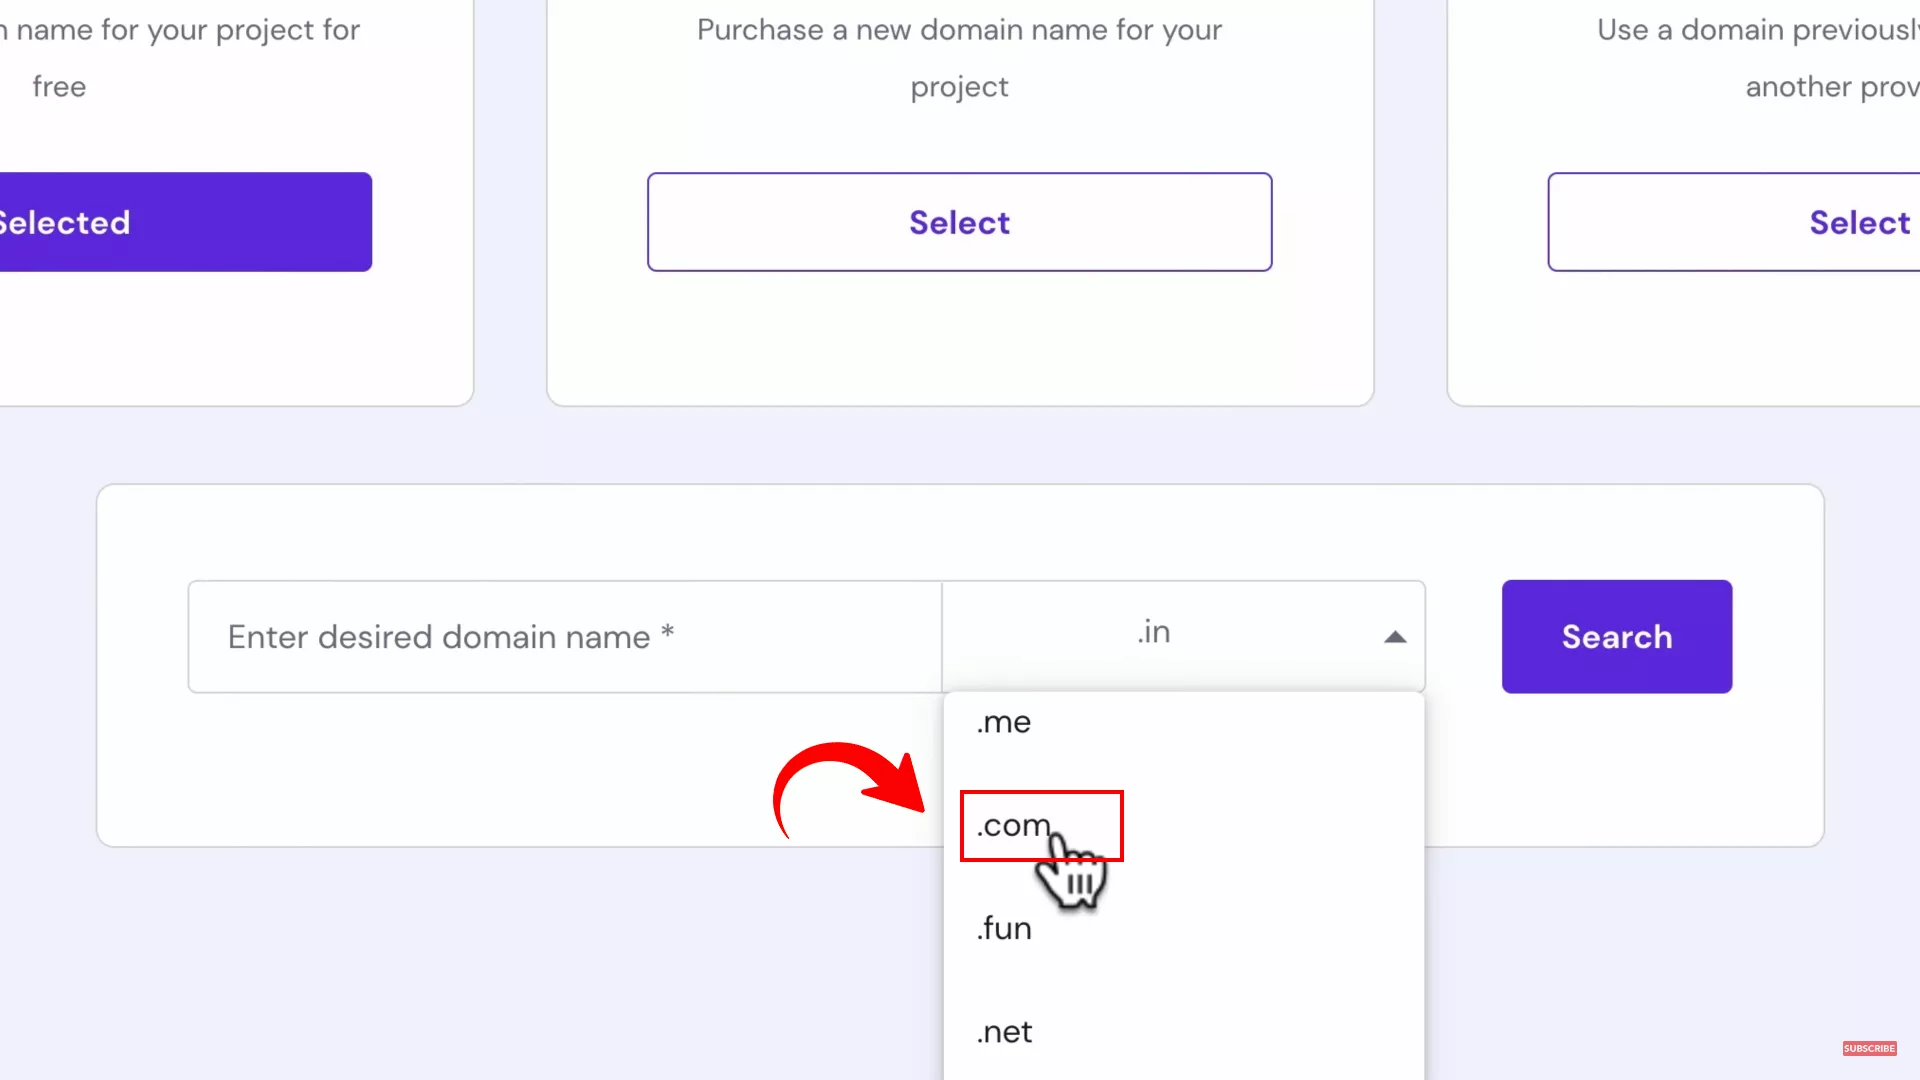
Next, pick a domain name extension. I recommend using the .com domain extension if you plan to sell globally. And if you want to sell locally, it’s best to go with a country-code top-level domain (ccTLD). For example, .us, .uk, .ae
Enter your desired domain name and check its availability. It might take some time, but I suggest you be creative and continue looking until you find one.
Install the SSL certificate
Today, website security is non-negotiable, and that’s where an SSL certificate comes into play.
Ferdy’s Fundamentals: What is an SSL certificate?
An SSL (Secure Sockets Layer) certificate creates a secure connection between your website and your visitors. It encrypts sensitive data like personal information, email addresses, and payment details, protecting them from cybercriminals.
More than just security, an SSL certificate enhances your business’s credibility, making visitors more confident in your site and services.
Let’s add this security layer to your website.
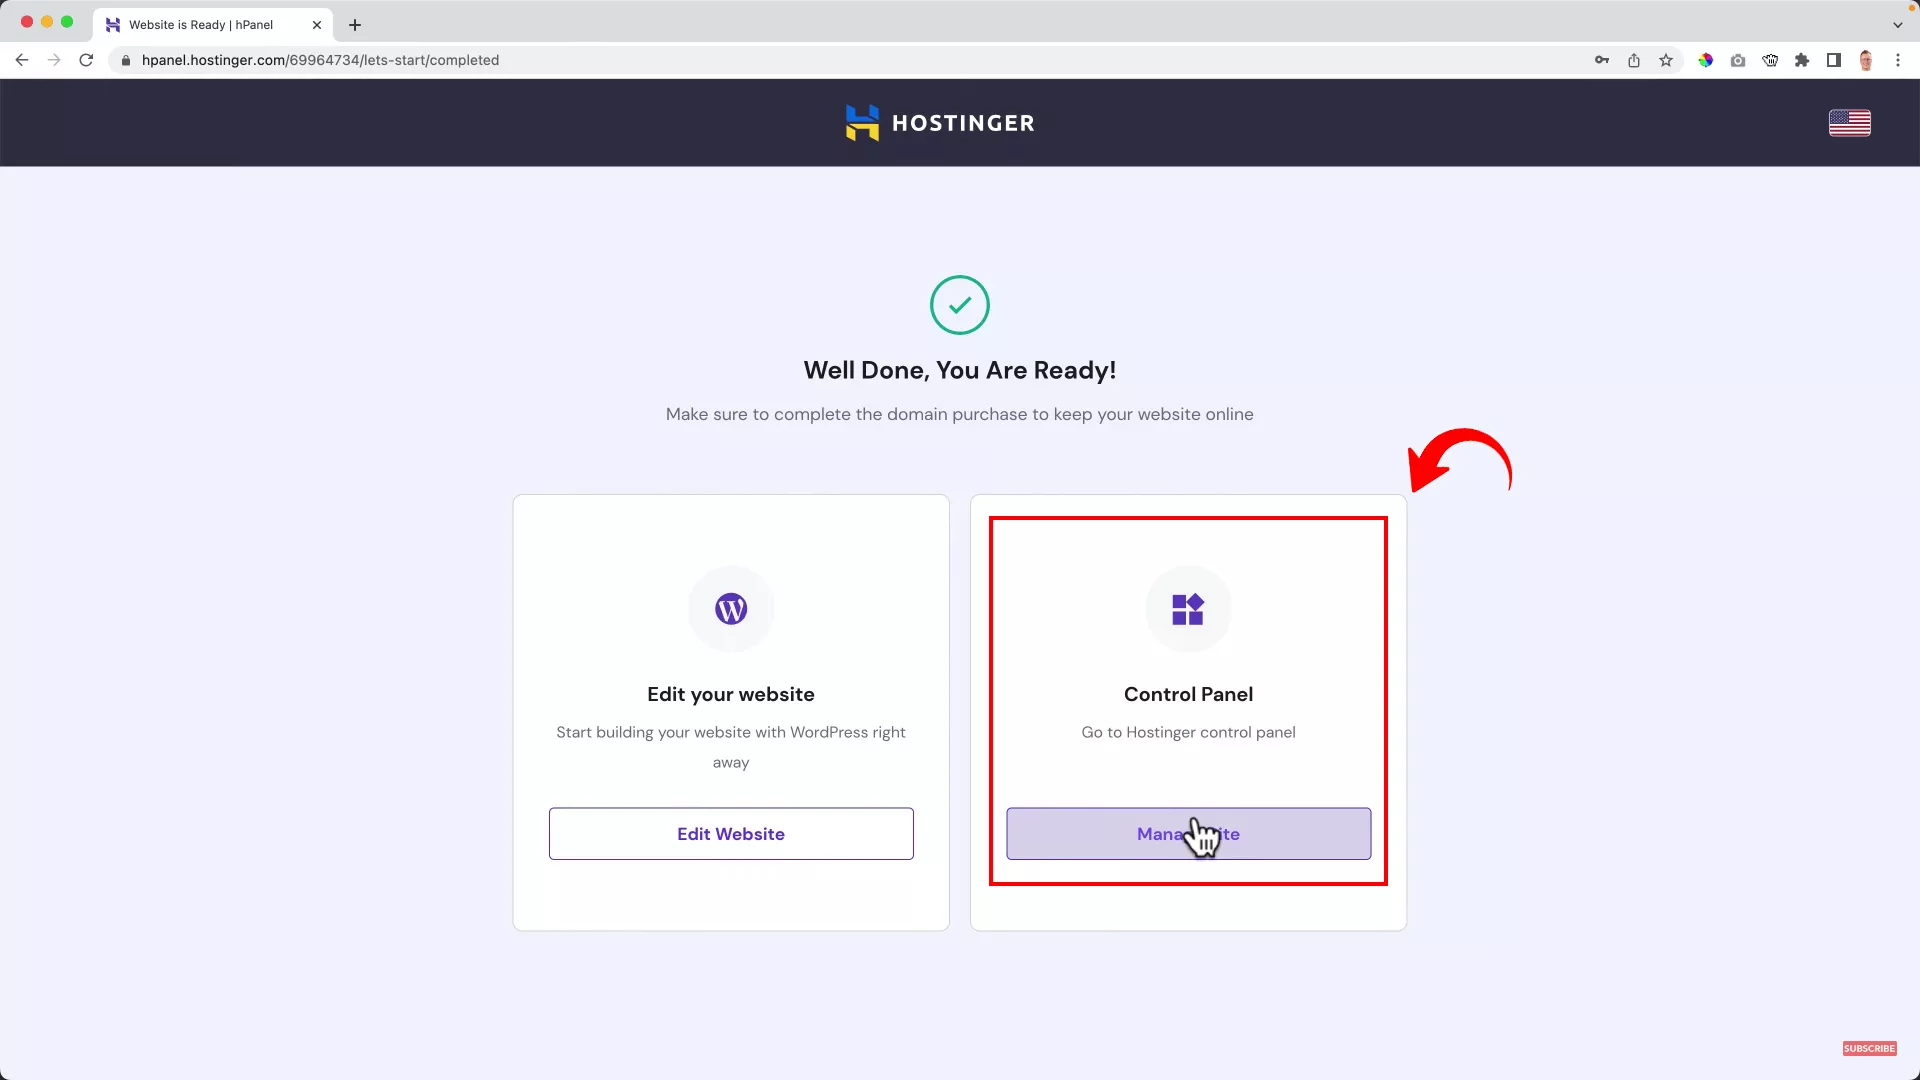
Log into your Hostinger account and access the hosting Control Panel.
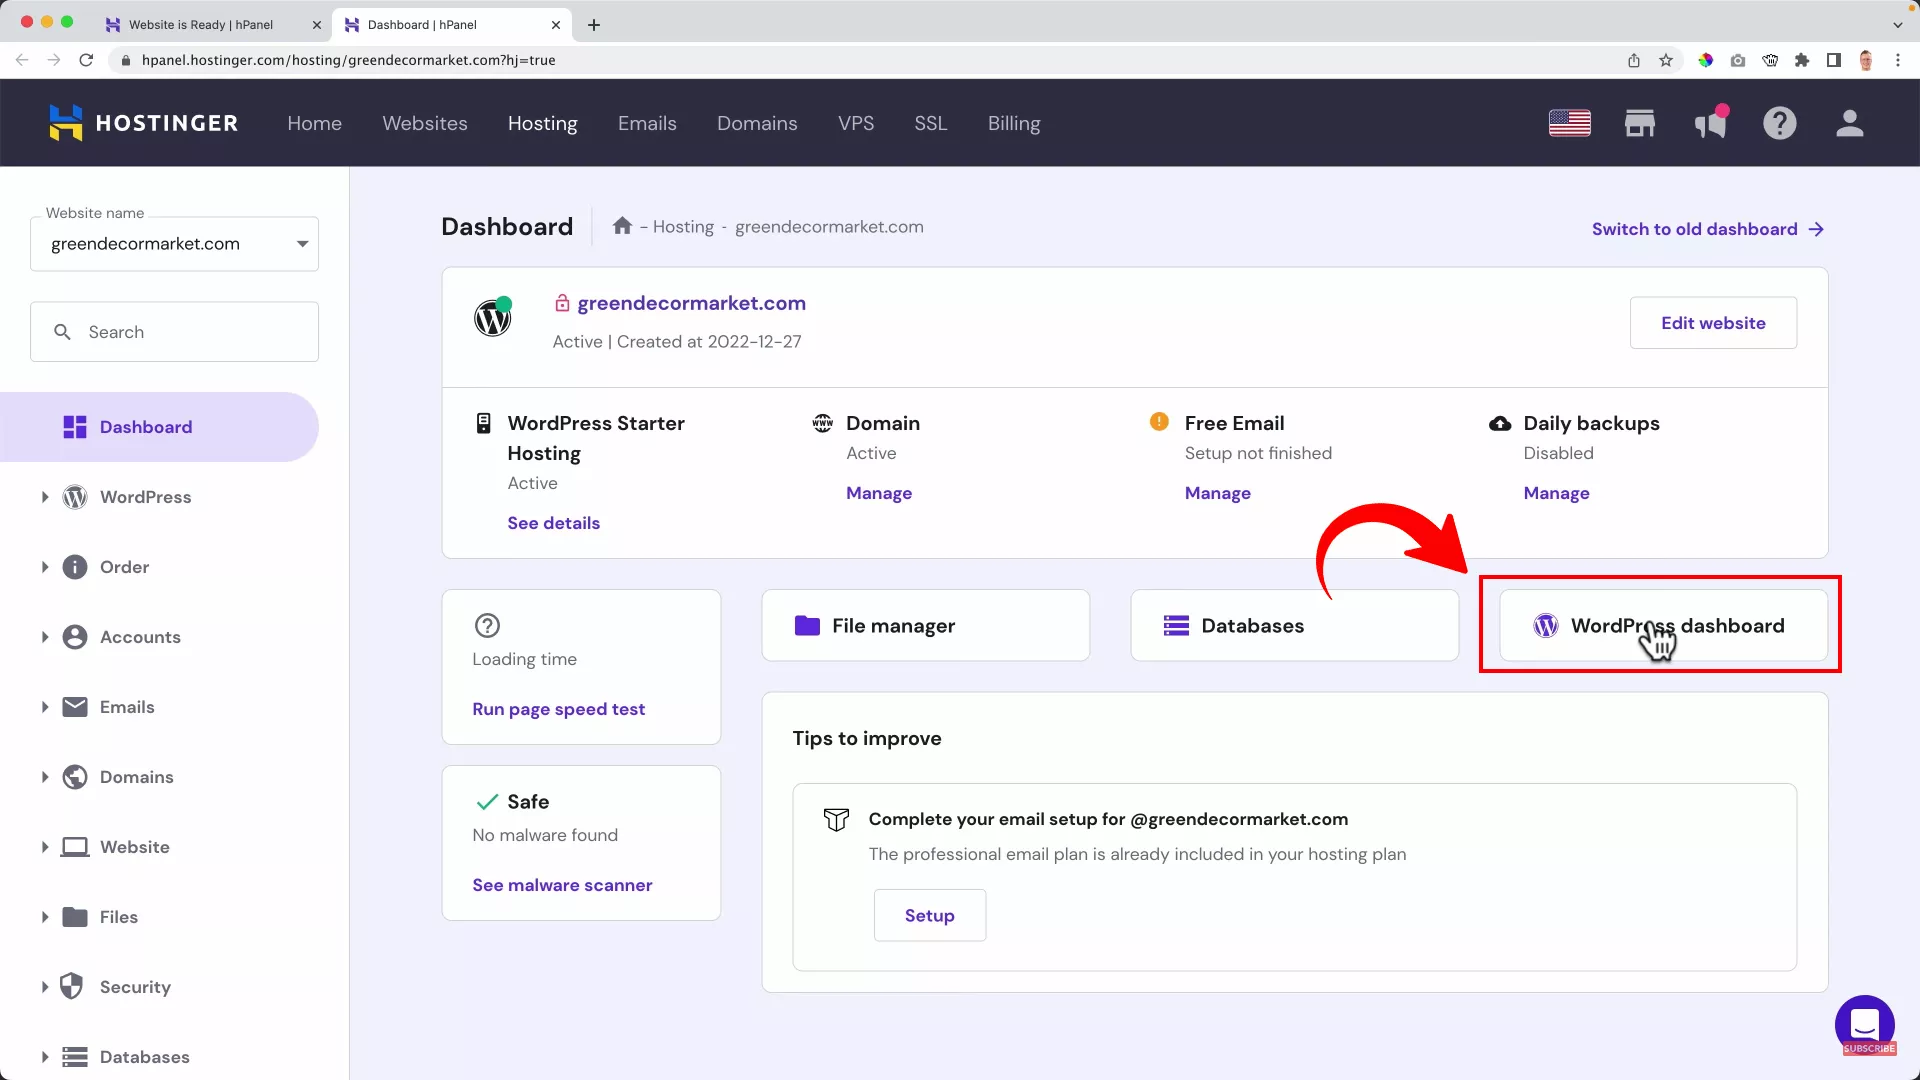
Navigate to the “WordPress Dashboard.”
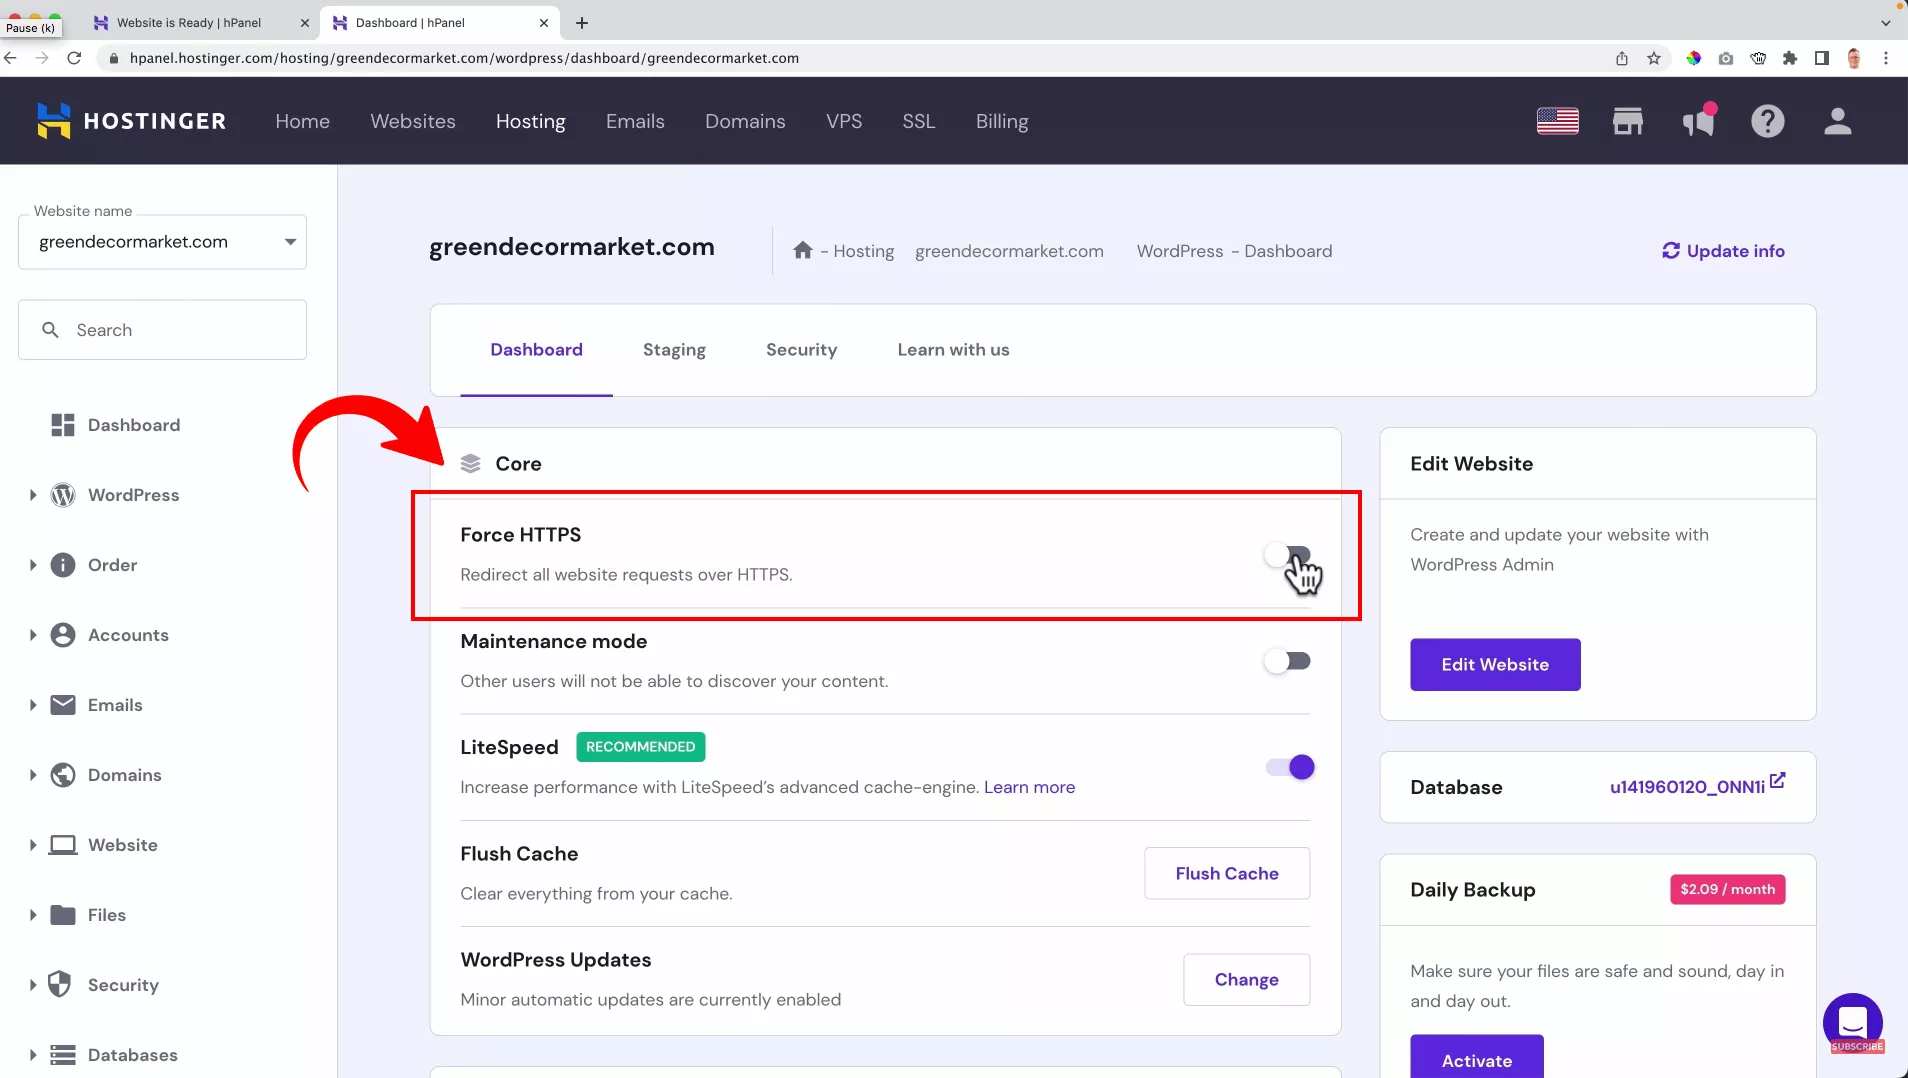
Look for the “Force HTTPS” option and enable it. This action ensures that all connections to your site use a secure HTTPS protocol.
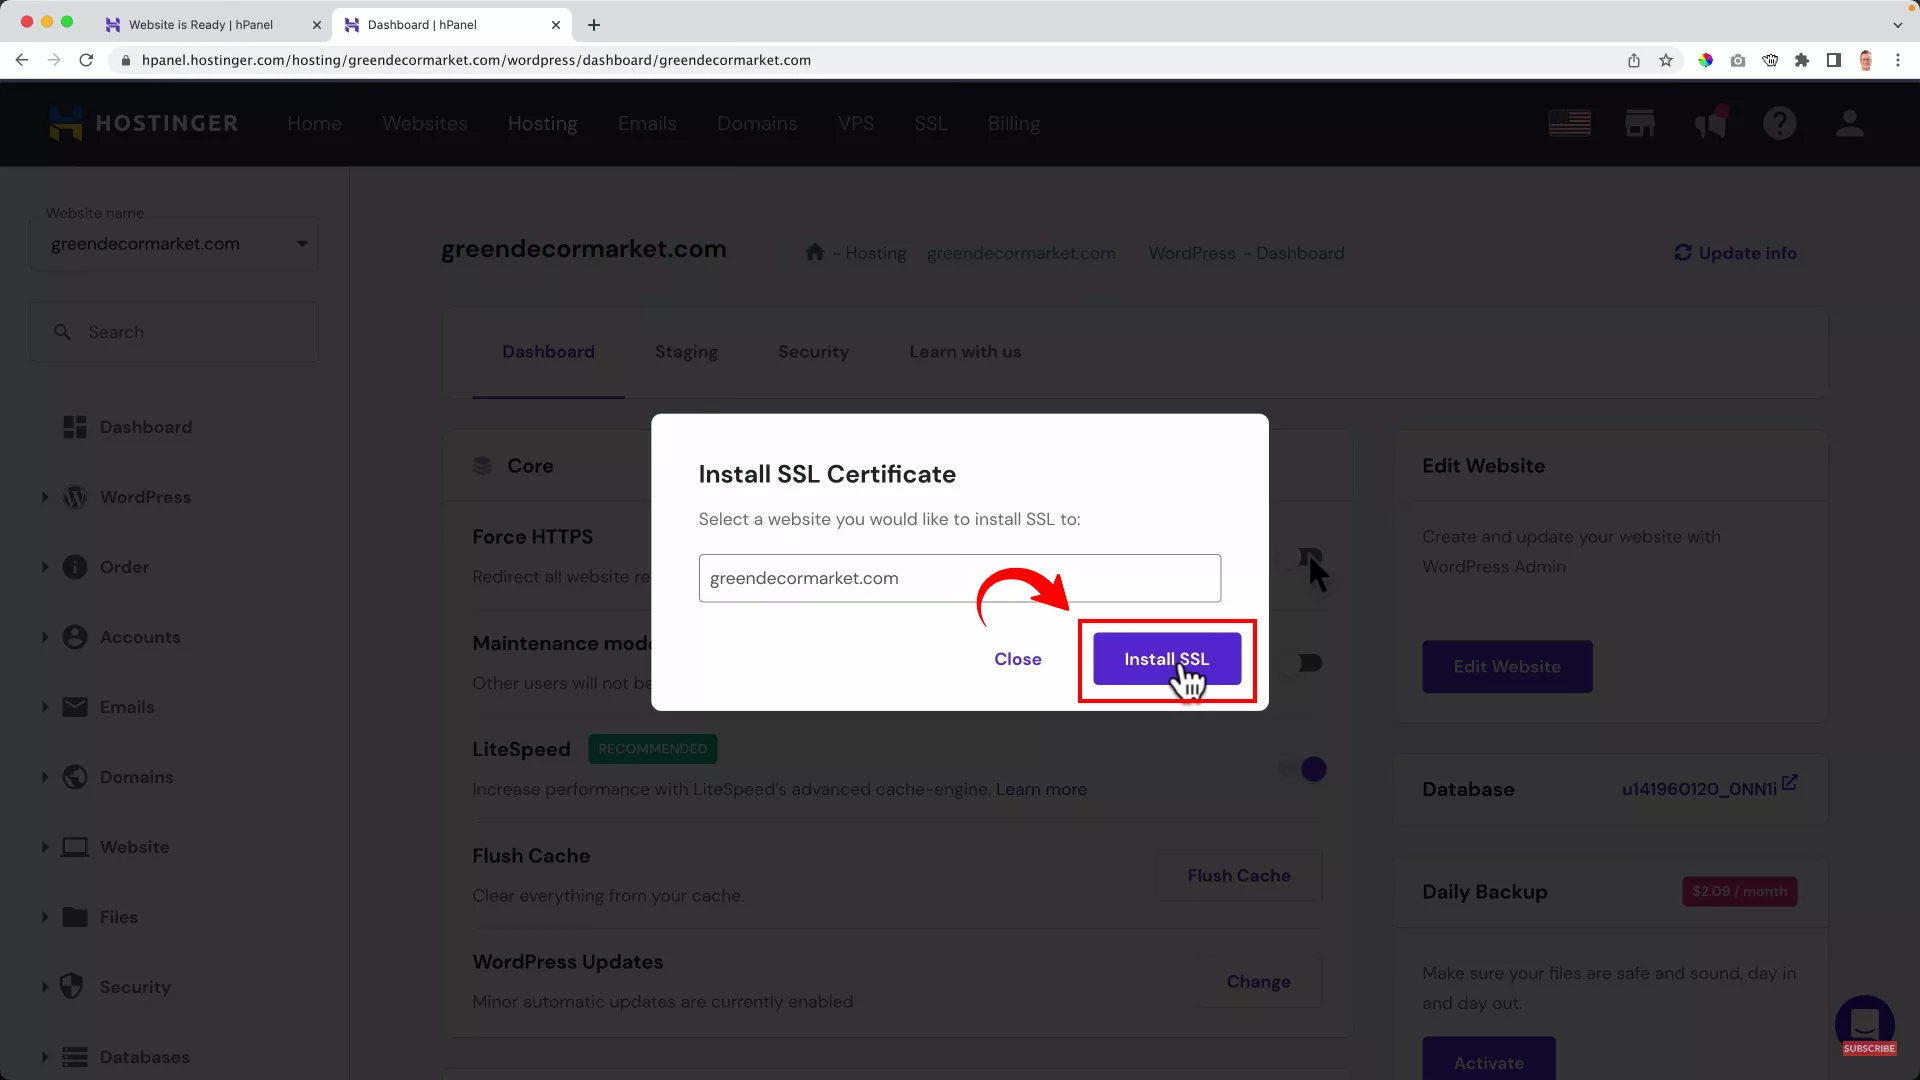
Next, click the “Install SSL” button to install the SSL certificate on your chosen domain name.
Configure site settings
By default, every new WordPress website comes with default settings that users need to change as per their liking.
Now that you’ve confirmed your website’s domain name and enabled the SSL certificate, you can start configuring your site’s settings.
Head to Settings > General from the panel on the left and set the following:
- Site Title
- Tagline
- Site Language
- Timezone
- Date Format
- Time Format
Pro tip: When setting your site title and tagline, conduct a quick competitive analysis on Google and note the keywords your competitors use in their site titles and taglines. Use those keywords to create a search engine-optimized site title and tagline to rank on Google.
Delete pre-installed plugins
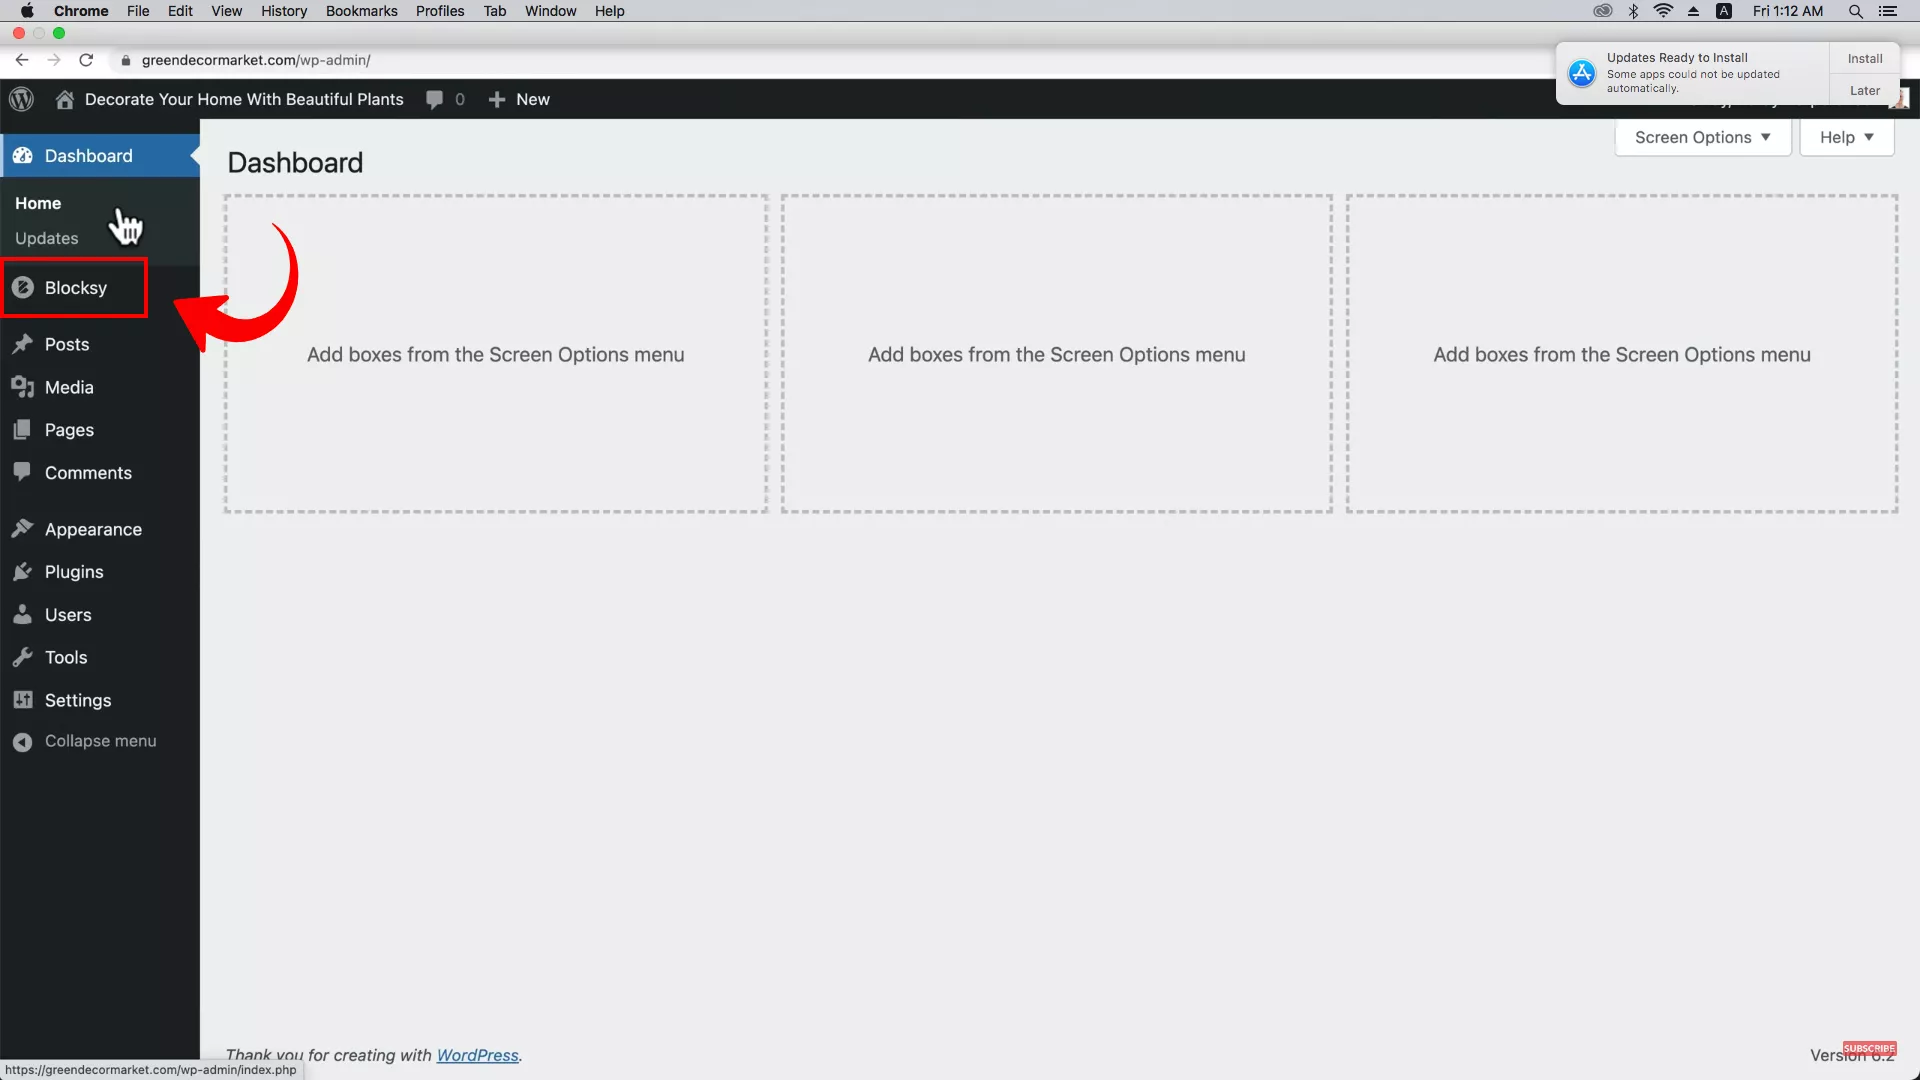
Since WordPress was built for content management, every new website comes with a set of plugins and widgets pre-installed. Currently, your dashboard should appear like this:
However, your dropshipping store does not need any of these. So, let’s go ahead and remove them.
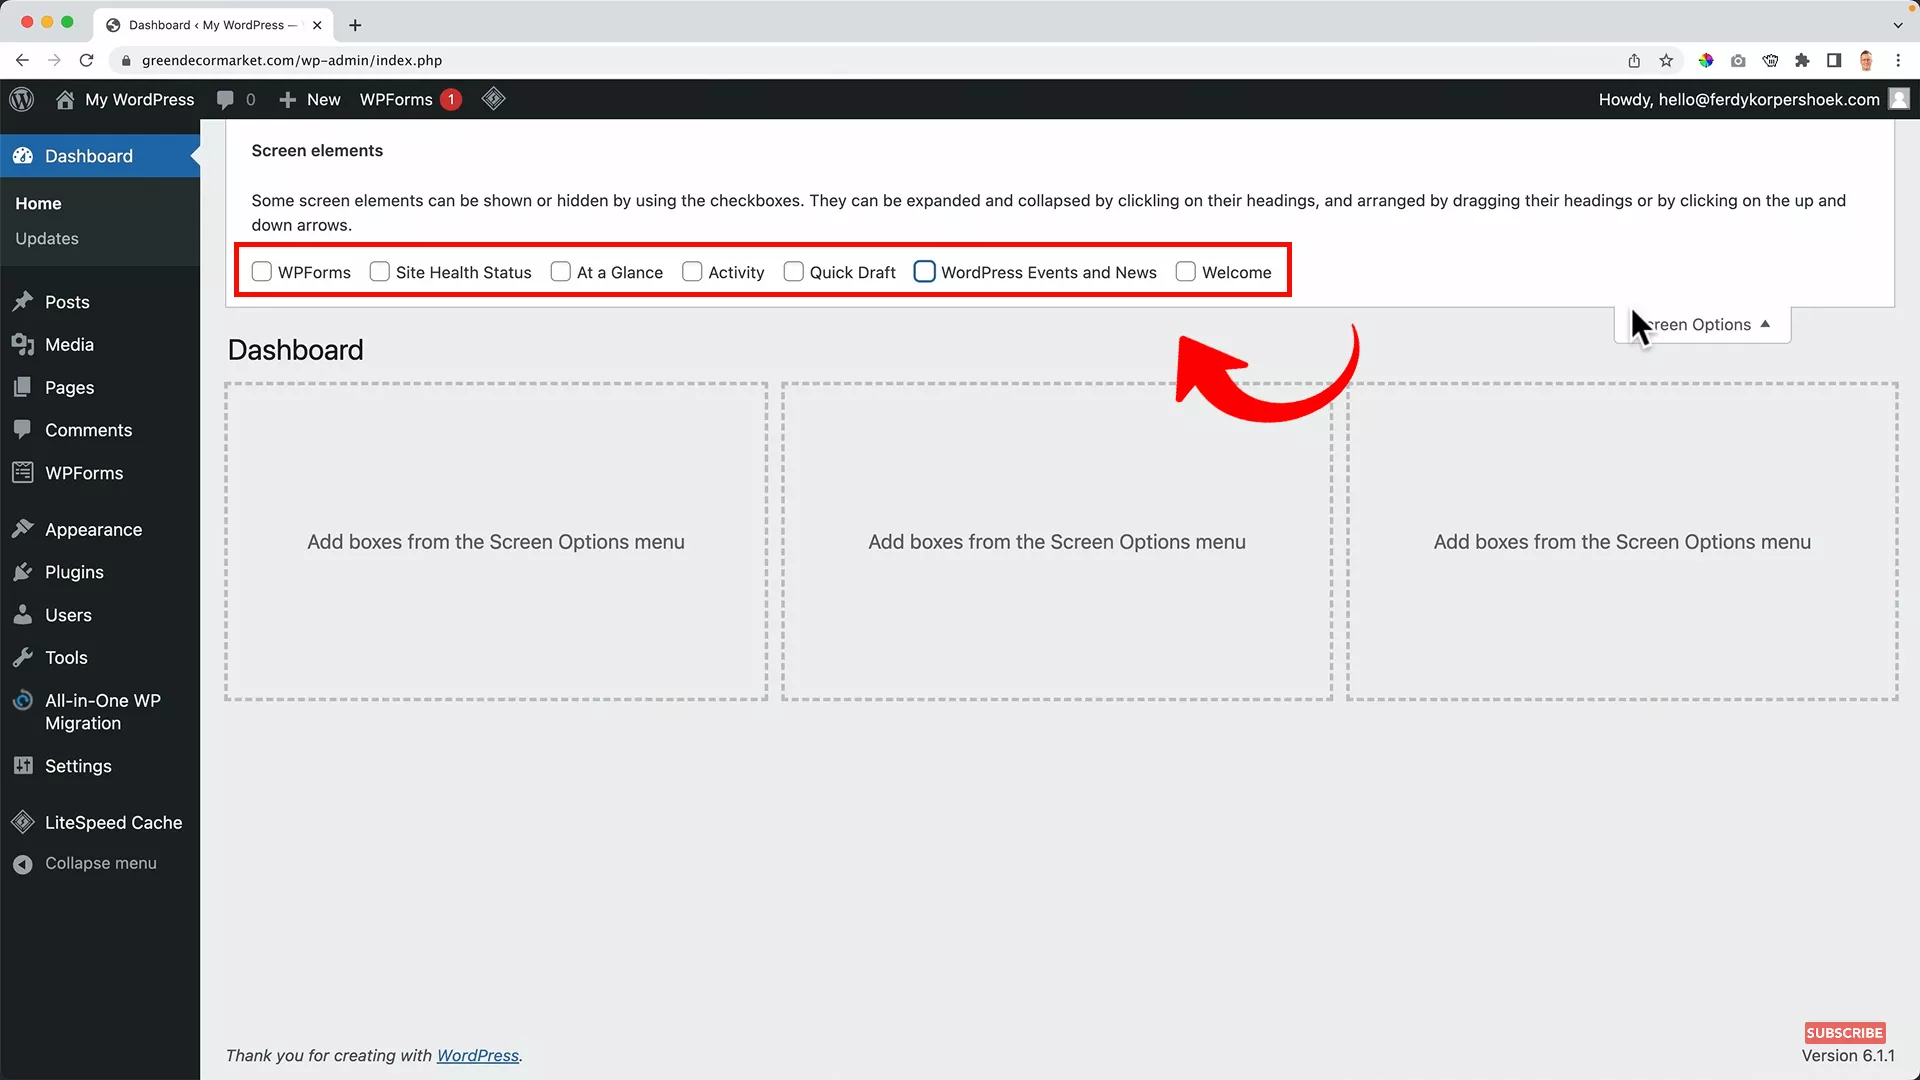
Go to “Screen Options” and uncheck all the widgets on the top of the screen.
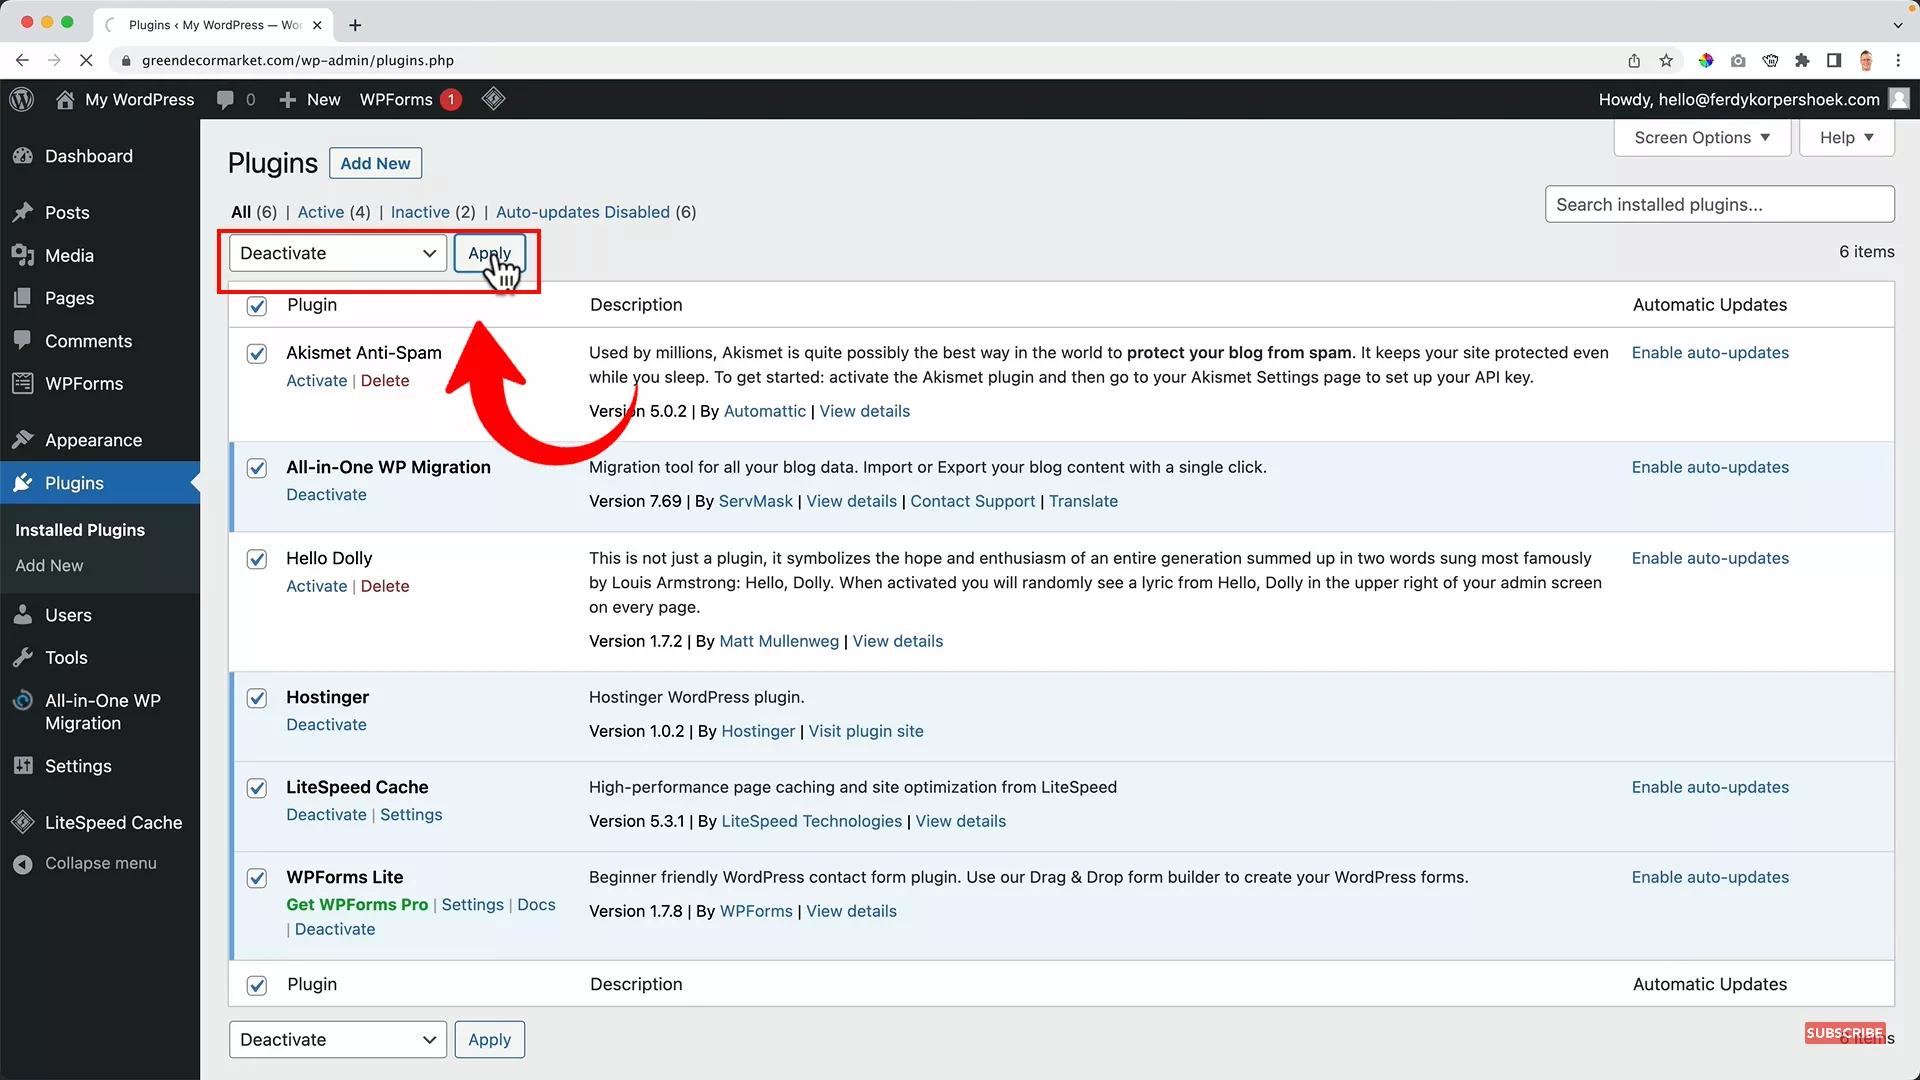
Next, head to the Plugins tab from the left panel. Select all > Bulk Actions > Deactivate > Apply.
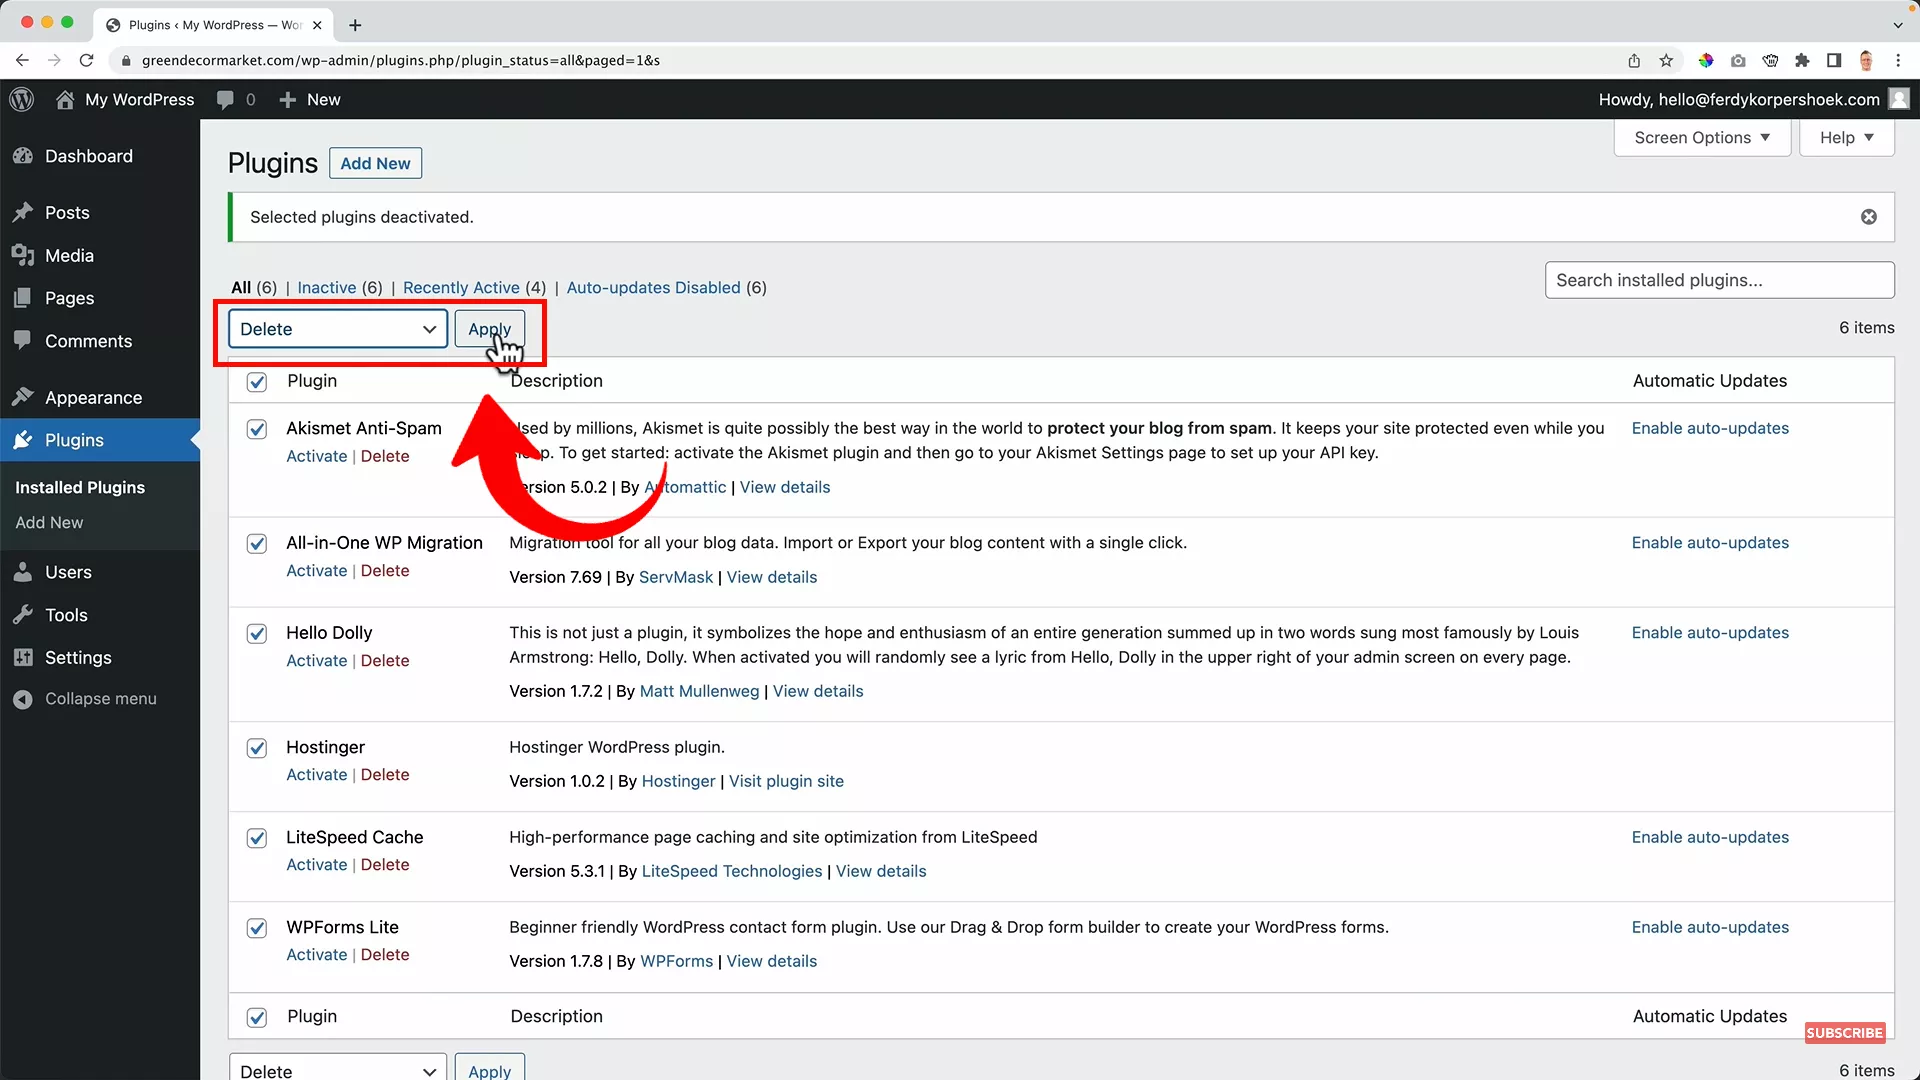
Repeat the same process, but this time select Delete from the “Bulk Actions” drop-down and hit “Apply”.
At this point, your website is clear from all pre-installed plugins and widgets.
One last step you need to do here is to change the permalink settings.
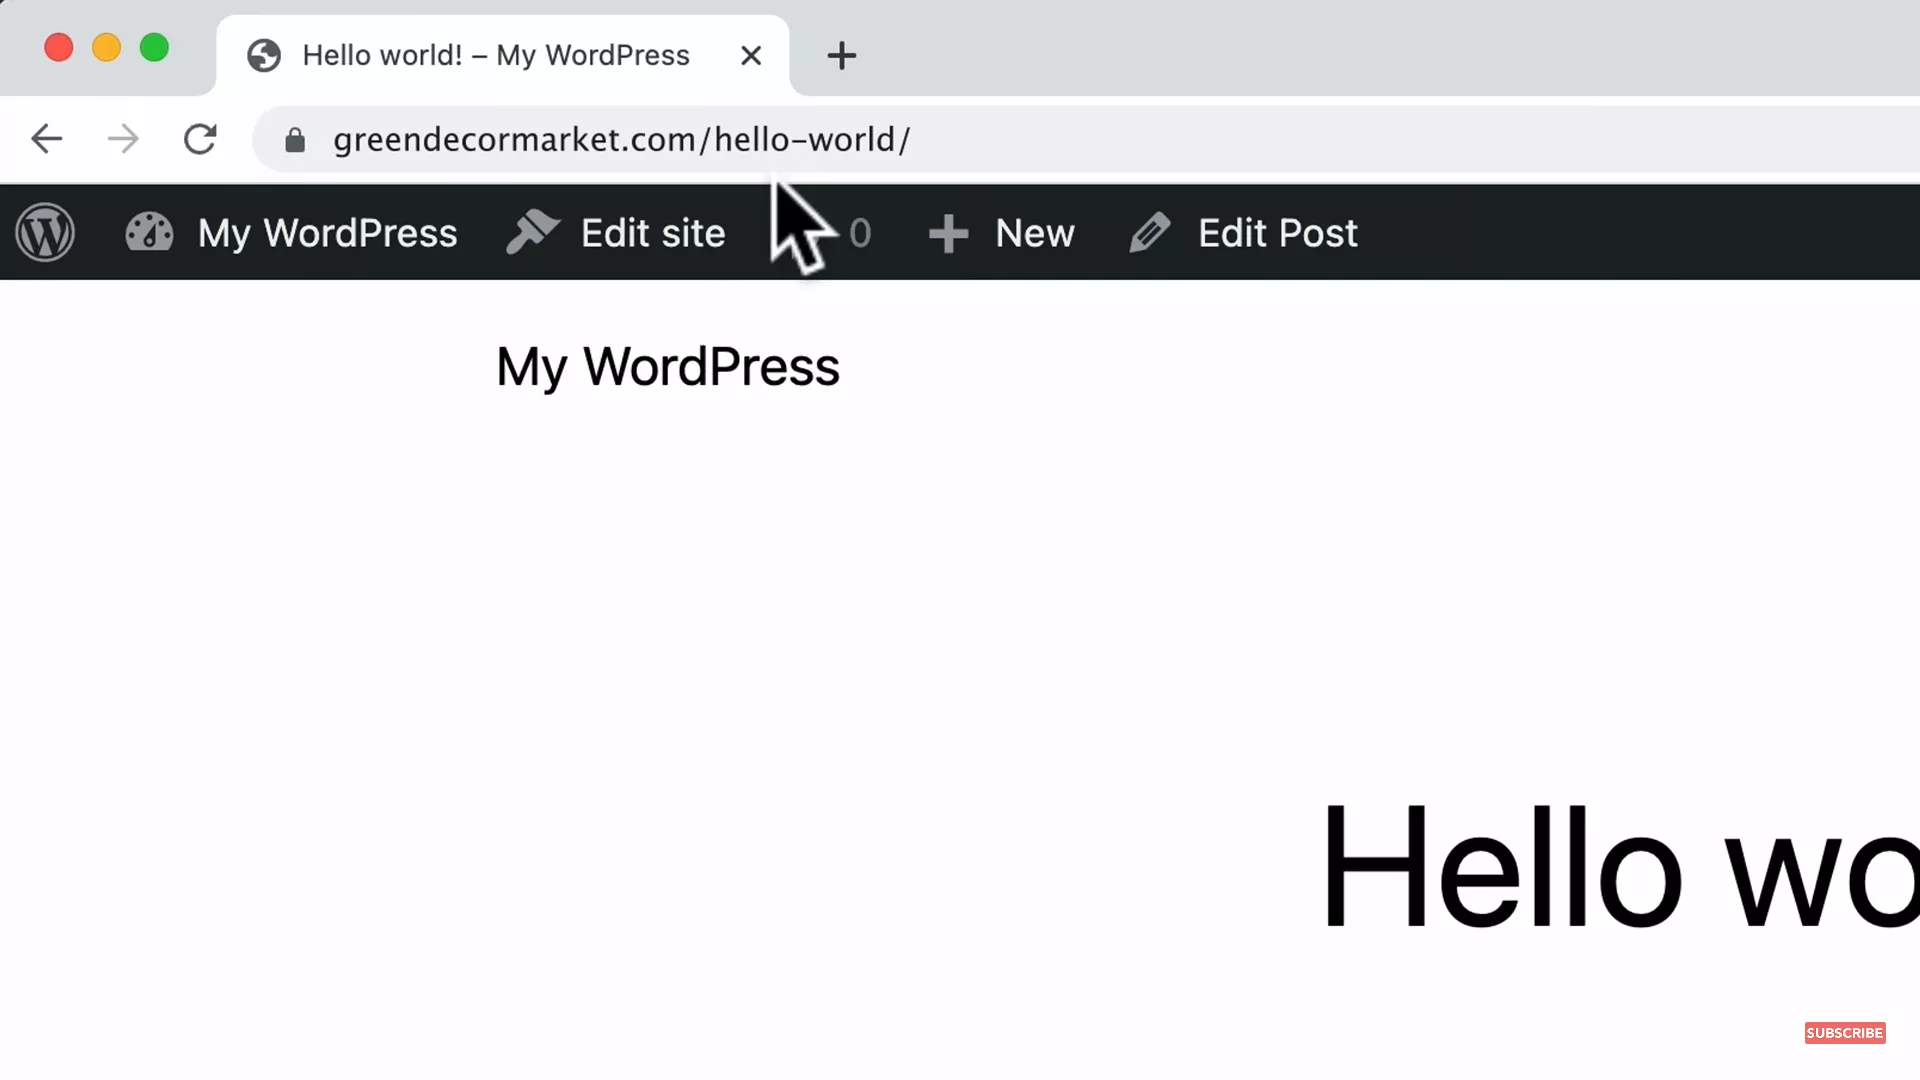
Permalink refers to the slug part of your URL.
If you visit your website and click “Hello world!,” notice the page’s URL at the top. It should display like this:
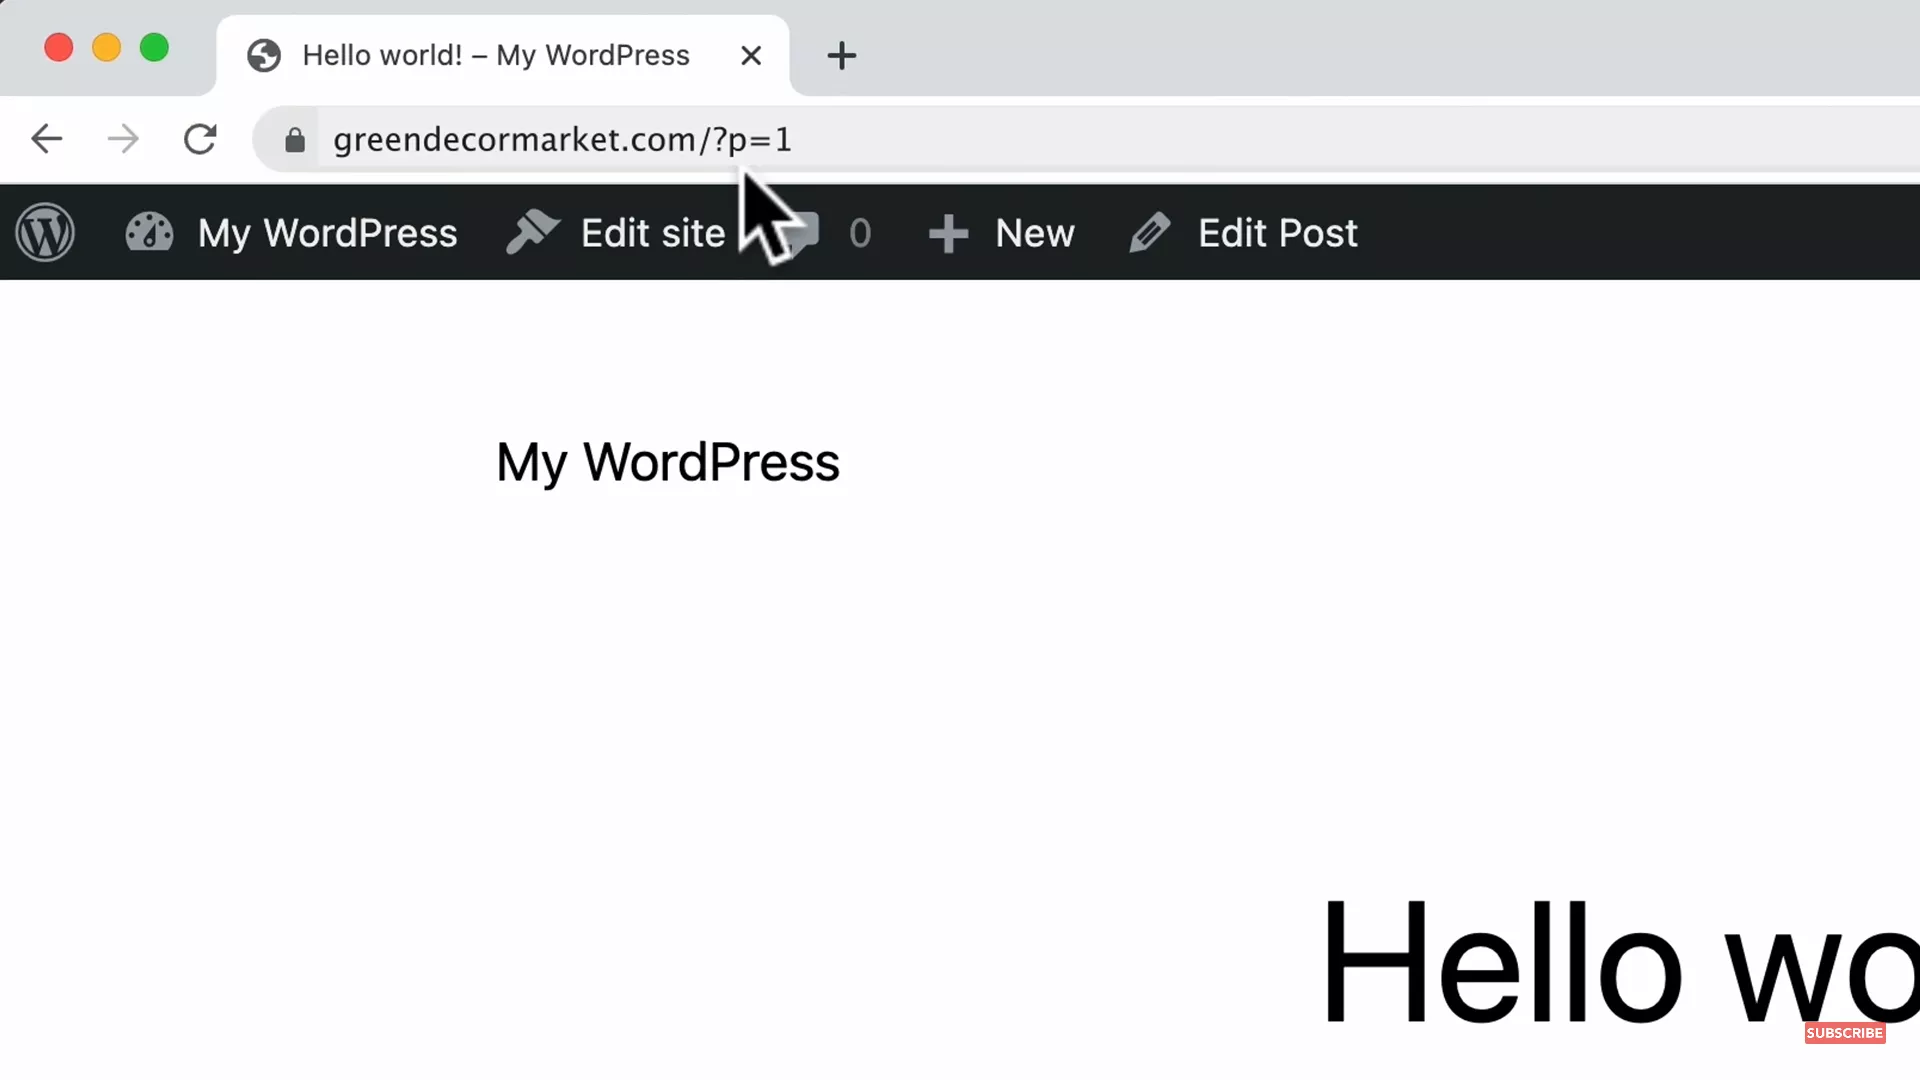
I don’t like it, and guess what? Google’s crawlers don’t like it, either.
You’ll need to change the way it’s displayed.
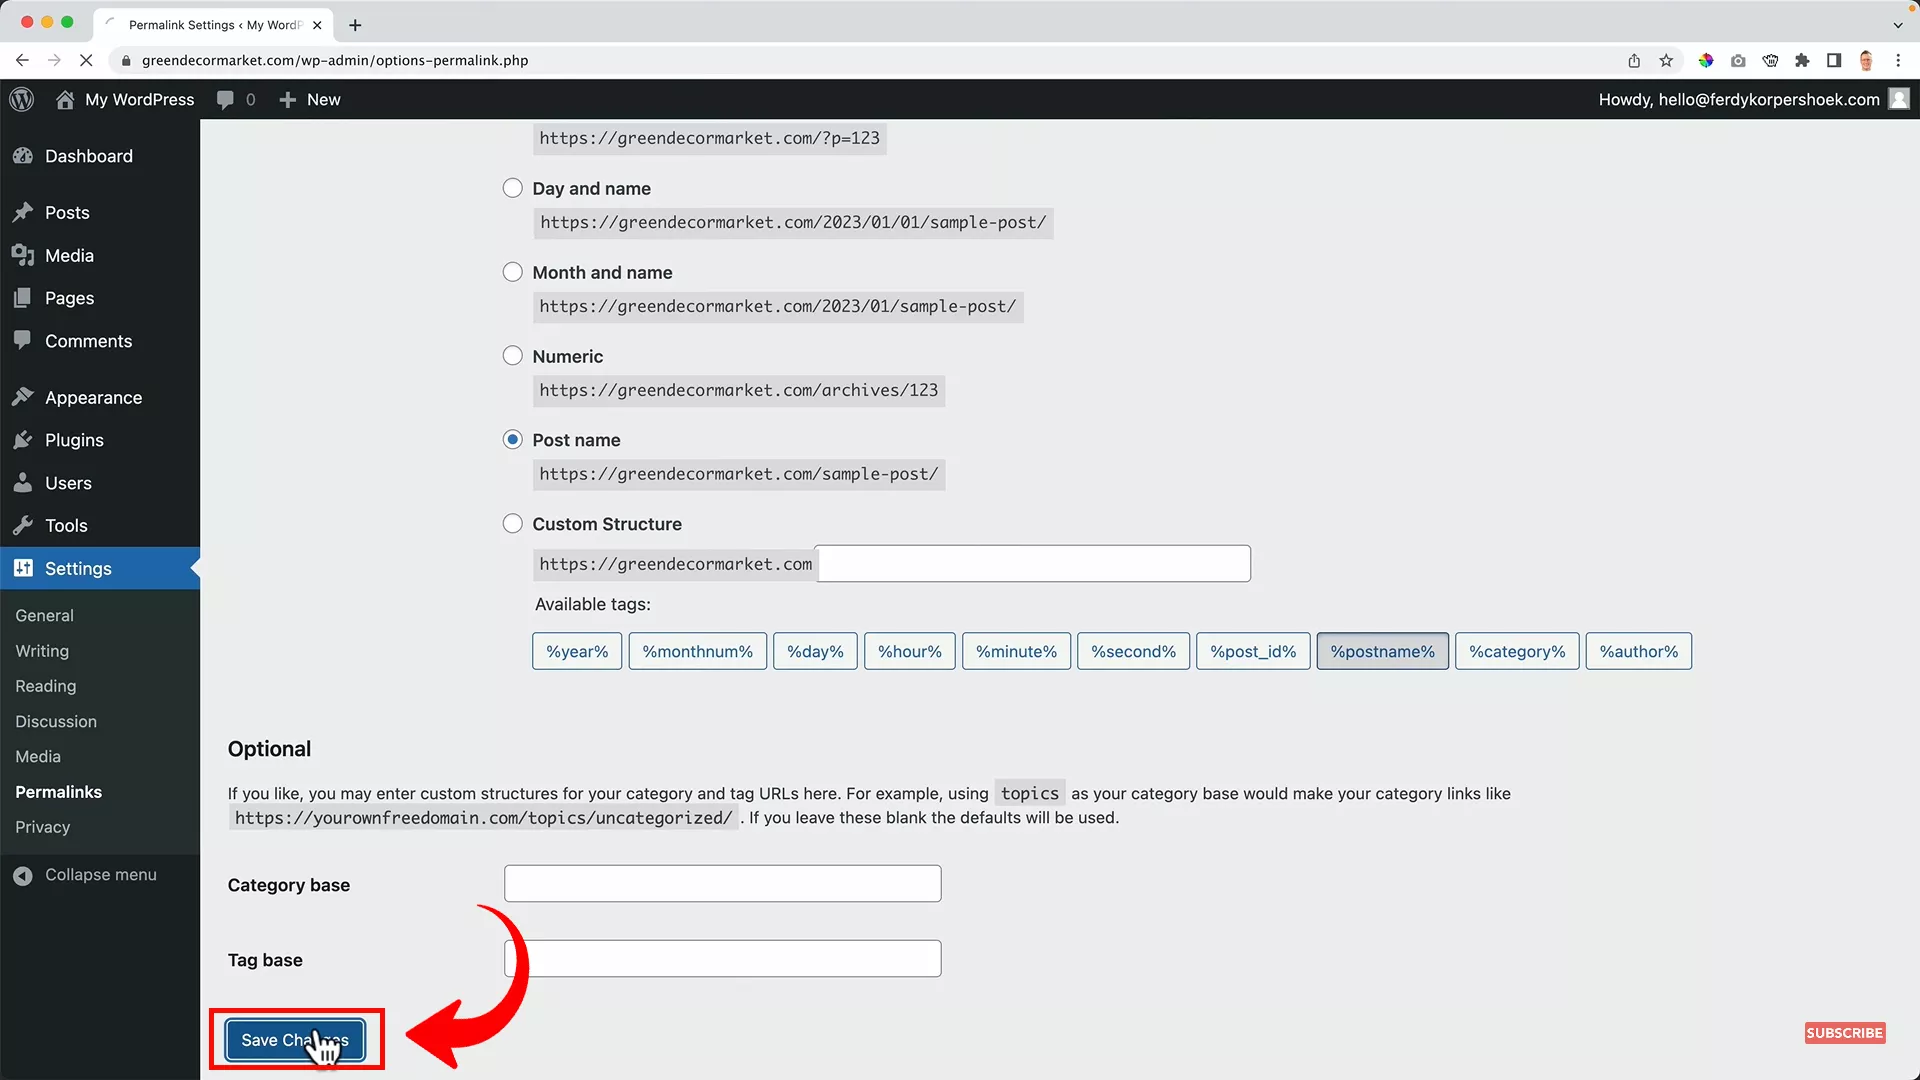
Head to Settings > Permalinks. Change the permalink structure from “Plain” to “Post Name.” Scroll down and hit “Save Changes.”
Now, visit the website and check the permalink. It should look something like this:
2. Choose a starter website
Building an e-commerce website for your dropshipping business from scratch is a rewarding experience, but it is extremely time-consuming.
Since you’ll already be spending a lot of time setting up the suppliers, importing products to your online store, and getting traffic, opting for a starter website is a smart move to save time.
Ferdy’s Fundamentals – What is a starter website?
A starter website is essentially a pre-designed, ready-to-use template that serves as the foundation for your website. It’s a streamlined solution, offering a professionally crafted layout and essential features that can be customized to suit your specific needs.
Using a starter website enables you to launch a functional, visually appealing website in a fraction of the time it would take to build one from scratch.
Let’s start by installing a theme for your website.
Install the Blocksy theme
Blocksy is one of the most popular themes on WordPress since it has tons of features that are usually premium in other themes.
To download the Blocksy free theme, select “Appearances” from the left menu and select “Themes”. Search for the Blocksy plugin and activate it after installation.
Once you have the Blocksy theme, I recommend installing the Blocksy Companion plugin within the Blocksy theme for added features.
Choose a starter e-commerce website
As soon as you activate the Blocksy theme on your WordPress site, you’ll notice that the look and feel of your site have changed. It should look something like this:
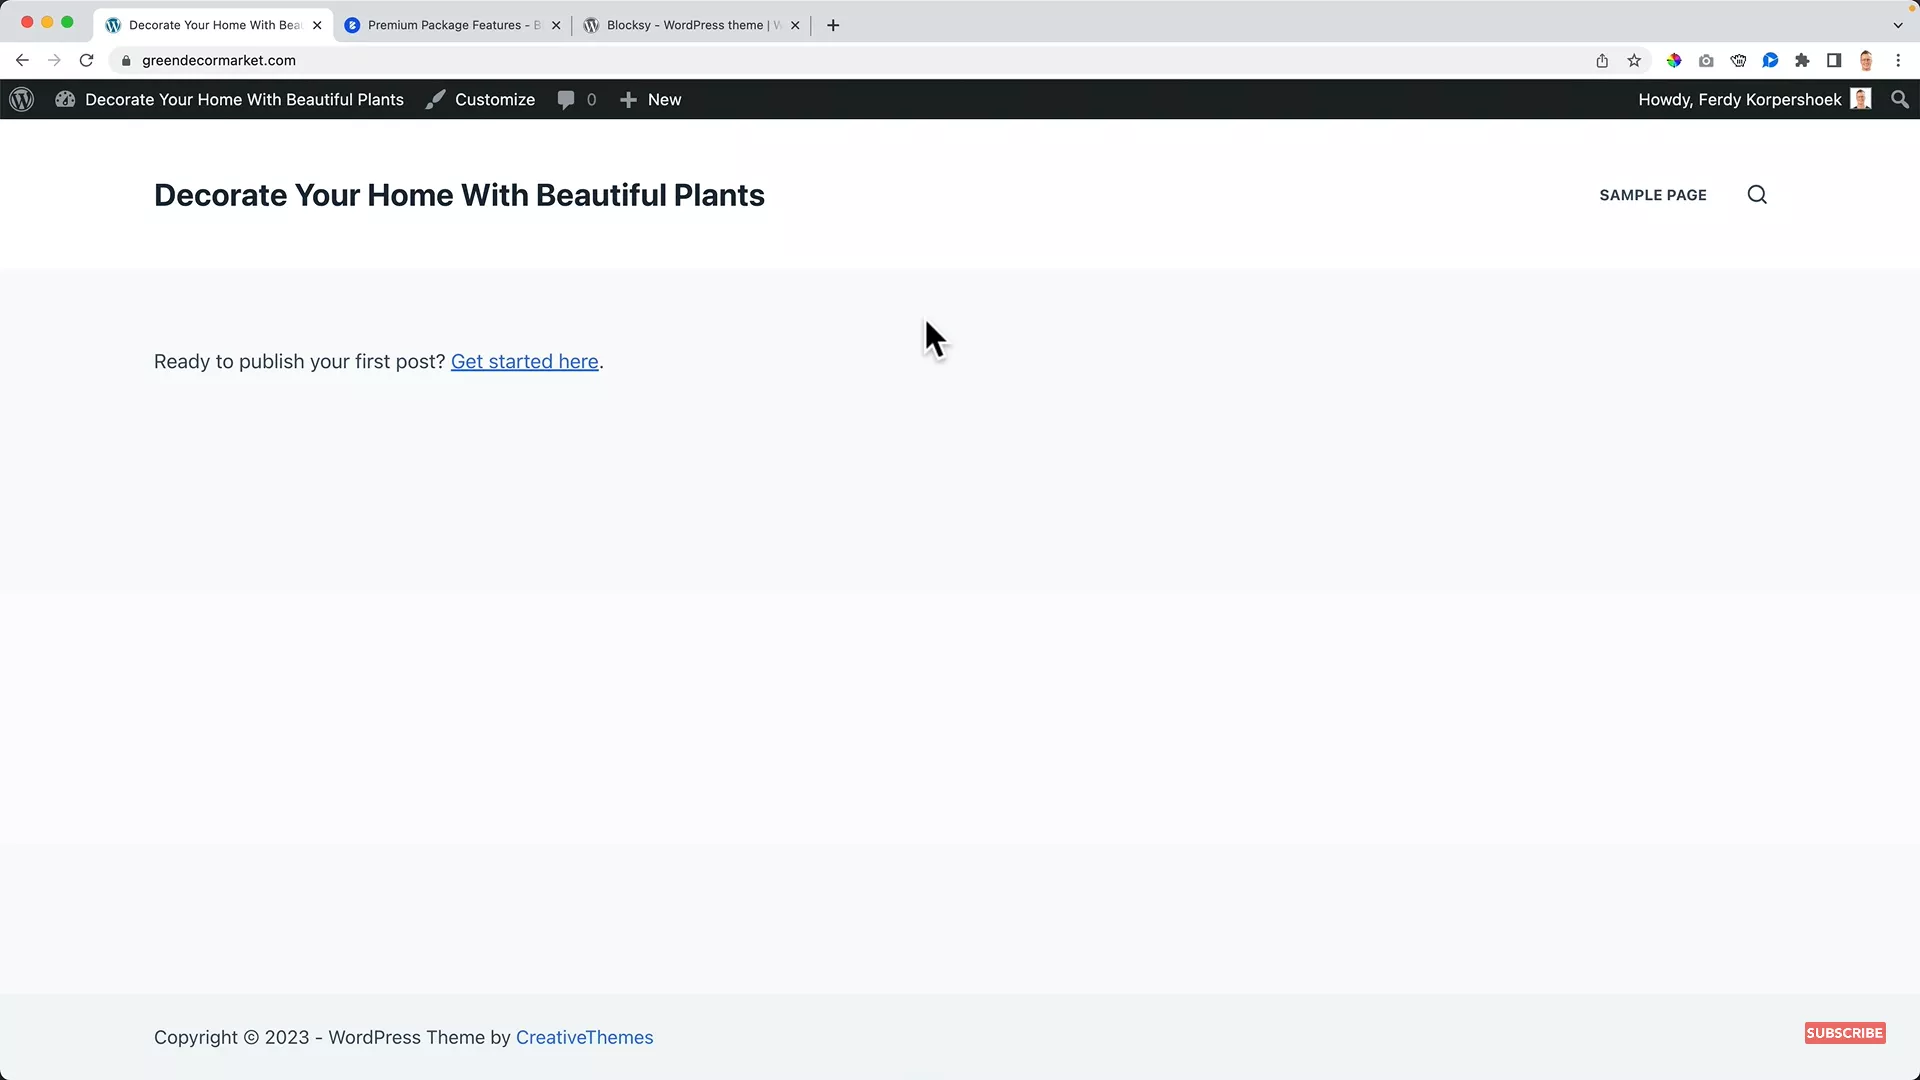
This is by no means the ideal look for your dropshipping store. We’ll make some changes to make it attractive to your website visitors.
And for that, you’ll need to select a starter website template that you can use to import a pre-made website for your dropshipping business.
Go to the backend of your site and notice the Blosksy tab on the left panel. To browse through starter websites, click on this section and head to the “Starter Sites” tab on the top.
Depending on your niche, you can find a template that suits your preferences.
I’m looking for a starter website that:
- Supports Elementor (an amazing free web page builder)
- Matches my niche (green decor)

Keeping these two factors in mind, I opt for the “Floreo” template and hit “Import.”
On the pop-up, skip the child theme as you won’t need it. I recommend choosing Elementor as your page builder.
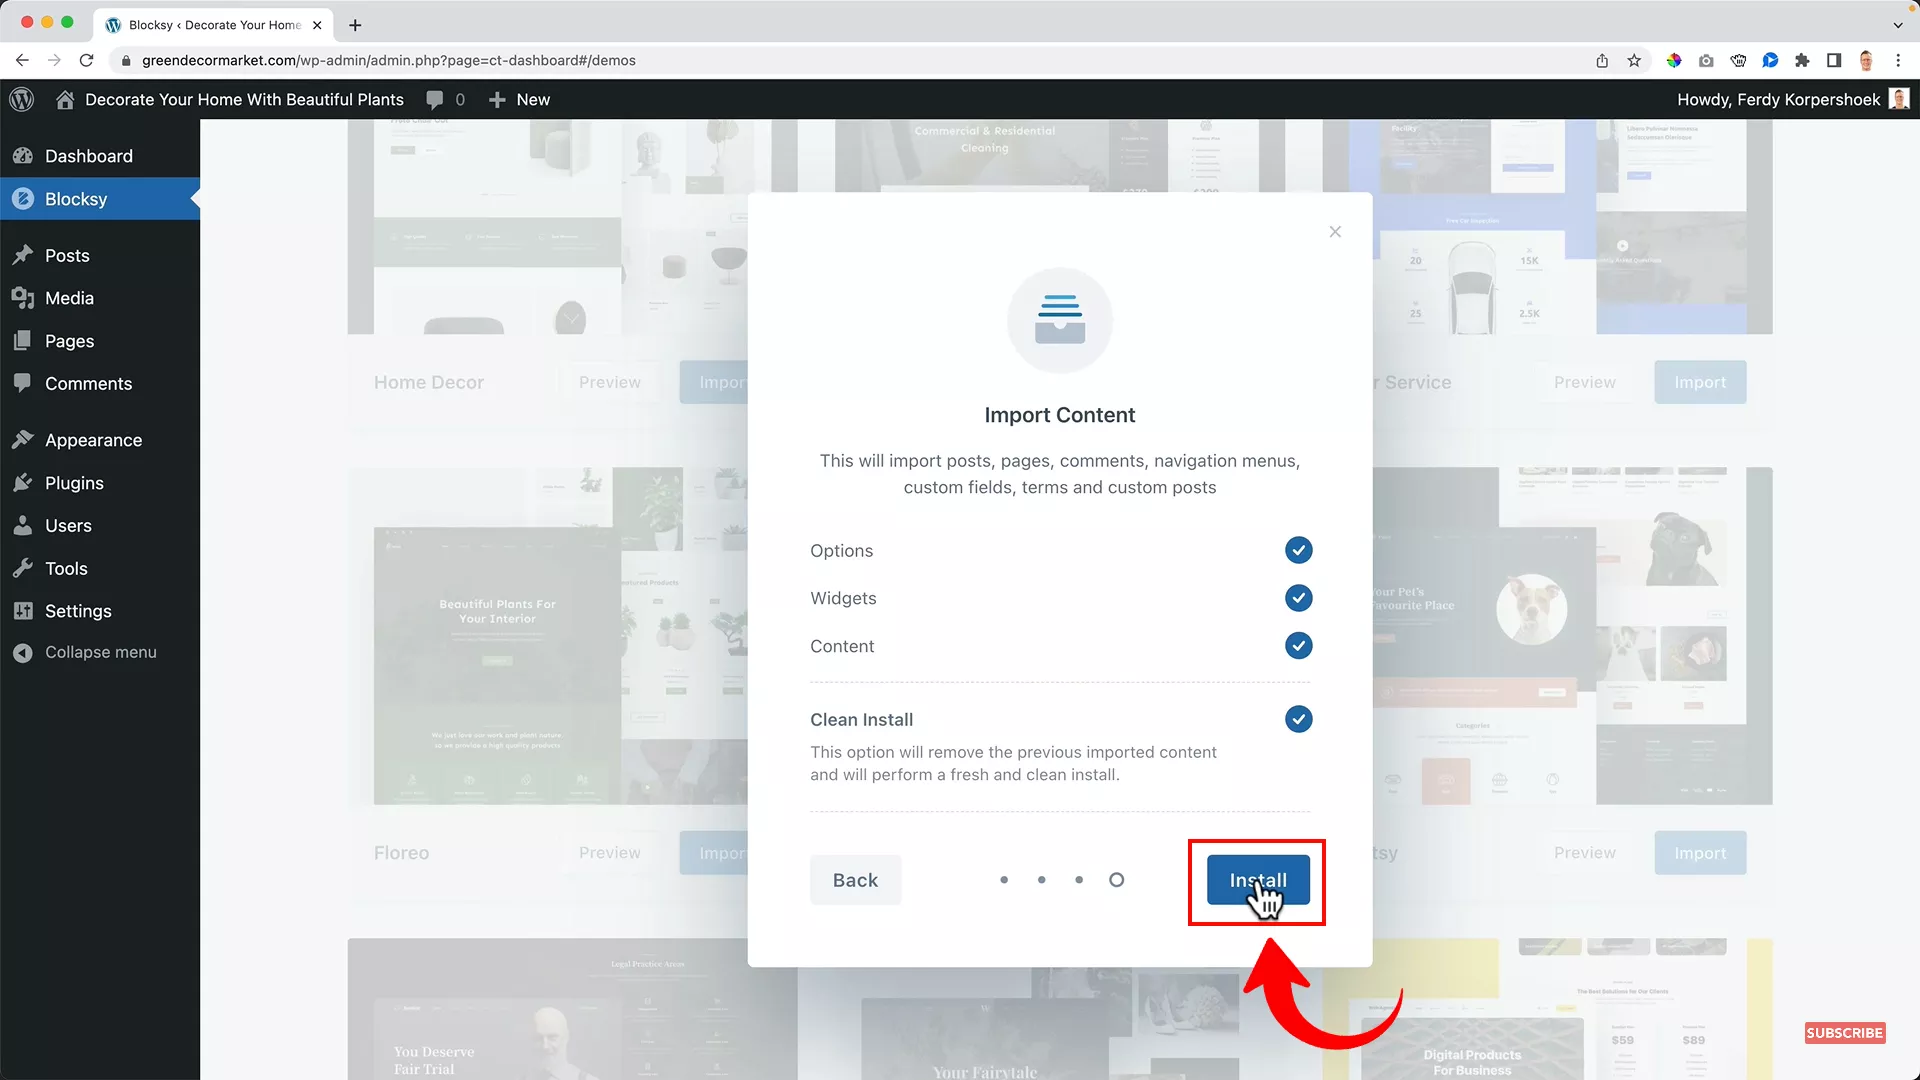
Hit” Next” twice and click “Install.”
Voila, your pre-made webshop is installed! Here’s how it looks for my store:
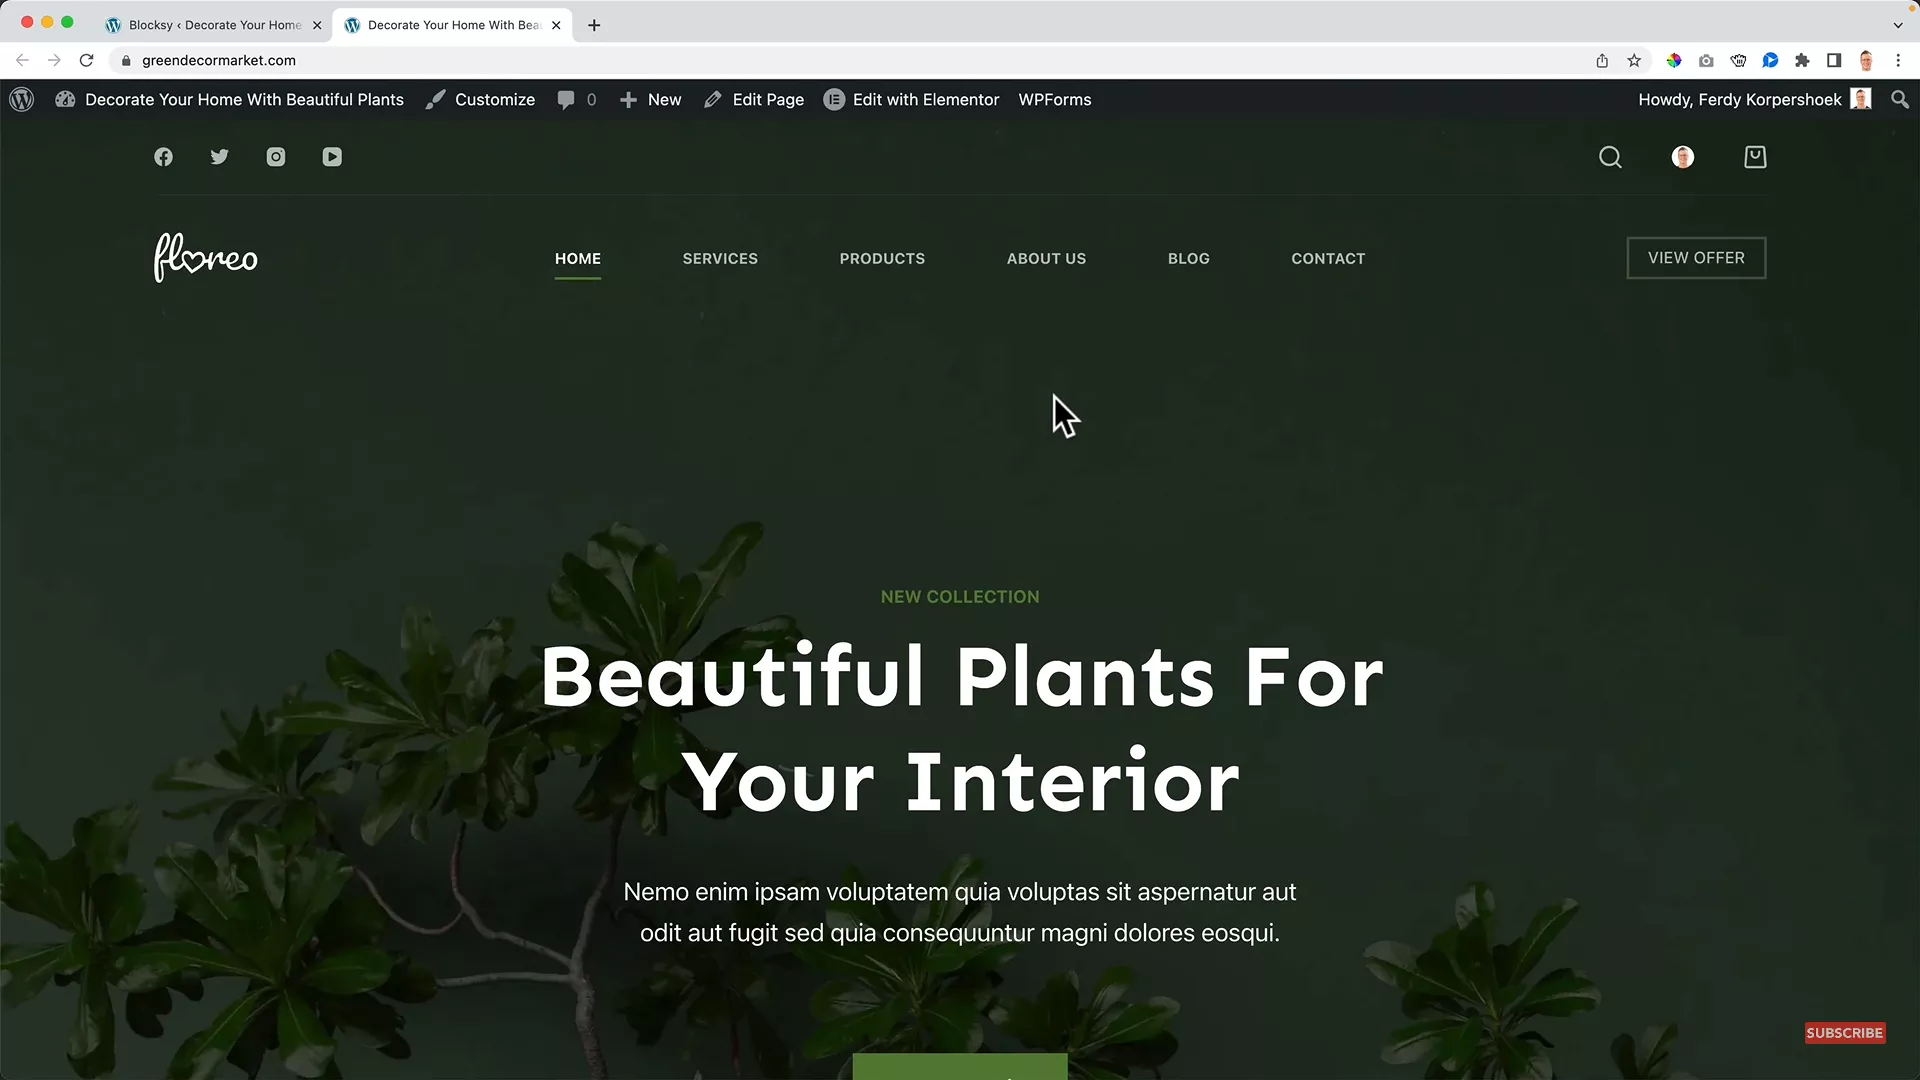
While your webshop looks beautiful, it’s not ready for your website visitors yet. You still need to customize it to make it relevant to your business.
So get creative and start customizing your website by changing the logo, header, product information, adding content to web pages, and much more!
If you’d like to learn how to customize your web pages, check out my easy WordPress guide for beginners. In this guide, I cover how to create a WordPress website from scratch using Elementor.
3. Find a dropshipping supplier
Once your website is set up, it’s time to start looking for a dropshipping supplier for your online business.
Ferdy’s Fundamentals – How does the dropshipping business model work?
The dropshipping business model includes a supplier, a marketer (you, in this case), and customers. The dropshipping suppliers you choose for your e-commerce business will handle everything from inventory to delivery. At the same time, you (the marketer) will promote the products as your own to customers and gain from the profit margins.
Choosing reliable suppliers is necessary for a successful dropshipping business since delivery timelines and product quality depend on them.
VidaXL is my top pick for dropshipping suppliers, especially for beginners. They have over 90,000 quality products, hundreds of product categories, and zero shipping costs worldwide (excluding a few places in Australia).
What makes VidaXL especially appealing for beginners is its user-friendly platform and reliable customer service. If your product niche falls under any of the categories on VidaXL, I recommend you go for it without a second thought!
Pro tip: When starting your first dropshipping business, choose one supplier to make your business model simple and cost-effective.
How to subscribe to VidaXL
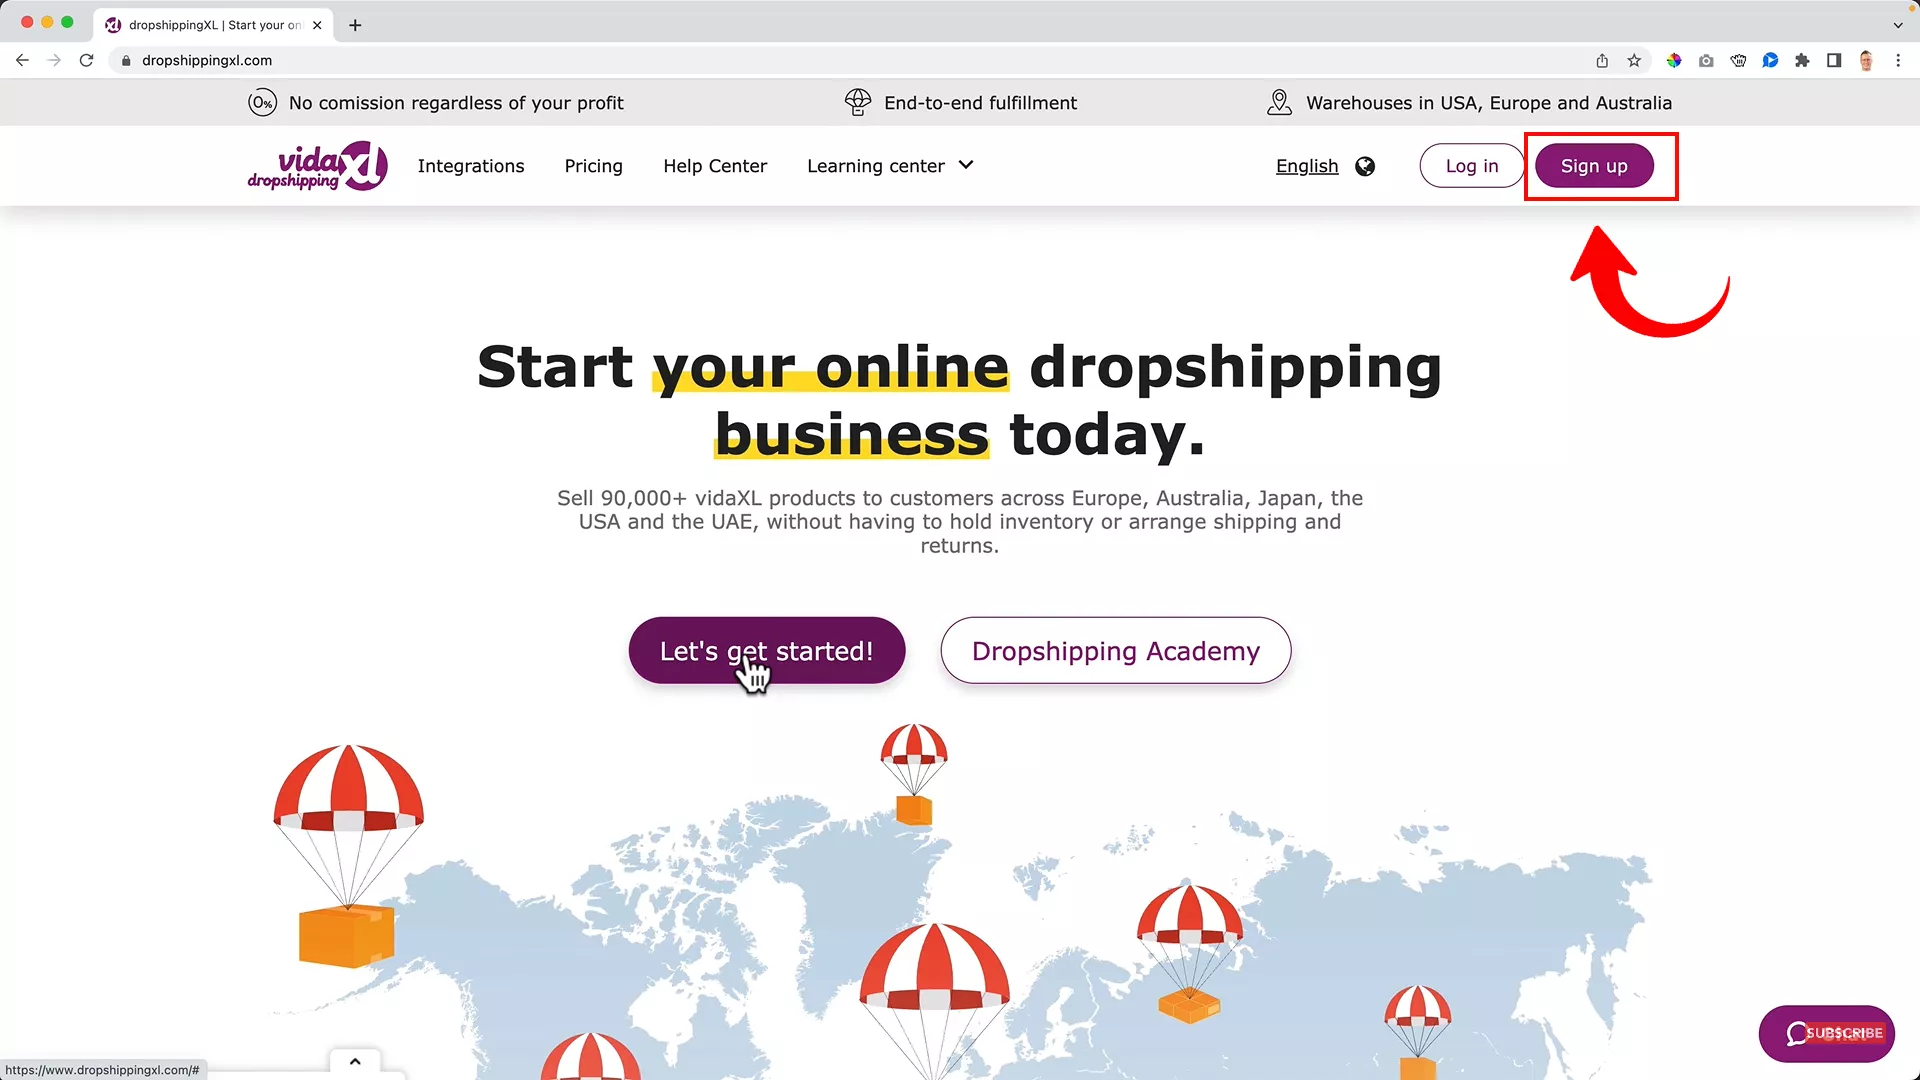
To connect VidaXL to your WordPress, first sign up on the platform as an individual.
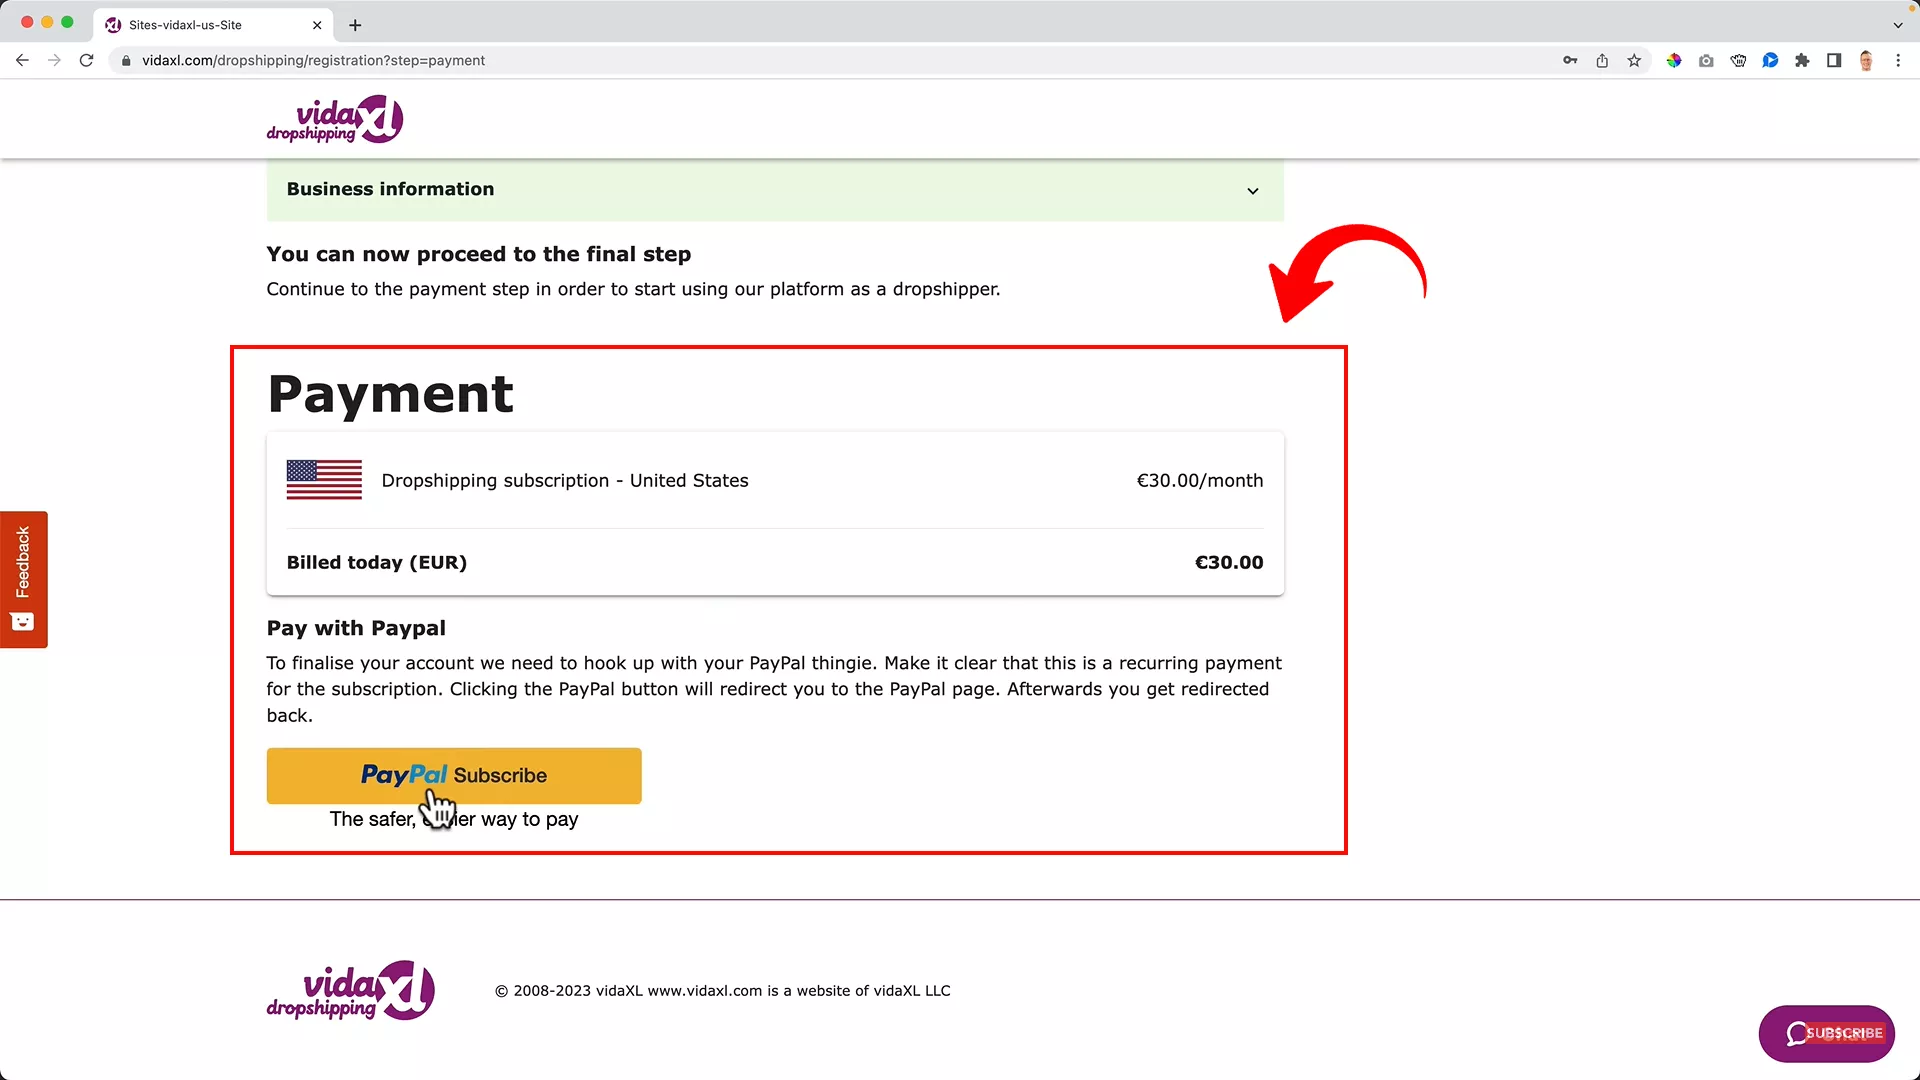
Fill out your details and credentials to sign up, then proceed to pay.
After the payment, you must wait 2-5 business days to get approved.
Why subscribe to VidaXL?
The VidaXL monthly subscription is your access to wholesale dropshipping accounts, allowing you to get a special wholesale price on all the products. With the VidaXL monthly subscription, you can sell any item on the platform at a profit margin on top of the wholesale price.
4. Add dropshipping products to your online store
After choosing your dropshipping supplier, you can now add your chosen dropshipping products to your e-commerce website.
For newcomers to e-commerce, it’s crucial to understand that a diverse product portfolio can boost your profit-making potential.
Keeping this in mind, your natural approach should be to include as many hot-selling products as you can in your store.
Consider this scenario: you decide to feature a vast range of 500 products in your online store. Manually adding each product would be a daunting task. It could take you days or even weeks!
However, I believe in smart and efficient work. Time is money, remember?
To streamline this process, I recommend using Woosa.
Ferdy’s Fundamentals – What is Woosa?
Woosa is an efficient WordPress plugin designed to automate the bulk importation of products. It effortlessly handles product images, descriptions, prices, and more, ensuring everything stays in sync with your supplier’s database.
So, if your supplier changes the price of your products in the future, Woosa will automatically reflect that on your website.
And that’s what I call effortless product management! All thanks to Woosa.
While this plugin is paid, it delivers high value for money. It lowers the risk of price discrepancies and order cancellations due to stockouts.
Activate Woosa on WordPress
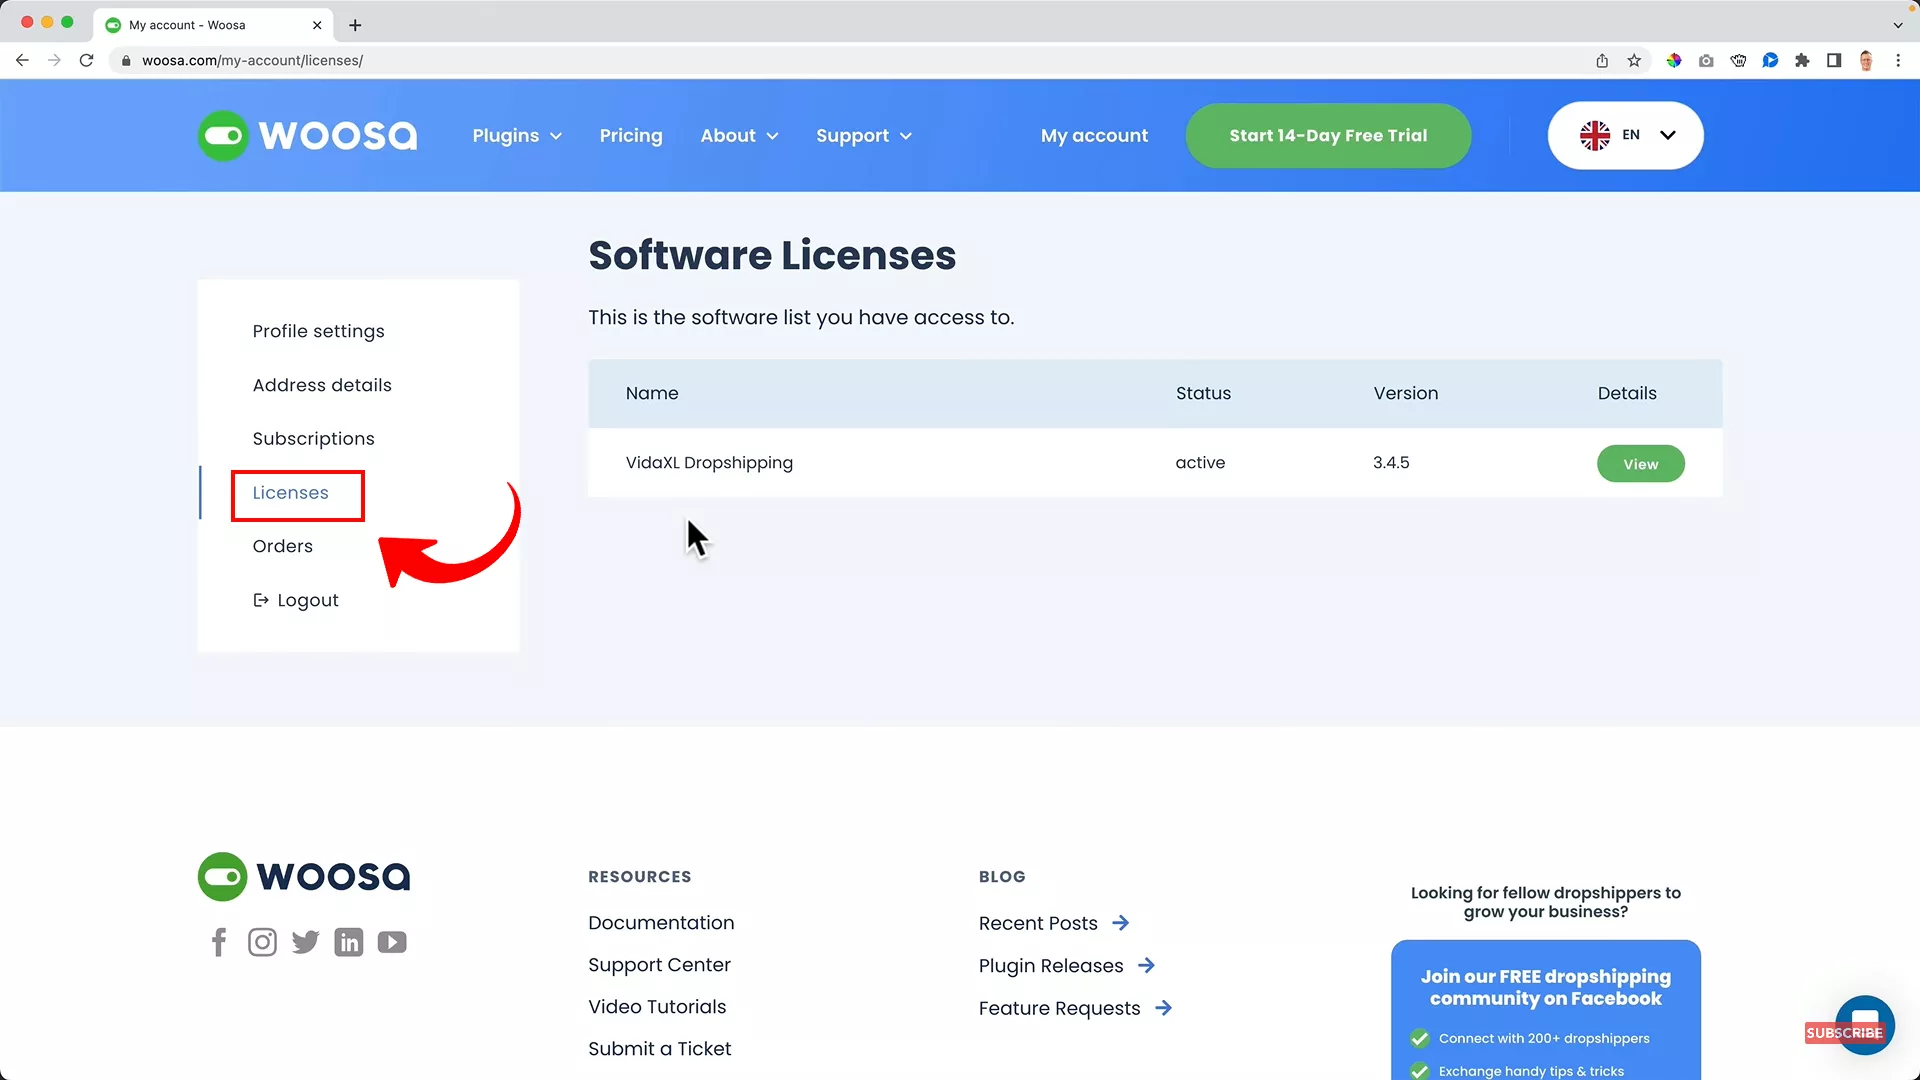
After subscribing, log in to Woosa and select your supplier by selecting “Licenses” from the left menu. I will be selecting VidaXL here. But you can pick from multiple options based on your location.
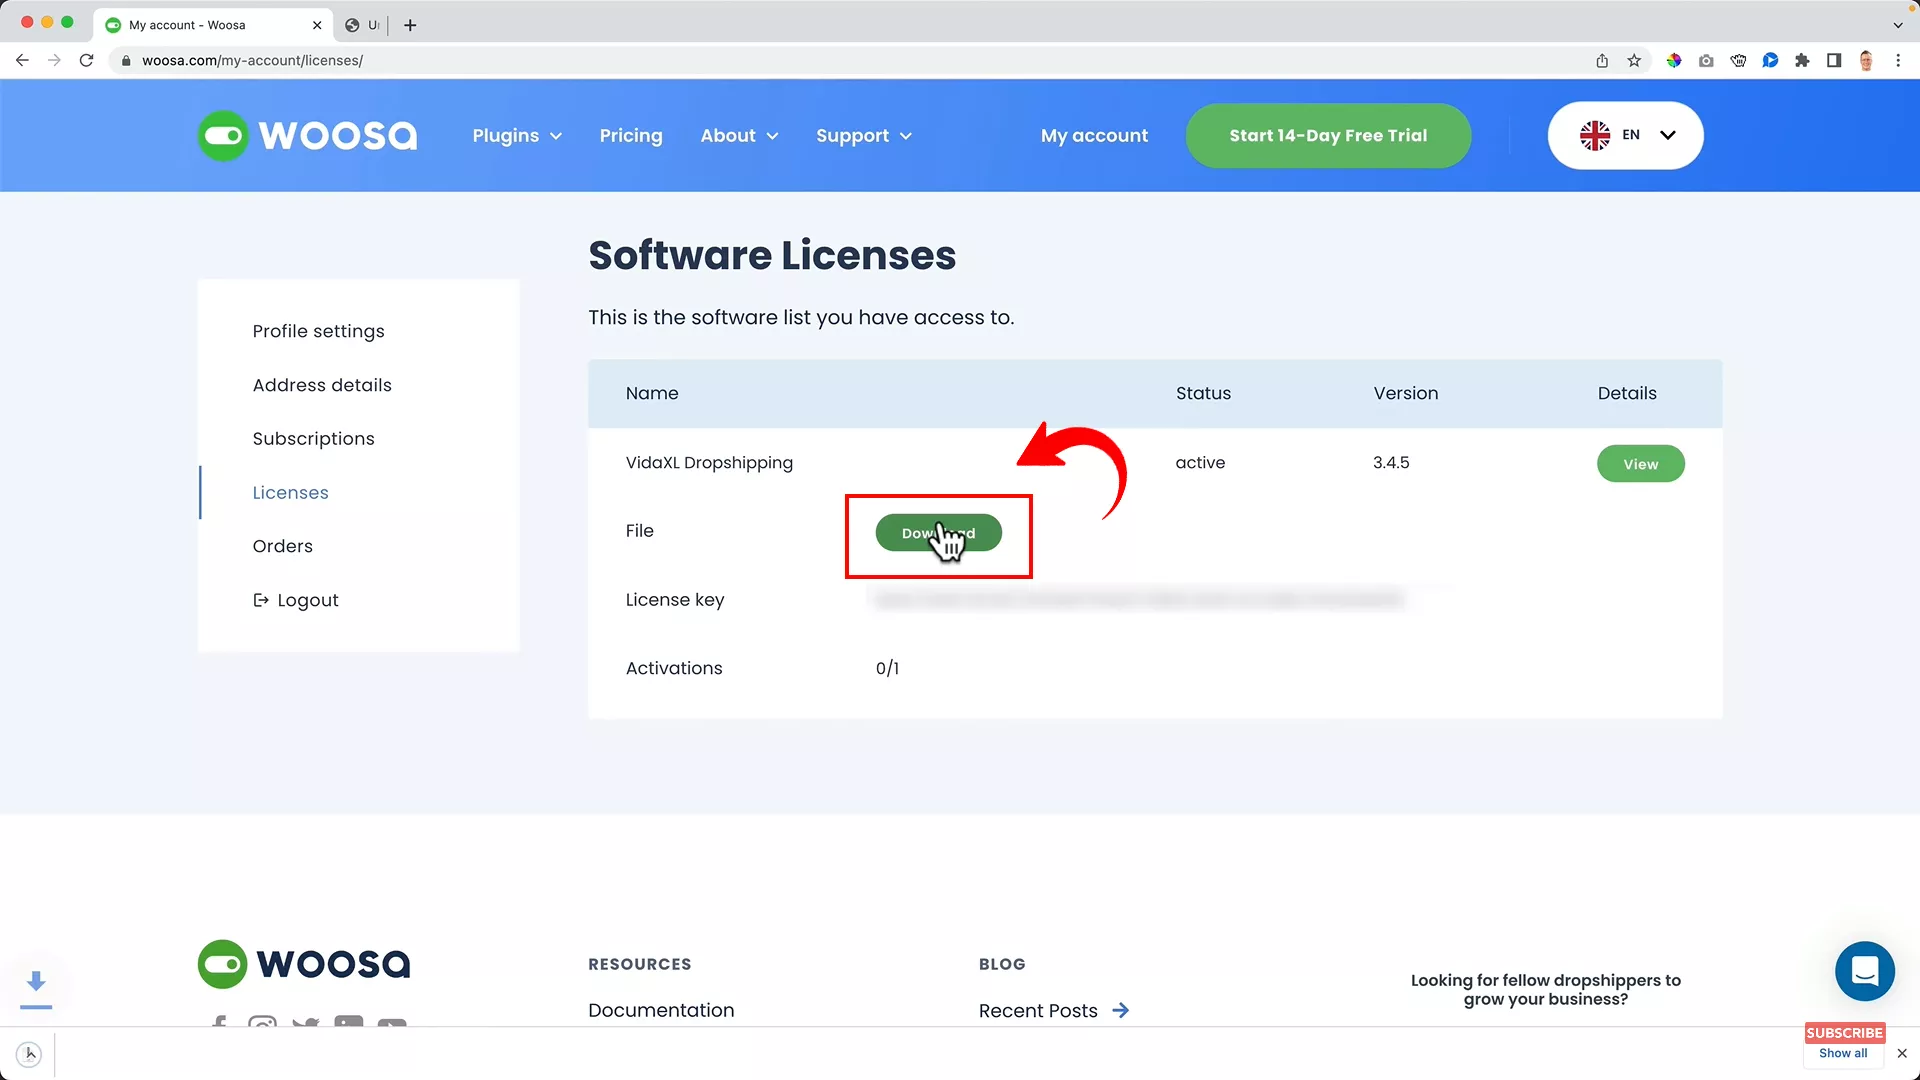
Next, on the same tab, you will see a download option for the plugin file. Click to download the file.
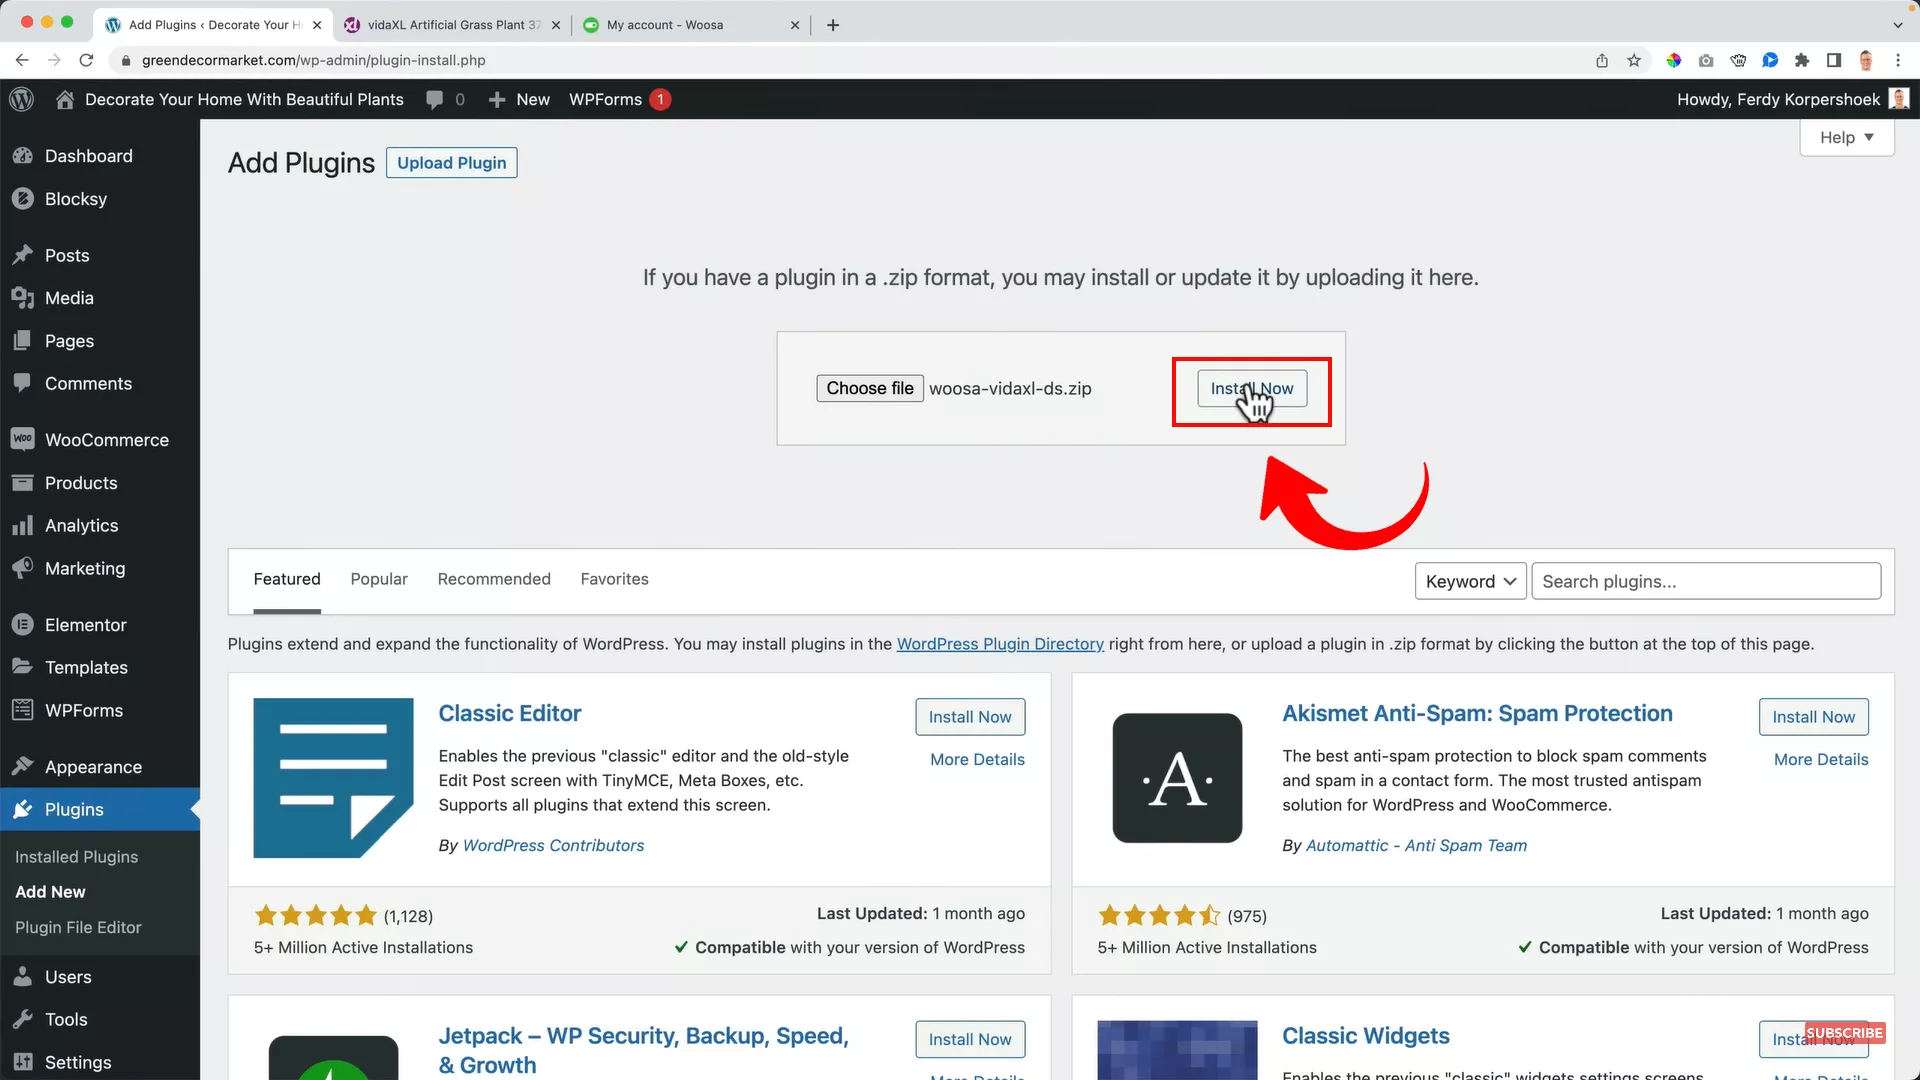
Upload the file to WordPress from Plugins -> Add New -> Upload Plugin -> Install Now.
Once downloaded, activate the Woosa license on WordPress using the license key from Woosa’s license tab.
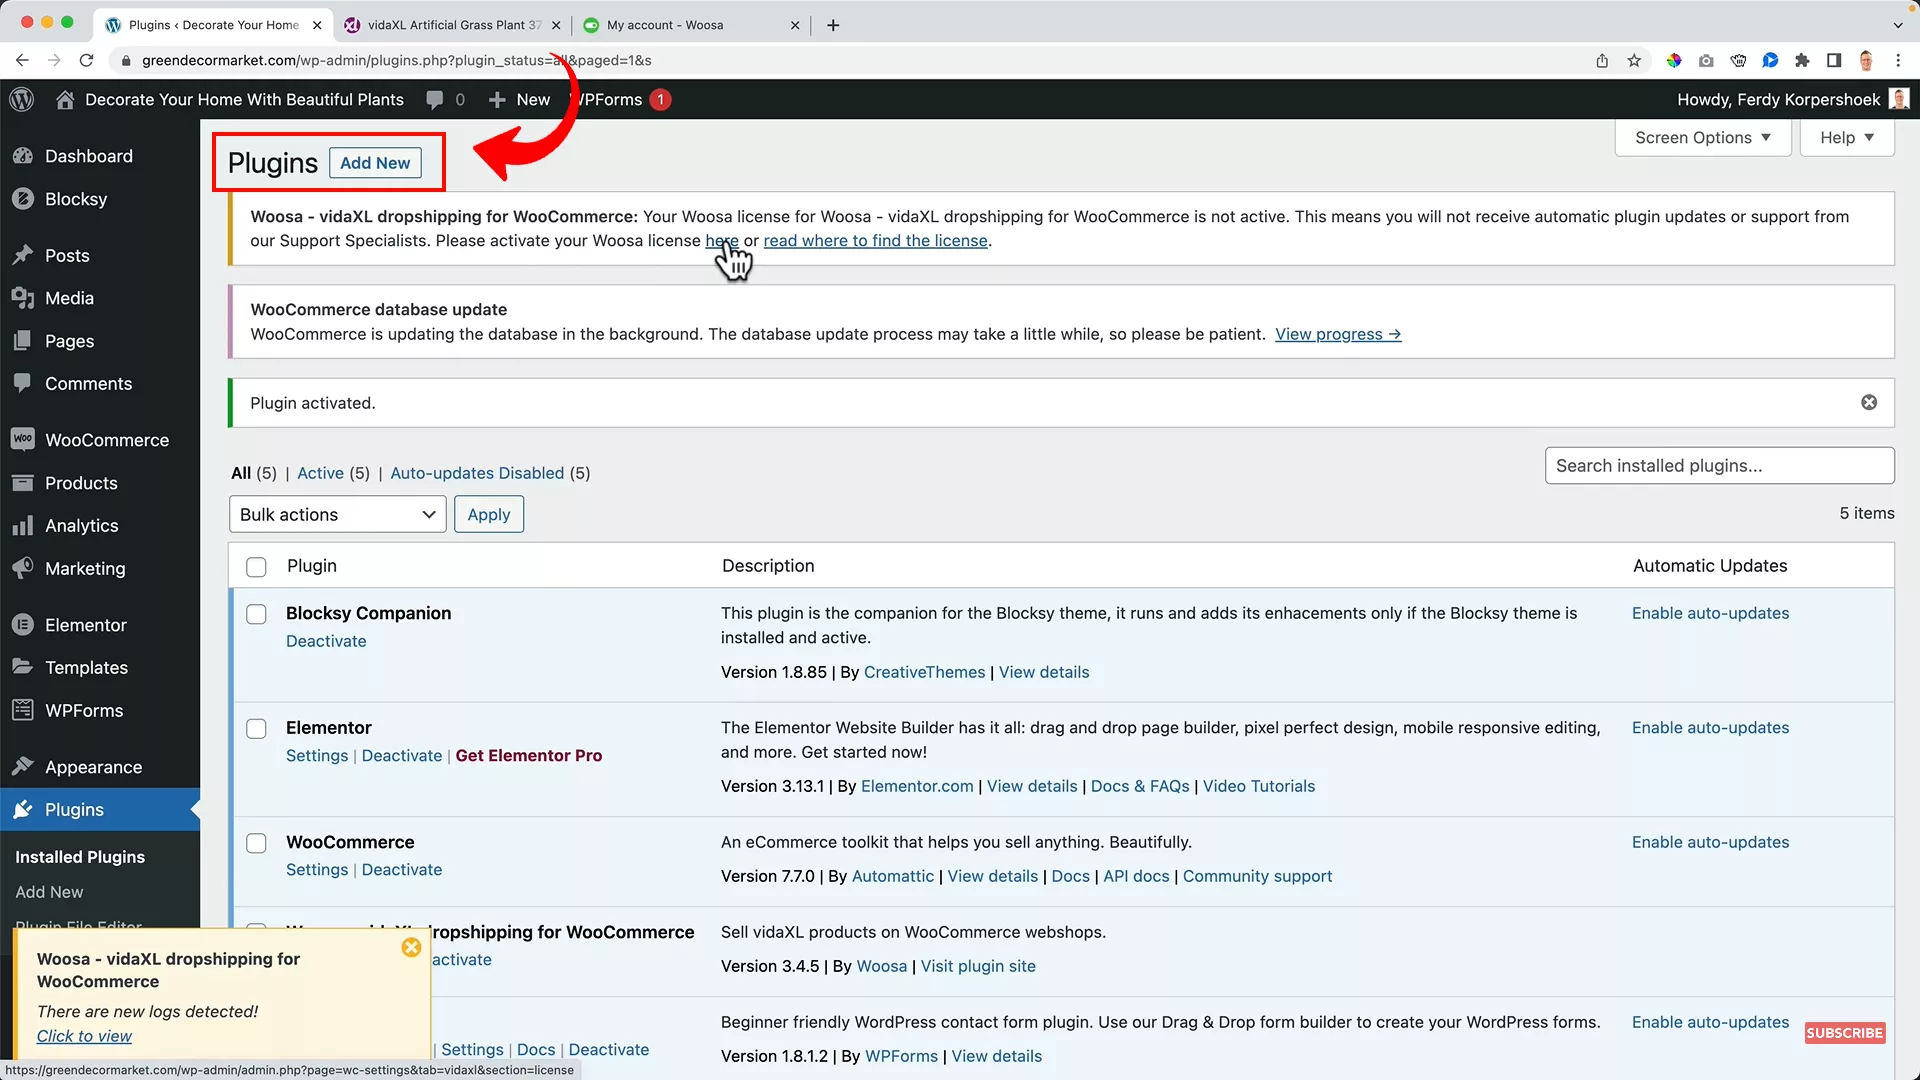
To do that, click on the dialog that appears on top of your plugins tab on WordPress.
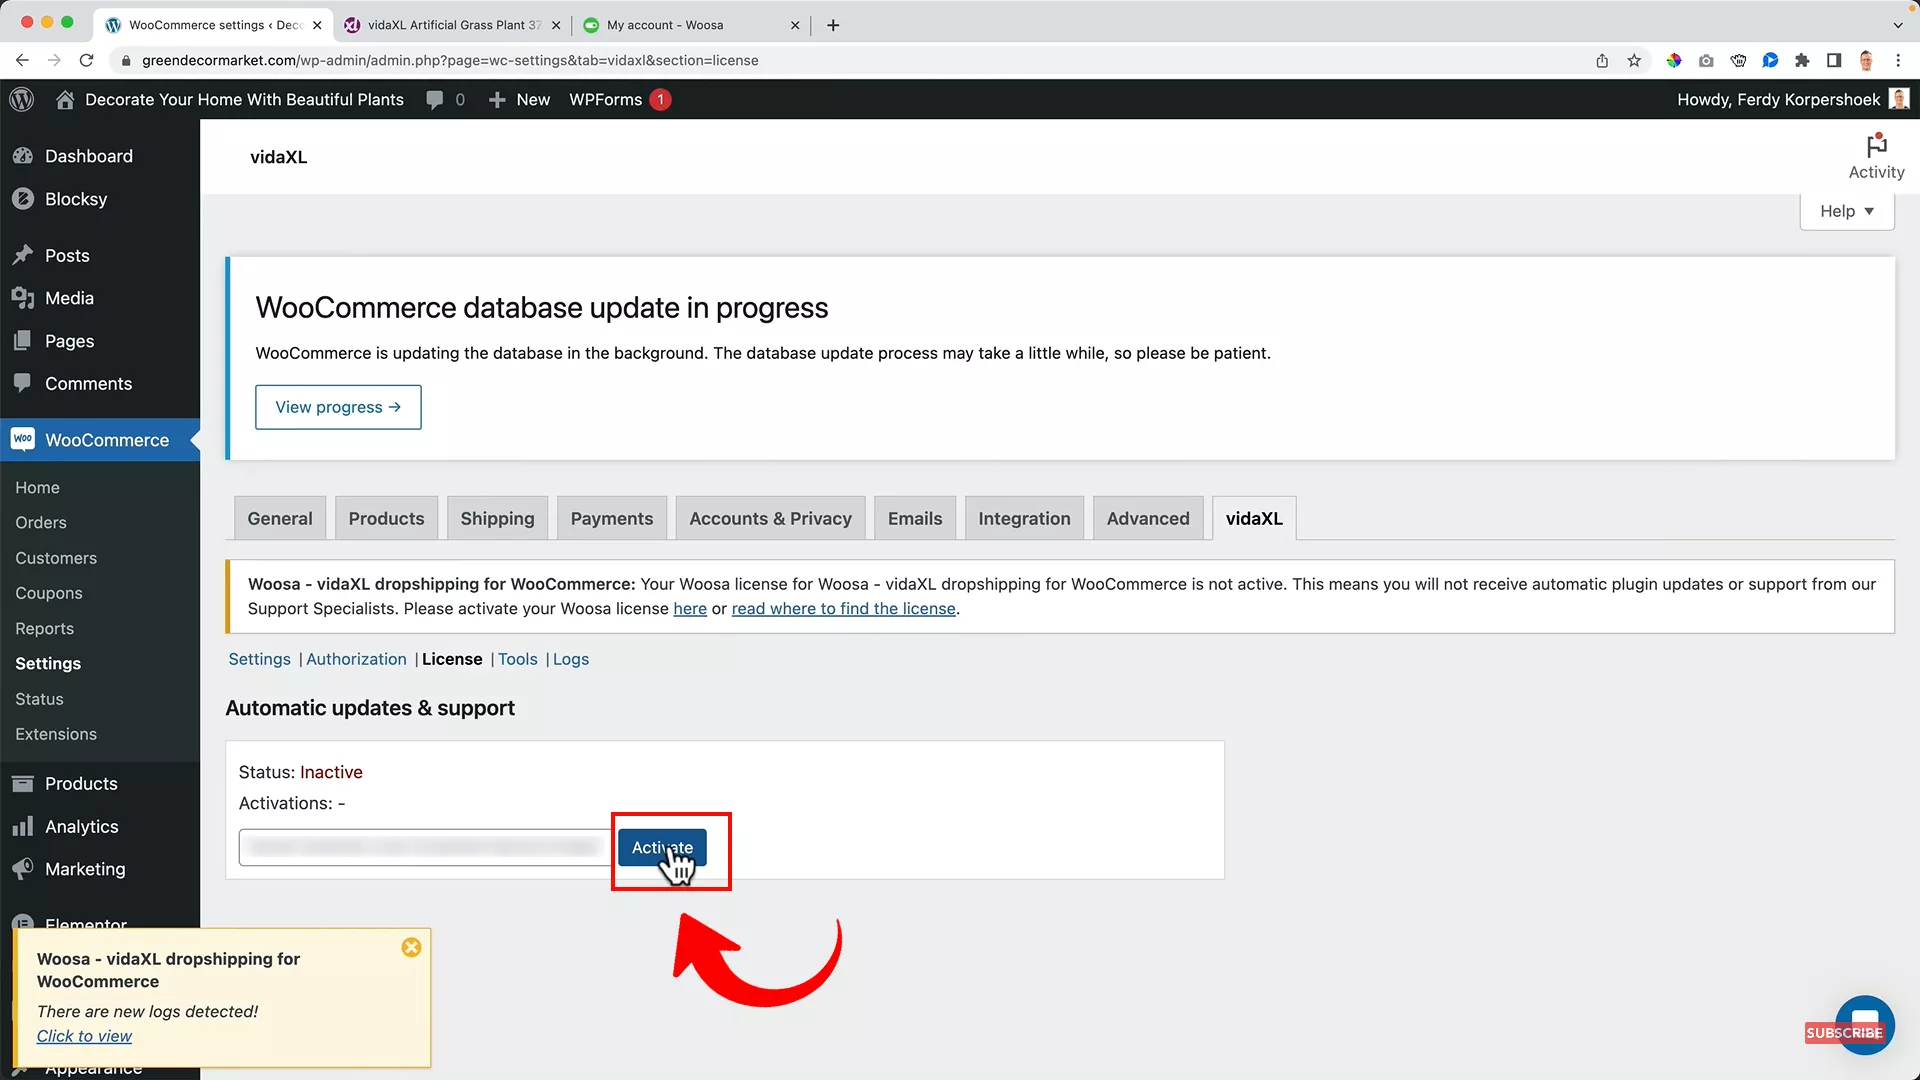
Next, copy the license key from your Woosa account, paste it into the “License Key” field, and hit “Activate.”
Configure Woosa Settings
Good going! Now, let’s start configuring Woosa settings.
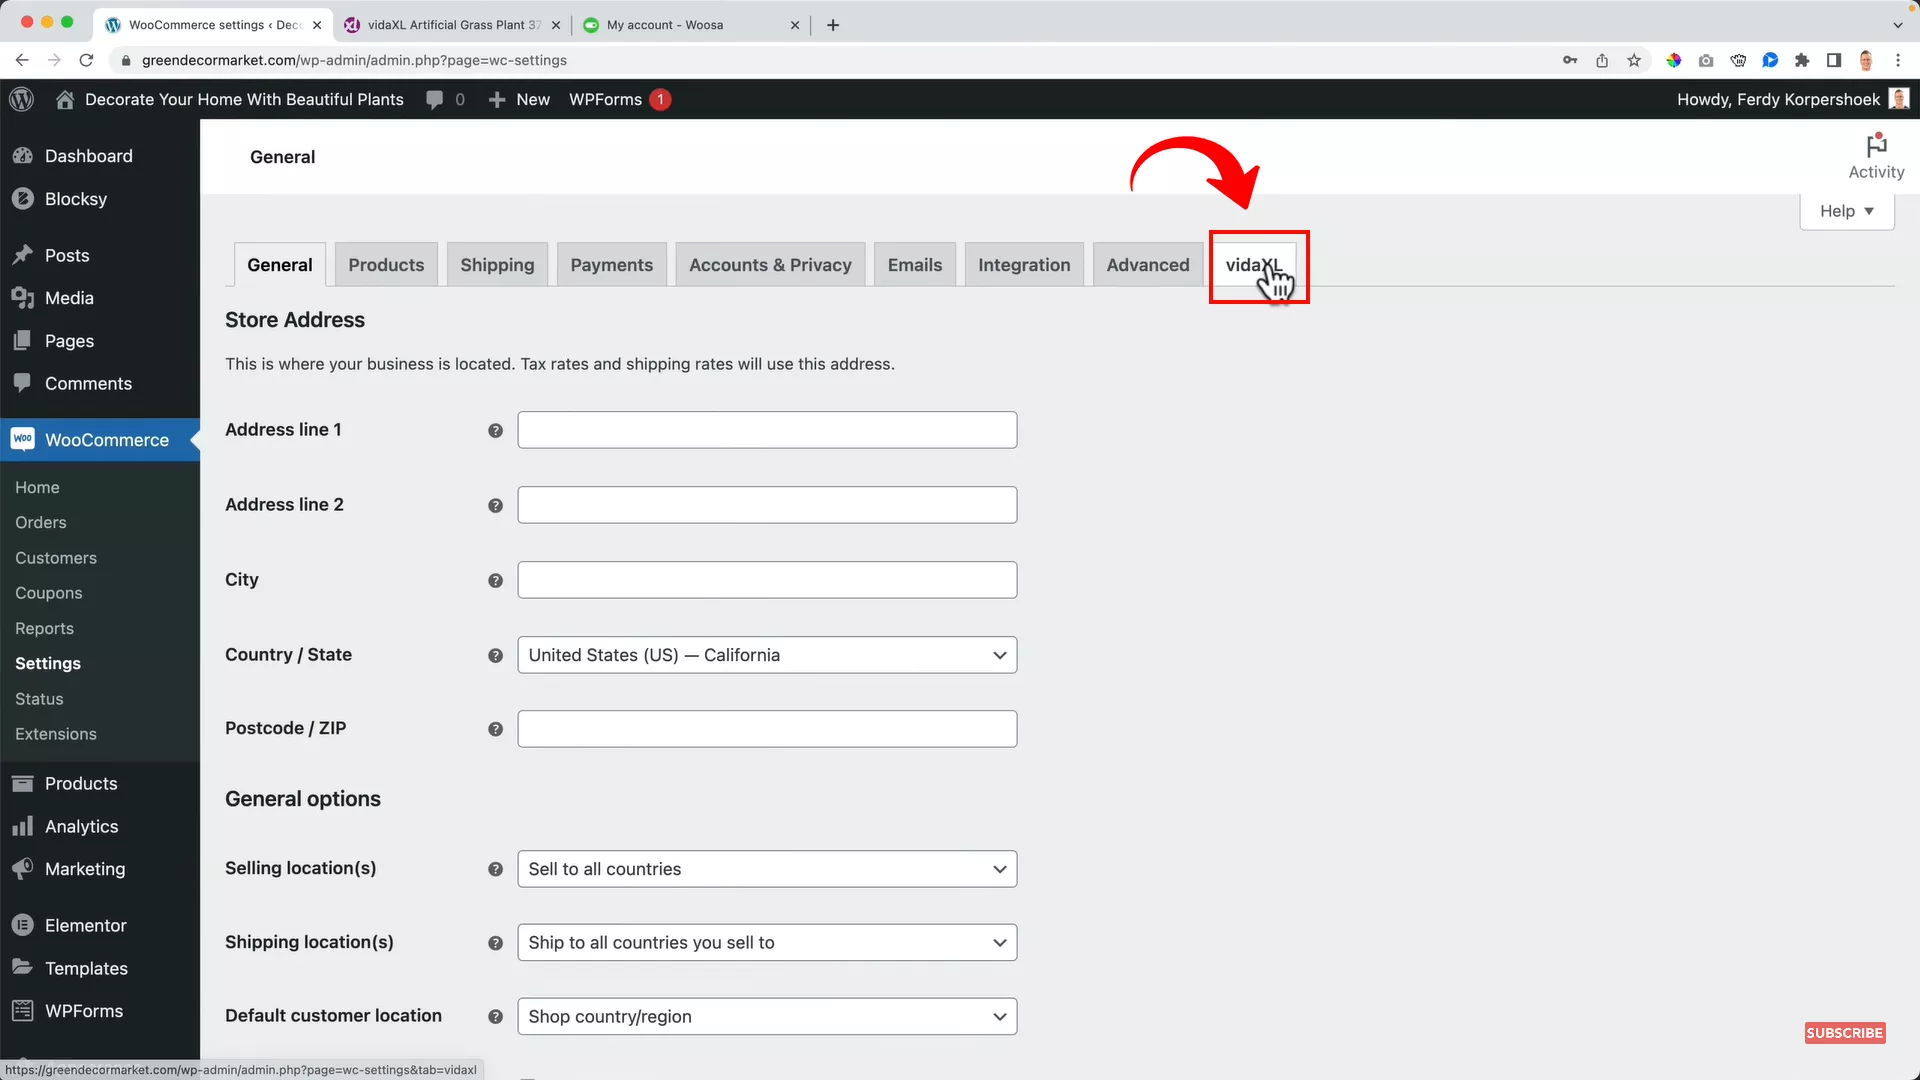
From the menu on the left, go to WooCommerce -> Settings and then click on the VidaXL tab.
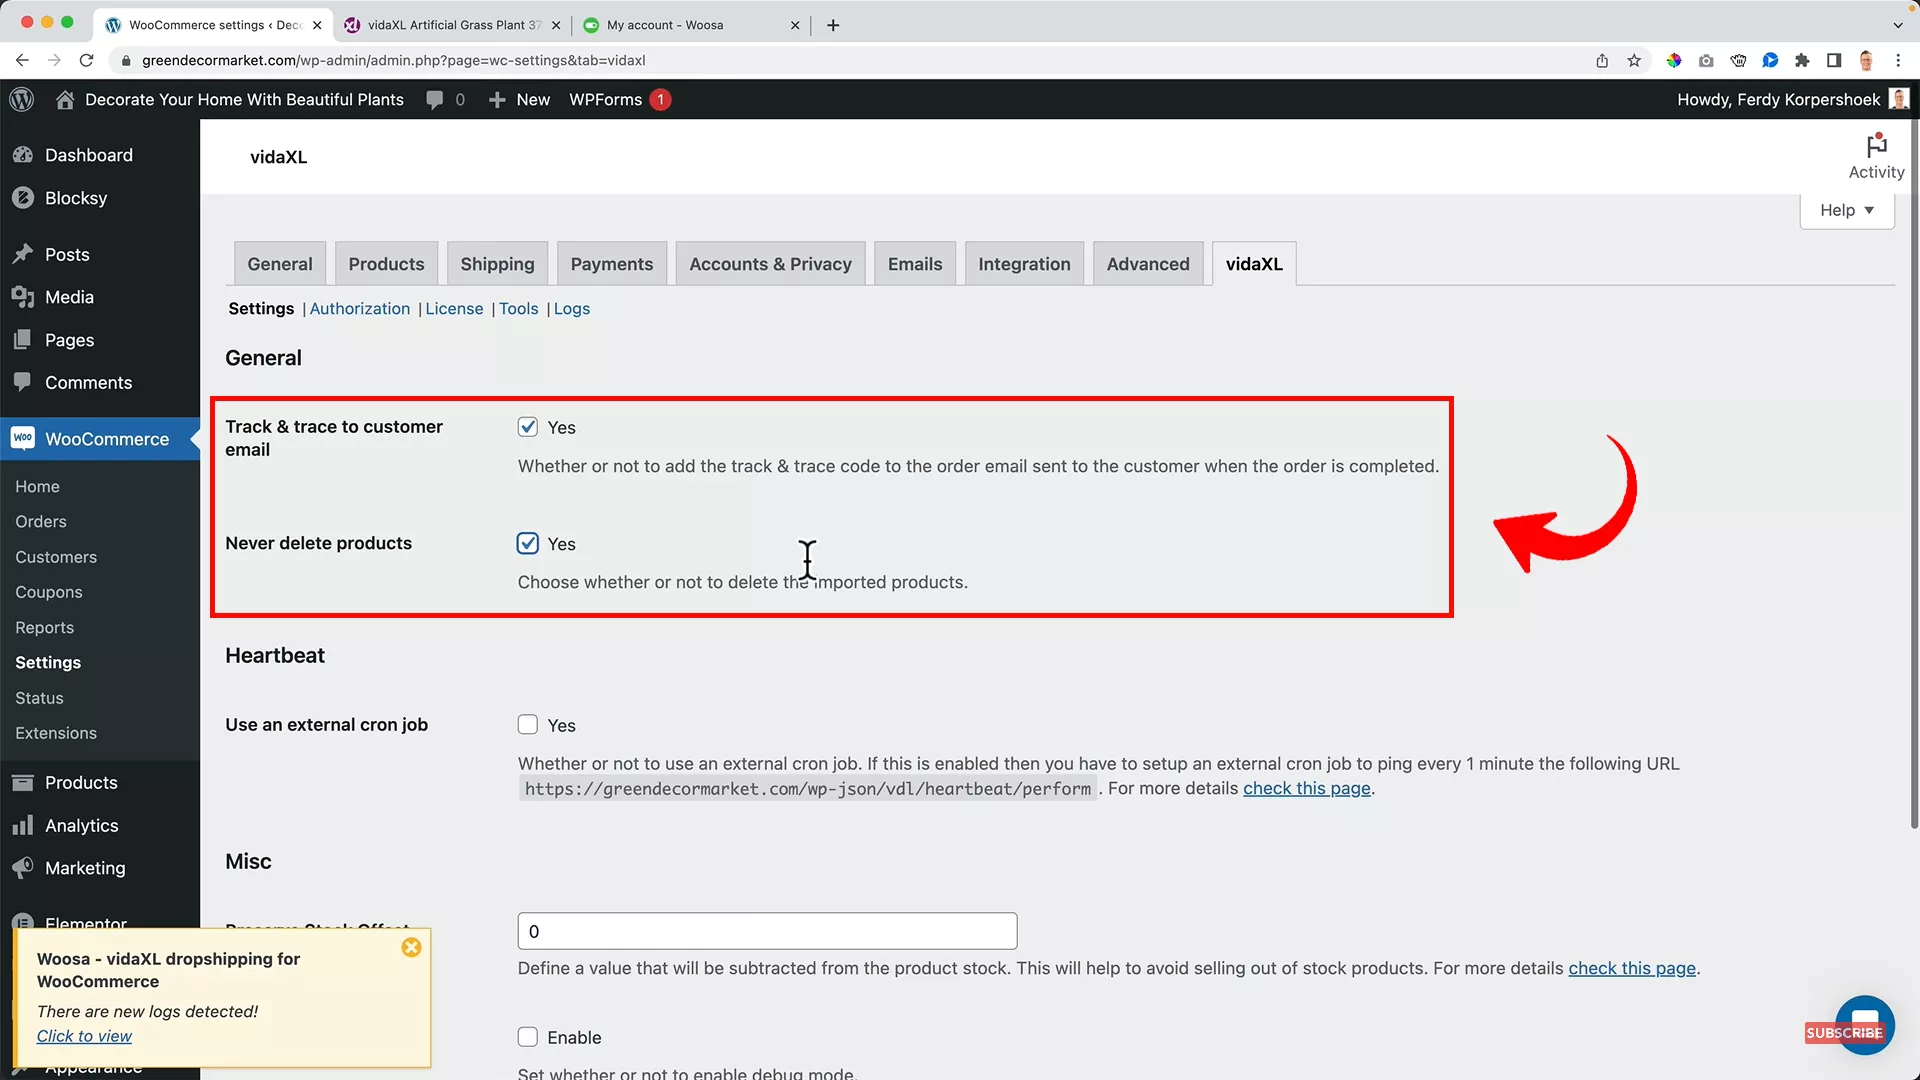
Check ‘yes’ for the following:
- Track and trace to customer email
- Never delete products
Considering VidaXL’s popularity as a dropshipping supplier, it’s common for multiple retailers to list the same products. This situation poses a unique challenge: stock availability.
Due to the brief sync delay (about 1 minute) and the time it takes to process an order on VidaXL after receiving it in your store, there’s a risk that a product may sell out on their end before you can confirm the order.
This is where the concept of stock offset becomes crucial.
Ferdy’s Fundamentals – What is stock offset?
Stock offset acts as a safeguard, providing a cushion to protect your business from the risk of selling products that are no longer in stock. Think of it as a buffer that accounts for potential delays and discrepancies in stock levels, ensuring you don’t promise customers products you can’t deliver.
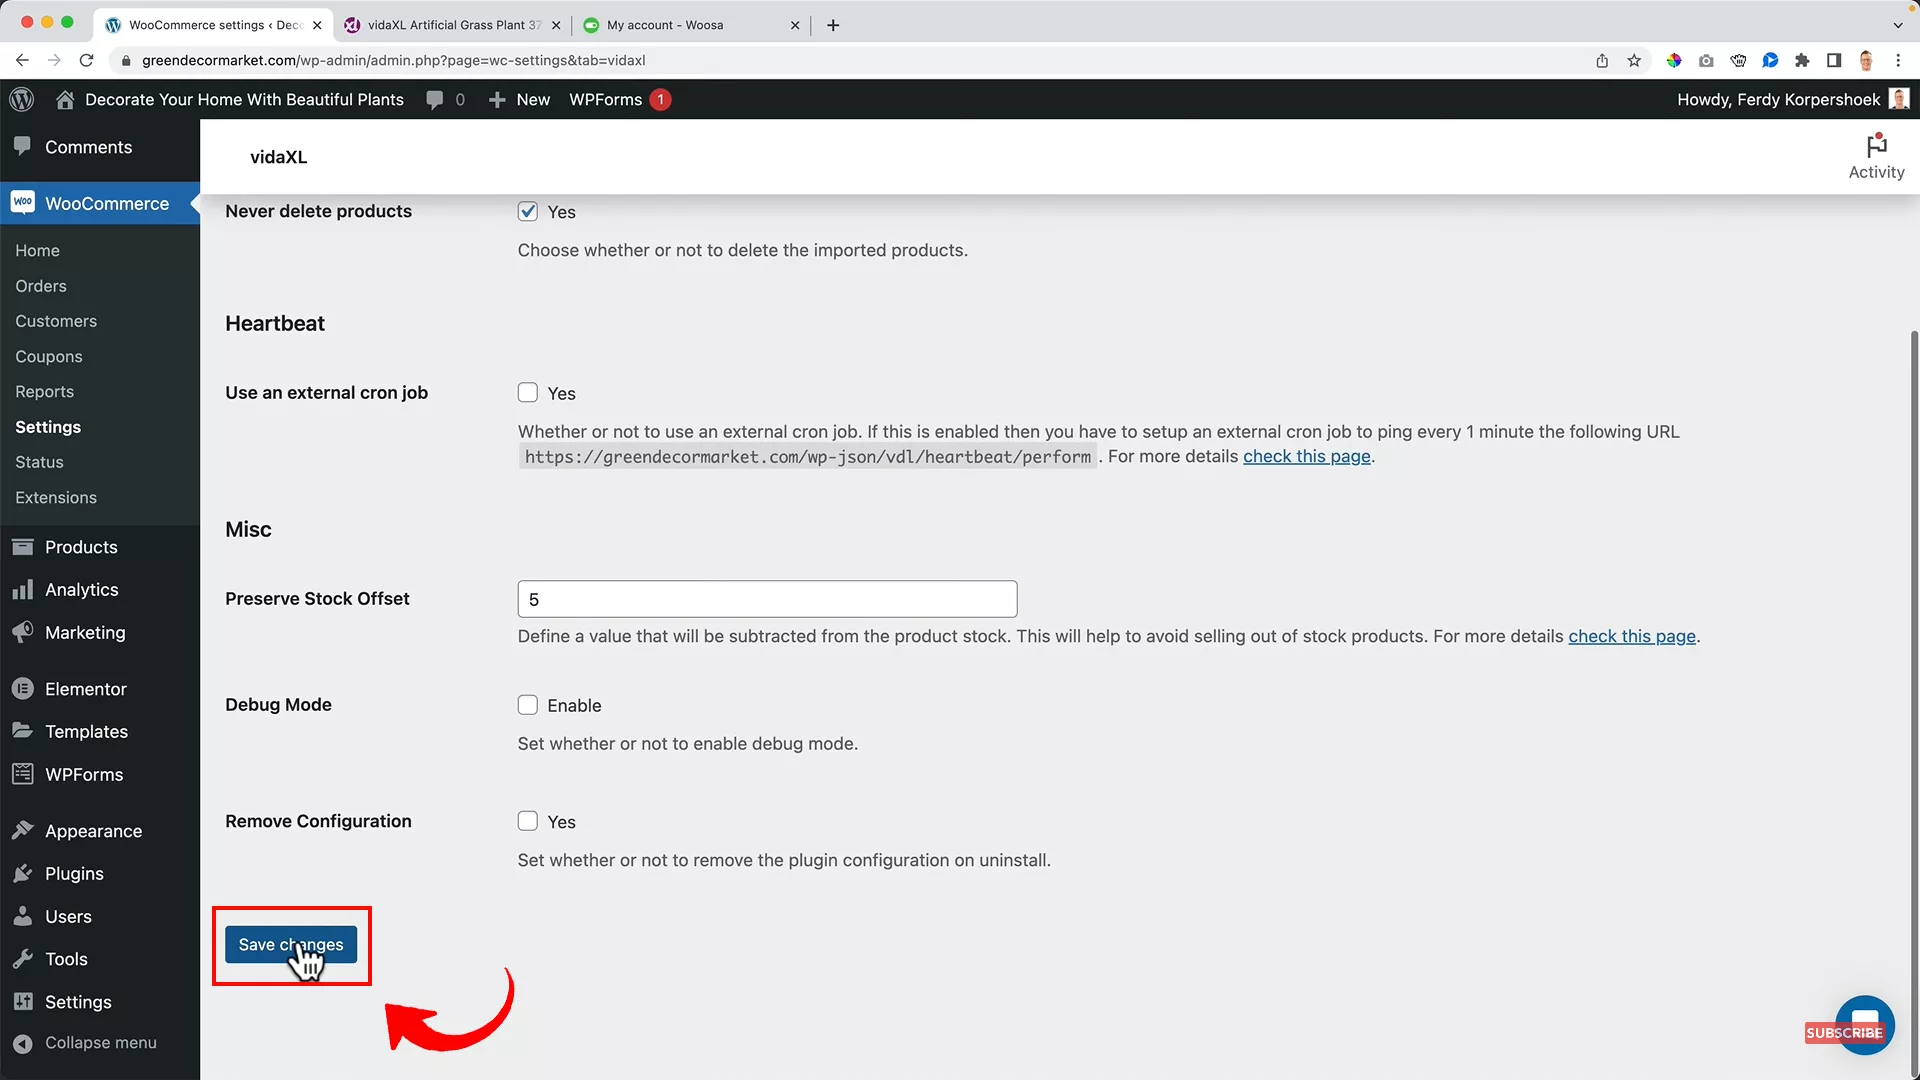
So, to avoid this issue, set the stock offset to 5, 10, or more, and click “Save changes.”
Activate VidaXL on WordPress
Now, it’s time to check your inbox and see if you got that confirmation email from VidaXL.
I got it within 24 hours of setting up my account.
If you did, then let’s activate VidaXL on your WordPress.
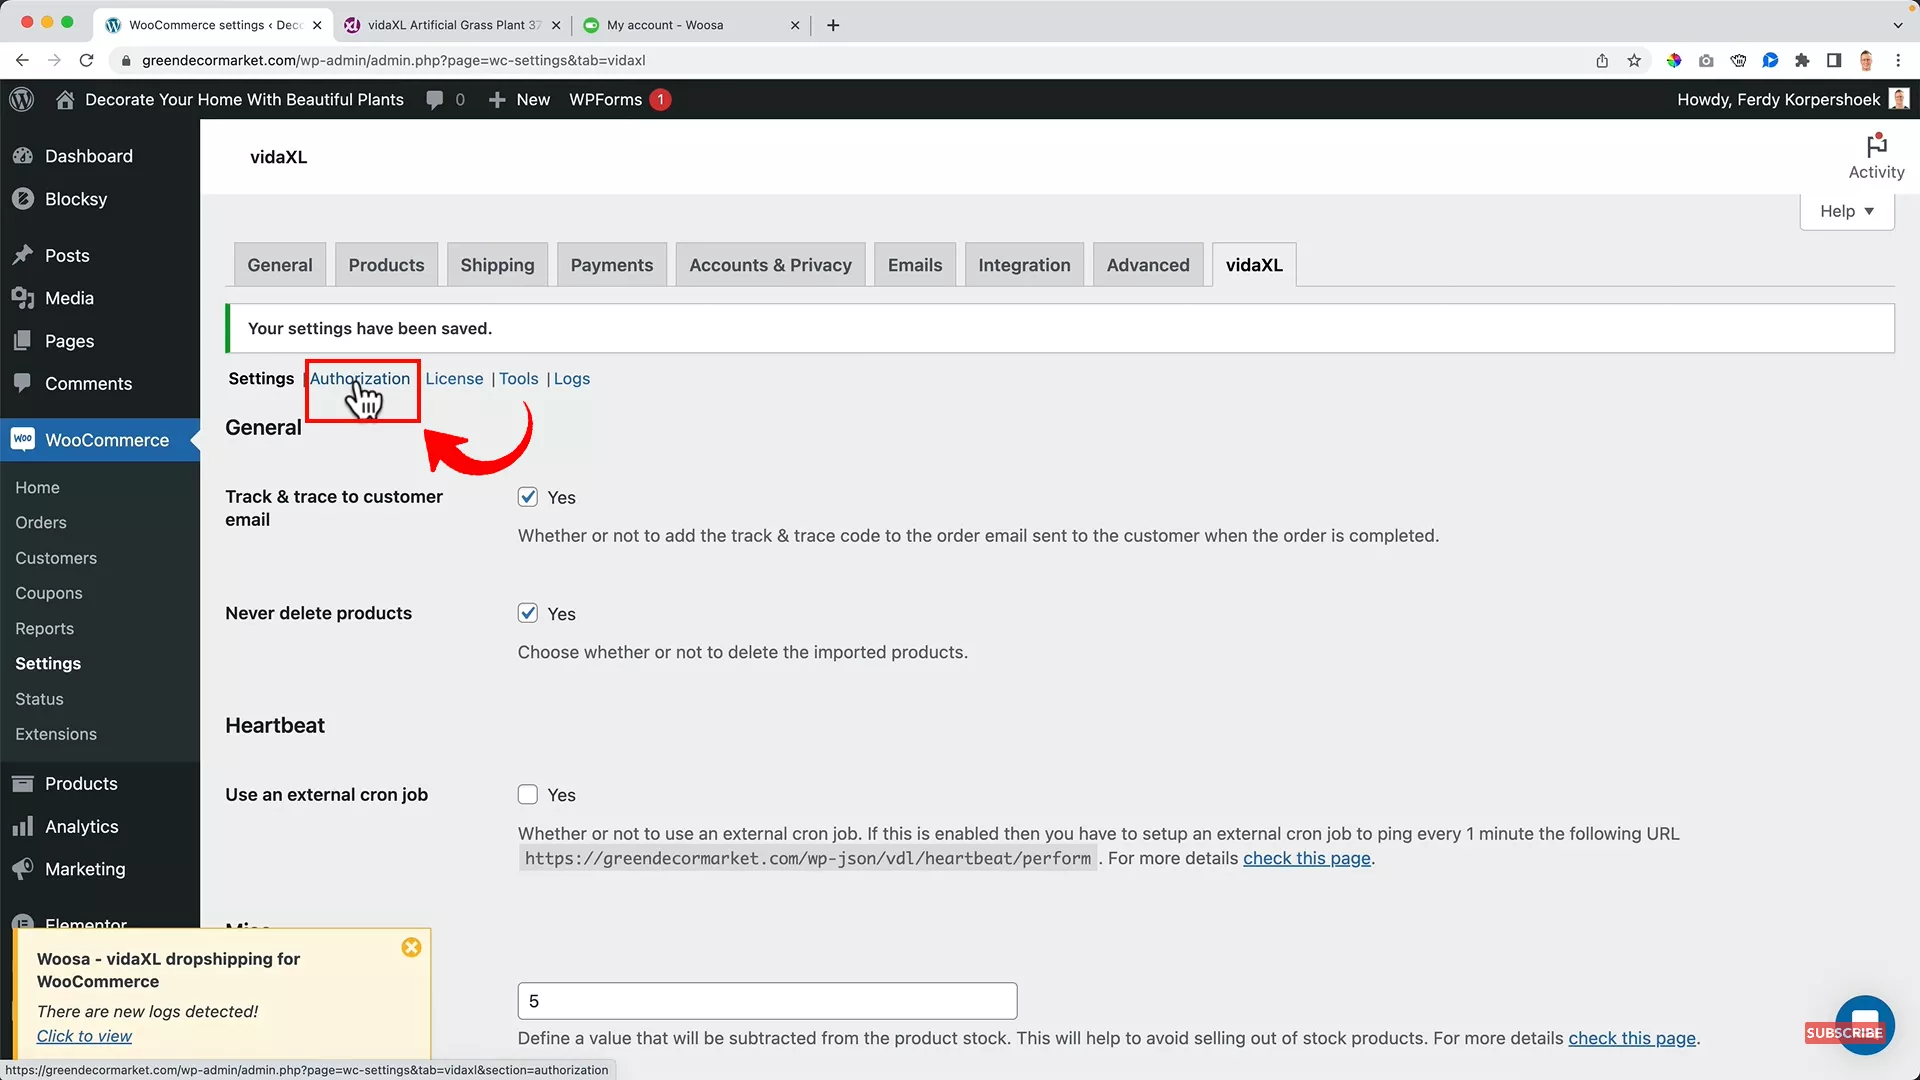
On your WordPress dashboard, go to WooCommerce -> Settings and click “Authorization”.
Log in to your VidaXL account using the credentials you received in the confirmation email.
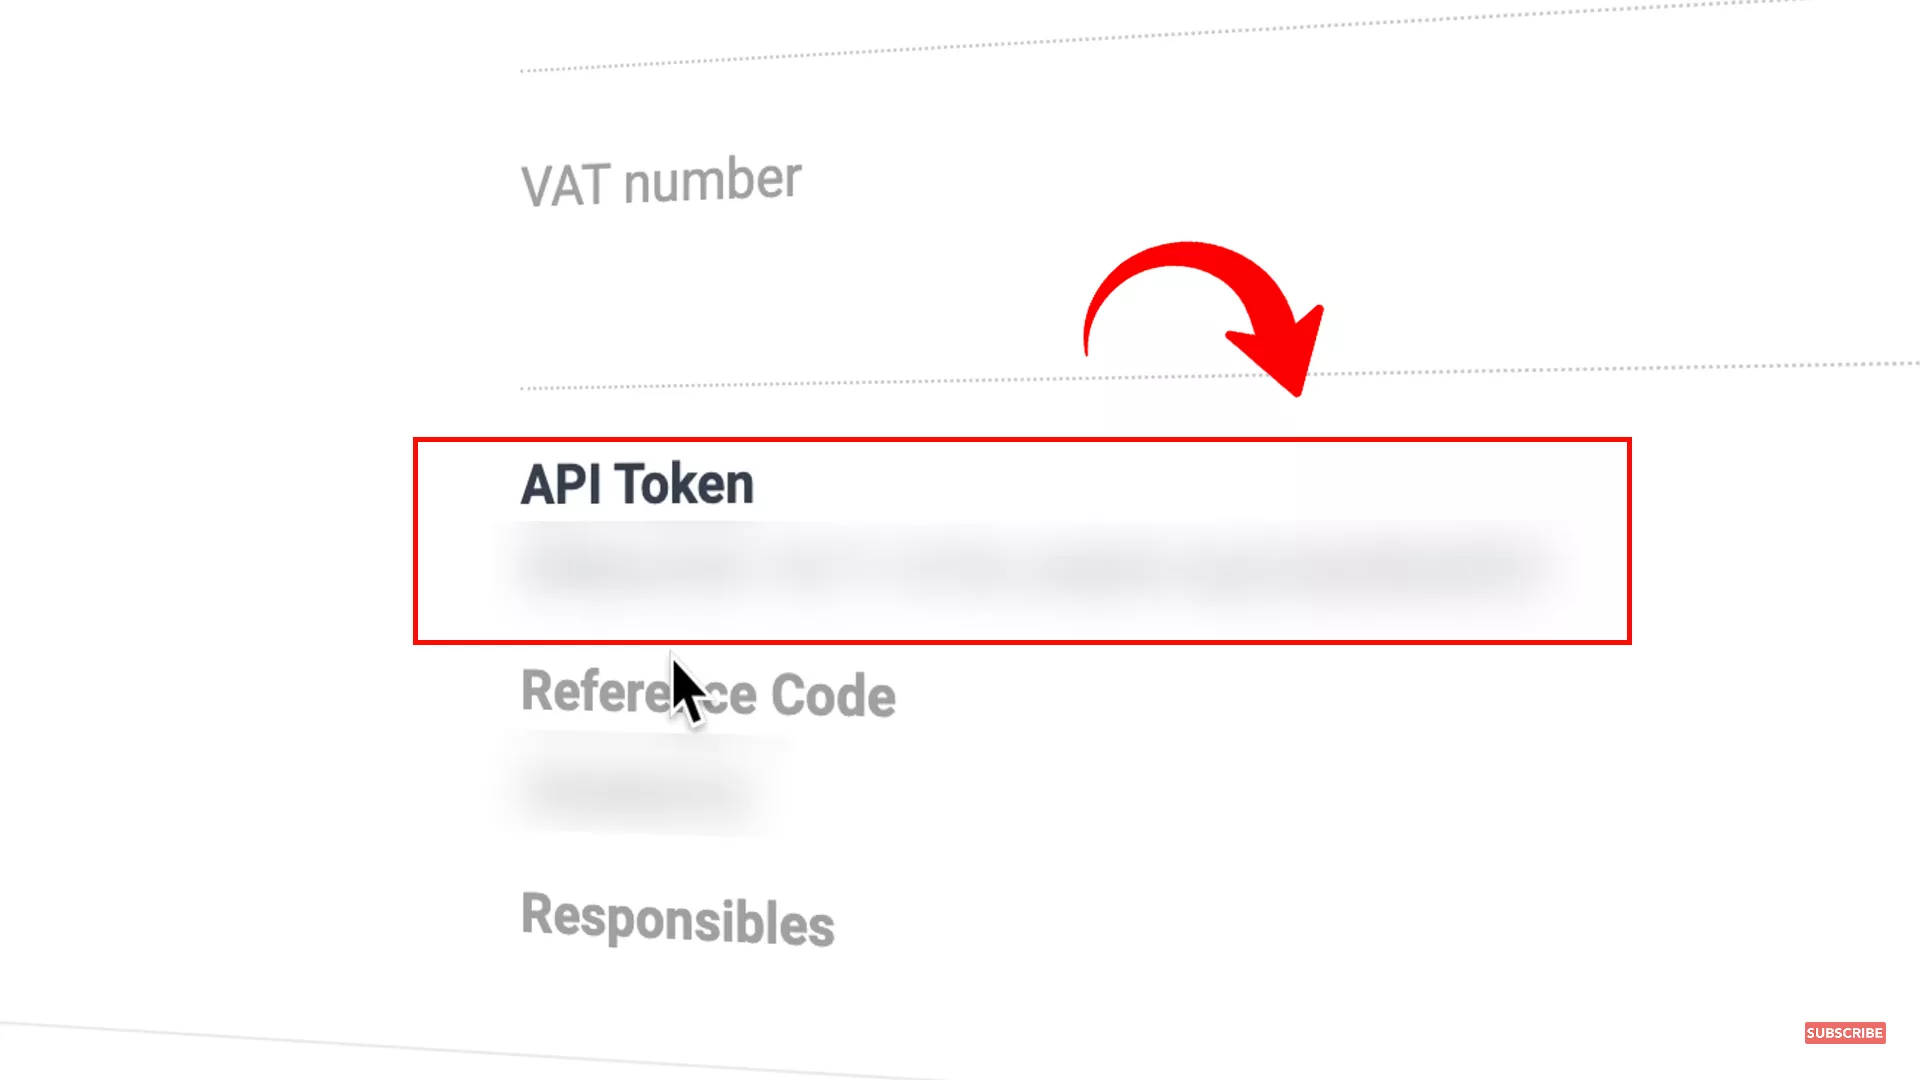
Go to “My Account.” Scroll down to find the API token on the bottom right of your screen. Copy it.
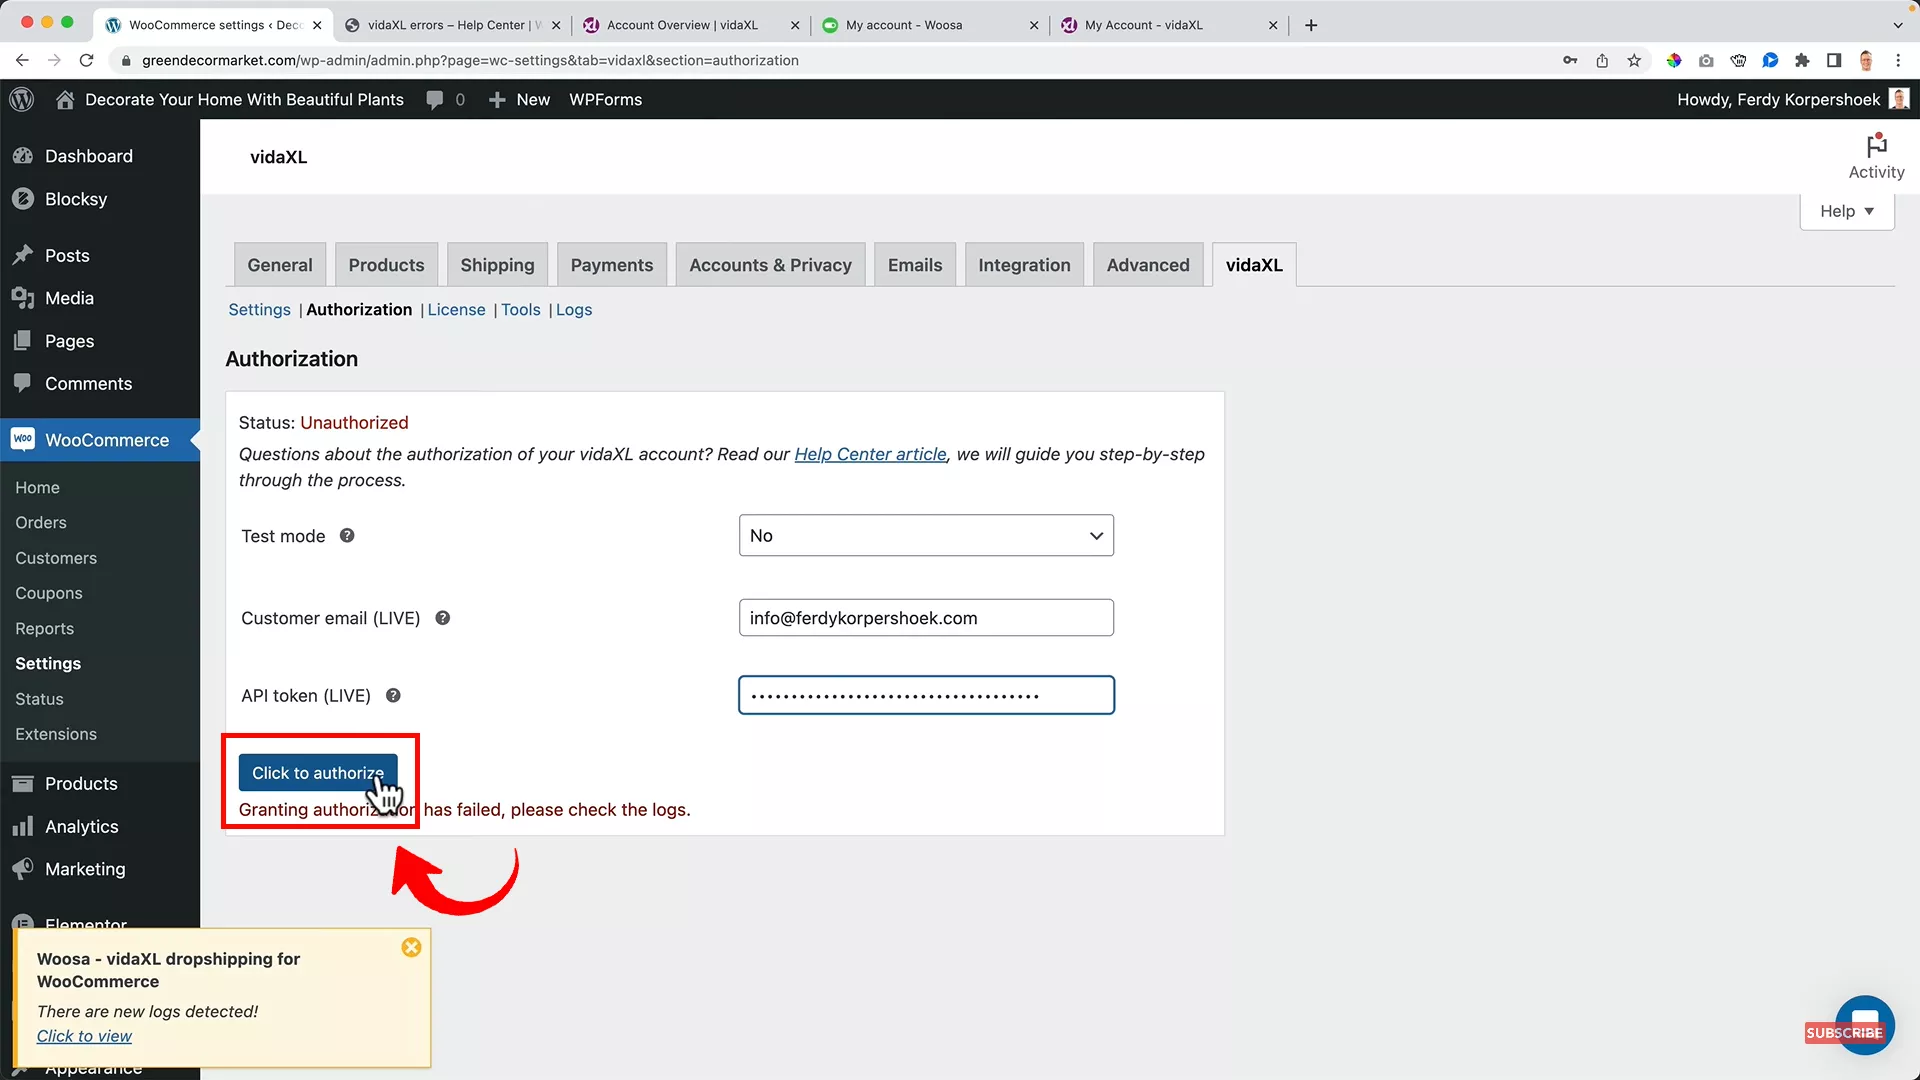
Return to your WordPress dashboard and enter your VidaXL account email and API token to authorize VidaXL.
Import products from VidaXL to WooCommerce
Before importing the products from VidaXL, remove the dummy products that come with the starter website by going to “Products” and moving them to trash.
Then, follow the instructions below to import products from VidaXL:
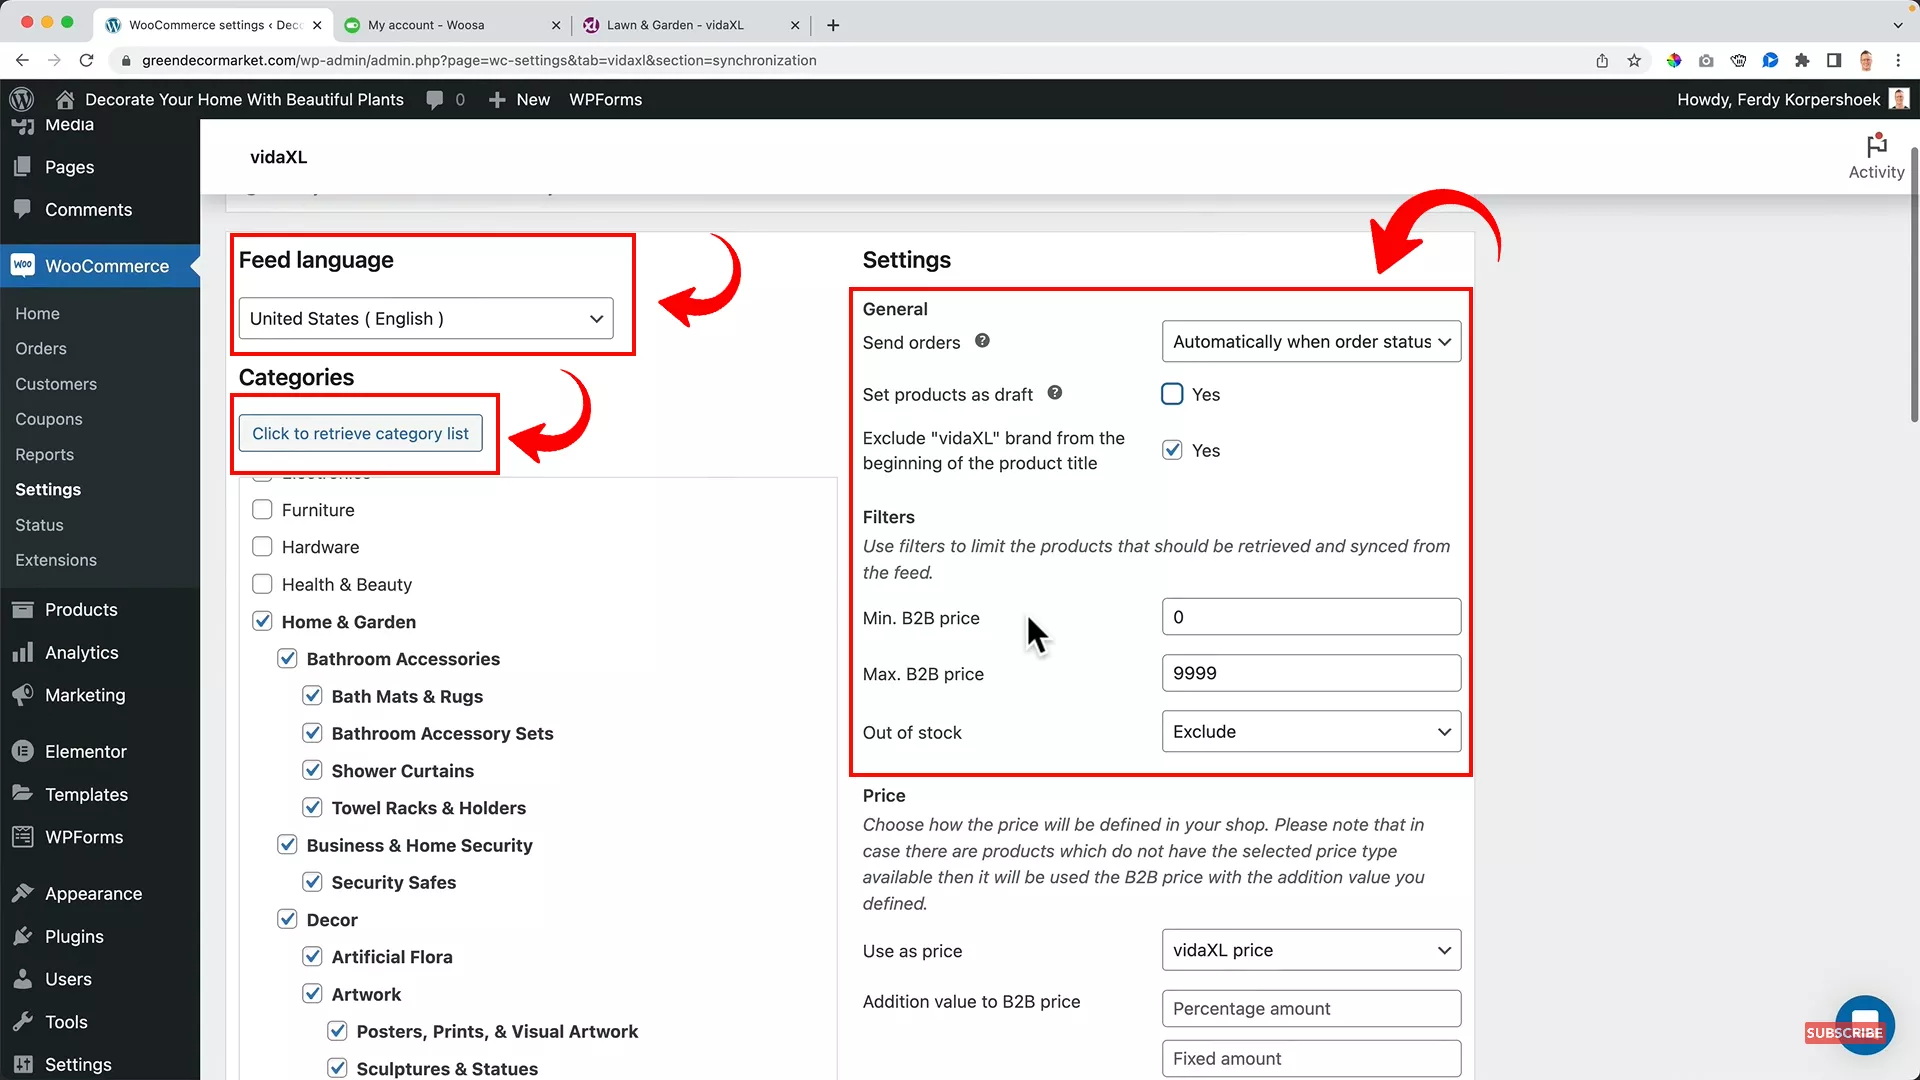
Go to WooCommerce -> Settings -> VidaXL -> Synchronization.
- Select the “Feed Language” according to your target market.
- Click “Click to retrieve category list.” Select all the product categories you want to list on your dropshipping store. For my dropshipping business, the home and garden category is the most relevant so I will choose that.
- Set “Send Orders” to “Automatically when order status is processing.” Doing this ensures that whenever you receive an order on your website, it will be automatically placed on VidaXL.
- Uncheck “Set products as draft.” Why? It’s a personal preference. I prefer to have my products live for my website visitors as is. If you want to make changes to your product listings before publishing them, you may check this option.
- Check yes for removing the VidaXL brand from the beginning of the product title. Obviously.
- Set the minimum and maximum B2B price for the products you’ll be importing. I won’t sell products worth over $10000, so that will be my maximum price limit.
- Select “Exclude” for “Out of Stock” products. This way, if a product is out of stock on VidaXL, it won’t appear on your online store.
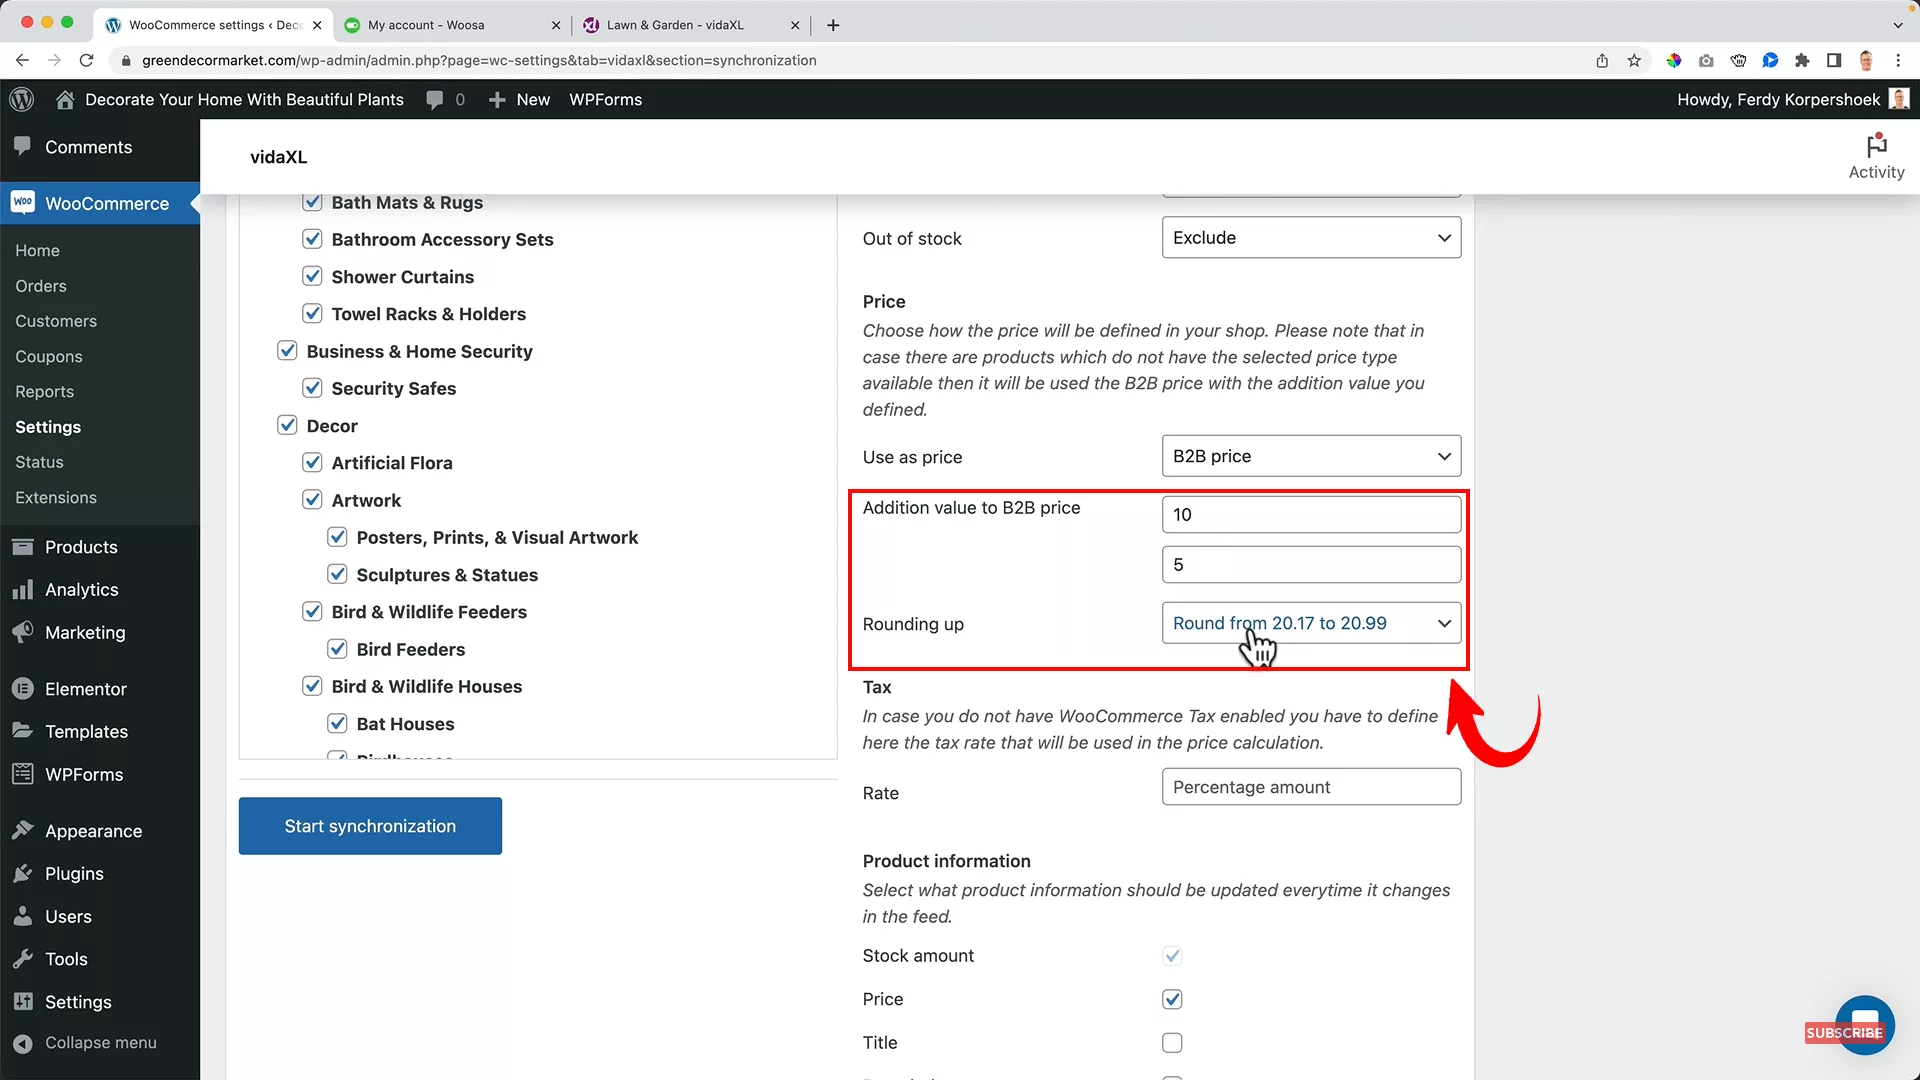
- In the “Addition value to B2B price” field, set the price formula for the products on your website. I want to sell the products listed on my website at a markup of 10% plus $5.
- For example, if a product costs me $60 on VidaXL, I’d like to sell it for $71 (110% of 60 + 5).
- Round the prices to .99.
Pro tip: When you start a dropshipping business, go for low-profit margins to attract the target audience. At the same time, make sure the margins are sufficient to cover your personal and business finances.
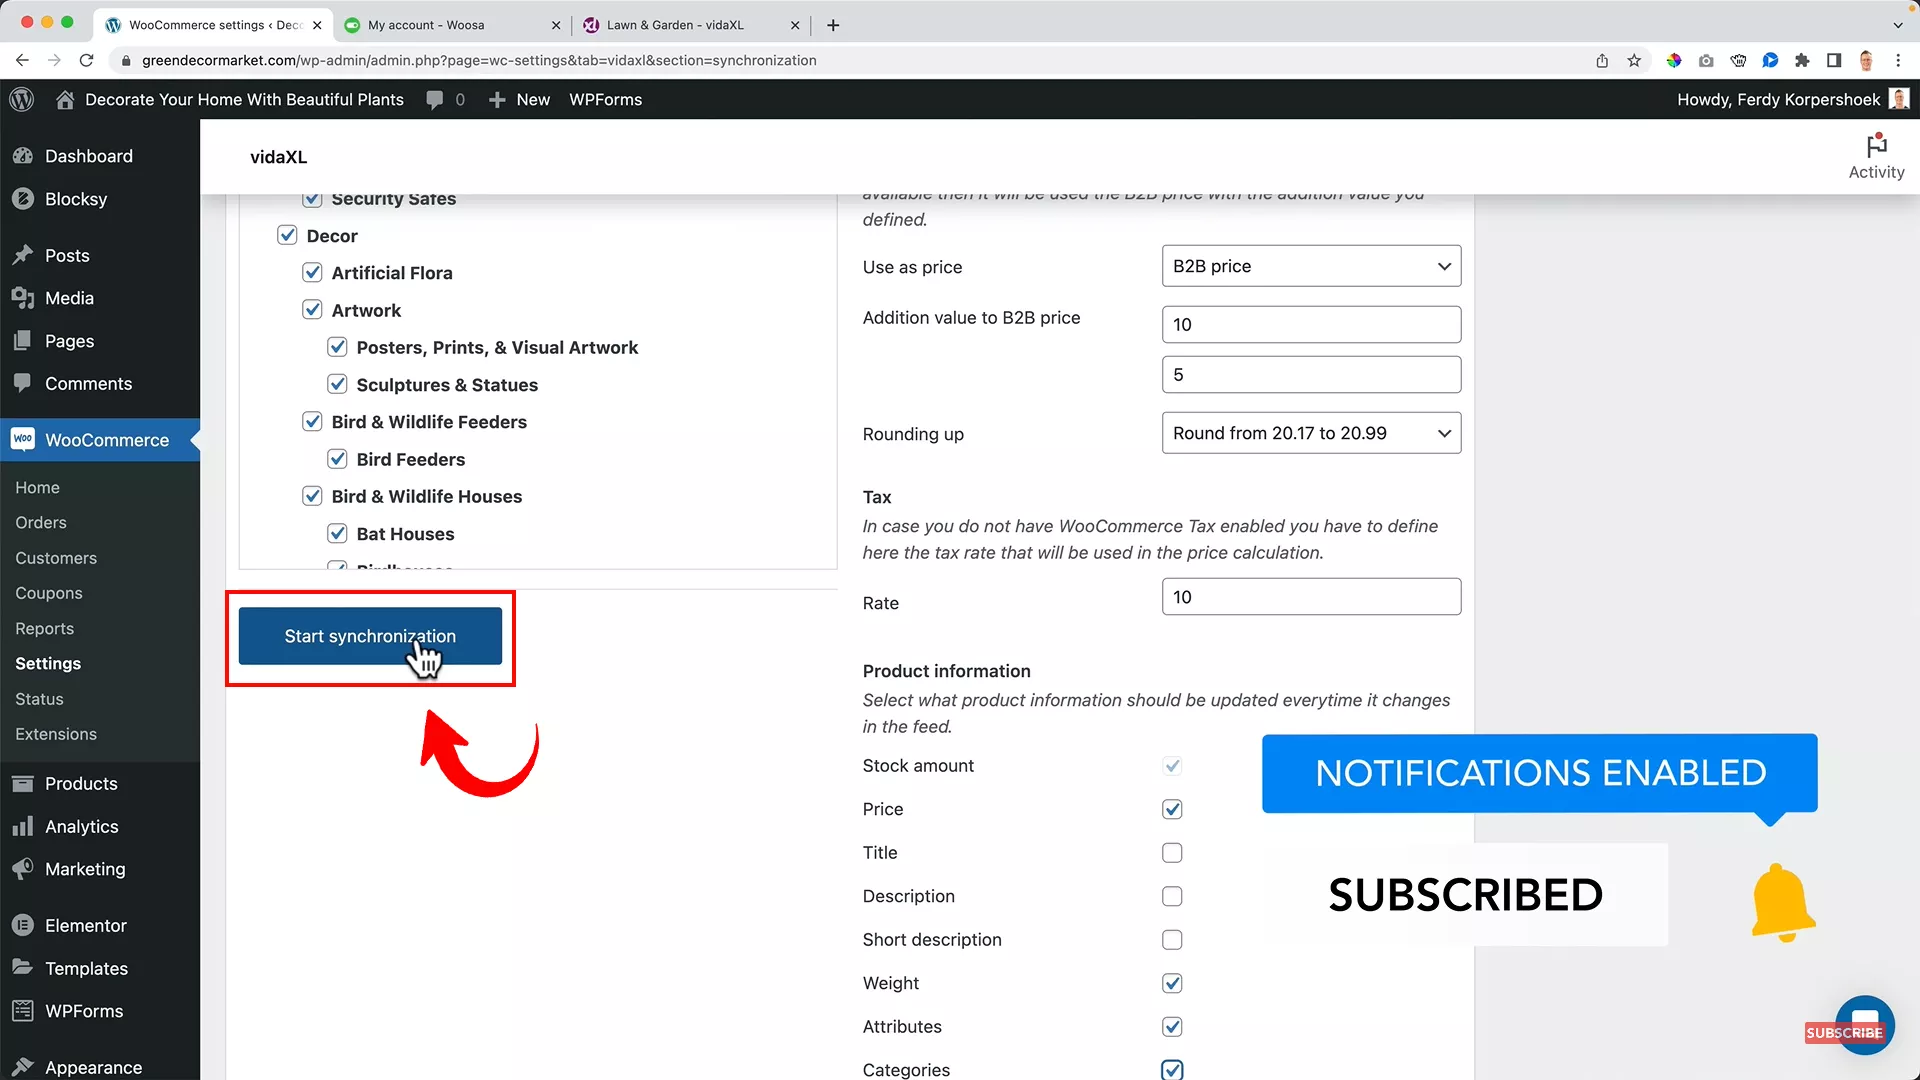
- Define the sales tax rate based on your country of operation.
- For synchronization, select price, weight, attributes, and categories. Uncheck synchronization for title, description, and short description.
- Finally, click “Start Synchronization” to import all the products to your ecommerce store. The duration of the import process depends on the number of products you’re importing.
Bear in mind that this process can be time-consuming. It took 24 hours in my case. And you might ask me: Ferdy, is your website slow? No, I imported 4000 products to my website. That’s a lot of products to handle at once!
But here’s the good news: Woosa made the process seamless and efficient.
Once the synchronization is complete, all your products, along with their descriptions, images, and prices, will be live on your site.
5. Configure payment and shipping settings
Now, it’s time to set up payment options for your customers before you start selling products.
In the sections that follow, I will demonstrate how you can set up Stripe and PayPal as payment methods for your dropshipping store
Setting Stripe as a payment method
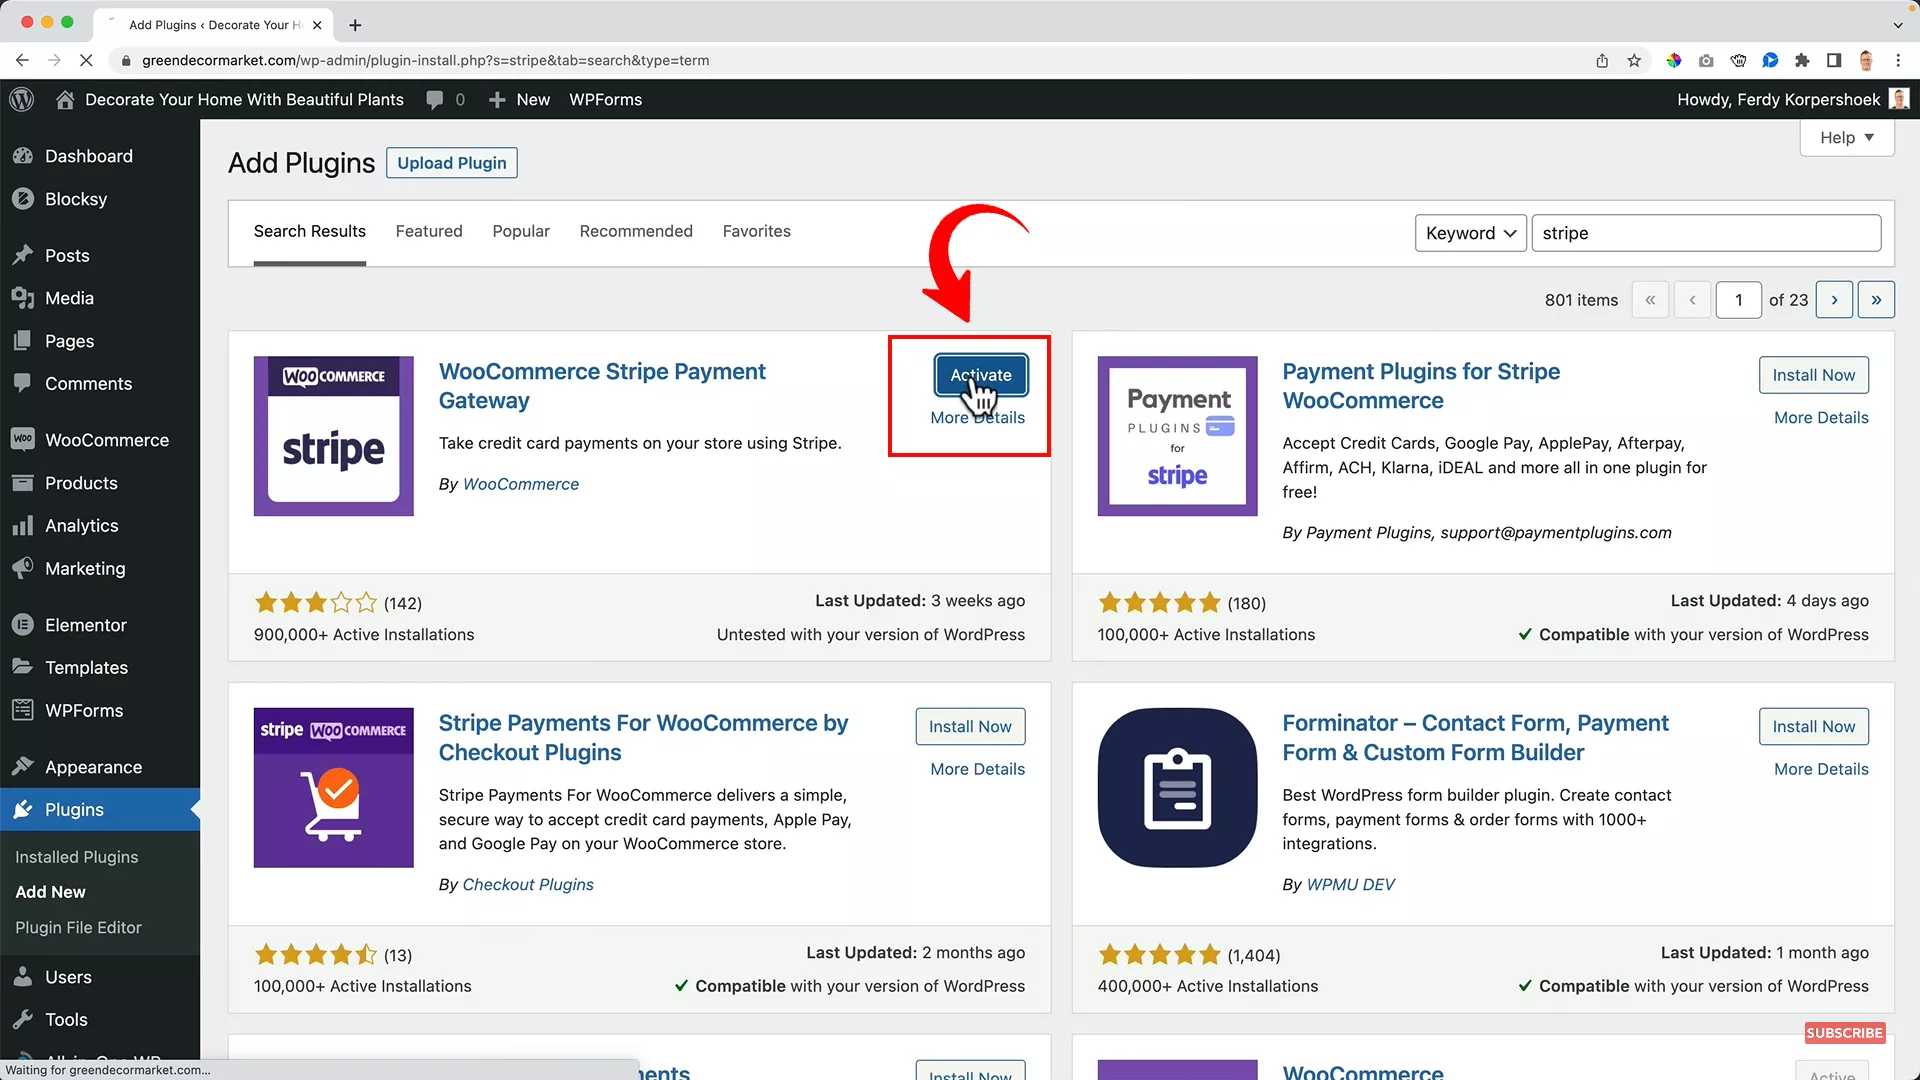
To set Stripe as a payment method, install and activate the “WooCommerce Stripe Payment Gateway” Plugin from the plugins library on WordPress.
If you don’t have a Stripe account yet, watch my tutorial below. In this tutorial, I walk you through creating a Stripe account and linking it with WooCommerce.
- Go to WooCommerce -> Settings -> Payments and create or connect your Stripe account.
- Copy the website link from WordPress and head to your Stripe account settings.
- Click on “Add Endpoint” and enter the Endpoint URL that you copied earlier.
- Select Event as “Charge”
- Upon adding the endpoint, you will get the Webhook which you will enter into WordPress’ Stripe settings by clicking “Edit Account Keys”.
- Add your website name as bank account details on the Customer Bank Statement.
Setting PayPal as a payment method
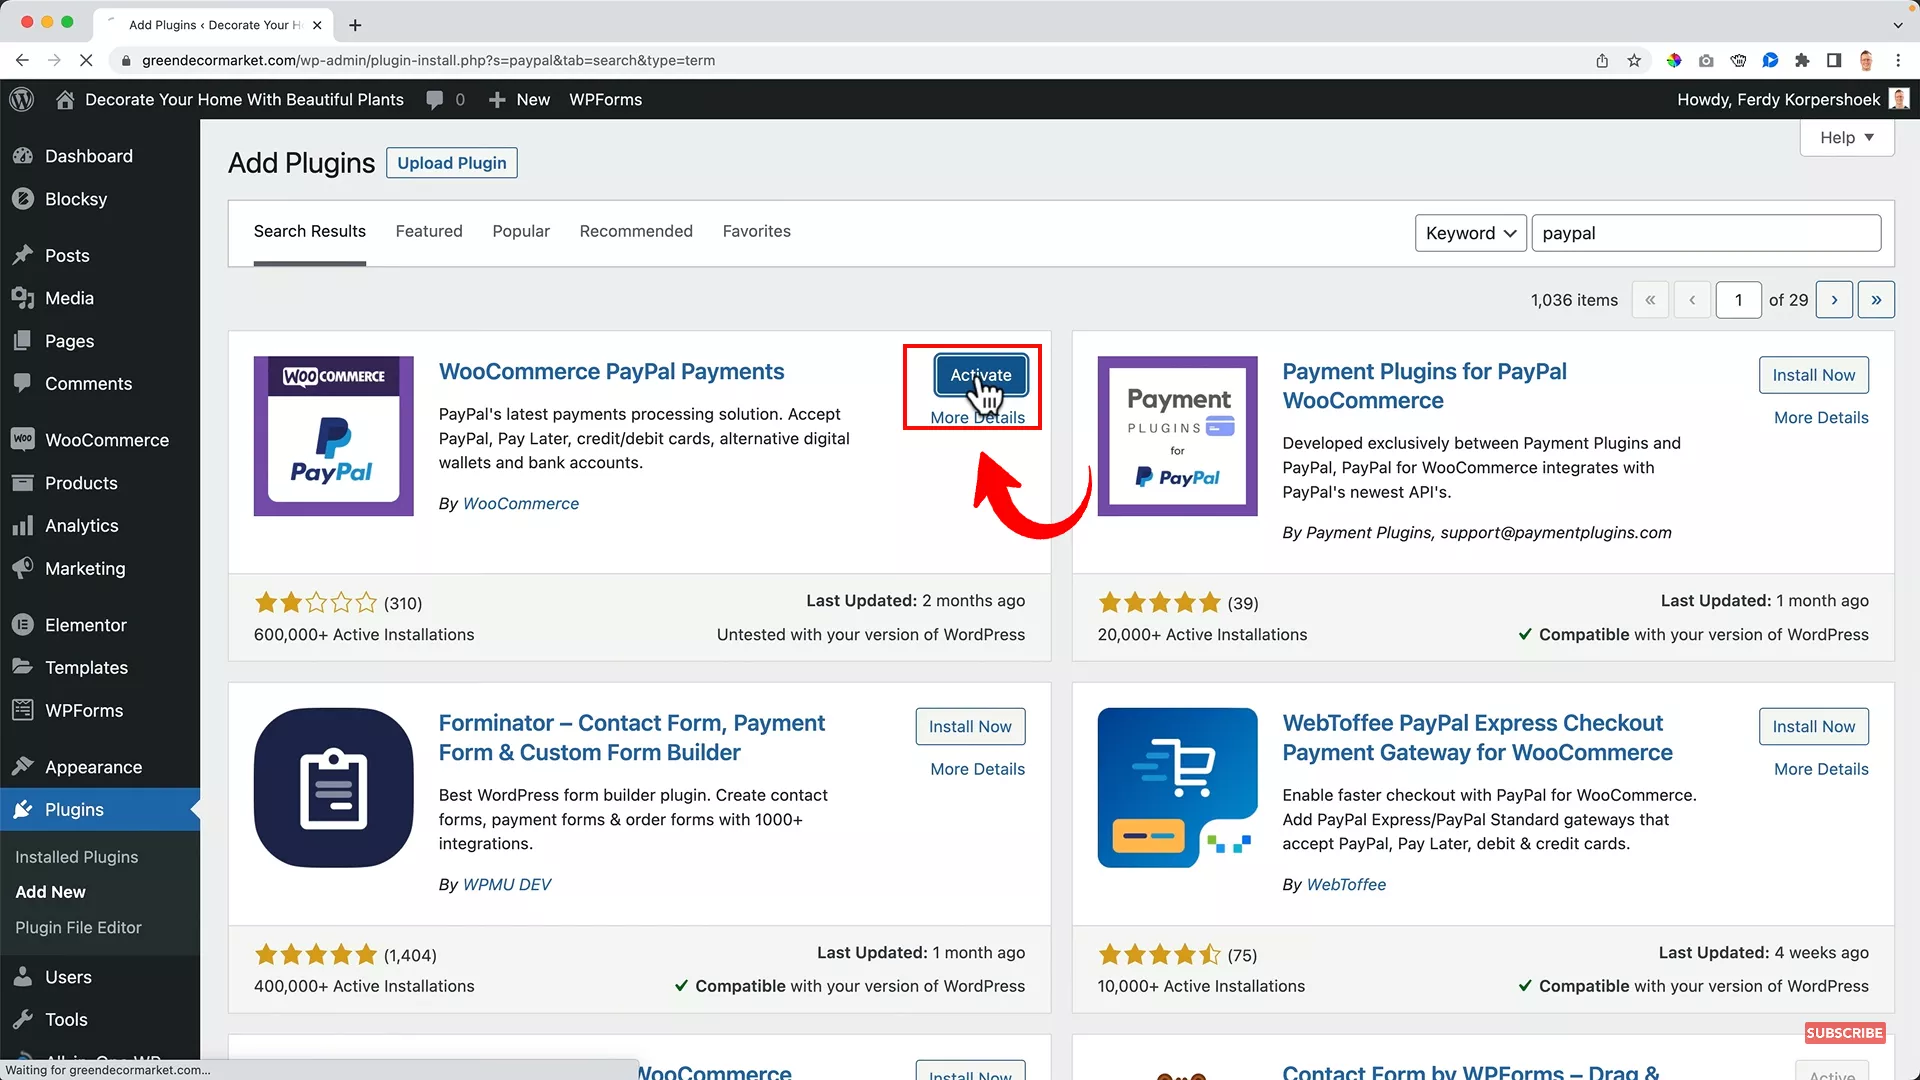
To set PayPal as a payment method, install and activate the “WooCommerce PayPal Payments” Plugin from the plugins library on WordPress.
- Go to WooCommerce -> Settings -> Payments and create or connect your PayPal account.
- Once connected, you must turn on the payment method from the same tab.
- Publish your website and proceed to checkout to test both payment methods.
Set up shipping
Free shipping can entice users to make a purchase. Since VidaXL offers free shipping across several countries, you can add “Free Shipping” on checkout by following these steps:
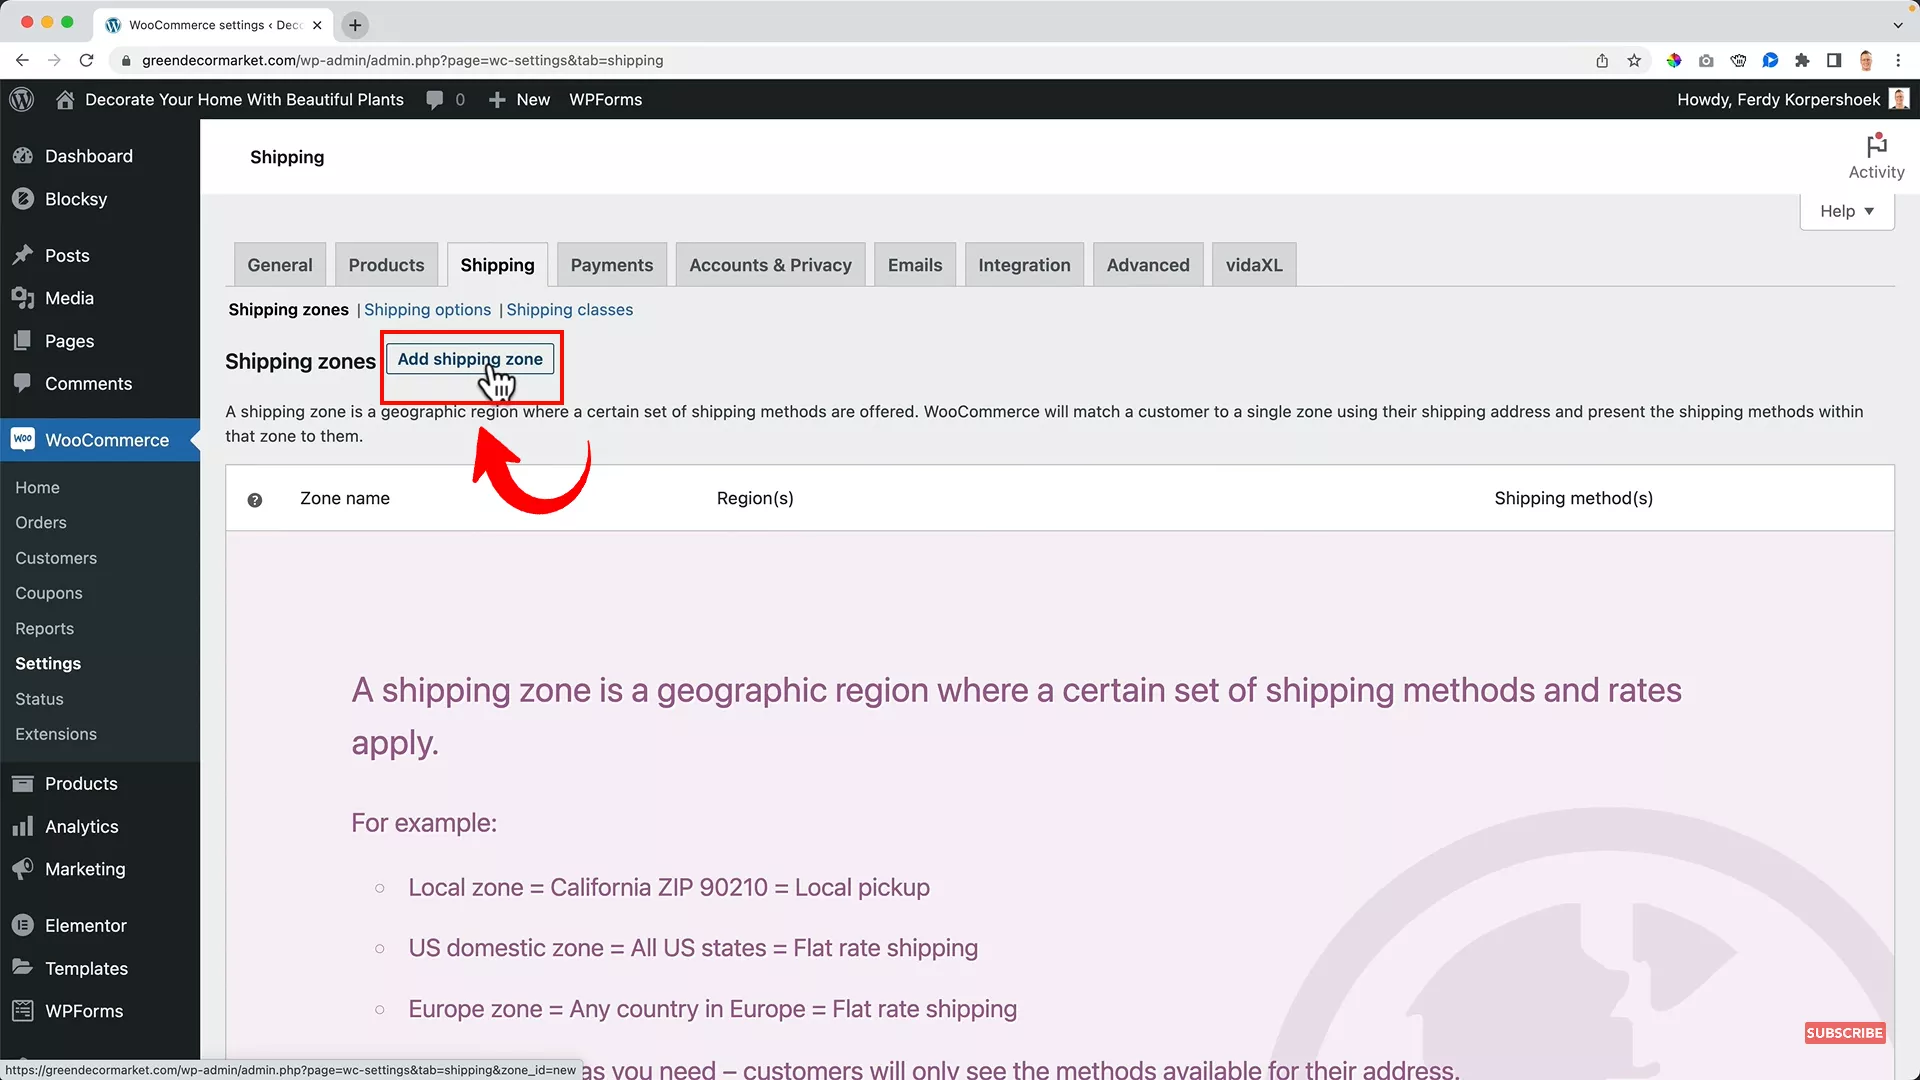
Go to WooCommerce -> Settings -> Shipping. Click the “Add shipping zone” button.
Add the shipping zone based on your business structure. I am selling globally, so I will set my shipping zone to “Worldwide.”
Next, select “Free Shipping” from the drop-down menu. Alternatively, you can also set a flat shipping rate if you want.
Finally, you can select your country of operation from Settings -> General -> General Options -> Selling Locations.
6. Set up the dropshipping supplier for purchase
Everything on your website is now set up. But before you sell products, you must take care of a few more things on the supplier end.
Place a deposit on VidaXL
When you receive an order on your website, you can order the product on VidaXL with just one click, provided you have a deposit account with them.
VidaXL places the order from your deposit if the product cost is within the deposit amount. However, if the order amount exceeds the deposit amount, you will have to manually pay VidaXL before placing your order on the website.
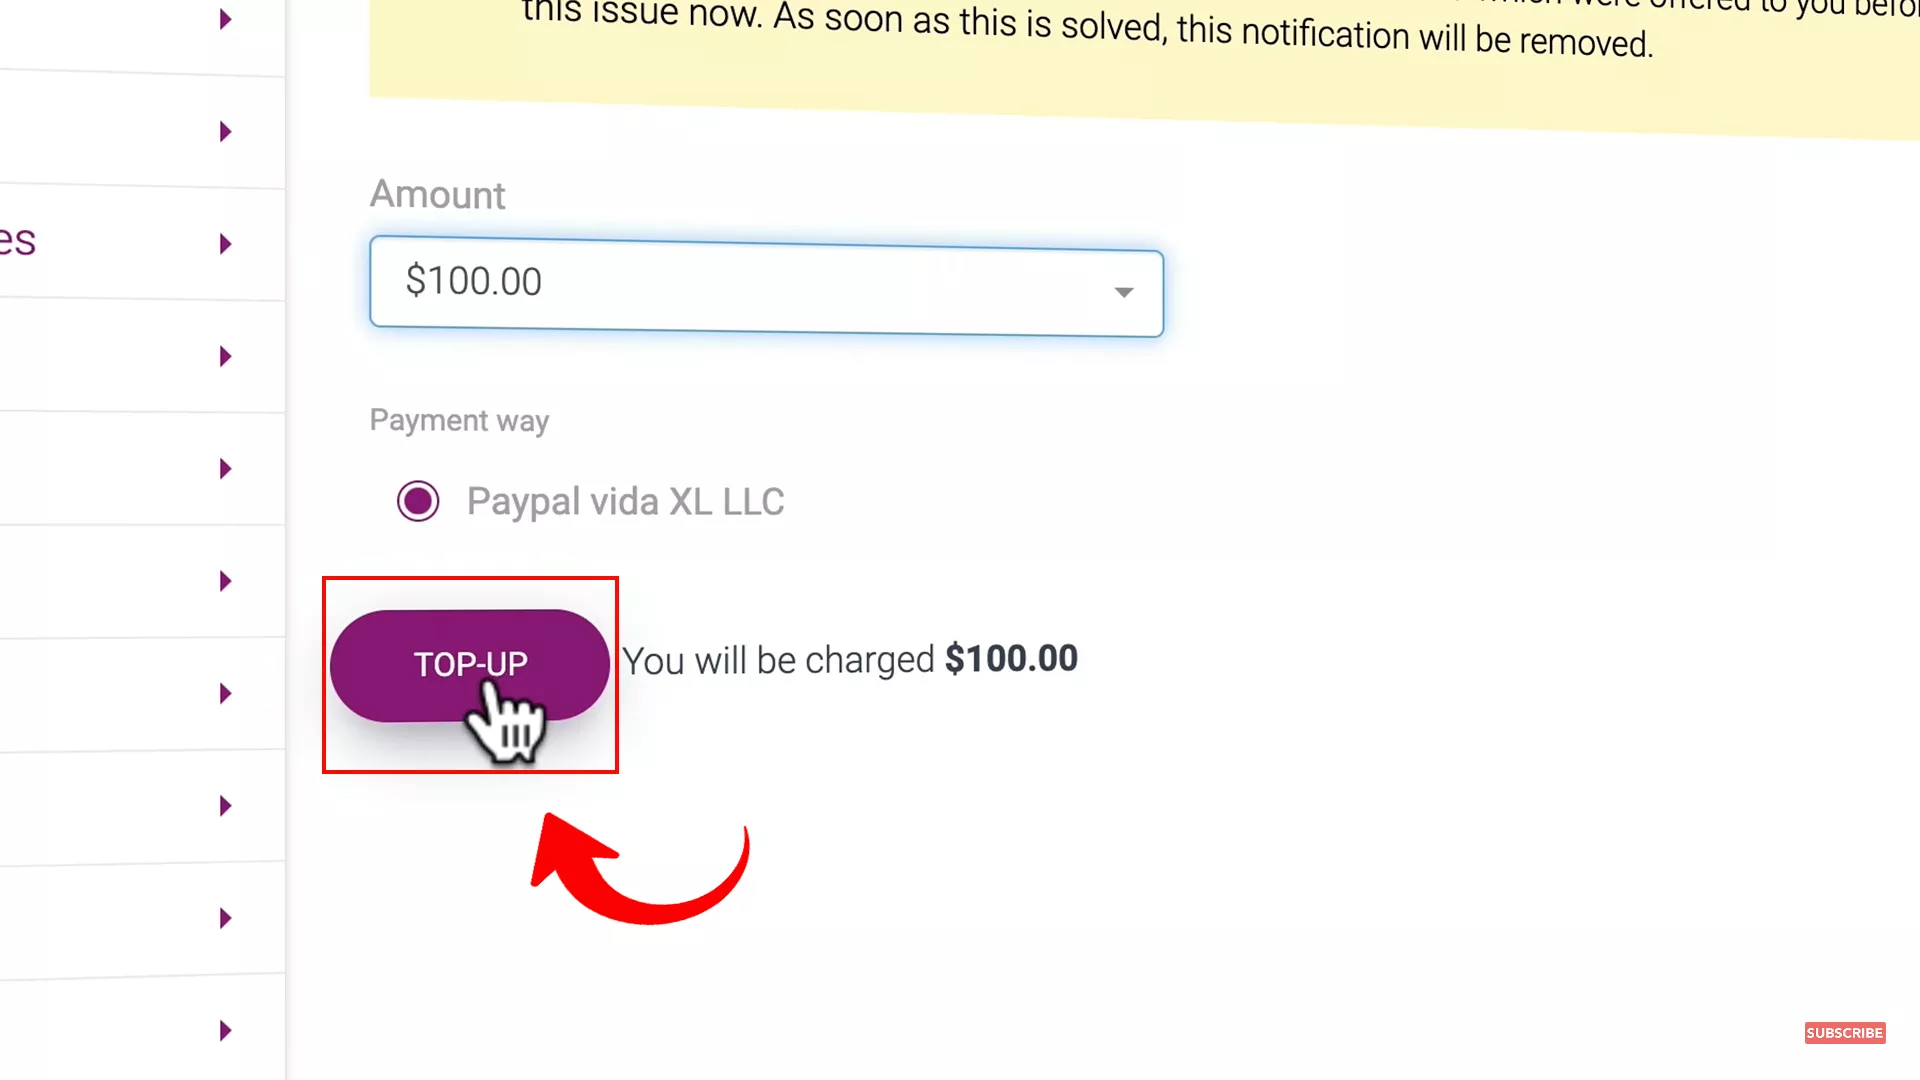
To place the deposit, head to your VidaXL portal. Go to your account and select payments to top up your account.
7. Get traffic to your dropshipping store
Now that your e-commerce website is set up and automated, it’s time to implement some strategies to drive traffic and start selling.
SEO
Search engine optimization consists of on-page and off-page strategies to help improve your website’s ranking on Google.
You can tackle SEO yourself by following my detailed tutorial below. In this tutorial, I walk you through the initial steps of keyword research and blog post optimization.
Alternatively, you can outsource this task to an SEO expert.
A practical first step in SEO is conducting keyword research and crafting blog posts optimized for these keywords.
Another effective strategy is to publish guest posts on high-authority websites, creating authentic backlinks. This approach helps Google’s web crawlers index your site, enhancing its appearance in search results.
Search engine optimization (SEO) is a mix of on-page and off-page strategies to elevate your website’s ranking on Google.
Digital Marketing
While a great number of people use Google before shopping at online stores, social media is now considered the search engine of the future. So, along with SEO, digital marketing is crucial to reach your target audience.
For example, for my green decor dropshipping business, I can publish blog posts on blog platforms reviewing the best indoor plants. I can write about popular indoor plants in this blog post and include a link to buy them through my online store.
To learn more about how to write an engaging blog post that converts, watch my tutorial below.
I can also create video reviews on YouTube and post reels on TikTok and Instagram, showcasing how these plants can enhance various home settings.
“You can have everything in life you want if you will just help other people get what they want.”
Zig Ziglar
I love this quote from Zig Ziglar. This philosophy is central to my approach – driving traffic to your store by genuinely helping your audience.
Ultimately, the goal is to guide potential customers to your store using helpful, engaging content as your primary funnel.
Start experimenting with various content forms and platforms to discover what resonates most with your audience and drives tangible results for your business.”
Email Marketing
If you’re running a promotional offer on your website or have a special discount for repeat customers, you can always use old-school email marketing for direct marketing.
Email marketing has always been an invaluable marketing tool for online businesses.
Learn how to create an email list for marketing from my tutorial below.
Paid Advertisements
Dropshipping businesses often turn to platforms like Google, Instagram, and TikTok for rapid sales through paid ads. However, it’s crucial to understand that marketing on social media isn’t a guaranteed path to sales.
From personal experience, I learned this the hard way. Several years ago, I ventured into running paid advertisements to promote my affiliate marketing business.
Confident in my abilities, I believed I could manage the campaigns on my own. Unfortunately, I ended up burning a lot of my money.
This experience taught me a valuable lesson: you should do what you do best. To avoid making similar costly mistakes, consider these two options:
- Hire an expert: Outsourcing your digital advertising to a professional can be a wise investment. While this involves upfront costs, their expertise can save you money in the long run by avoiding ineffective strategies.
- Self-education: If you prefer a hands-on approach, dedicate time to learning the art of digital advertising. Platforms like YouTube are filled wCith tutorials and guides from experienced marketers. These resources can provide the foundational knowledge needed to run your campaigns more effectively.
Pro tip: Since there are a lot of options to market your dropshipping business, it is wise to set a marketing budget when you’re first developing your dropshipping business plan. Setting a budget helps in managing expenses and measuring ROI, ensuring that your marketing efforts are both strategic and cost-effective.
Final Words
Embarking on your dropshipping journey in 2024 may seem tough, but with the right guidance, it’s more achievable than ever.
This step-by-step guide has armed you with the essential tools and knowledge to establish your online dropshipping store, from securing a domain to driving traffic to your store.
I hope you found this guide helpful. If questions arise, feel free to reach out on my Instagram. For more insights and tips, visit my YouTube channel and consider subscribing.
Happy dropshipping – here’s to your success in the digital marketplace!


0 thoughts on “How to Start Dropshipping in 2024 – Set Up Your Dropshipping Business (Step by Step)”