


How to Speed Up Your WordPress Website (Mobile + Desktop)
I was always wary about the speed of my WordPress website and researching ways to improve it. I found a few useful tips, but my goal was to find a solution that was efficient, cost-effective and gave quick results. Thankfully, I found a hidden tool in the WordPress plugin directory that made my job easy.
To speed up your WordPress website, use the NitroPack plugin. It automates optimization for both mobile and desktop, improving loading times significantly without manual intervention. NitroPack requires minimal setup, making it a user-friendly solution for enhancing site performance.
In this guide, I’ll walk you through the installation process of NitroPack and how you can use it to speed up your WordPress site.
1. Check your website speed
Before fixing the site load speed, it is important to analyze the current metrics to determine how your website is currently performing.
While there are many site performance checking tools to check site speed, I always prefer Google PageSpeed Insights for its user-friendliness and comprehensive view.
To check your website’s performance, visit the Google PageSpeed Insights tool -> enter your website’s URL -> click ‘Analyze.’
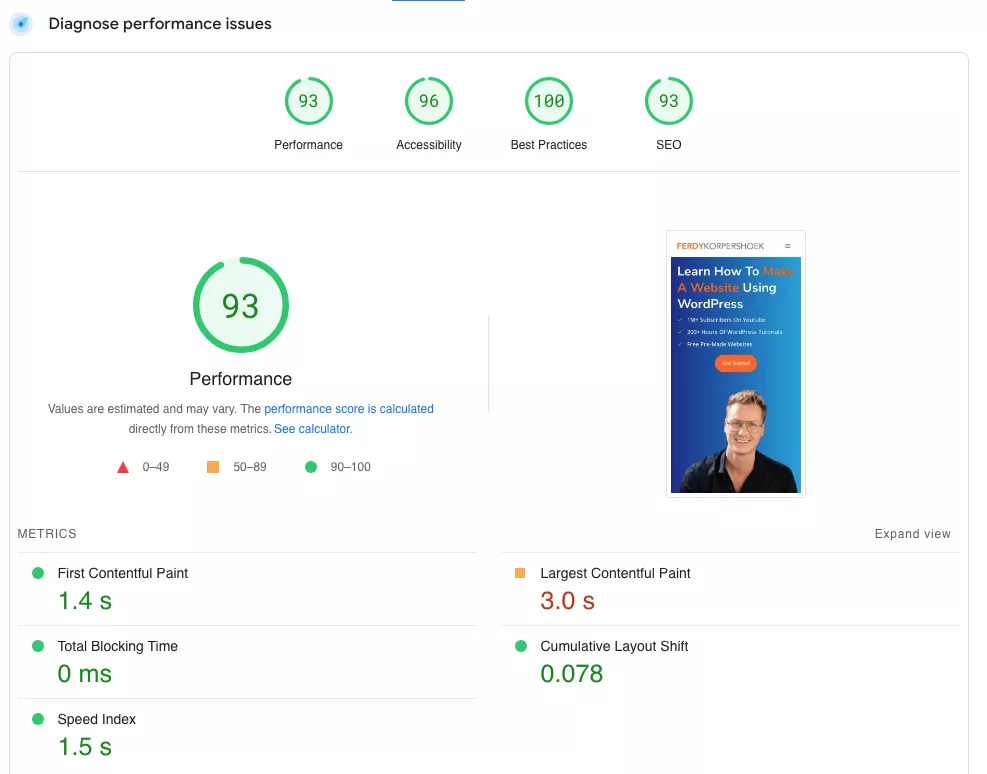
This will pull up the site speed metrics of your website. Here’s how it looks for my website:
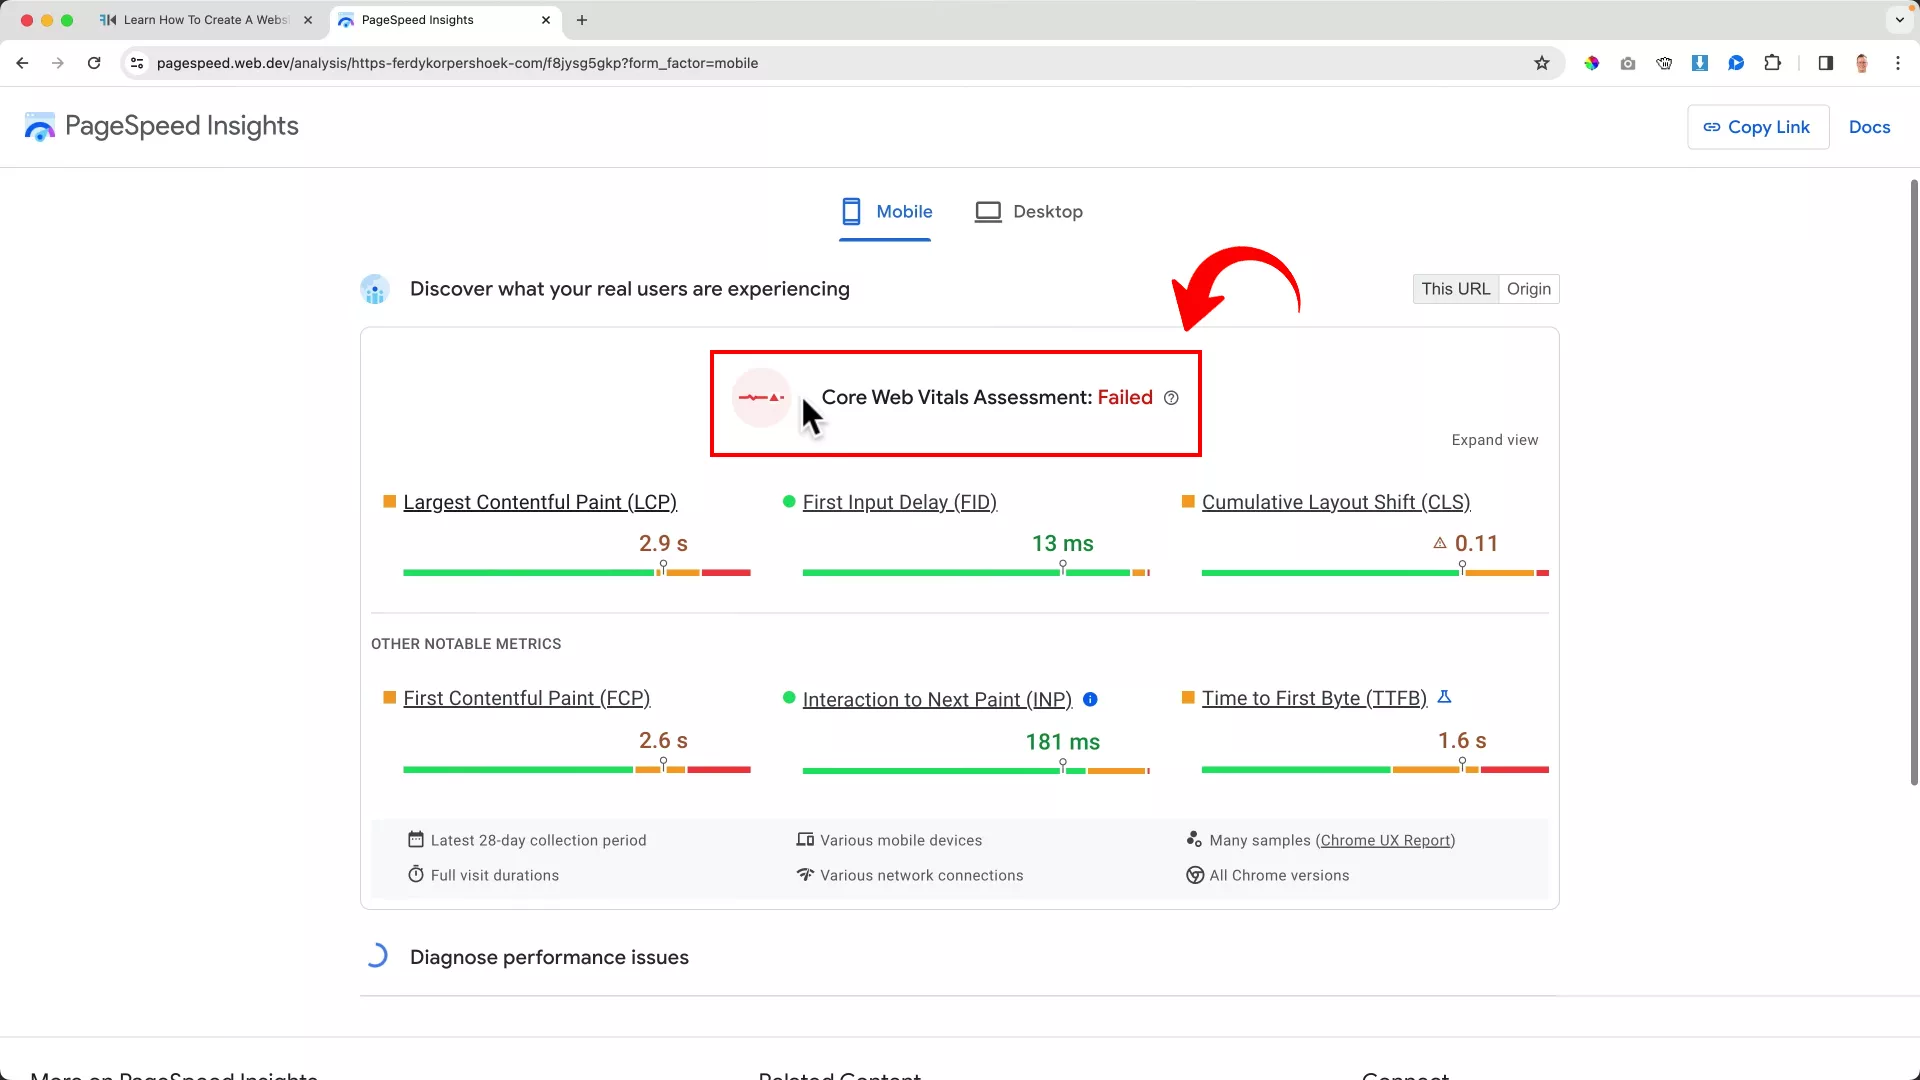
On the first fold of the screen, you’ll see the Core Web Vitals Assessment metrics. While they are important for determining the user experience, it is important to note that they are measured over the last 28 days.
Since I am looking for quick improvements, I will focus on the metrics on the second fold, “Diagnose performance issues.”
Here, you can toggle between Desktop and Mobile to check your site’s scores across 4 categories:
- Performance
- Accessibility
- Best Practices
- SEO
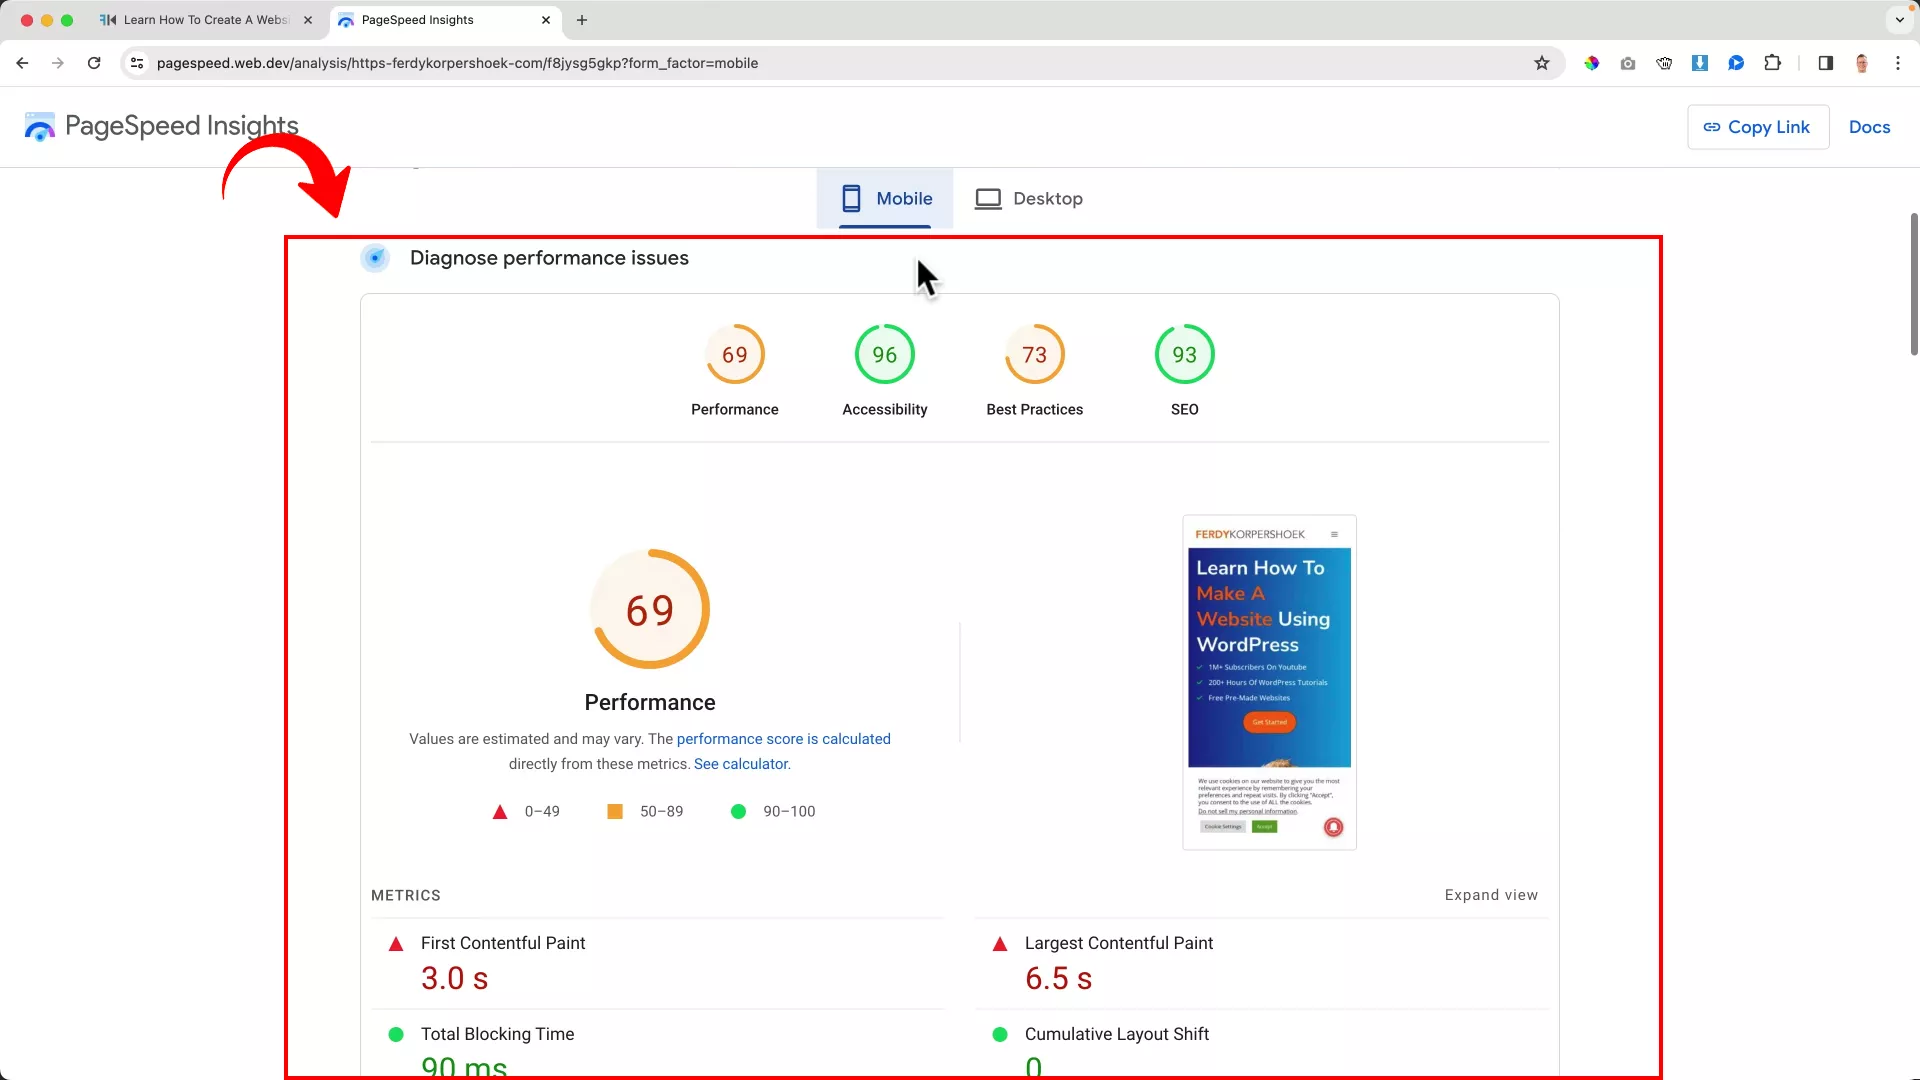
Diagnosing your site speed report
Upon a quick assessment, I see two major issues I must fix immediately: First Contentful Paint (FCP) and Largest Contentful Paint (LCP).
For starters, FCP measures the time it takes for your website to display the first bit of content on your web pages. It’s a great metric for site speed as it reflects how quickly your website displays data to visitors.
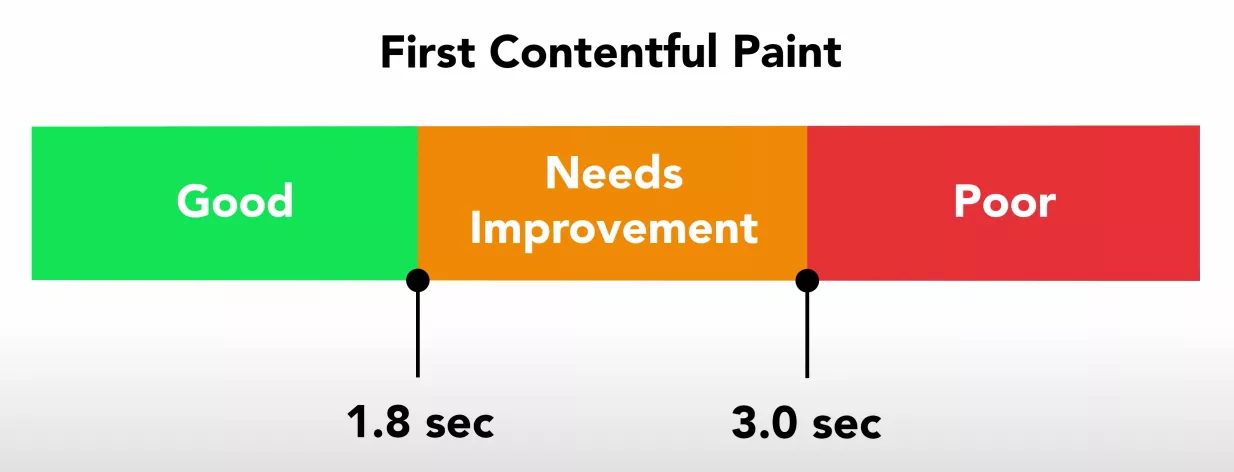
Currently, my website averages around 3 seconds for FCP on mobile and 1.2 seconds on desktop. This is not great as the ideal FCP range, as seen in the image above, is within 1.8 seconds. That’s the range we should be aiming for.
Unlike FCP, LCP measures the time it takes your website to display the largest bit of content on your website. For most websites, this could be a heavy image, like a complex infographic. In my case, this could be the video tutorials I upload.
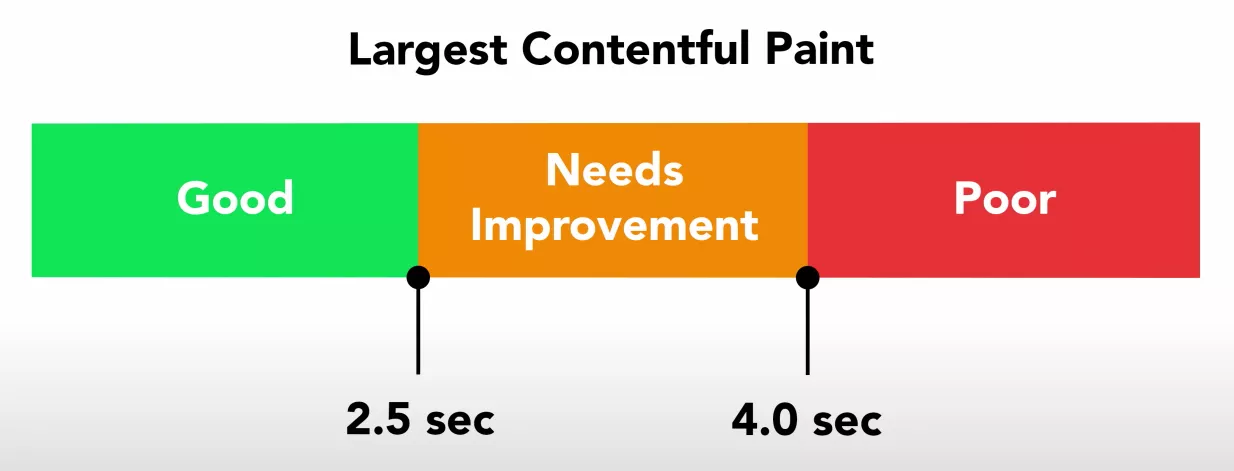
My website averages around 6.5 seconds for LCP on mobile and 3.3 seconds on desktop; the ideal LCP range is within 2.5 seconds. Looks like I have got some serious work to do.
Pro tip: Pay close attention to the Timelapse section as you scroll – it’s a key indicator of your website’s loading speed. A fully optimized site will display identical frames in the Timelapse, showcasing a smooth and consistent loading experience.
2. Install the NitroPack plugin
Now that I have diagnosed the problems, it’s time to fix them.
I’m sure you’ve heard of traditional site speed optimization methods like changing the hosting provider, removing inactive plugins, compressing images, etc. Most of these methods require manual input and can take several hours.
Lucky for you, I found a WordPress plugin that automatically optimizes your website performance with a single click. It’s called NitroPack. And guess what? You can get started for free!
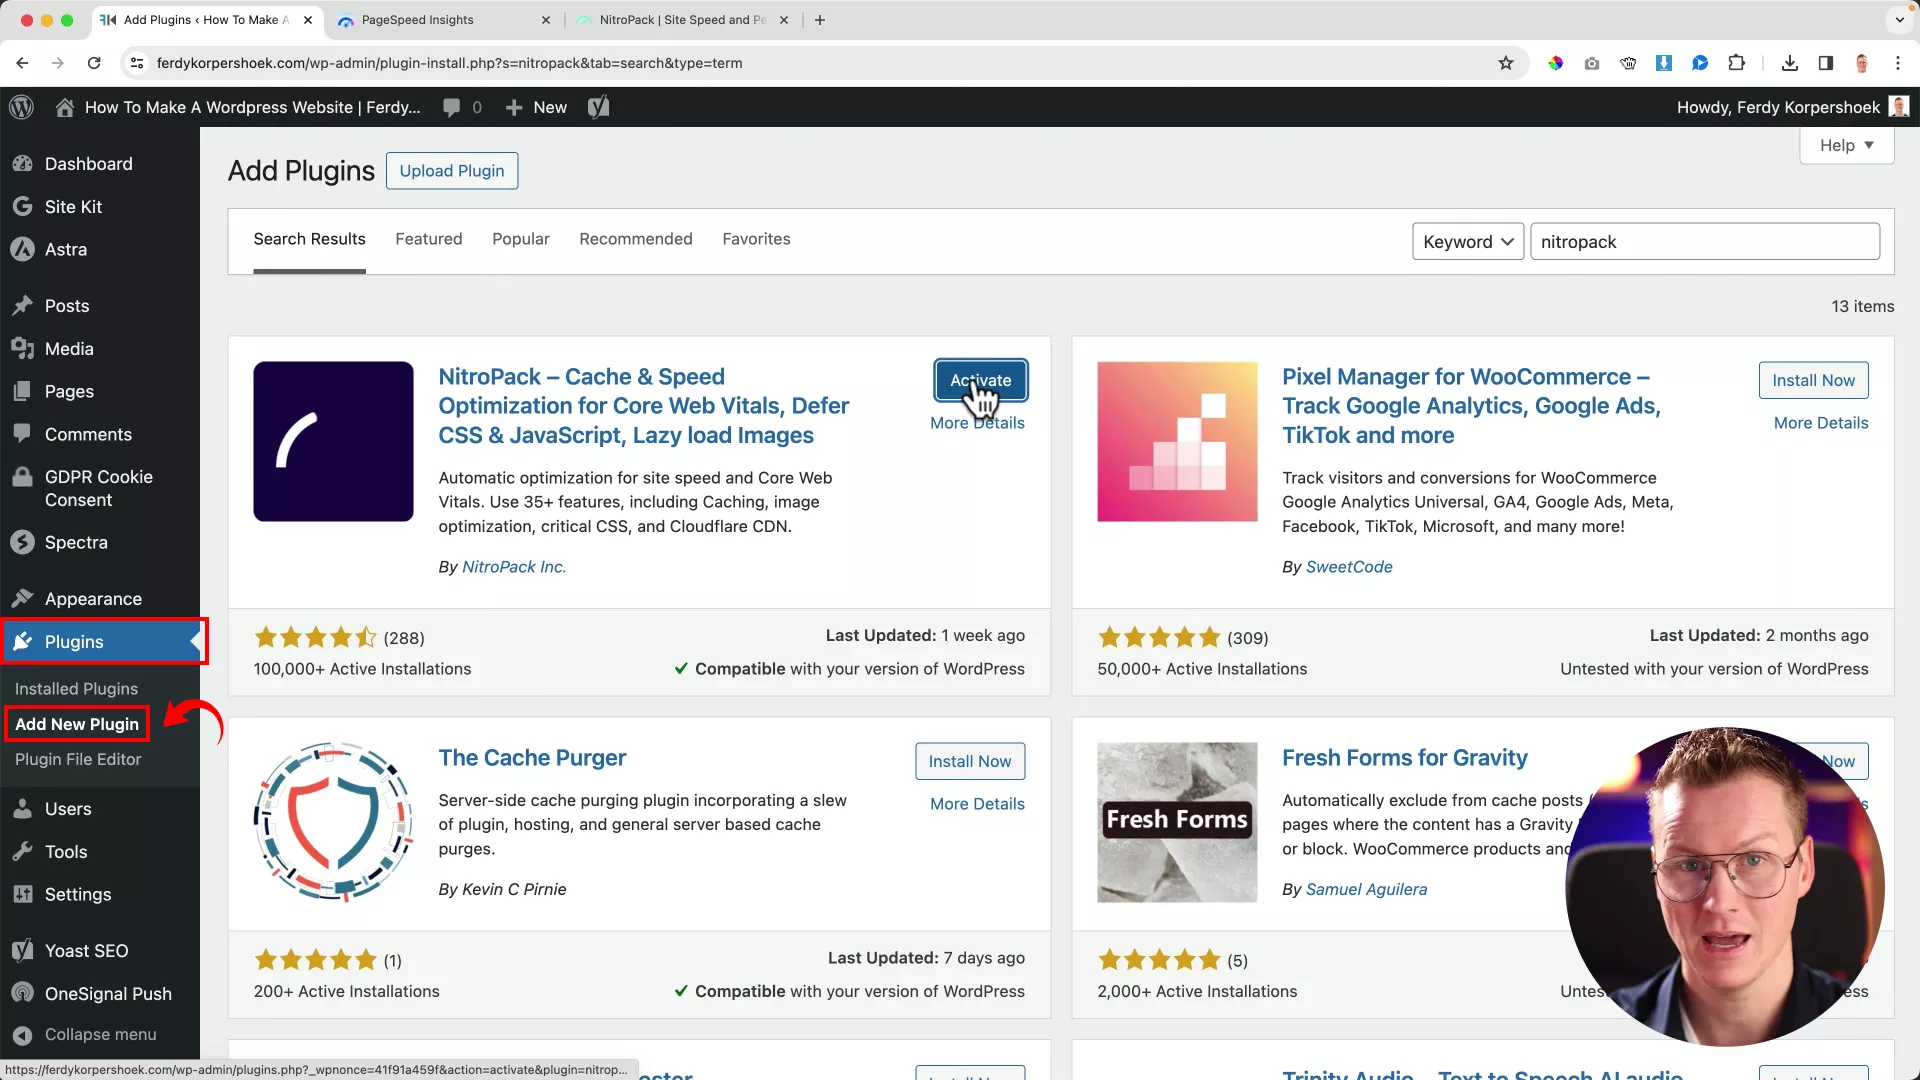
To install NitroPack on WordPress, log in to your WordPress dashboard. Go to Plugins -> Add New Plugin -> Search for NitroPack -> Click on “Install Now” -> Activate.
The next step is to connect your website with NitroPack to use it fully.
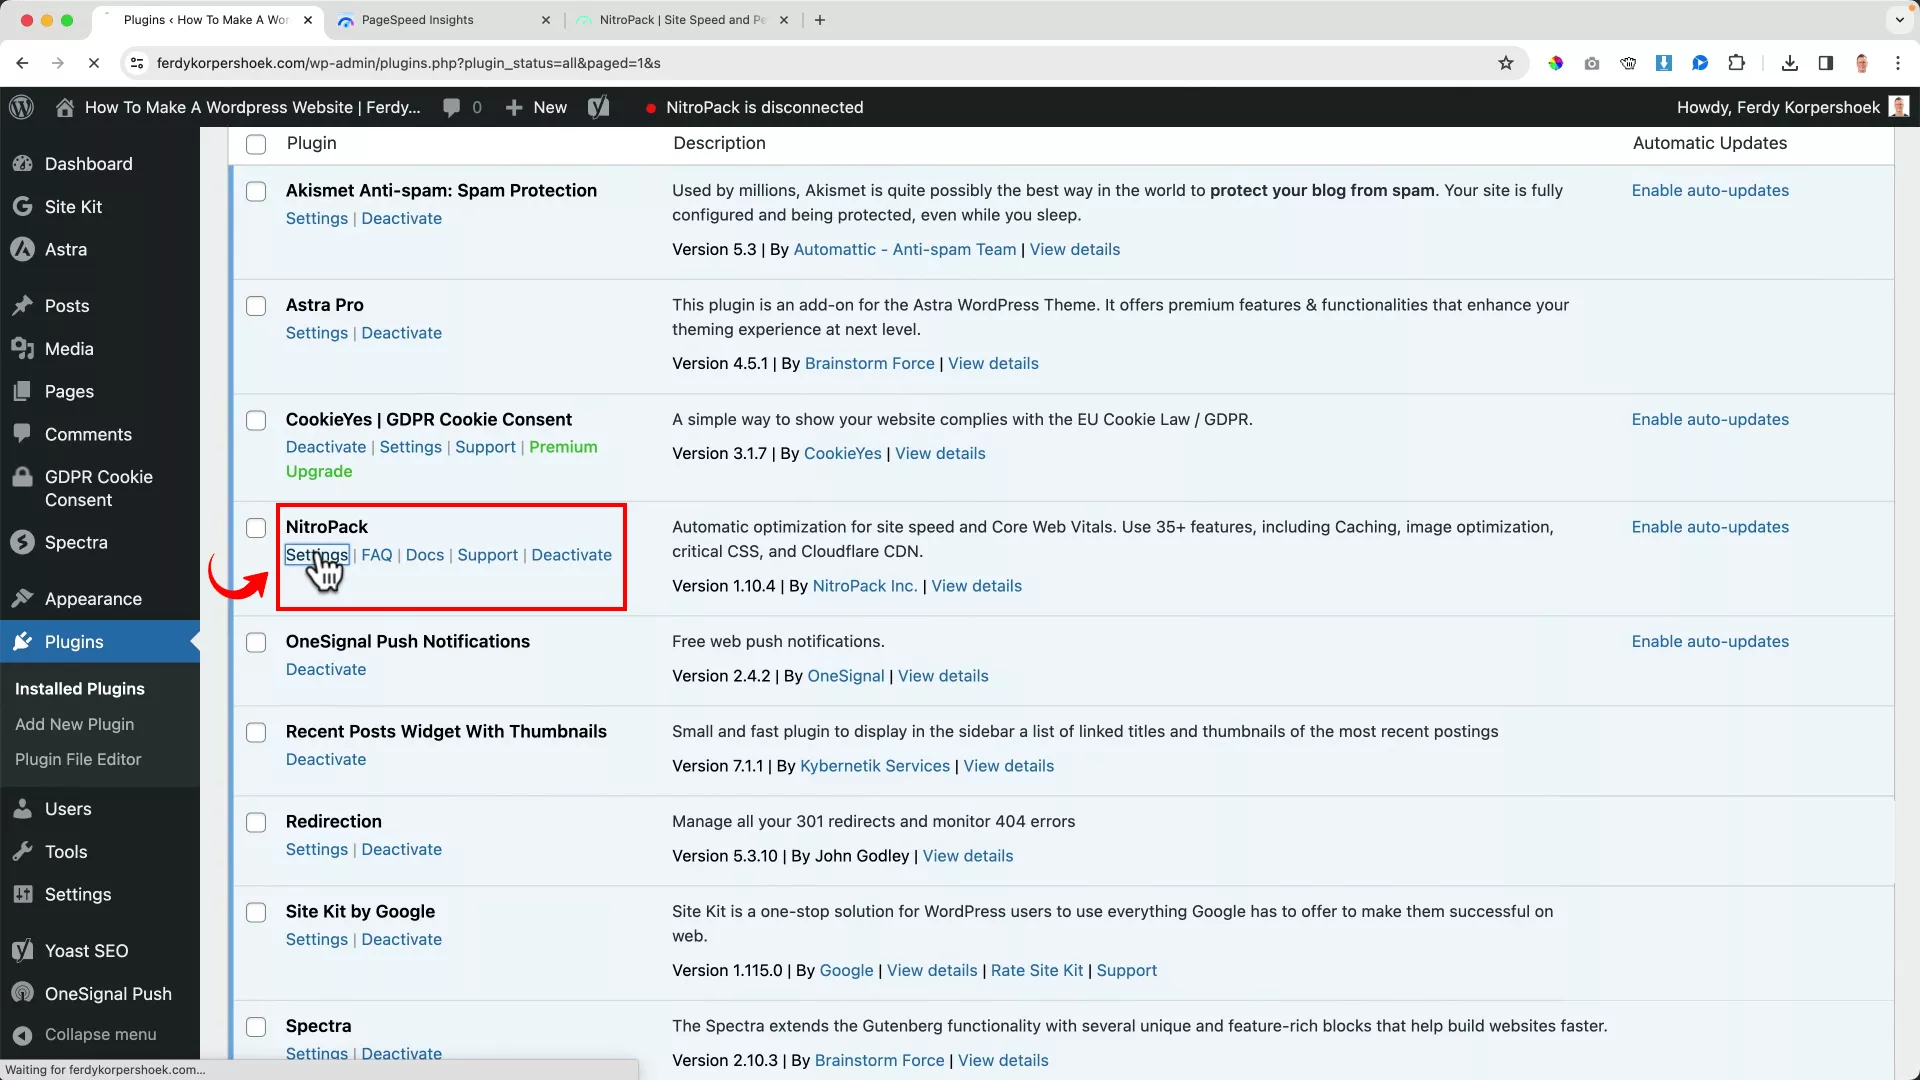
Find the NitroPack plugin in your “Plugins” tab on WordPress. Click “Settings.”
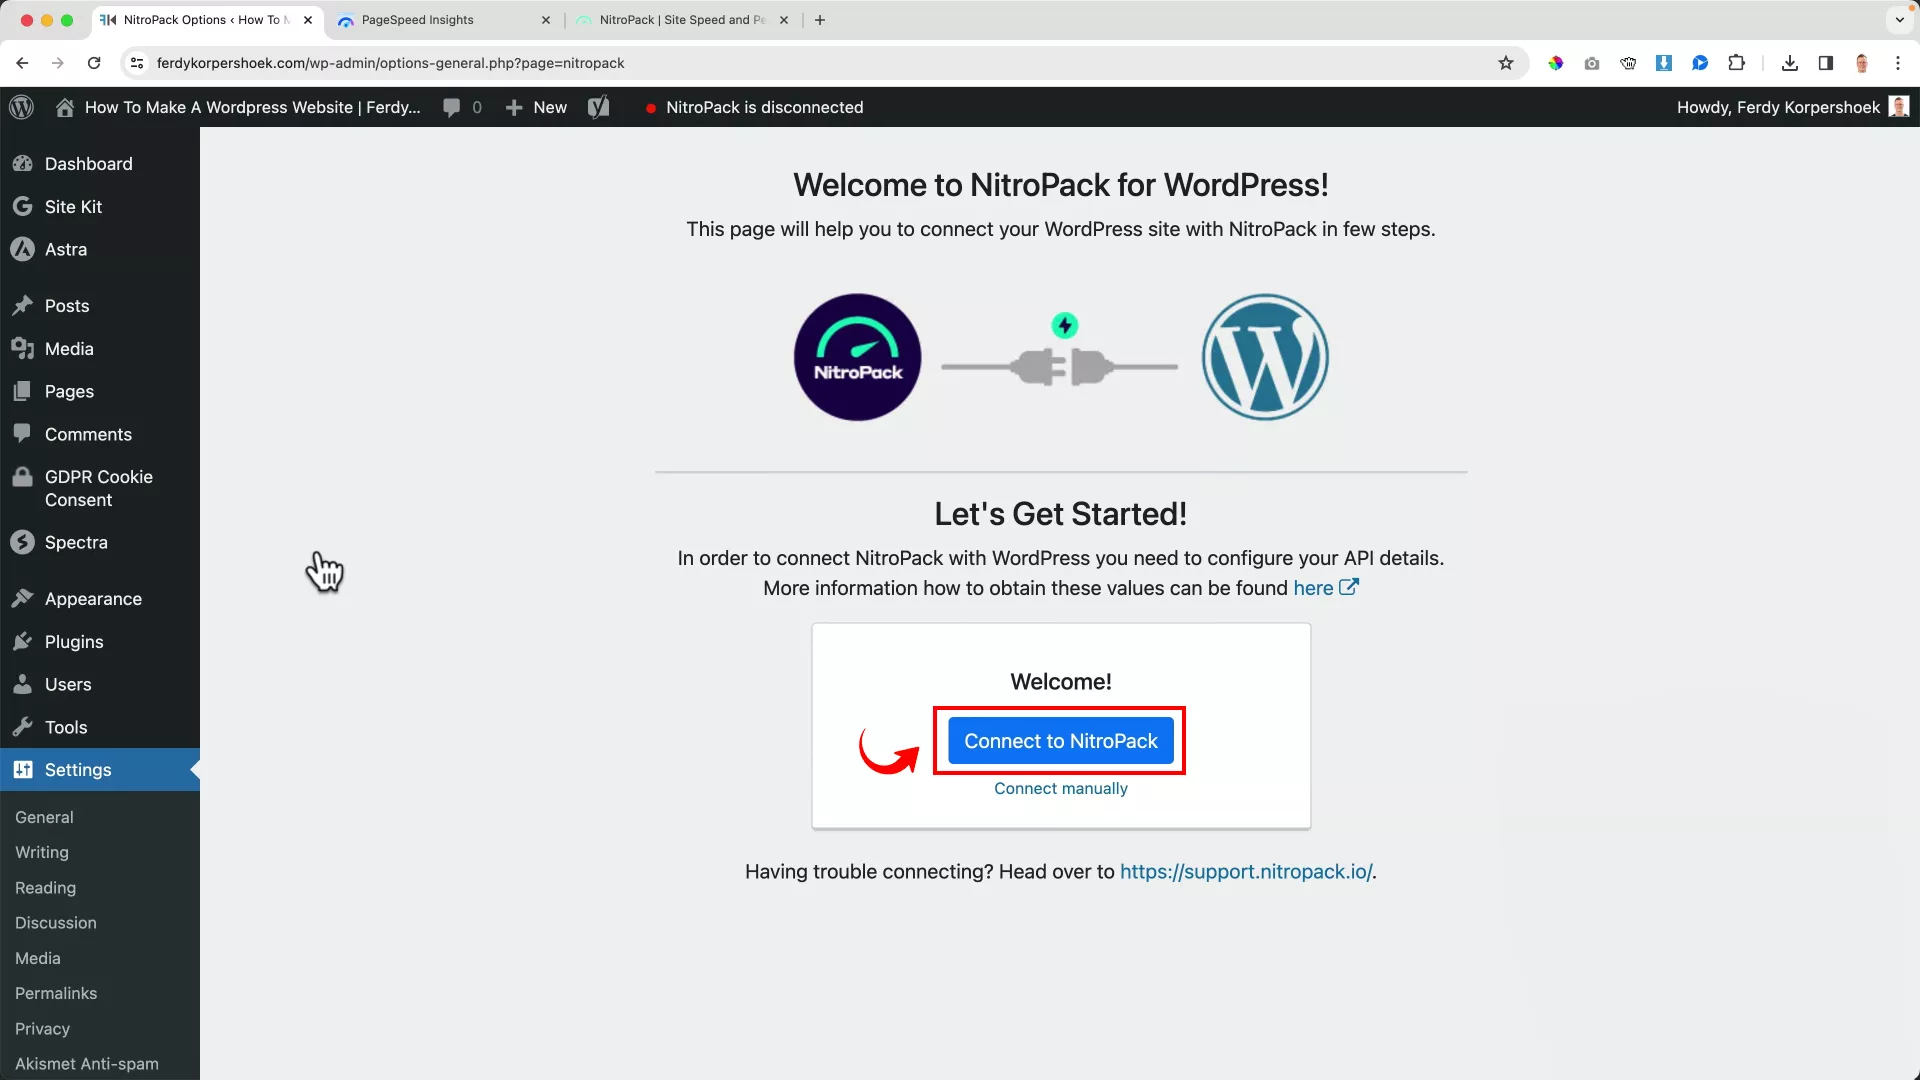
Next, click “Connect to NitroPack” and proceed by signing up.
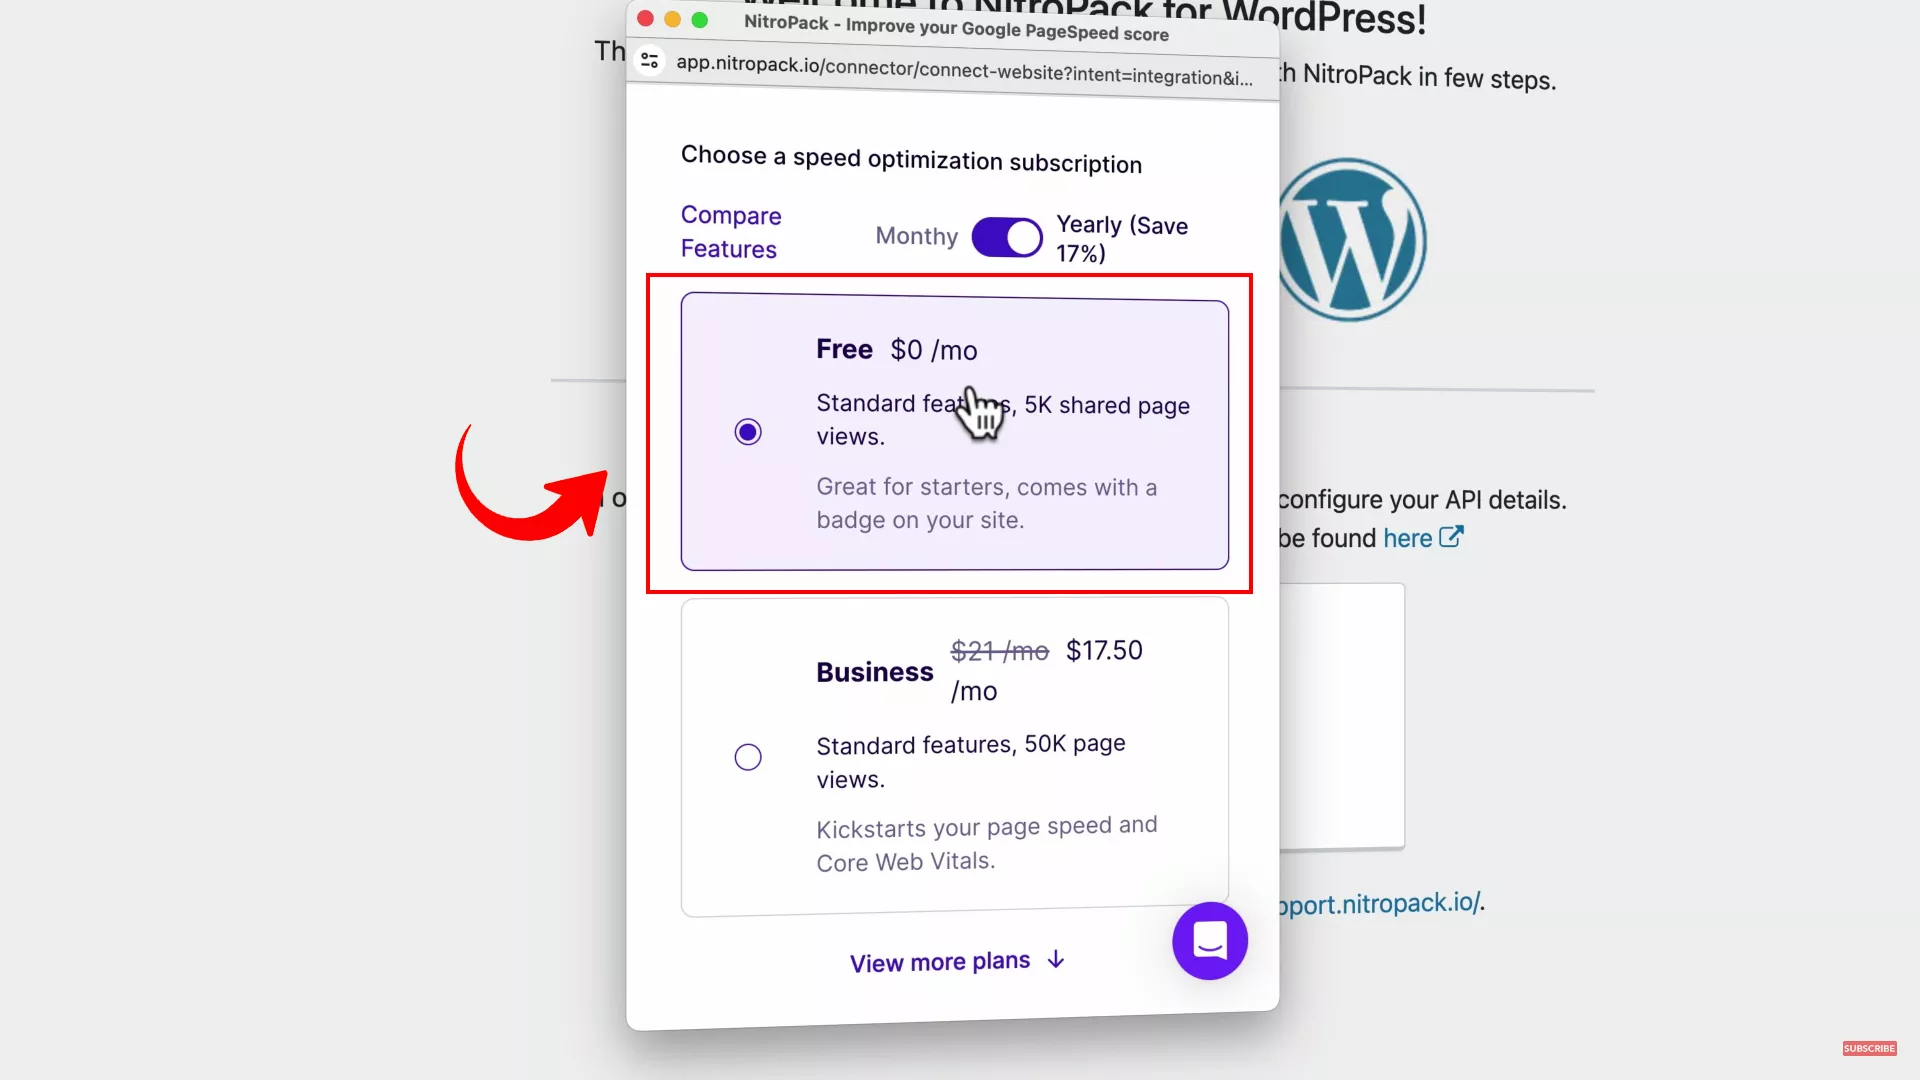
Complete the sign-up process by choosing a plan. The Free plan is perfect for those who want to test the waters.
Note that the free plan lets you connect up to three websites to the plugin, with 1 GB of CDN bandwidth and up to 5,000 page views/mo.
With that, your WordPress website is now connected to NitroPack.
3. Recheck WordPress site speed
Now, recheck your WordPress site performance using Google PageSpeed insights.
I did, and just look at the results I got:
Do you see the remarkable change? By just connecting a free version of the plugin, I significantly improved my website’s performance.

And if you see the Treemap timelapse, you will notice that every element on my page is loaded without a glitch.
Similarly, on my web pages, everything is working optimally. The only difference is that it is loading faster, without any delays.
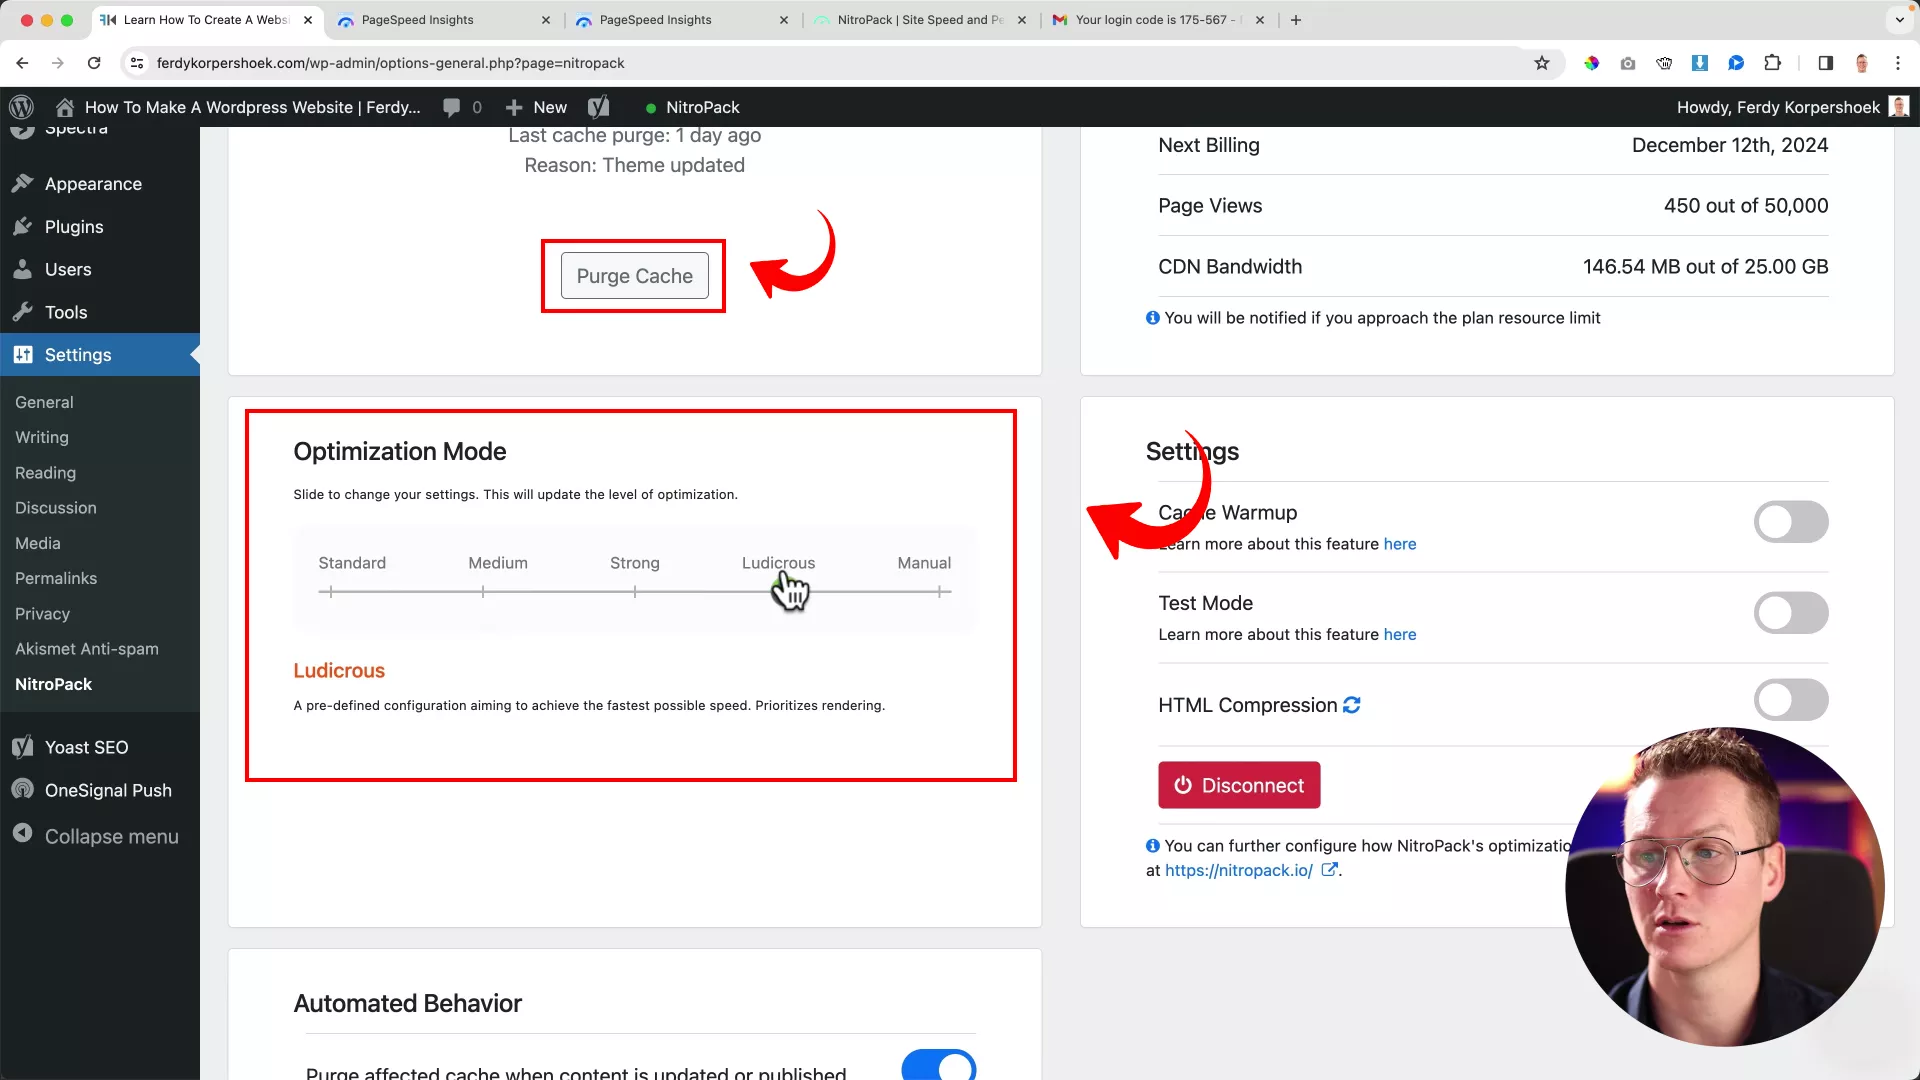
Pro tip: If you notice any glitch in your website, go to NitroPack’s settings and toggle the ‘Optimization Mode.’ Click on ‘Purge Cache’ to update the settings.
4. Choose the right website optimization mode
The NitroPack WordPress plugin has various optimization modes you can select based on your website type. However, all WordPress websites are set to ‘Ludicrous” mode by default.
Depending on your website, you can change the optimization mode between Standard, Strong, Medium, and Manual configurations.
In my experience, the Strong optimization mode works great for sites with a lot of JavaScript. And if you have a website like mine – lightweight page builder, not a lot of JavaScript – you should stick to Ludicrous.
For example, the ‘Strong’ optimization mode is ideal for heavy WordPress sites. While the ‘Ludicrous’ mode is better suited for lighter sites by focusing on delaying JavaScript and prioritizing HTML and CSS.
You can choose the mode as per your website’s requirements. However, test your site’s performance after every change you make.
While the NitroPack plugin kept my web pages functioning properly, I recommend frequently checking your website’s performance after installation to ensure it runs smoothly without any disruptions.
And again, if you find something wrong, change the optimization mode > Purge Cache > Test website.
5. Optimizing a heavy website
The WordPress site I was playing around with earlier is working on the Gutenberg editor. And we all know that this is the lightest editor for WordPress sites. So, I thought, why not try the NitroPack plugin on heavier websites to see the results?
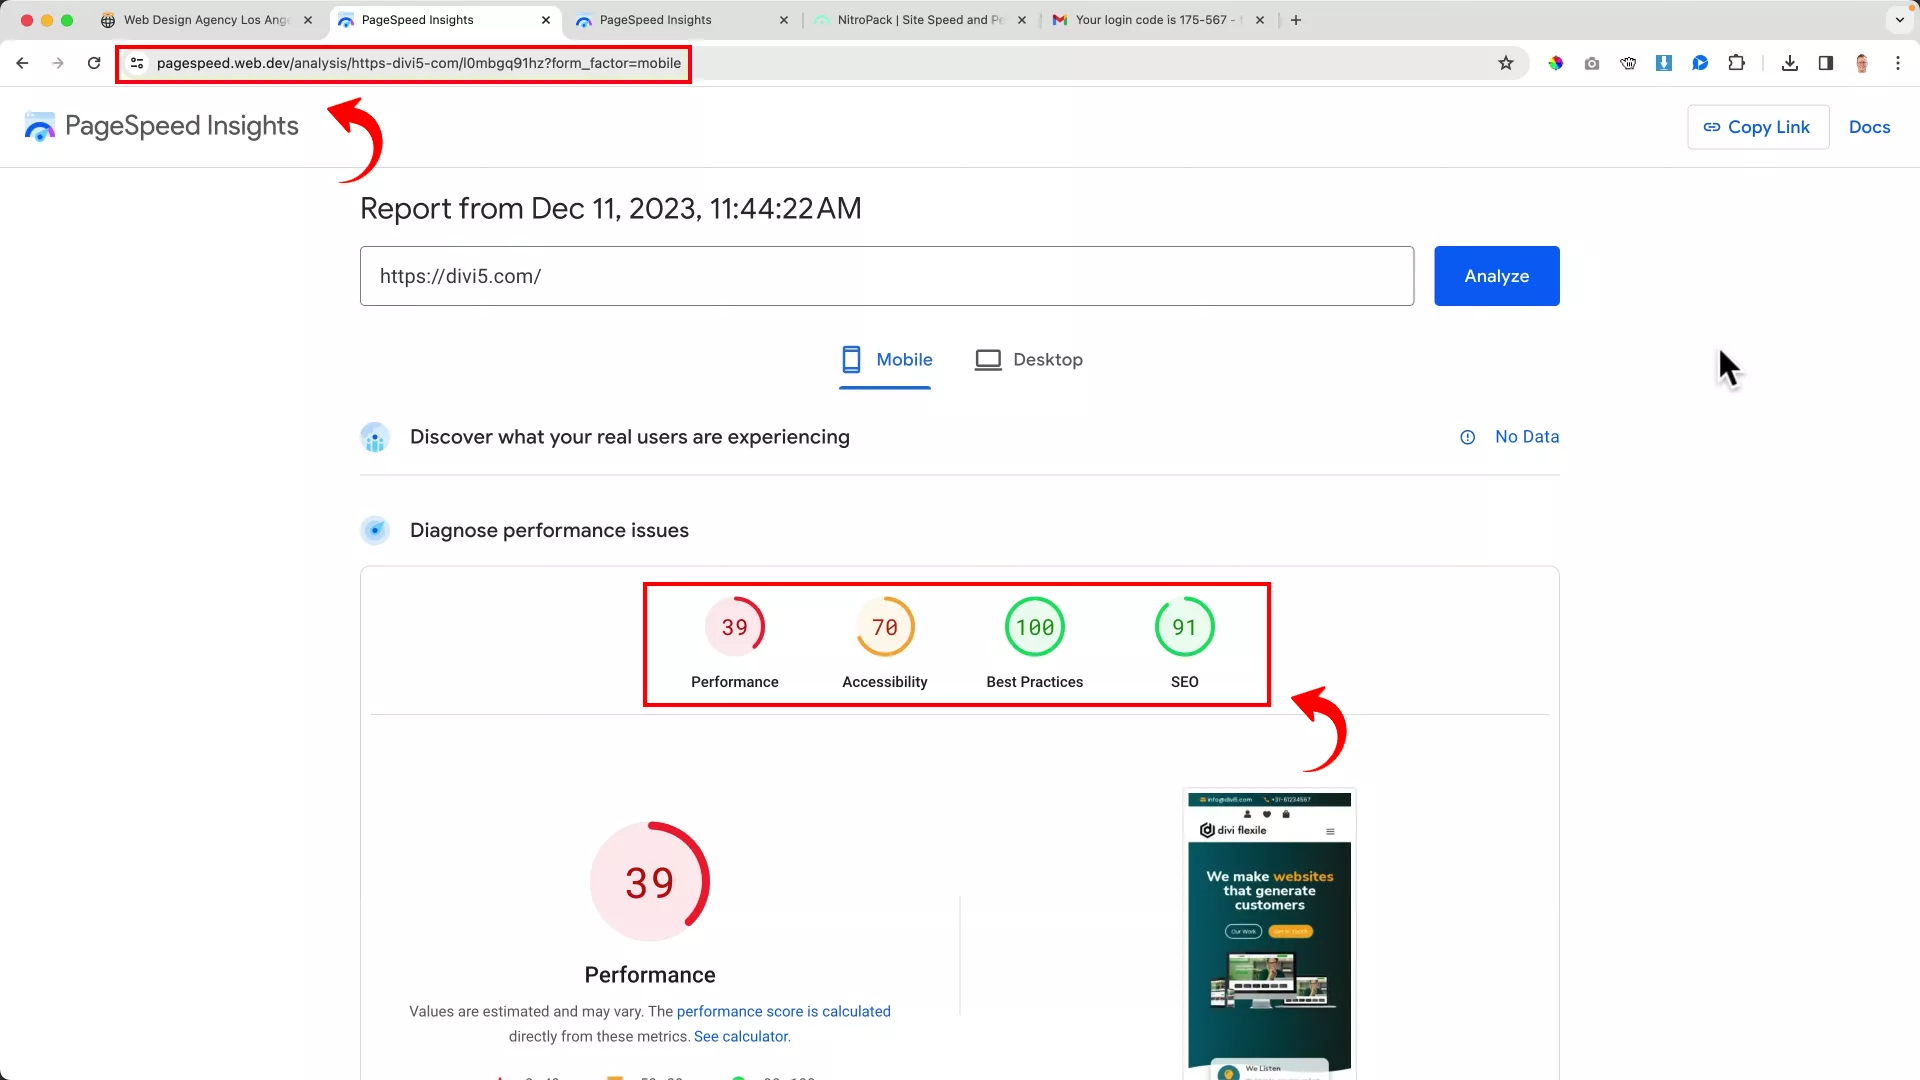
I decided to use one of my heavier demonstration websites, divi5.com, for this experiment.
First, I got rid of all the caching plugins on this website to make sure that the results would be purely attributable to NitroPack. This step was crucial to ensure no other optimization tools interfered with or skewed the test results.
Initially, I tested its performance using Google PageSpeed Insights and the results were quite underwhelming:
- Performance: 39
- Accessibility: 70
- Best Practices: 100
- SEO: 91
- First Contentful Paint (FCP): 3.2s
- Largest Contentful Paint (LCP): 7.9s
- Speed Index: 5.9s
Here’s a snapshot of the report for reference:
Curious to see the impact of optimization, I logged into the WordPress admin dashboard of divi5.com and installed the free version of the NitroPack plugin.
After the installation, I ran the Google PageSpeed Insights test again. Just take a look at the striking difference in the results below:
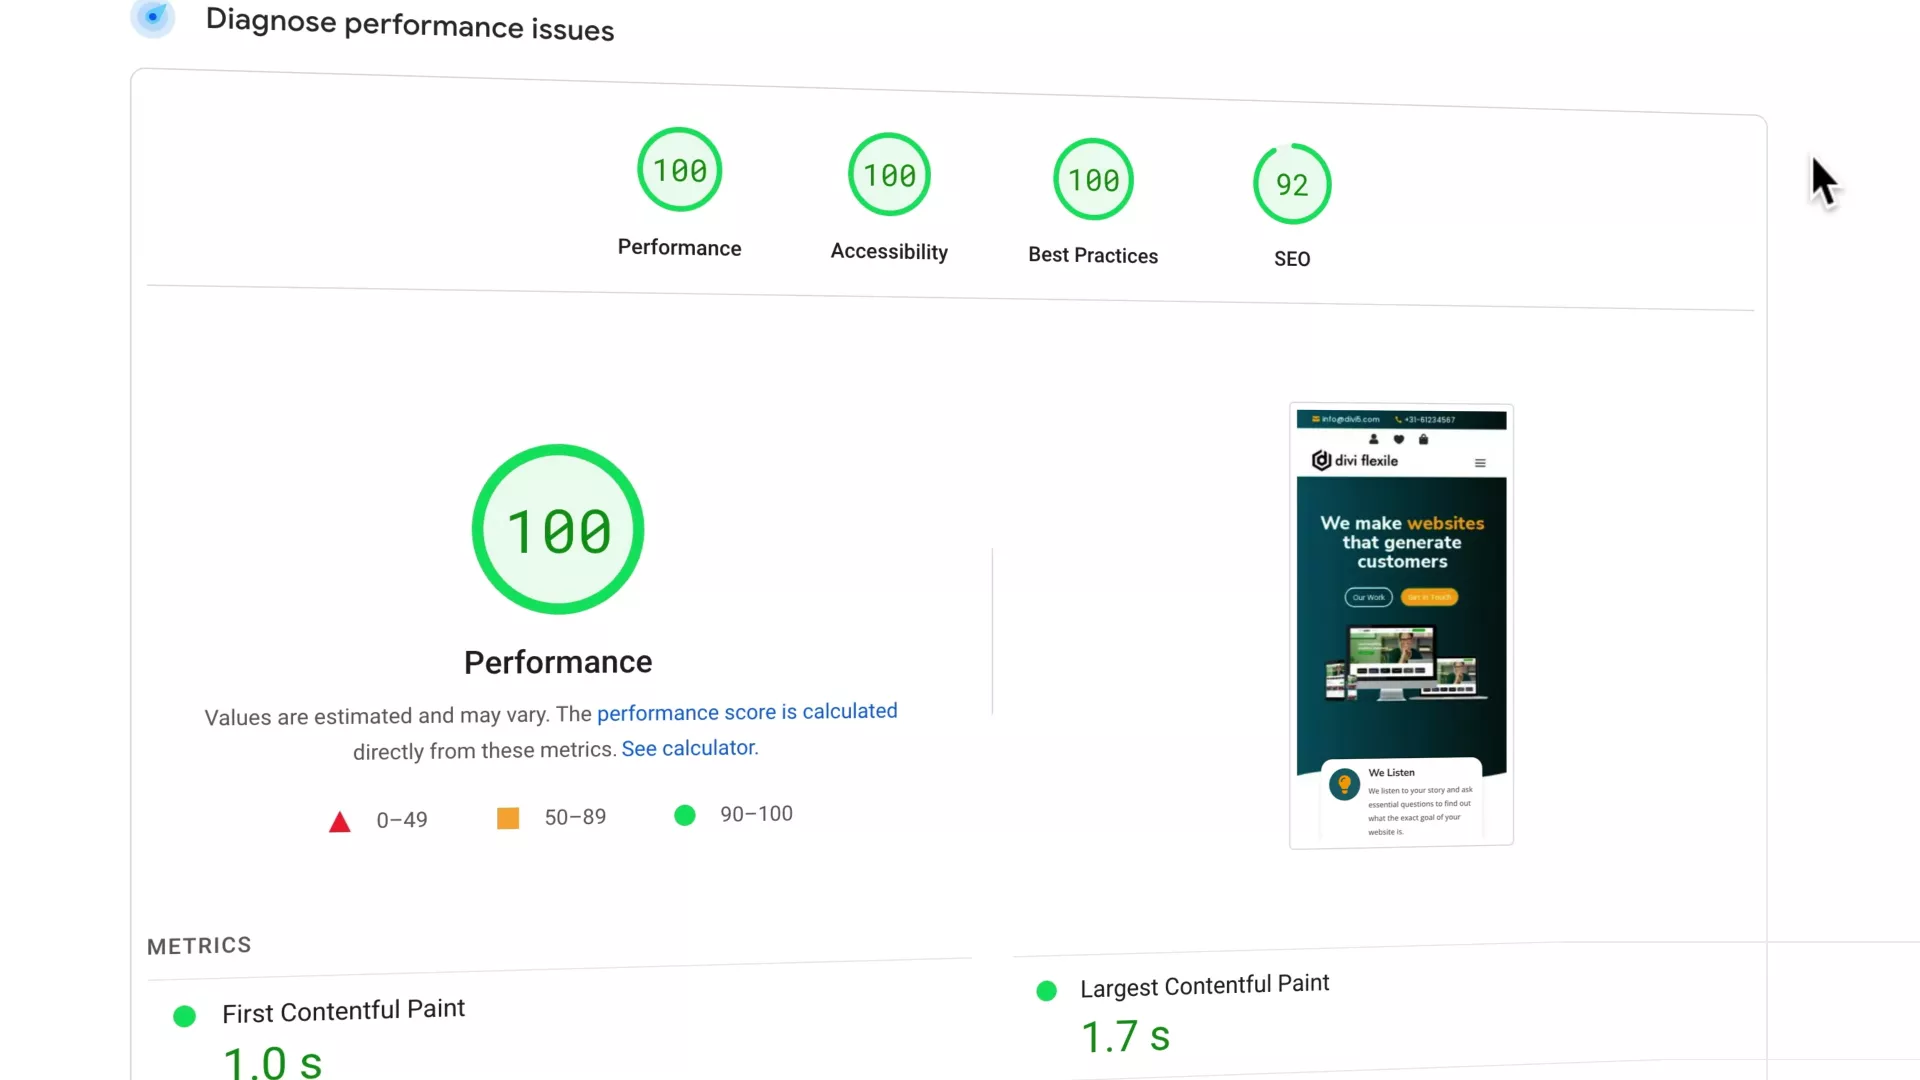
Wow! It seems like I only need to focus on my SEO strategies for this ‘fast’ WordPress site (haha!).
Only the page’s ‘Treemap’, which indicates the page view through screenshots, appears disoriented. However, that is probably because I am using animations (that take time to appear) in the initial layout of my page.
Other than that, I am pleased with this website’s performance. All thanks to NitroPack!
6. Optimizing an e-commerce website
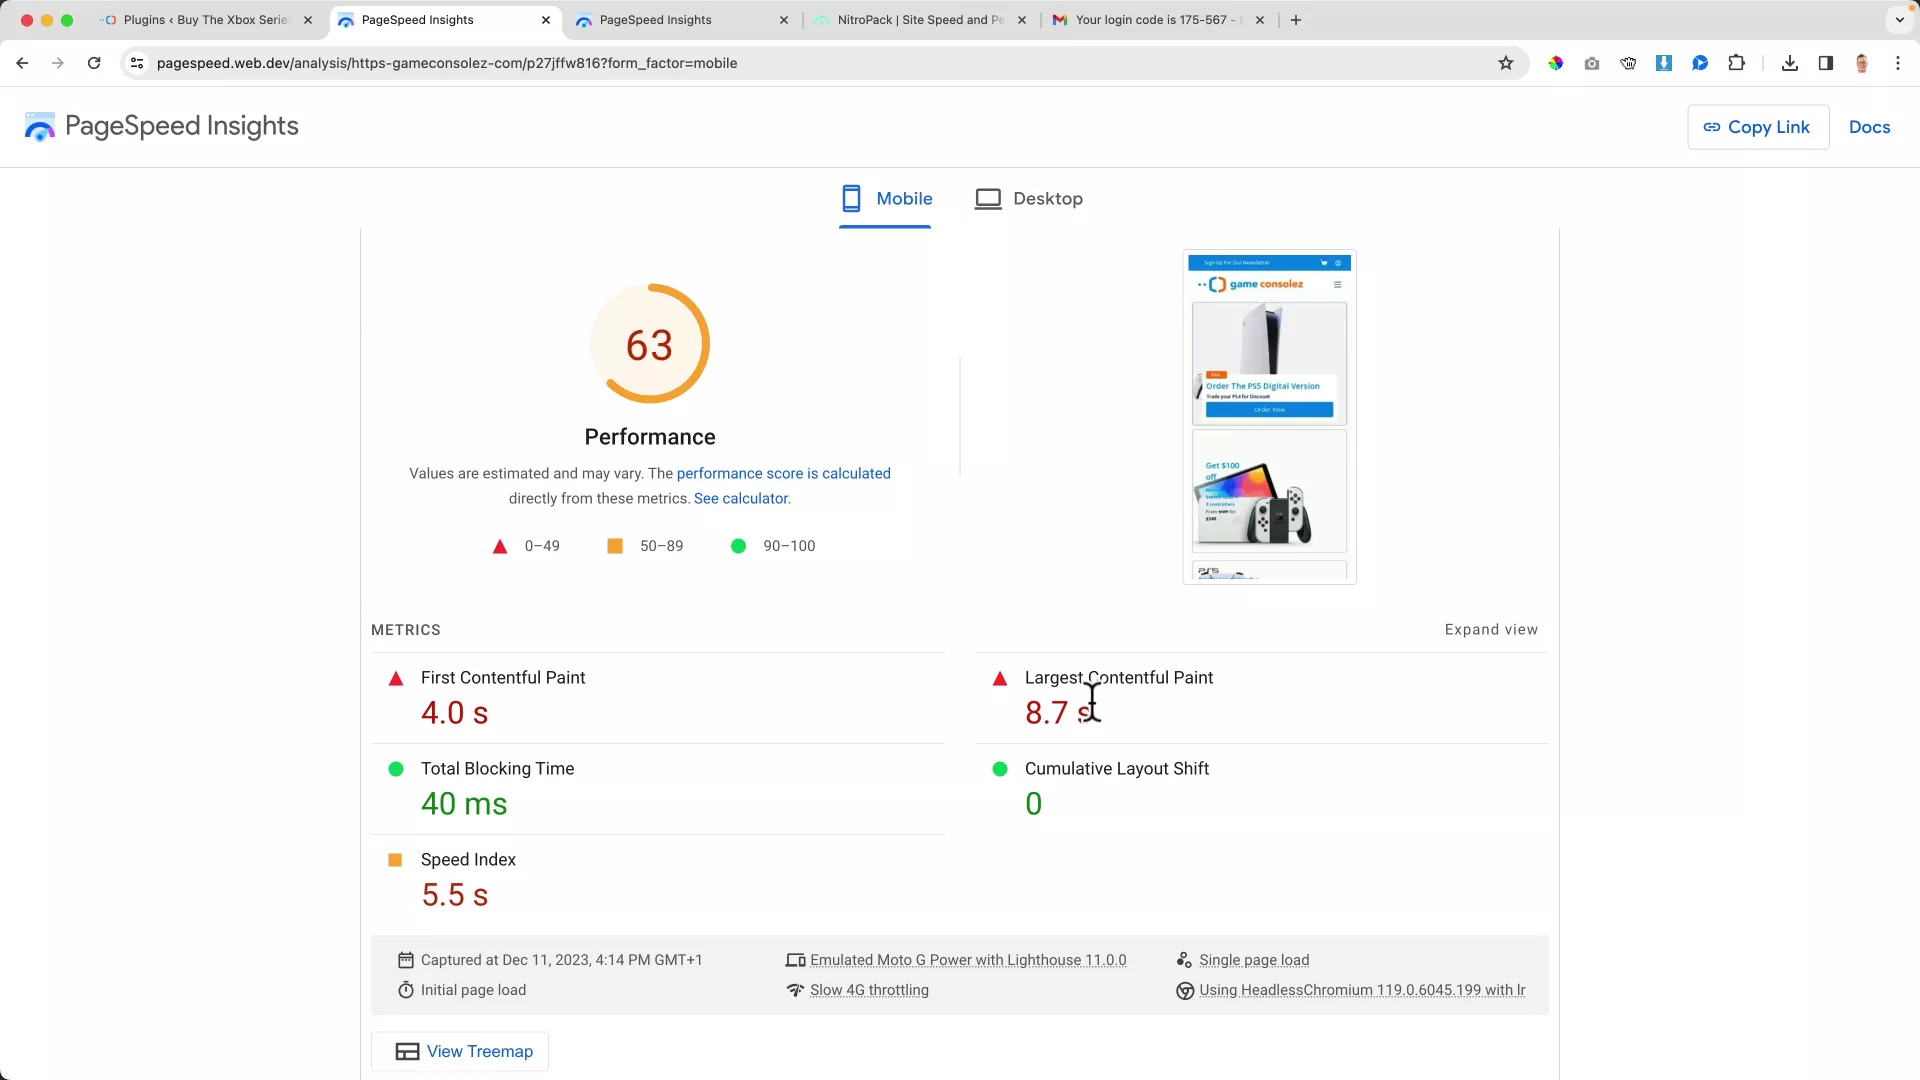
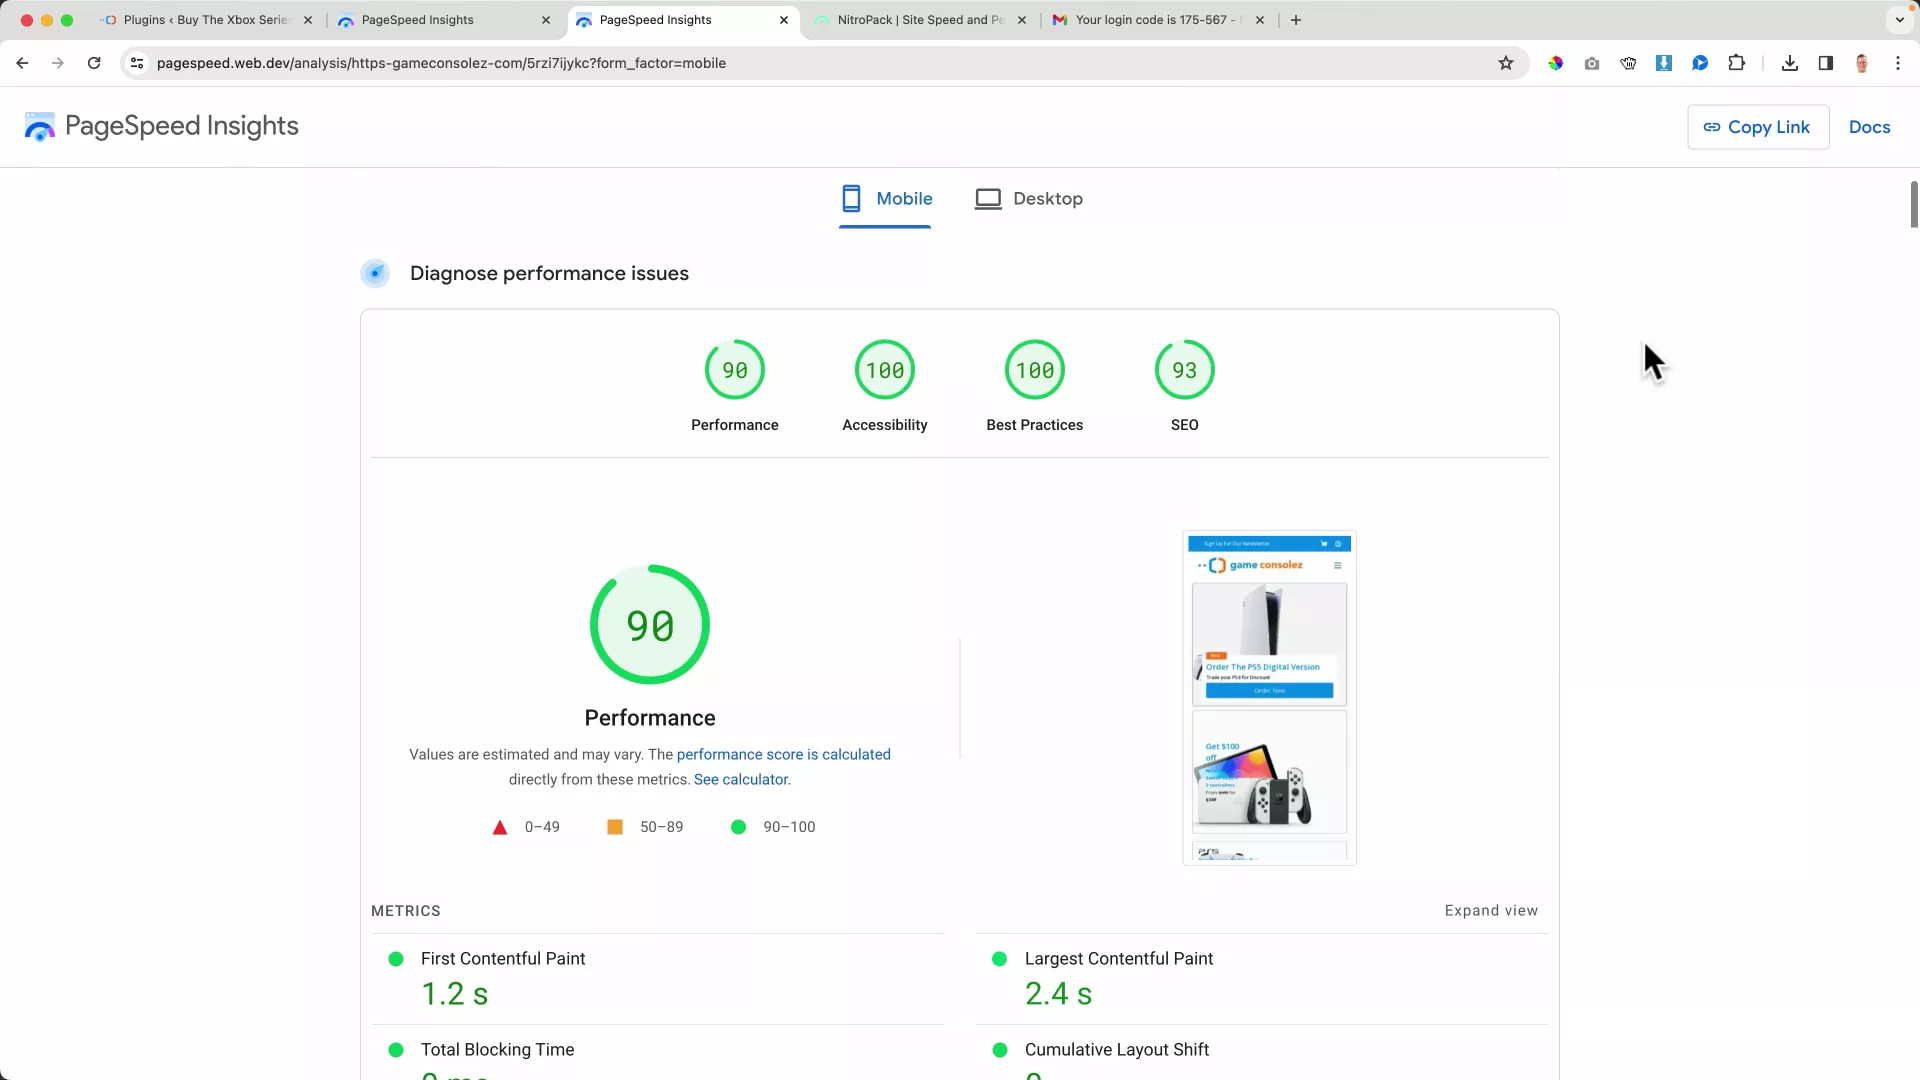
The next website I selected (gameconsolez.com) is one of my eCommerce sites powered by WordPress and WooCommerce. Since this is an online store, it is loaded with images and lots of e-commerce functionality.
I installed the NitroPack plugin on this website as well and ran the tests. The results were phenomenal, as always, with NitroPack. Look at the before and after comparison chart for this e-commerce website below.
| Speed Factors (Mobile) | Site Performance Before Installing NitroPack | Site Performance After Installing NitroPack |
| Performance | 63 | 90 |
| Accessibility | 89 | 100 |
| Best Practices | 100 | 100 |
| SEO | 93 | 93 |
| First Contentful Paint (FCP) | 4.0s | 1.2s |
| Largest Contentful Paint (LCP) | 8.7s | 2.4s |
| Speed Index | 5.5s | 3.0s |
Isn’t it amazing?
For your reference, I’m attaching the screenshots of the before and after Google PageSpeed Insights reports below.
Before installing NitroPack
After installing NitroPack
The experiment on different WordPress websites indicates that the NitroPack plugin works on every type of website. Whether you have a general blog, a heavy image-based eCommerce page, or a JavaScript-loaded webpage – the NitroPack plugin doesn’t disappoint.
If you’d like to learn more about NitroPack, check out my in-depth NitroPack plugin review. In this article, I review NitroPack thoroughly and dispel a few myths associated with it.
Final Thoughts
Gone are the days when optimizing website performance used to be complex and time-consuming. NitroPack offers a quick, automated solution to improve site speed while maintaining your website’s existing interface.
My experiments across various WordPress websites, including e-commerce and image-heavy sites, confirm its effectiveness. Try NitroPack and see the difference for yourself – it’s a simple step towards a faster, more efficient website.
Besides this blog, I also have a YouTube channel where I upload in-depth tutorials around WordPress, e-commerce and affiliate marketing. For more tricks and tools to optimize your website, consider subscribing to my YouTube channel.
Good luck!


0 thoughts on “How to Speed Up Your WordPress Website (Mobile + Desktop)”