


How to Start Affiliate Marketing in 2024 (Insights From a $1M+ Affiliate Marketer)
- create an affiliate marketing website
- create an affiliate marketing. blog
- how to start affiliate marketing
Do you want to start a successful affiliate marketing business in 2024? Great idea! The affiliate marketing industry, worth over $17 billion, offers a great avenue for anyone with an online audience to make money online – myself included.
Starting a successful affiliate marketing business involves finding a niche, establishing an online presence, creating helpful content for your target audience, signing up for affiliate networks, embedding affiliate links, and leveraging video content to drive traffic and generate revenue.
If you’re serious about starting affiliate marketing and eager to learn from someone who’s earned over $1M in affiliate commissions (yes, that’s me!), this post is your go-to guide.
How to start affiliate marketing – video tutorial
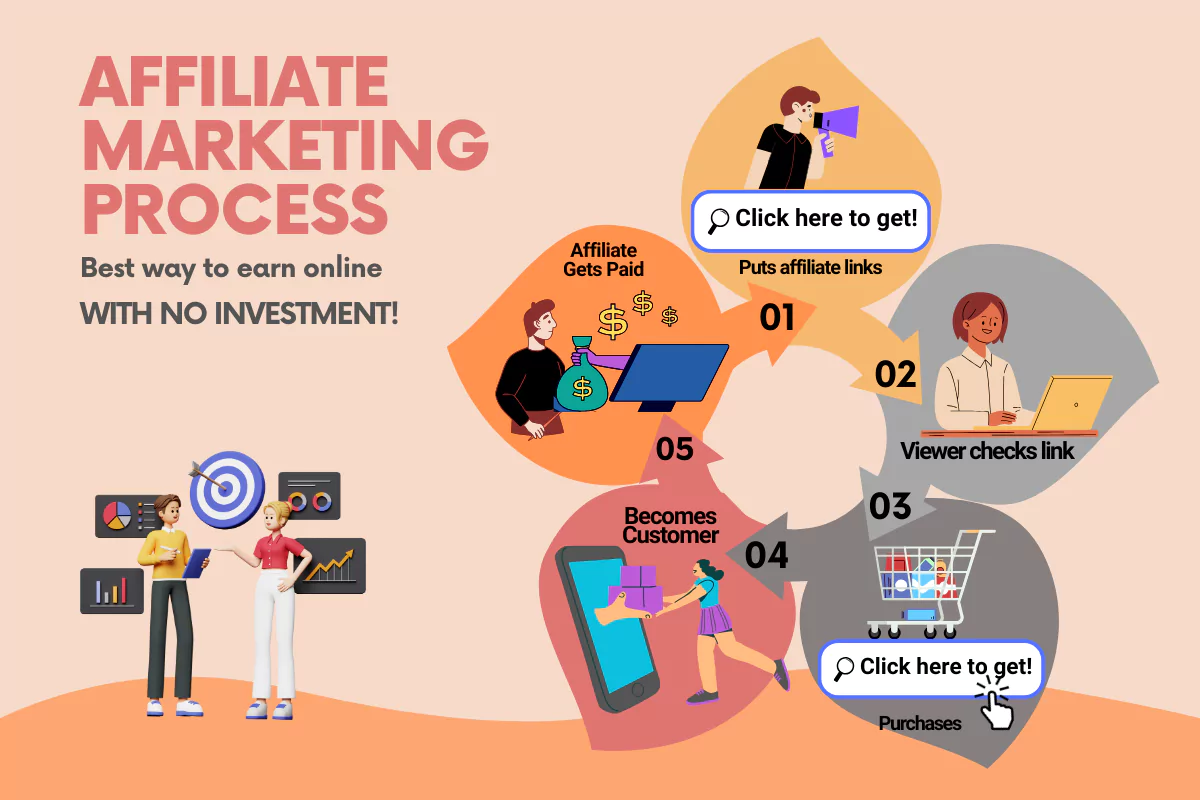
What is affiliate marketing?
Affiliate marketing is promoting someone else’s products or services to earn a commission on each sale. You don’t have to own any products or invest to buy products in affiliate marketing.
Instead, you promote other’s products and when people buy them via your affiliate link, you earn a commission on each sale you generate.
Ferdy’s Field Files – Amazon Associates Program
Take Amazon, for example. Amazon runs an affiliate program that allows registered affiliate partners to promote their products by placing affiliate links (unique to them) on their YouTube channels, social media posts, or blogs. When someone from their audience buys that product on Amazon using their unique affiliate link, they earn a commission. That’s a win-win-win for all parties involved. Amazon gets more sales on its platform, affiliate marketers earn more income through commissions, and the customers get the products they want.
Why become an affiliate marketer?
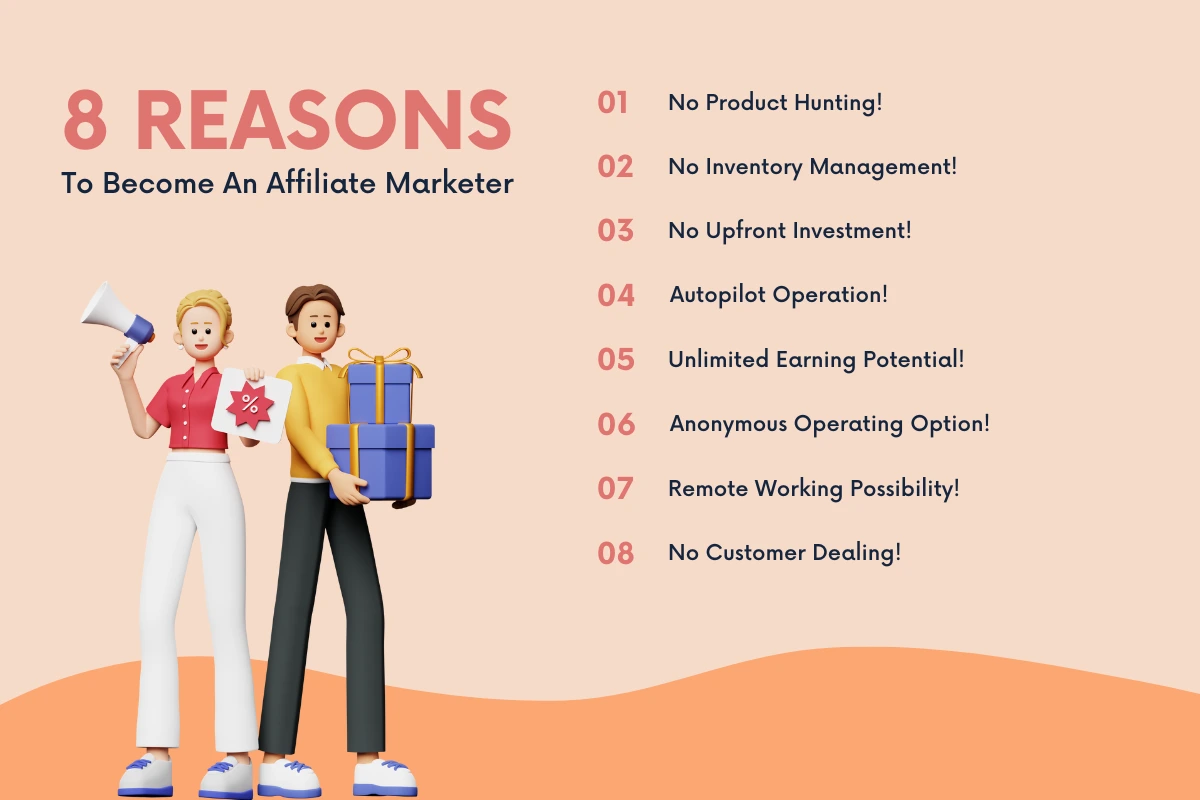
Here are eight reasons to become an affiliate marketer:
- Forget about hunting or creating a product. Why? Because you are endorsing and marketing someone else’s product to earn a commission.
- You don’t have to worry about stock, inventory management, etc.
- It’s a risk-free business model—no upfront investment. Plus, you can even return your domain name and web hosting if you want to.
- Affiliate marketing does not need 24-hour attention. It operates on autopilot, generating cash even when you sleep. I still generate affiliate revenue from content that I created back in 2017!
- Once results start coming, there’s no limit to your earning potential. Get ready to experience exponential growth in this business.
- You can operate anonymously. Yes, you must build authority for the website, but it does not mean showing the world your real self.
- You can work remotely. No sitting in an office cubicle or workspace. As long as you have a laptop and internet, you can run an affiliate business anywhere. Try to avoid doing it on your smartphone, though.
- No customer service headaches. If customers don’t like a product they bought through your affiliate link, they’ll contact the brand’s customer support, not you.
Adopting the right affiliate marketing mindset
The affiliate marketing mindset can be categorized into two broad categories: involved and unattached. Let me break it down for you:
- Involved affiliate marketing: This approach involves a deep understanding of the products or services you’re promoting. As an involved affiliate marketer, you leverage your expertise in the product’s niche to build trust with your audience. Your recommendations are based on personal experience and genuine belief in the product’s value. Like what I do.
- Unattached affiliate marketing: Unattached affiliate marketing doesn’t require you to have expertise in the product’s niche or even use the product. It’s more about leveraging marketing skills to drive traffic to a product link. Here, your connection with the product is minimal. Instead, you solely focus on effective advertising strategies to generate sales.

Both approaches have merits, but your choice should align with your brand’s values and audience’s expectations.
For me, the right affiliate marketing mindset is one where your primary focus is helping people, not making money. You’ll ultimately make money if people find your content helpful. Understanding this principle is very important before you step into affiliate marketing.
To put this into practice, start by identifying problems. Then, address them in the content you write for your audience.
For example, take the common query for the best WordPress plugin. As a seasoned web developer experienced in WordPress, I consider this a problem that requires a solution. I will write a blog post titled “Top 10 WordPress Plugins in 2024.”
I’ll address the important factors to consider when choosing a WordPress plugin, along with my top premium and free recommendations.
This way, I will be helping people make informed decisions and naturally position myself to earn affiliate commissions as a byproduct of providing valuable information.
Remember this: affiliate marketing is all about genuinely helping others and earning in the process.
If you want to become a successful affiliate marketer:
- Identify people’s problems
- Create high-quality content that addresses their problems
- Recommend products with your custom affiliate link that solve their problems
Choosing between physical vs digital products
The choice between promoting physical and digital products is equally important. Take a digital camera, for example. Manufacturing a physical product like this involves assembling parts globally, requiring extensive resources, labor, and costs.
This often results in higher retail prices and lower commission percentages for affiliates. While you can promote high-ticket physical products like a $3700 digital camera, your potential buyer pool may be limited.
Conversely, promoting a SaaS subscription costing $40 a month with a 40% recurring affiliate commission can be more scalable.
Why? Because it’s a digital product that the company created once and can now sell repeatedly without significant expenses. This offers a lower entry barrier for customers and a consistent income stream for you.
Makes sense? Look at the math below for further clarity:
| Factor | Digital Camera | SaaS Subscription |
| Price | $3700 (one-time) | $40/mo |
| Affiliate Commission | 2% | 40% |
| Website Visitors | 10000 | 10000 |
| Paid Customers | 30 | 300 |
| Affiliate Payout | $2220 (one-time) | $4800/mo (recurring) |
My affiliate marketing journey + $172000 case study
I have been doing affiliate marketing for over a decade. It’s been so lucrative for me. Here’s a quick breakdown of my progress over the years:

I made a promising $2,000 in my first six months. After that, I made $3500 in subsequent years and then $5000 a year after. I saw a consistent rise in my affiliate income, even after an affiliate program switch in 2018.
And that’s not the end. My success stories include the Divi theme, bringing in $172,000, and a tool like WebinarJam, generating me steady monthly income for years.
When the pandemic hit in 2019 and online marketing tools saw a boost, I started endorsing them. For example, my content about an advanced Zoom live streaming tool contributed a lot to my affiliate income and has been lucrative to this day.
Note that these are just glimpses of my affiliate marketing journey. I have many more affiliate products that generate thousands of dollars every month.
I’m neither a marketer nor do I have a sales background, but I made over 1 million dollars with affiliate marketing. Do you know why? Because of my persistence. Complete dedication to what I was doing and persistence made all of this possible.
How to start an affiliate marketing business in 8 steps
As beginner affiliate marketers, lots of you may find affiliate marketing challenging and not immediately fruitful. While that’s true, it’s important not to let these early hurdles overshadow the substantial rewards that await you.
A major benefit of affiliate marketing work is its ‘set and forget’ nature – a focused initial effort can lead to sustained earnings over time. Remember my WebinarJam example? I created just one video about it in 2017 and continue to reap the rewards.
The real secret lies in your persistence and diligent application of the steps that I’m about to share. Stay consistent and your early affiliate marketing efforts will pay off in the long run.
1. Find your niche and products
First, you need to find a niche to write content about. Most people spend too much time finding a niche, but I have a simple formula:

- Interest: Brainstorm topics you are interested in or know about. Think about your hobbies, interests, or areas of expertise. Rate your genuine interest in various topics from 1 to 10.
- Market demand: Conduct market research. to determine if a demand exists for your identified niche. You can use different tools such as Google Trends, Answer Socrates, and Exploding Topics Score the market demand based on search trends and customer interest, again from 1 to 10.
- Profitability: Identify niches within your chosen market with high demand and less competition. Assess the potential earnings from affiliate programs in these topics, scoring them 1-10.
- Competition level: Finally, estimate the level of competition and inversely score it (10 for low competition, 1 for high).
Multiply the interest, market demand, and profitability scores, then divide by the competition score. The higher the final number, the more suitable the niche is for you!
Finding the right products to promote
Next, look for the relevant products you can advertise on your blog. But how do you know what product to promote? There are two ways to do this:
- Find high-paying affiliate programs related to your interests and passion.
- Find the best affiliate programs and pick the ones you resonate with the most.
I like finding the best affiliate programs related to my interests and passion. This allows me to create content on subjects I am genuinely interested in helping people. And this is what differentiates a successful affiliate marketer from an average affiliate marketer.
For example, I am a YouTuber and love growing my YouTube channel. I can start a blog that helps YouTubers grow their YouTube channel.
On this blog, I can cover topics most YouTubers need help with, like getting your YouTube thumbnails right, writing the perfect titles, what camera gear and equipment to use, etc.
Using my unique affiliate links, I can recommend all the tools and gear I use to run my YouTube channel in these blog posts.
Maybe you’re someone who’s into fitness. You could start a fitness blog, teach people how to build muscle or lose weight, and recommend the supplements and training gear you use. Or perhaps that Keto diet course on Udemy you found helpful. The possibilities are endless!
2. Set up your affiliate marketing website
Now comes the tricky part. Picture this: your physical store has amazing products, but your display is not enticing. Do you think prospects will enter your store? Probably not.
The same rule applies to an affiliate marketing business. And to attract more website visitors, you need to create a compelling website.
When it comes to website creation, you can’t get wrong with WordPress. Follow the steps below to create a WordPress website for your affiliate marketing business:
Step 1: Get web hosting and domain name
First, choose a web hosting provider and get a domain name for your website. I recommend Hostinger if you want a blazing-fast web hosting service with a money-back guarantee. To put the cherry on top, they were kind enough to offer exclusive discounted deals for my audience.
Here’s a quick run-down of how to get web hosting and a free domain with Hostinger.
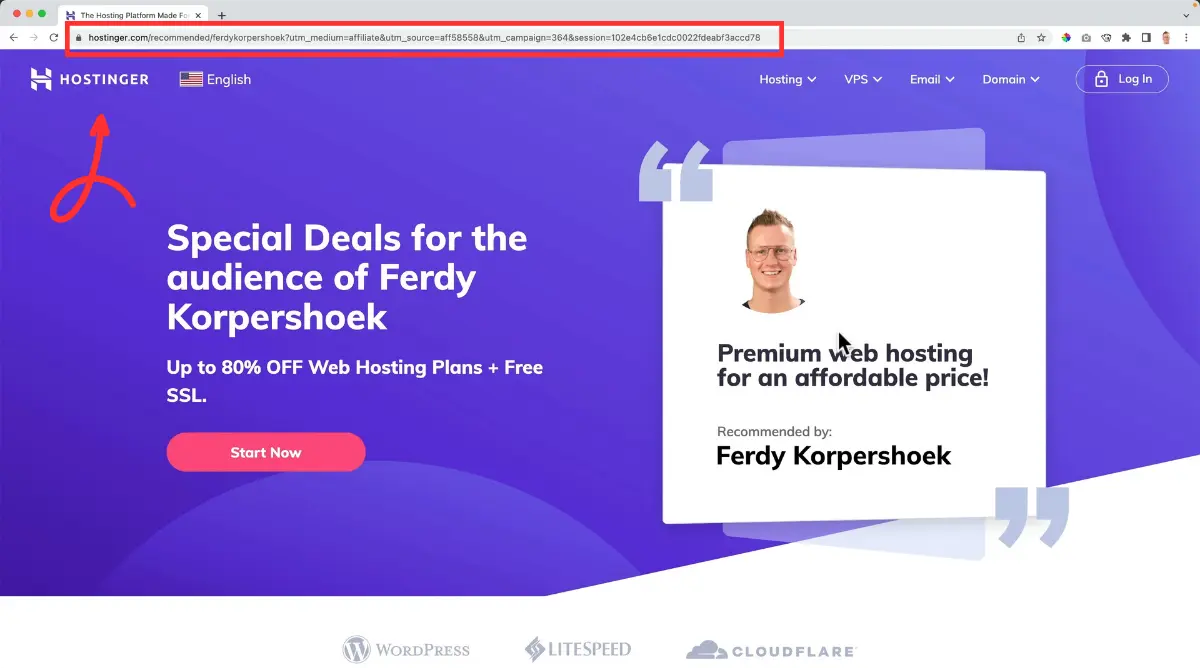
Click on the button above to visit Hostinger. You’ll be redirected to the exclusive pricing page shown above.

Next, pick a plan that best suits your needs. Go for the WordPress Starter plan if you plan to create no more than 10 websites and enjoy a free domain for a year. No need to install WordPress either, as it comes pre-installed with the plan.
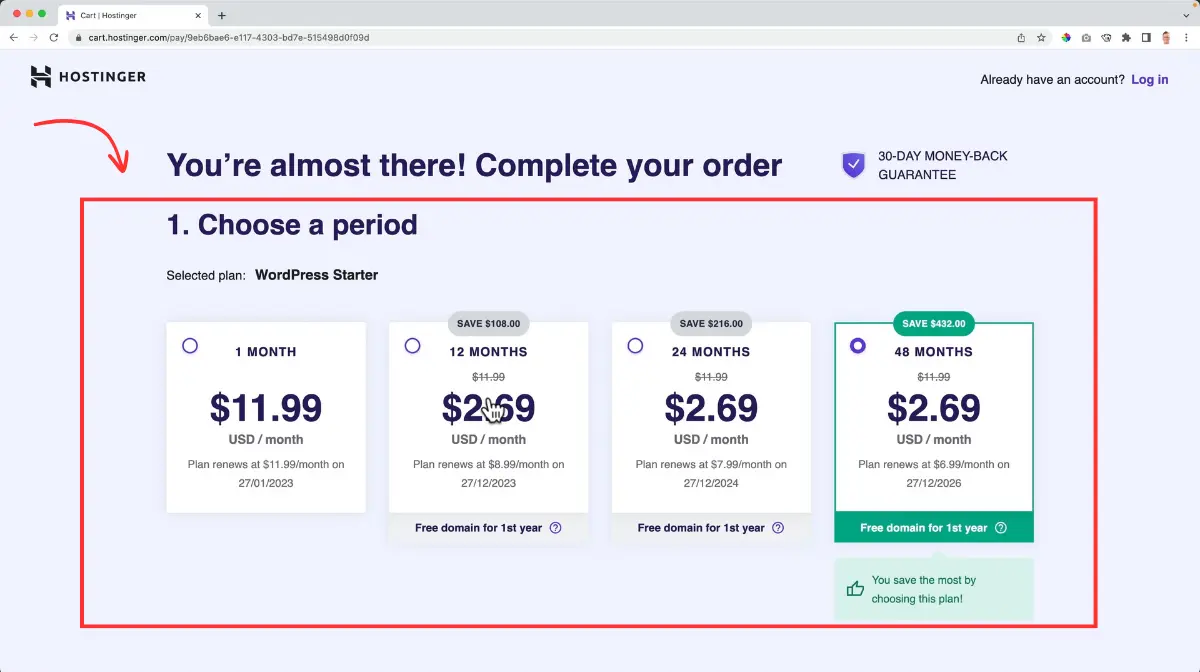
Decide the duration of your plan. There are options for up to 48 months of web hosting,
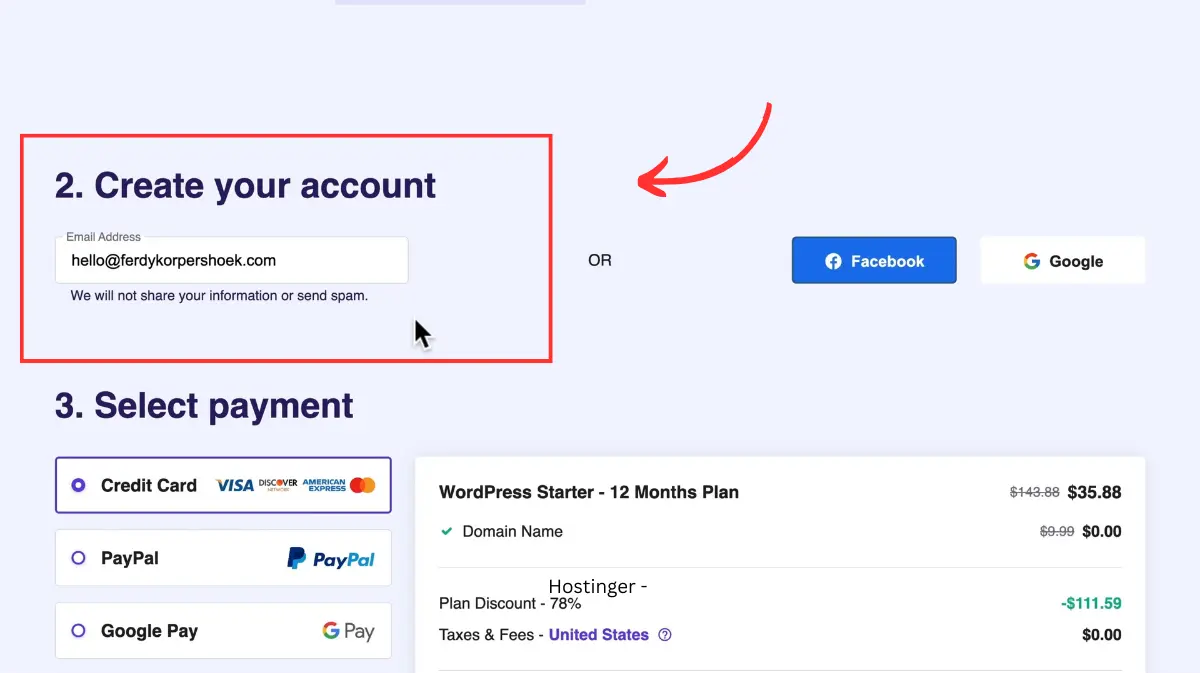
Then, create your account by entering your email.

Next, choose your payment method. Hostinger offers multiple payment methods depending on your location.
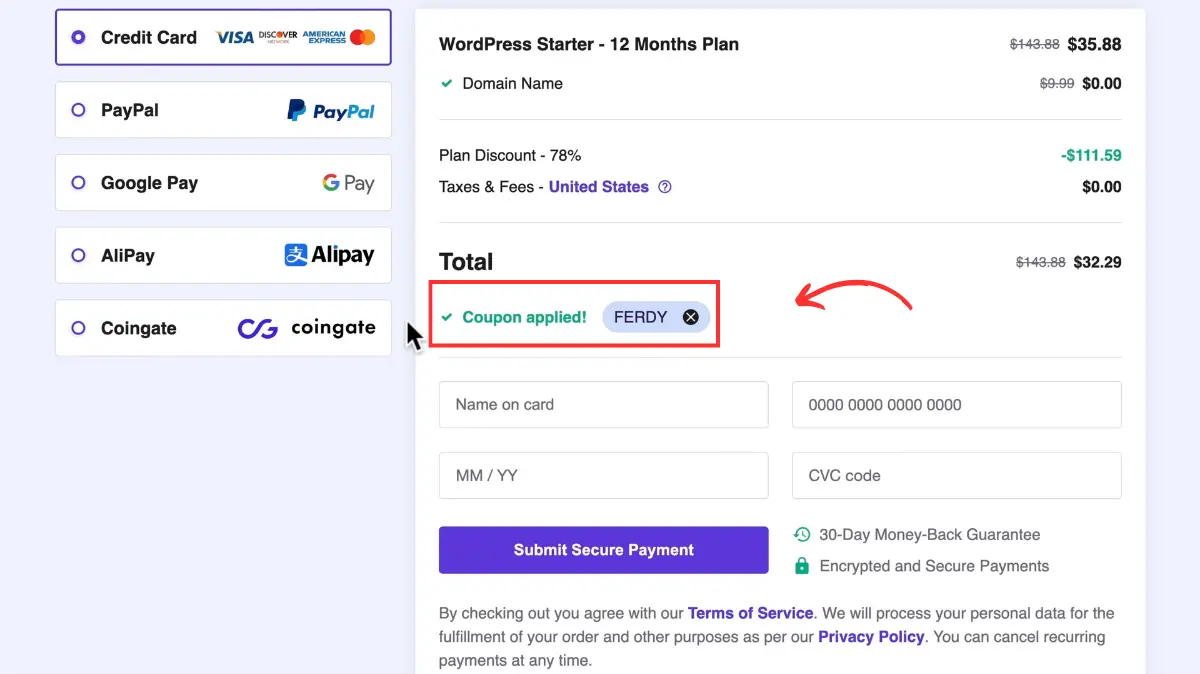
Finally, add your payment info to complete your purchase. You can also use my coupon code, FERDY, for an additional discount.
Once you’ve picked a web hosting plan, choose a domain name. There are two ways of doing this:
- Branded domain: Perfect for creating a personal brand. Example: freddiedavid.com.
- Niche-relevant domain: Ideal for establishing authority over a niche. Example: ytmastery.com
If you don’t want to create a personal brand, I suggest using a domain name relevant to your niche.
For example, if you plan to create content around pianos, an ideal domain would be “learnpiano.com” or “perfectpianist.com.”
In case, you bought the WordPress Starter plan, you need to claim your free domain.
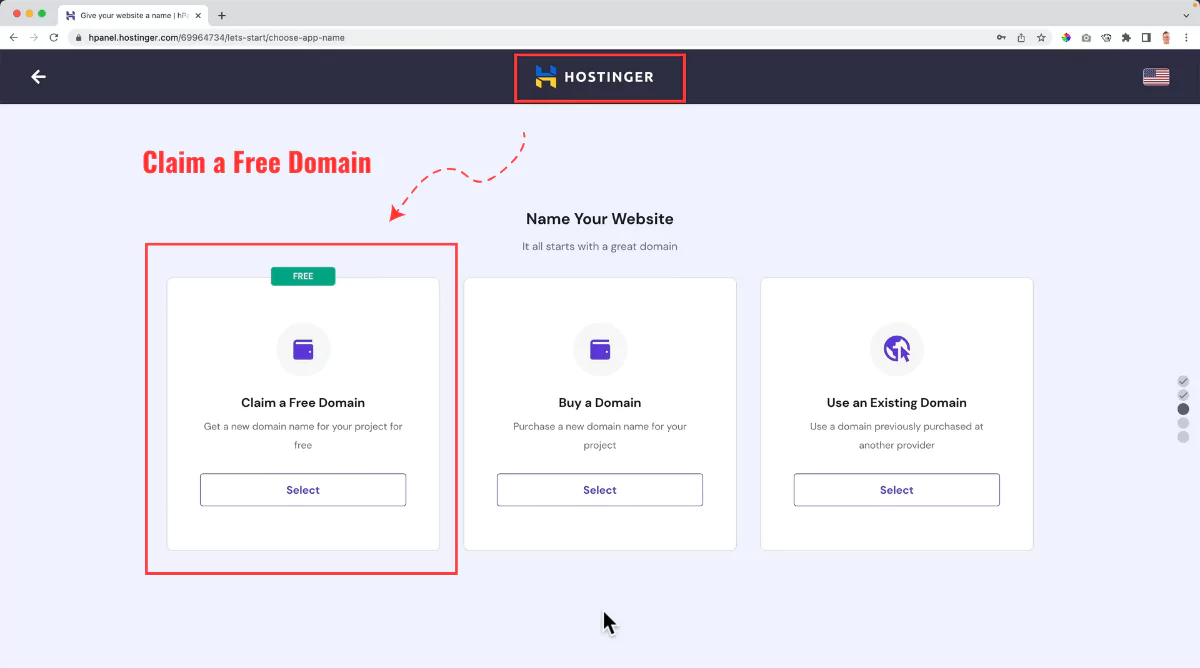
To claim your free domain name, click “Select” right under the tab displaying “Claim a Free Domain.”
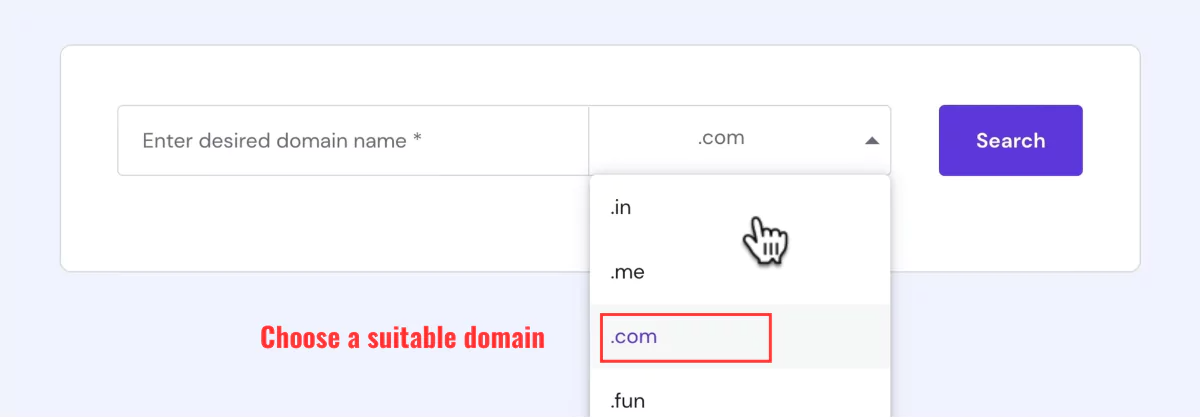
Pick your domain extension. If your target audience is global, go for the .com domain extension. If you’re targeting people in a specific location, look for the relevant country-code top-level domain (ccTLD) extension.
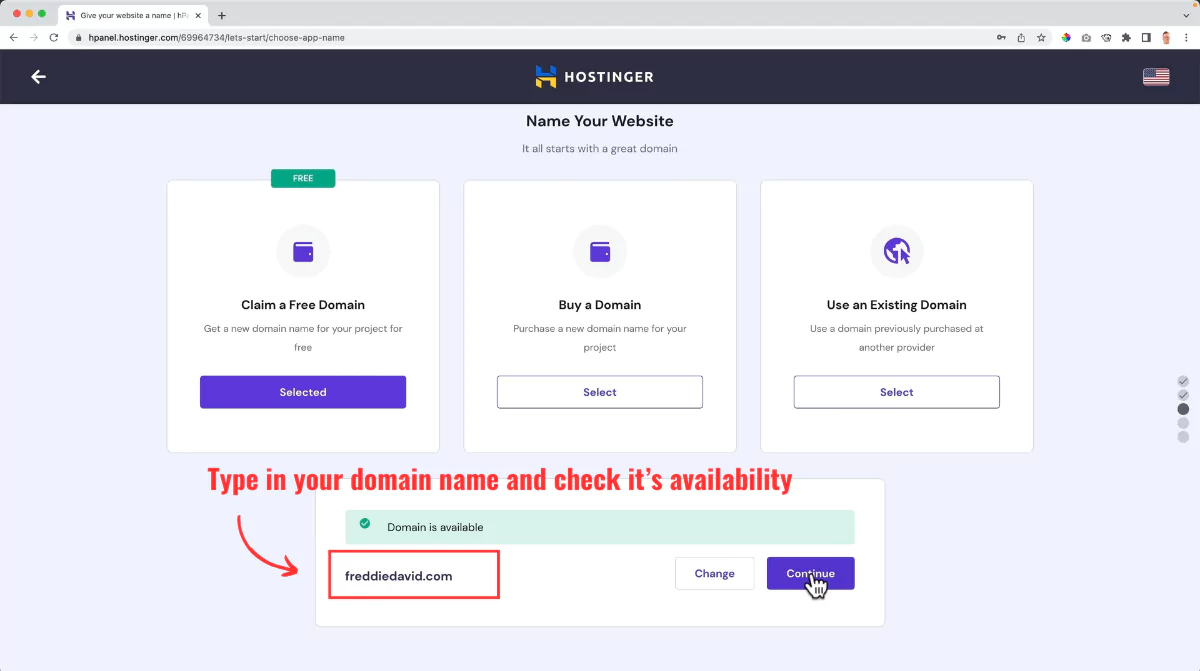
Next, enter your desired domain and check if it’s available.
If you cannot find a domain name due to unavailability, I suggest using the formula below:

Example: ferdyandpianos.com
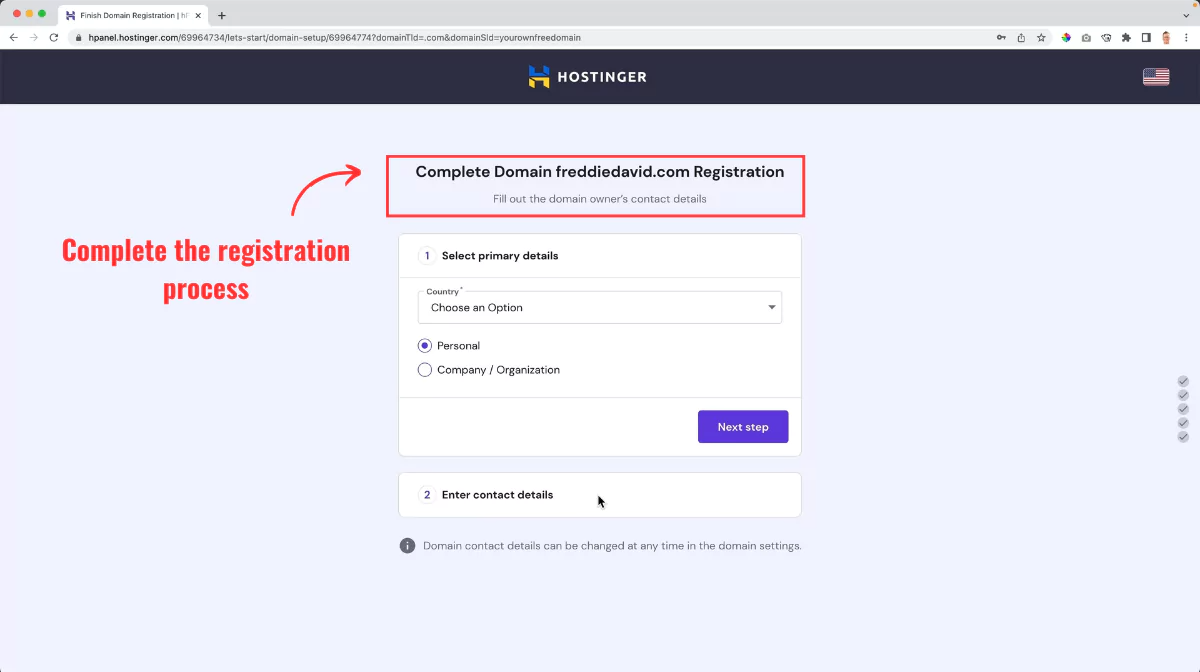
Finally, start filling in the information required to complete your domain name registration.
Step 2: Configure WordPress
This will probably be the most tedious part of the process, so I’ll try to get this done as quickly as possible.
Please bear with me and follow along:
Start with enabling SSL.
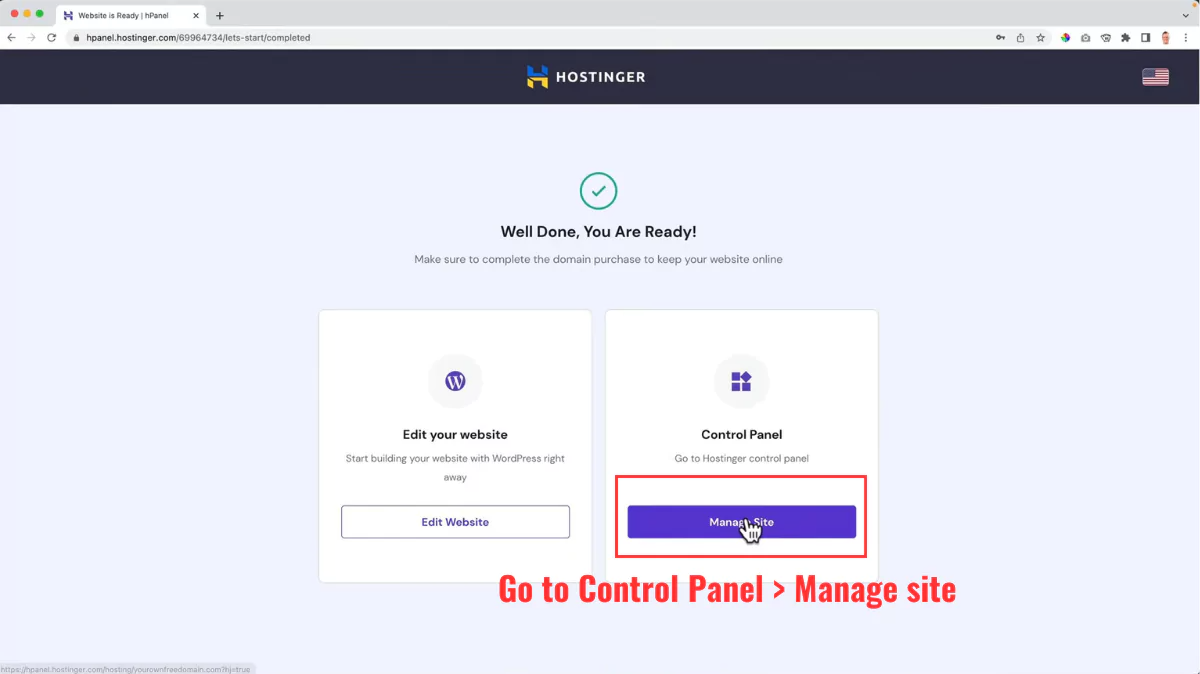
Head to Hostinger’s Control Panel by clicking “Manage Site”.

Click “WordPress Dashboard.”
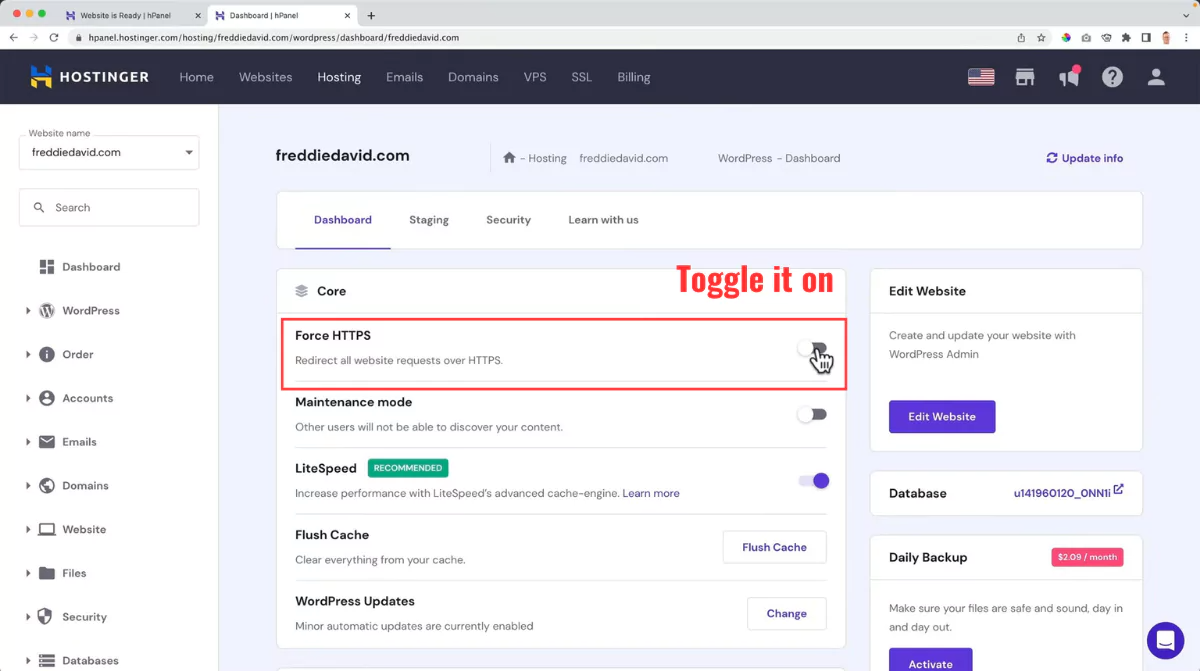
Enable the “Force HTTPS” toggle.

A pop-up will appear on your screen. Click “Install SSL.” This will enable SSL on your website, making it secure.
Next, clean your WordPress.
By default, you’ll notice your WordPress site has a few widgets and plugins pre-installed. These are not necessary. Let’s clean and remove up.
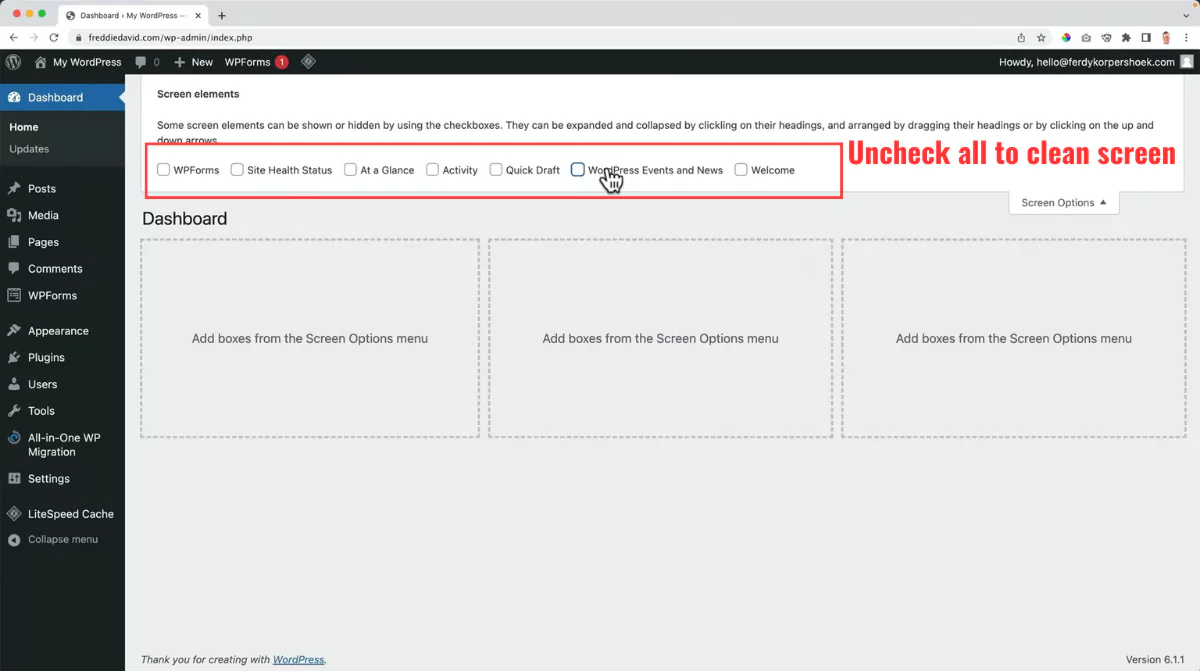
Click “Screen Options” on the dashboard and uncheck all the widgets.
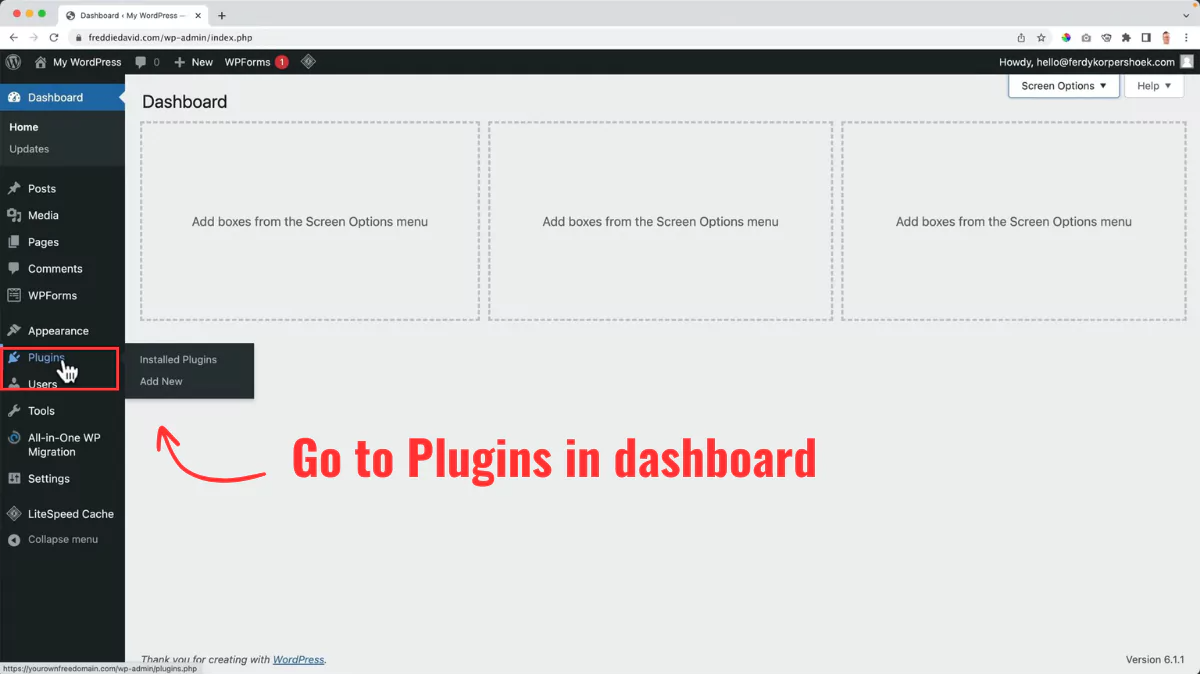
Now, it’s time to remove the plugins. Click “Plugins” on the dashboard.
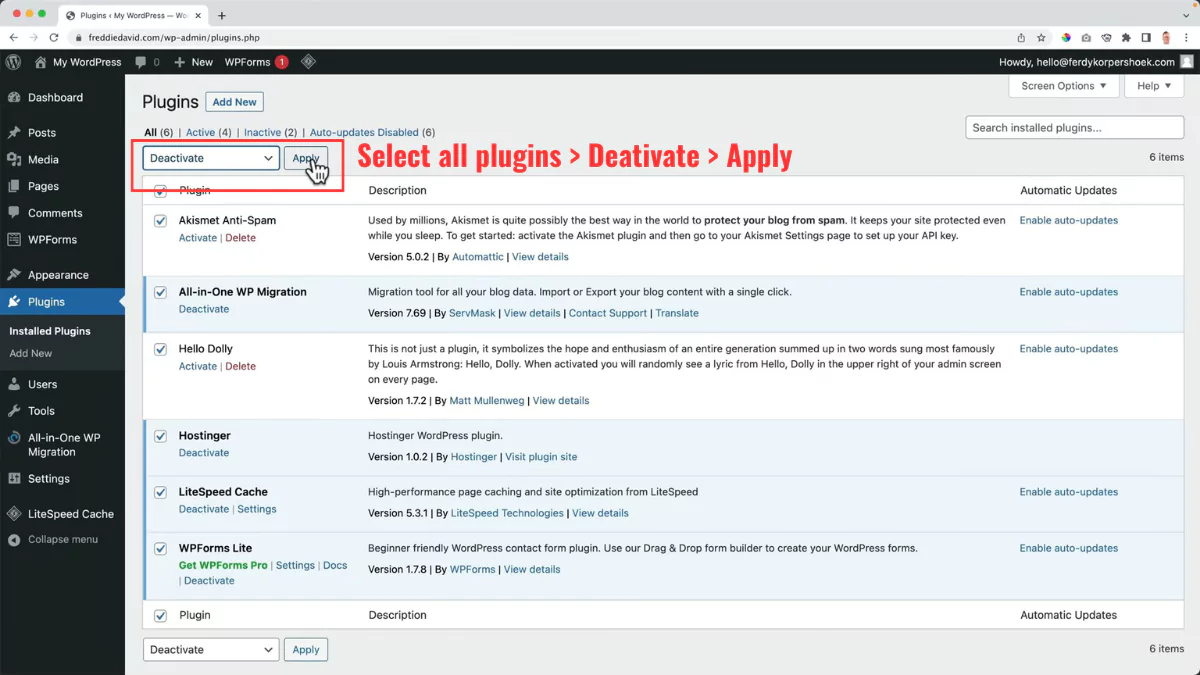
Select all the plugins one by one. Hit “Bulk Actions” followed by “Deactivate” and apply the changes.
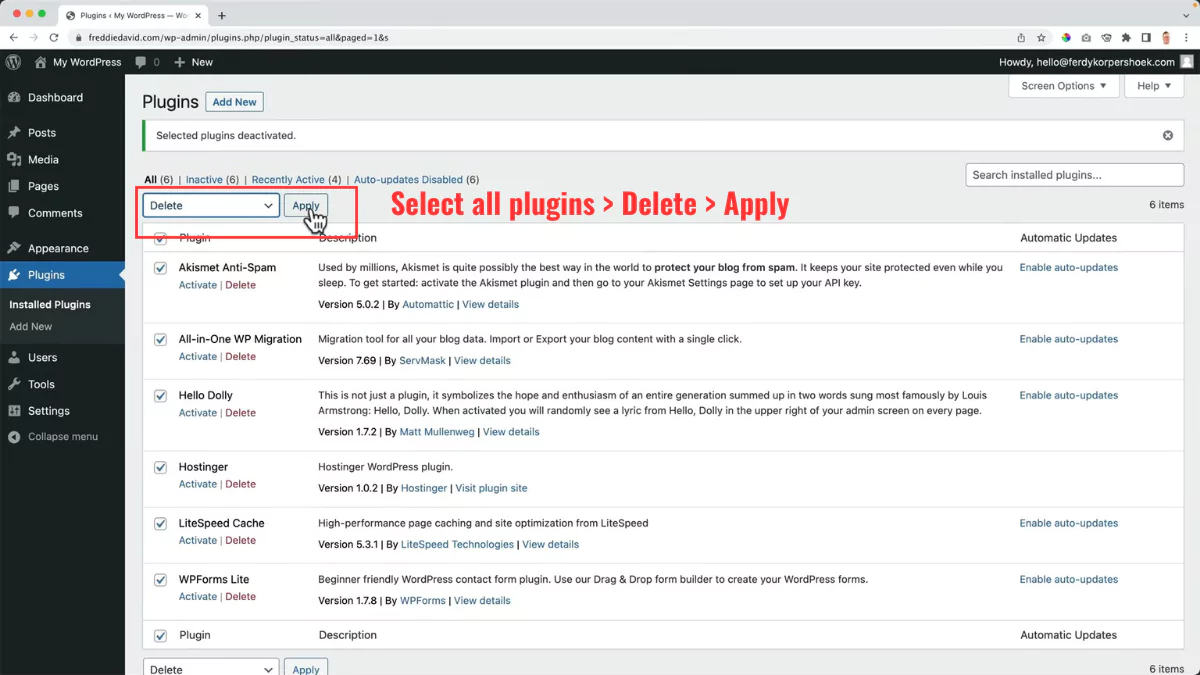
Repeat the process: Select all plugins > Bulk actions > Delete > Apply > OK.
After that, change the permalink.
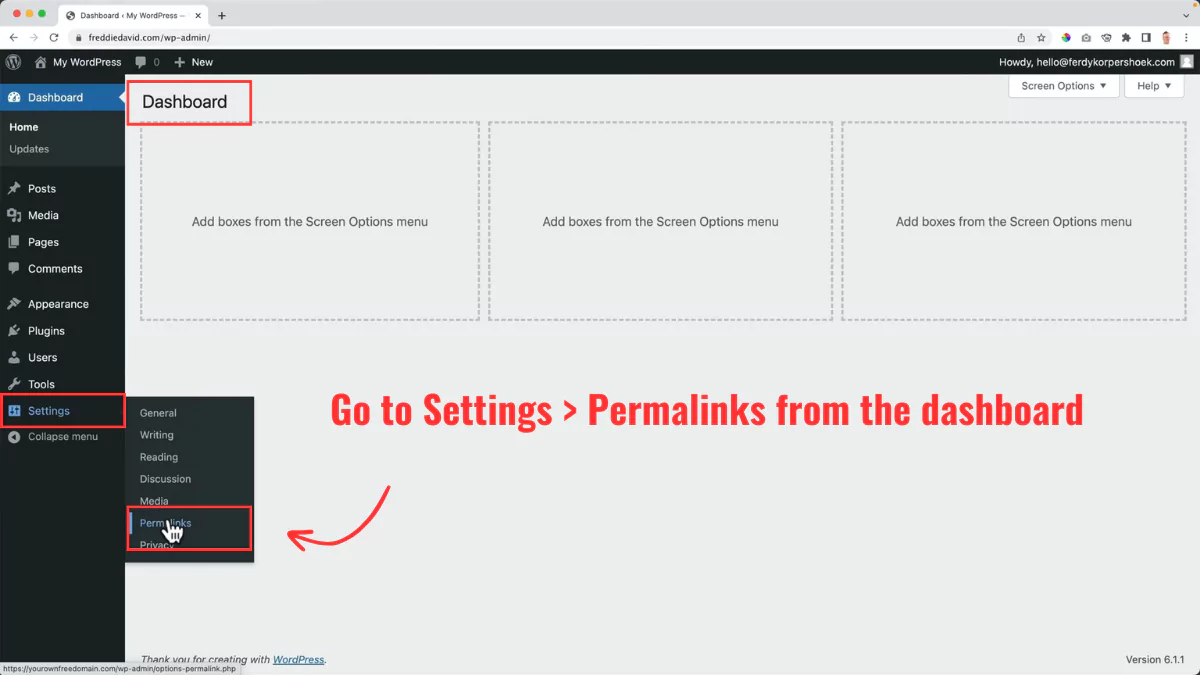
On the dashboard, click Settings > Permalinks.
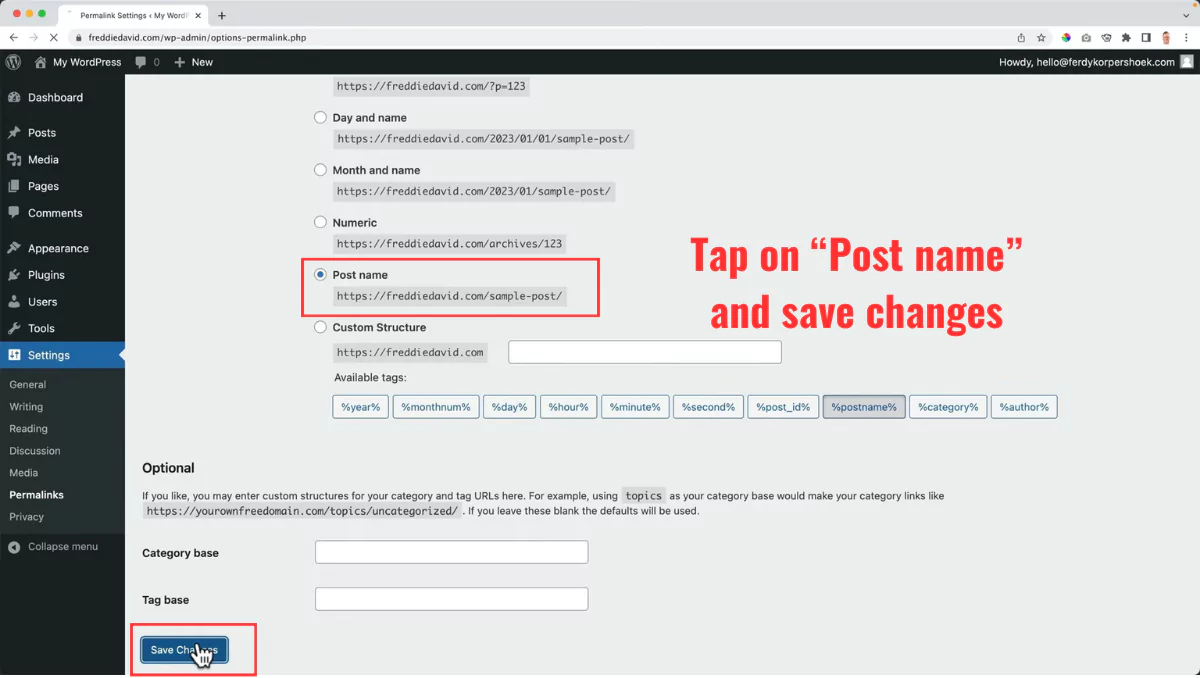
Select the “Post name” option and hit “Save Changes”.
Edit your profile.
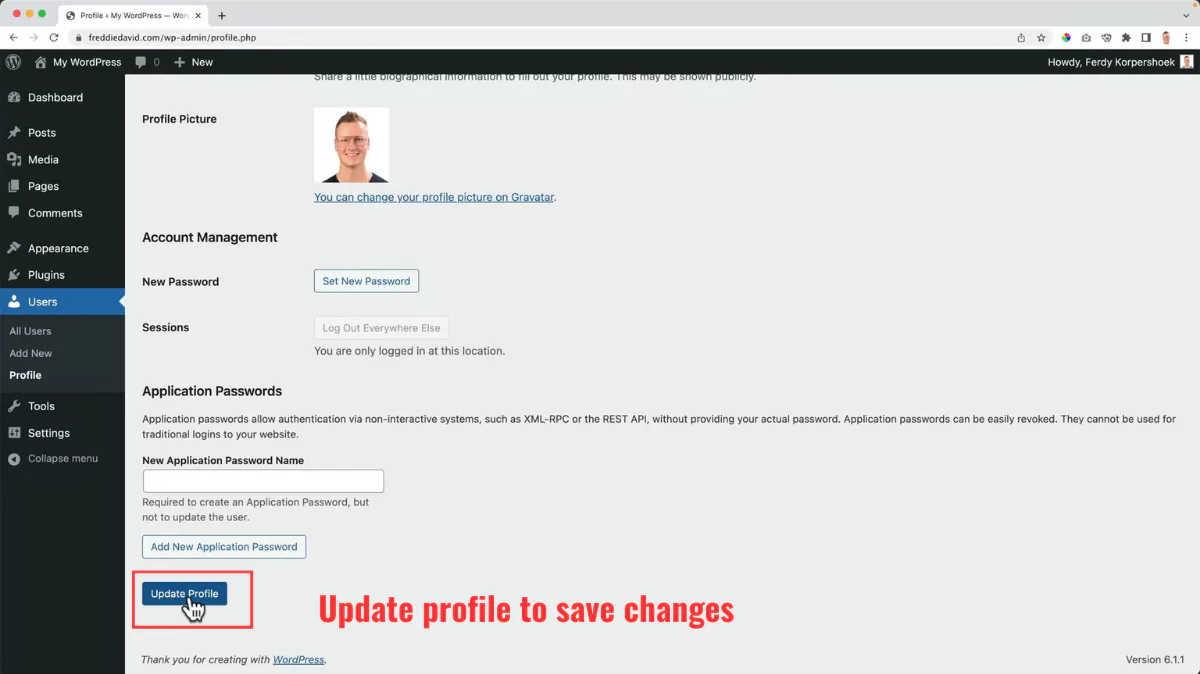
Hover the cursor to your profile, click Edit Profile > Enter First Name and Last Name > Display name publicly as your name > Update Profile. You can also update your profile picture using Gravatar. It comes with a monthly subscription costing $50/mo.
Make sure your website is secure.
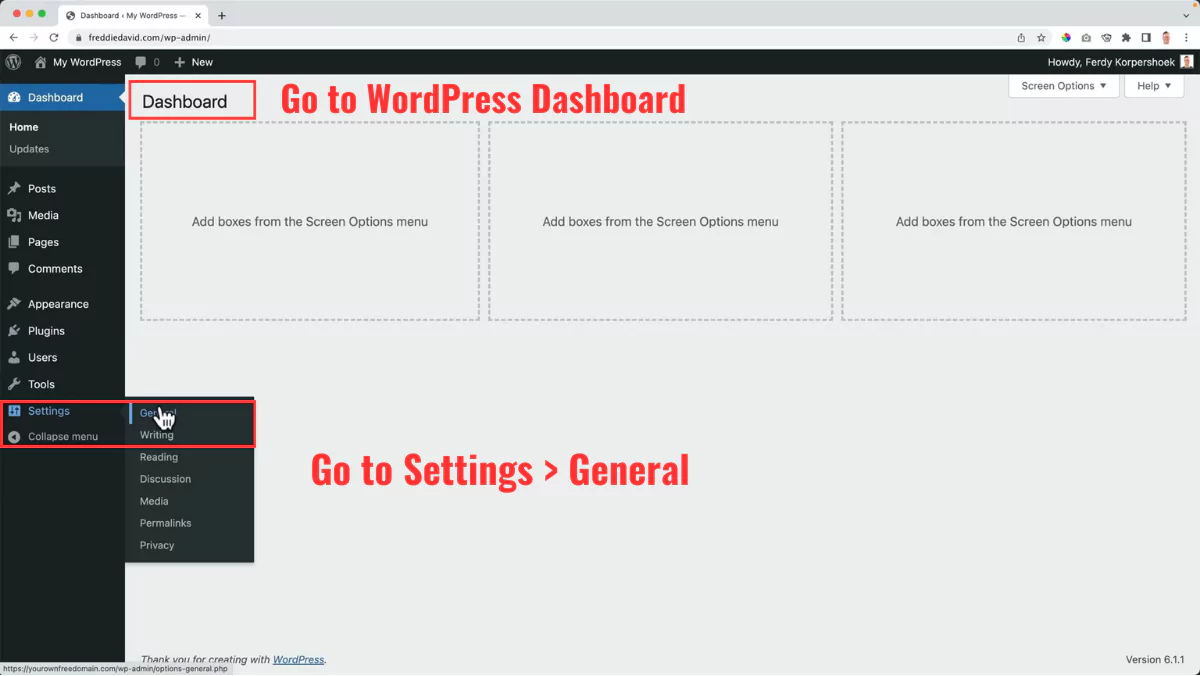
On the dashboard, click Settings > General.
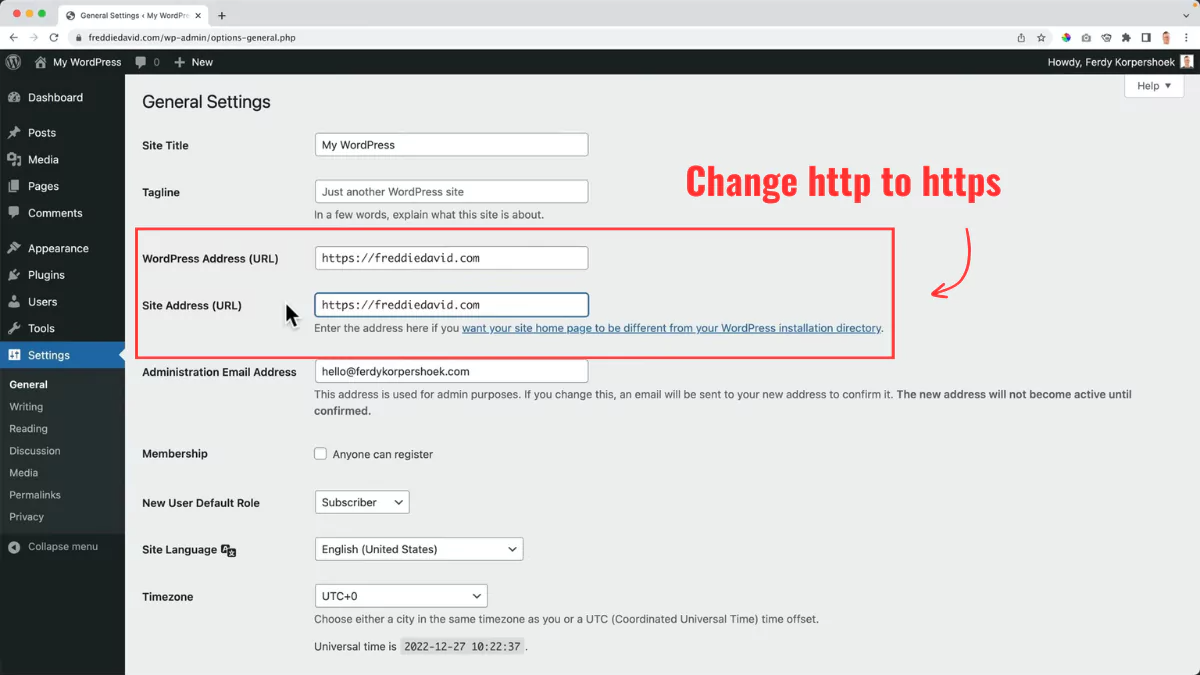
Add “https” to WordPress Address (URL) and Site Address (URL) > Save Changes.
Configure the general settings.

Change the “Site Language,” “Timezone,” “Date Format,” “Time Format,” and “Week Starts On” as you like and click “Save Changes”.
Step 3: Create a site title
Your website’s title is a very important search engine ranking factor. So, it makes sense to get it right.
To create engaging, search-engine-optimized site titles, follow this formula:
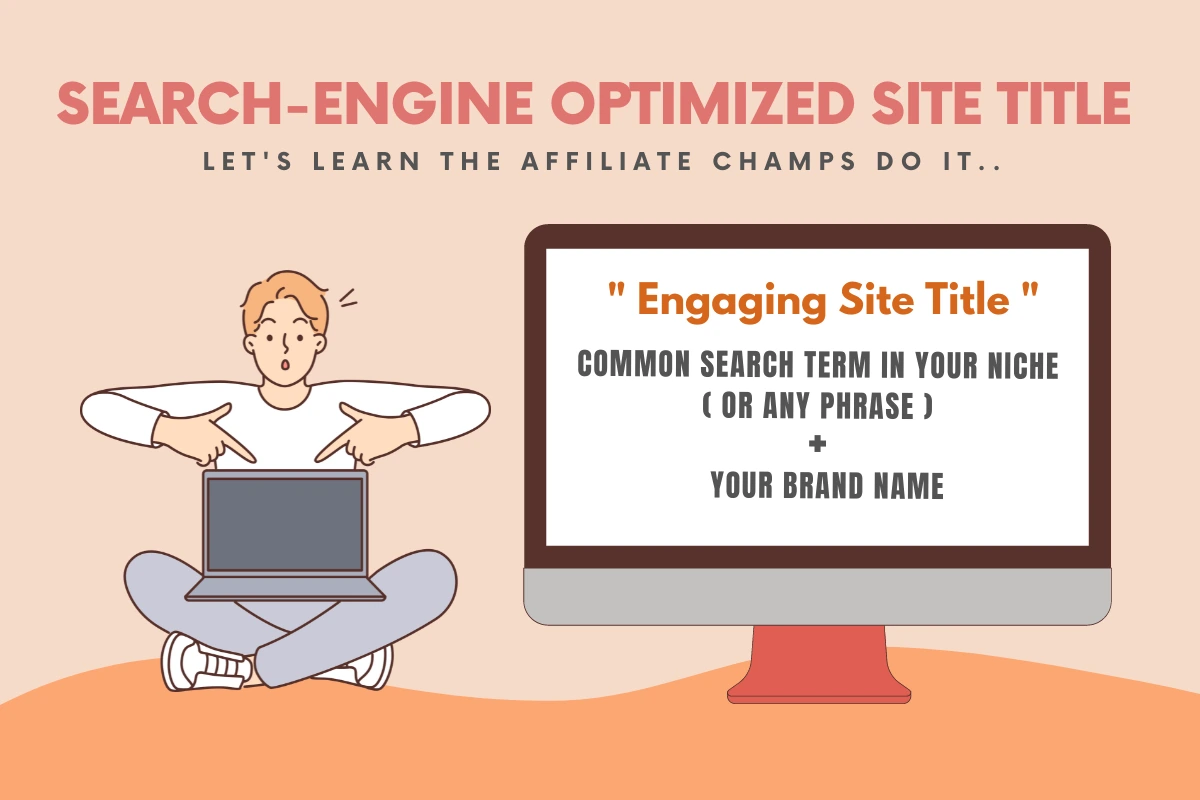
Let’s revisit my YouTube affiliate blog example. If I were to create an engaging site title for this blog, I’d use this formula.
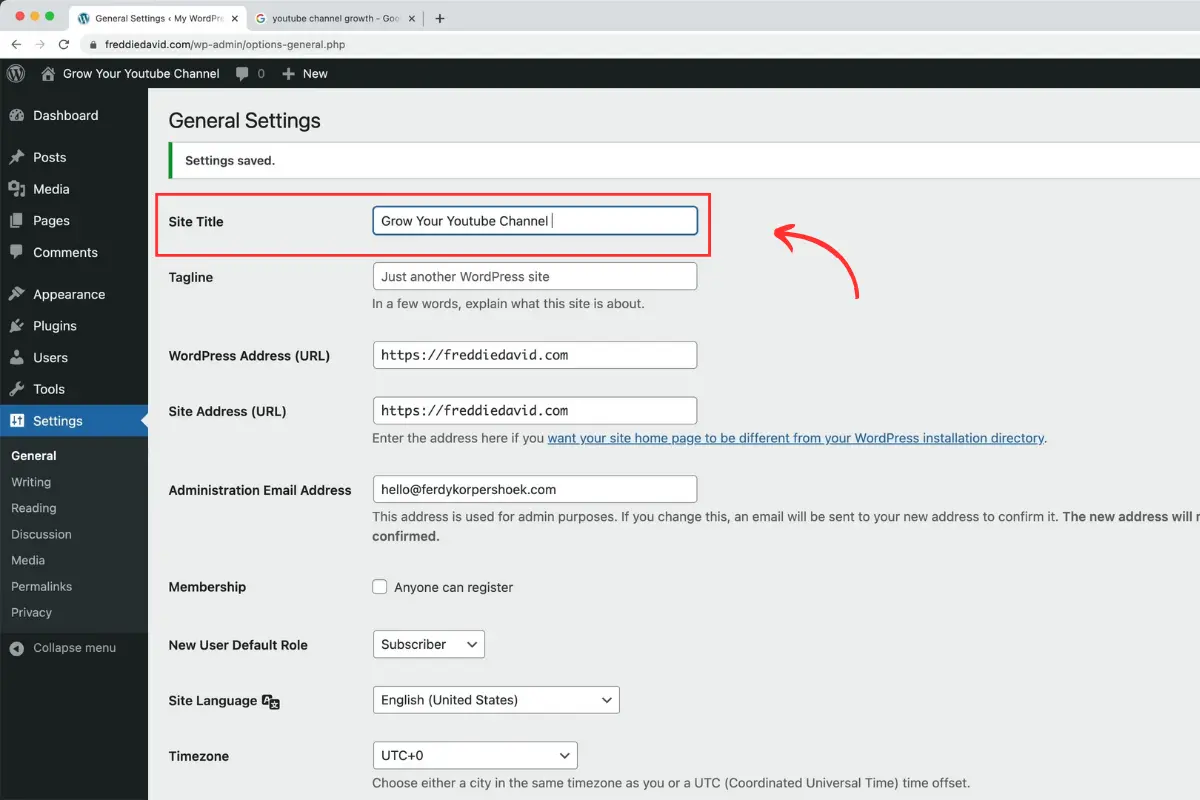
First, I’ll brainstorm the terms/phrases closest to the content I will write on this blog. For example, “grow your YouTube channel” would be the closest match to my niche.
Next, I’ll enter this phrase on Google and look for suggestions under the search bar. For example, the next best suggestion for this search term is “grow your YouTube channel fast.” This suggests it’s a popular search term for my target audience, so I should use it in my site title.
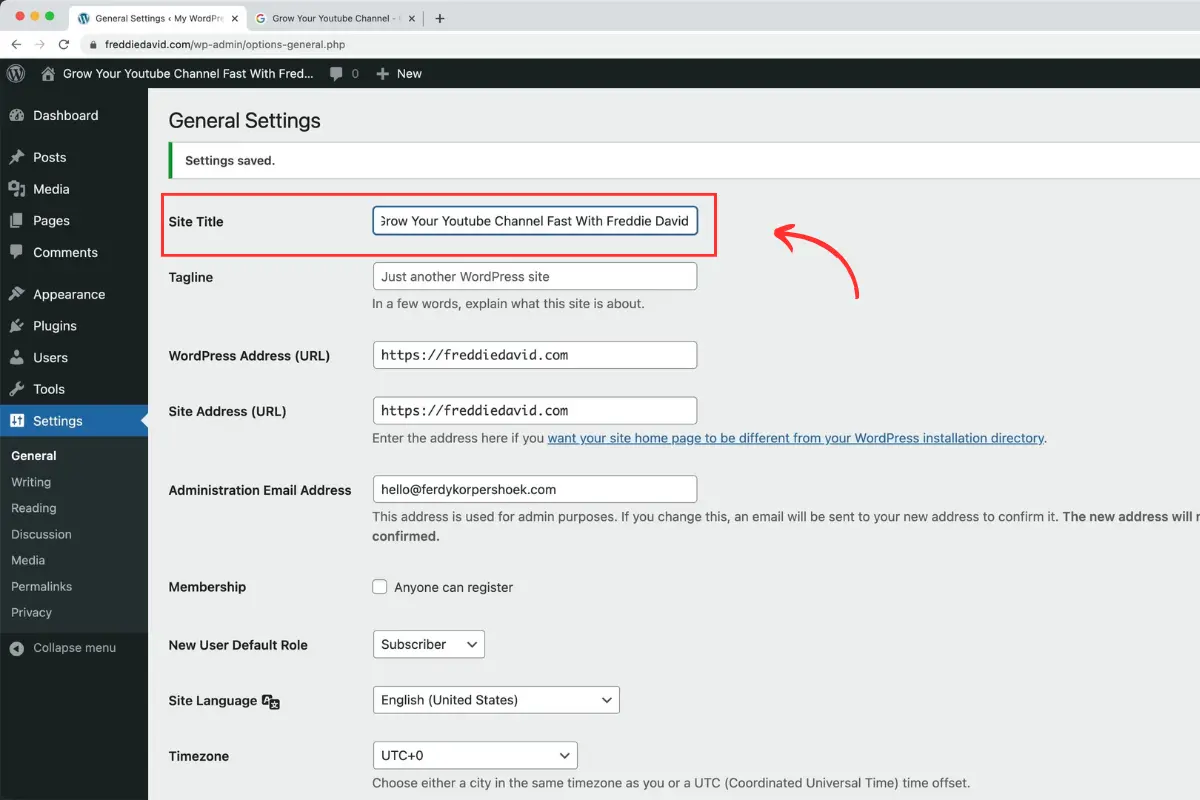
Finally, because I want to create a personal brand (that’s a choice; you don’t have to), I will add the brand name I chose for this blog, i.e., Freddie David.
My site title should appear like this: Grow Your YouTube Channel Fast With Freddie David
I hope you get the drill. Follow this process, and your site title will be ready in less than a few minutes.
Step 4: Create a logo and favicon
Back in 2009, when I started my own company, I hesitated to fully commit because I didn’t have a logo. It might sound trivial, but not having a logo made it difficult for me to take my business seriously!
But I don’t want you to face the same hurdle I did (unless there’s someone like me out there, haha!). So, let’s dive into how you can create a logo or if design isn’t your thing, how to outsource it.
I’m not a graphic designer, and I like doing what I do best (making WordPress tutorials on YouTube). If you can afford $10 for a logo, I recommend you hire someone on Fiverr. There are some really talented people on this platform that I’m sure will do a great job and save you time.
If you want to create a logo yourself, I recommend Canva. It’s straightforward—perfect for tech-averse people.
While you’re at it, I’d like to share some inspirations for creating your logo. For example, look at the logos of Tony Robbins and Brendon Burchard below.
They’re simple and clean. Exactly the style I like.
Here’s how to create a simple and clean logo on Canva:
Visit Google Fonts. Type your brand name on the search bar and see which fonts you like the best. I like Nunito Sans.
Sign up on Canva. Click the “Create a design” button. Select “Logo.”
Enter your brand name in a text box and adjust the font size and color.
Hit “Share.” Select the image dimension and format you prefer and hit “Download.” Your logo is ready!
Repeat the same process to create a favicon like the one below.

With your logo and favicon ready, let’s add them to your WordPress website.
Add your logo to WordPress: Click Media > Add New > Select Files > Upload Image > Publish
Add your Favicon to WordPress: Click Customize > Site identity > Select site icon > Upload Files > Publish
Step 5: Select a WordPress theme
One thing that pumps the blood to your website is its theme. There are both paid and free WordPress themes. It’s best to go for free ones. But what exactly is a WordPress theme?
Ferdy’s Fundamentals – What is a WordPress theme?
A WordPress theme is a collection of files that work together to create the design and functionality of a WordPress site. Each theme offers different styles and layouts, allowing users to customize the appearance and feel of their website easily. You can find both paid and free WordPress themes.
When choosing a WordPress theme, ensure your website’s style, features, and goals match it. To simplify this process, I spent hours finding the best WordPress theme for affiliate marketing. It’s called Blocksy.
Simply click the button above to download the Blocksy theme on your computer.
Once downloaded, follow the process below to install the Blocksy theme on your WordPress website:

Click Appearance > Themes > Add New > Upload Theme.
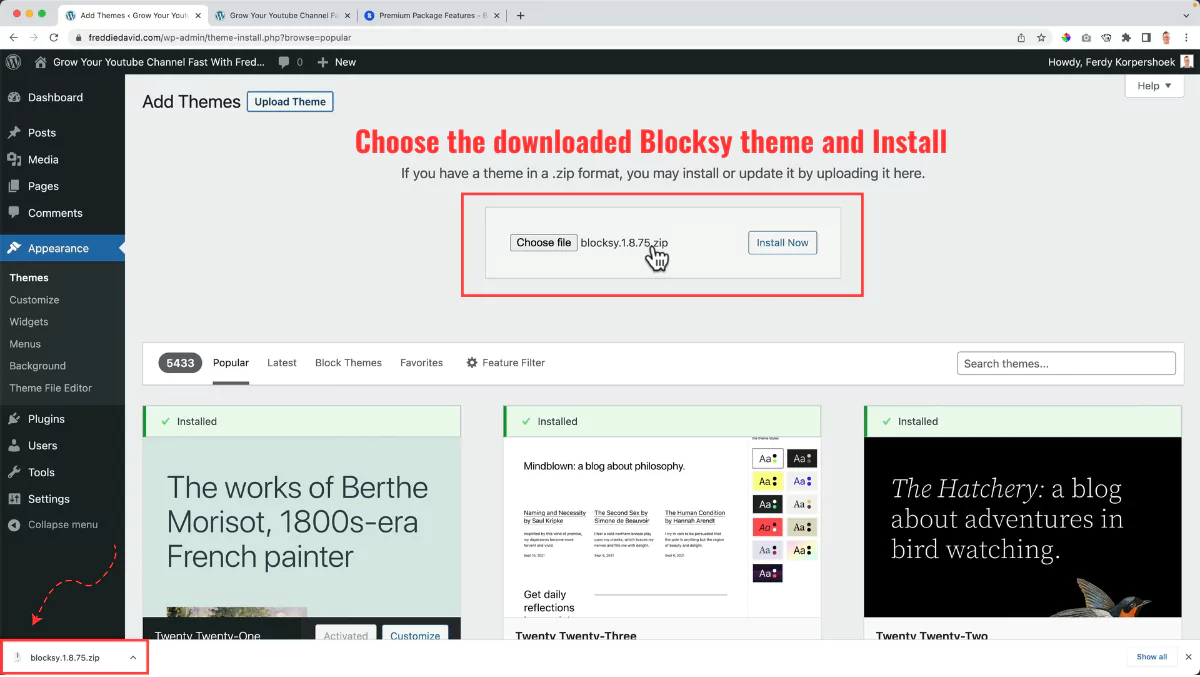
Drag and drop the downloaded Blocksy theme to the upload tab and hit “Install Now.”
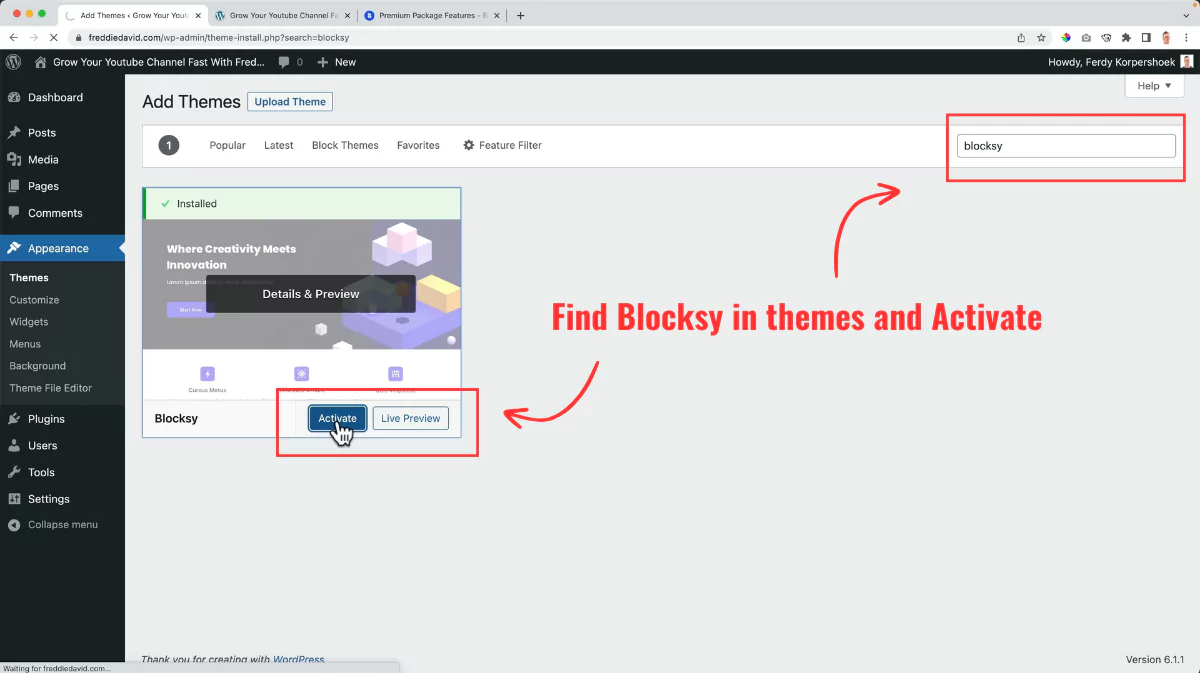
Or search “Blocksy” in the tab at the top right corner of your screen. Click Install > Activate.
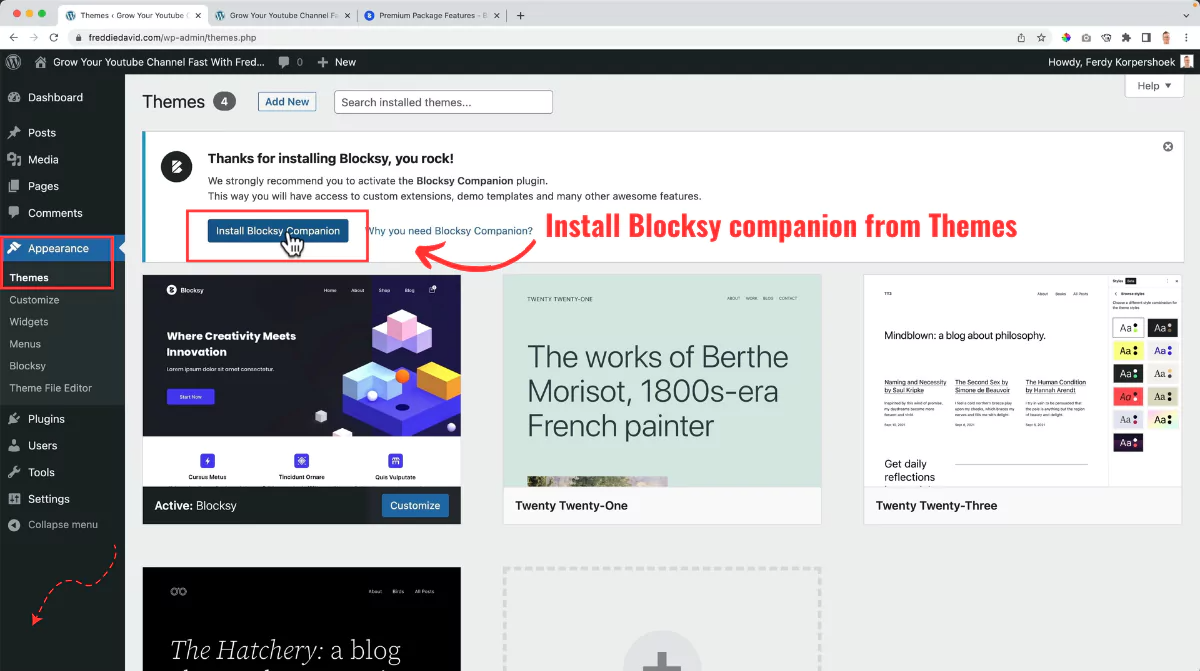
Finally, click Appearance > Themes > Install Blocksy Companion. That’s it! Blocksy is installed on your WordPress website.
There are a lot of customizations you can perform on your WordPress website to make the theme look better.
But to save you some time (1 hour, to be precise), I created a folder with a ready-to-use WordPress theme for an affiliate site with all the customization settings built in.
And I’m giving it away for free! Click the button below to download the WordPress theme customizations.
To apply these customizations to your site, follow the instructions below.
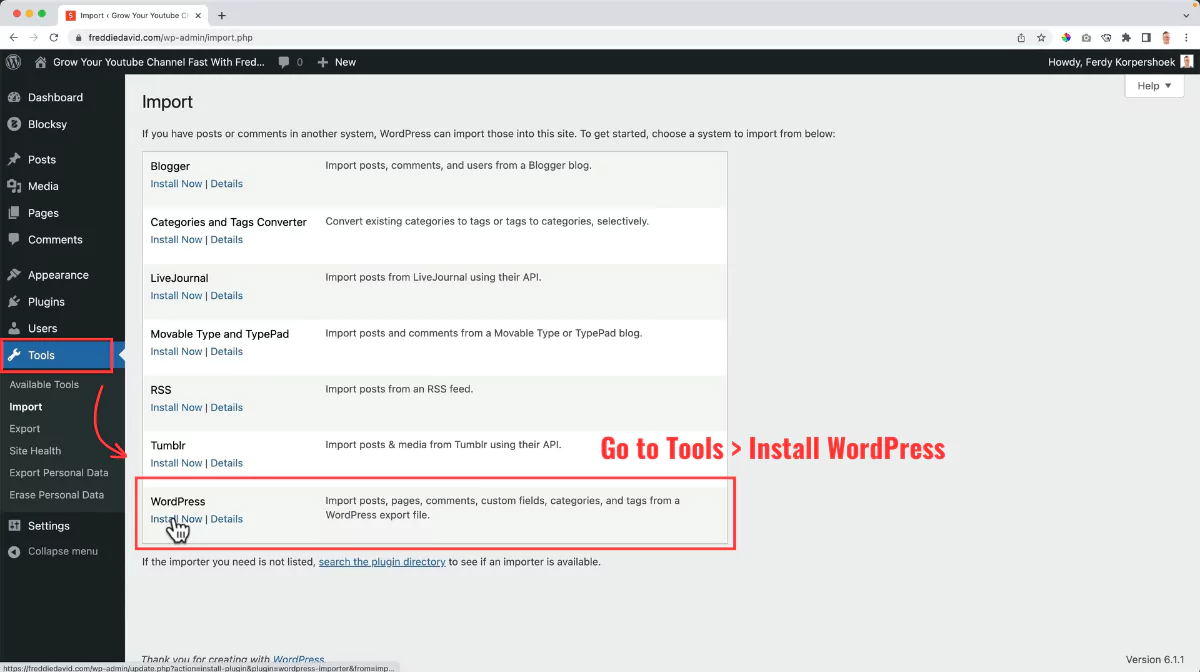
Import blog posts: Click Tools > Import > WordPress (Install Now).
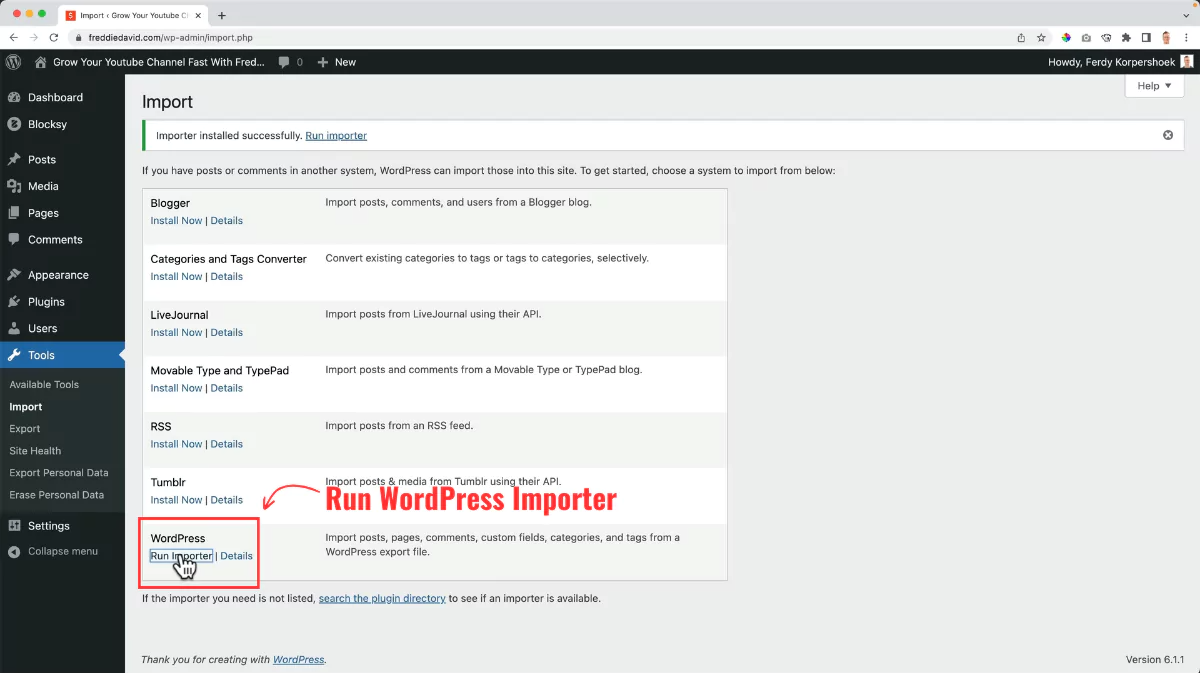
Hit “Run Importer.”
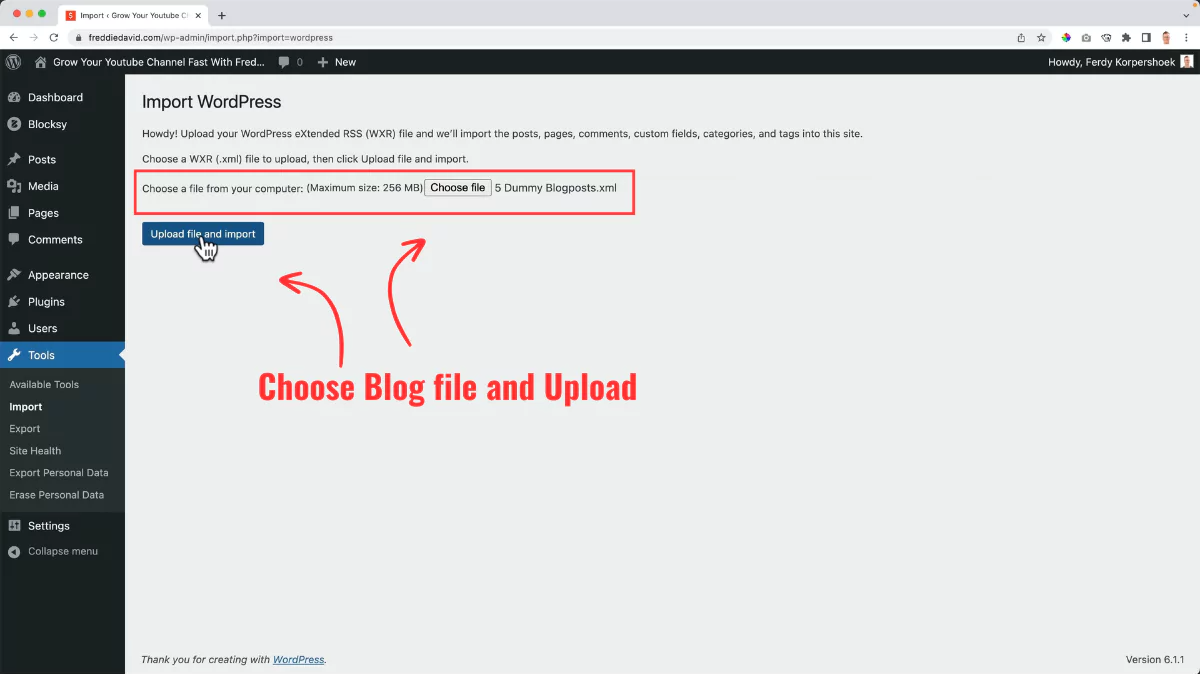
Choose File > Folder (amstuff) > File (5 Dummy Blog posts) > Open > Upload file and import.
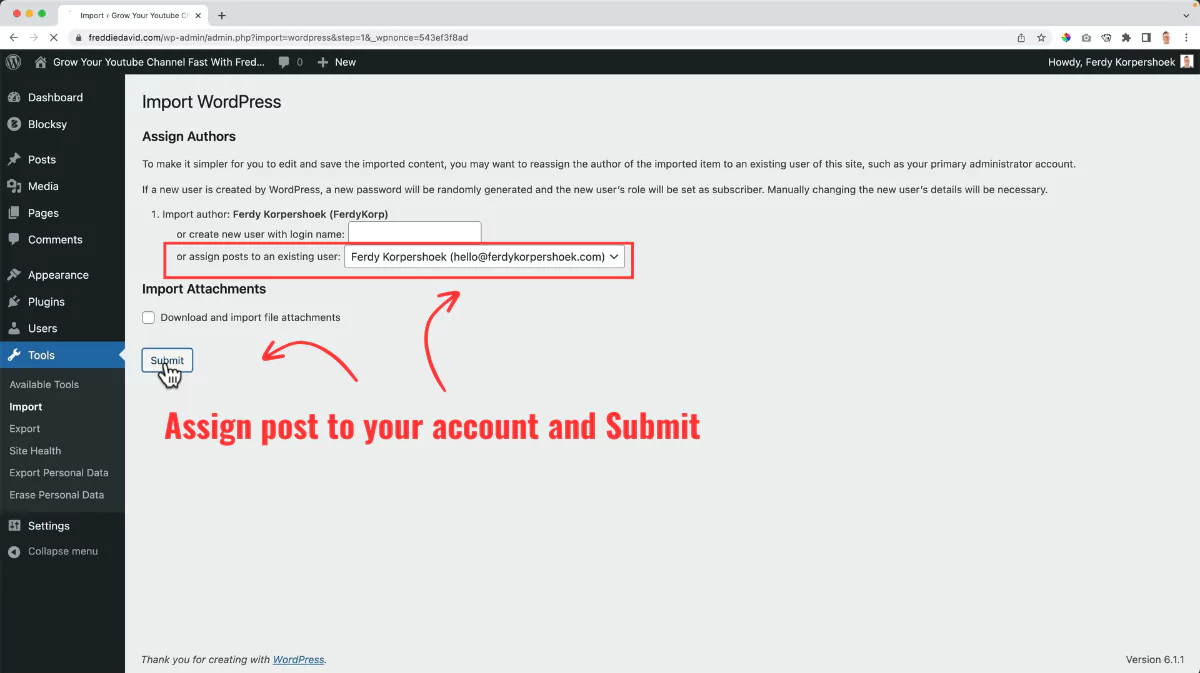
Assign posts to an existing user (yourself) > Submit.

Import Blocksy settings: Click “Customize” to access the WordPress dashboard of your site.
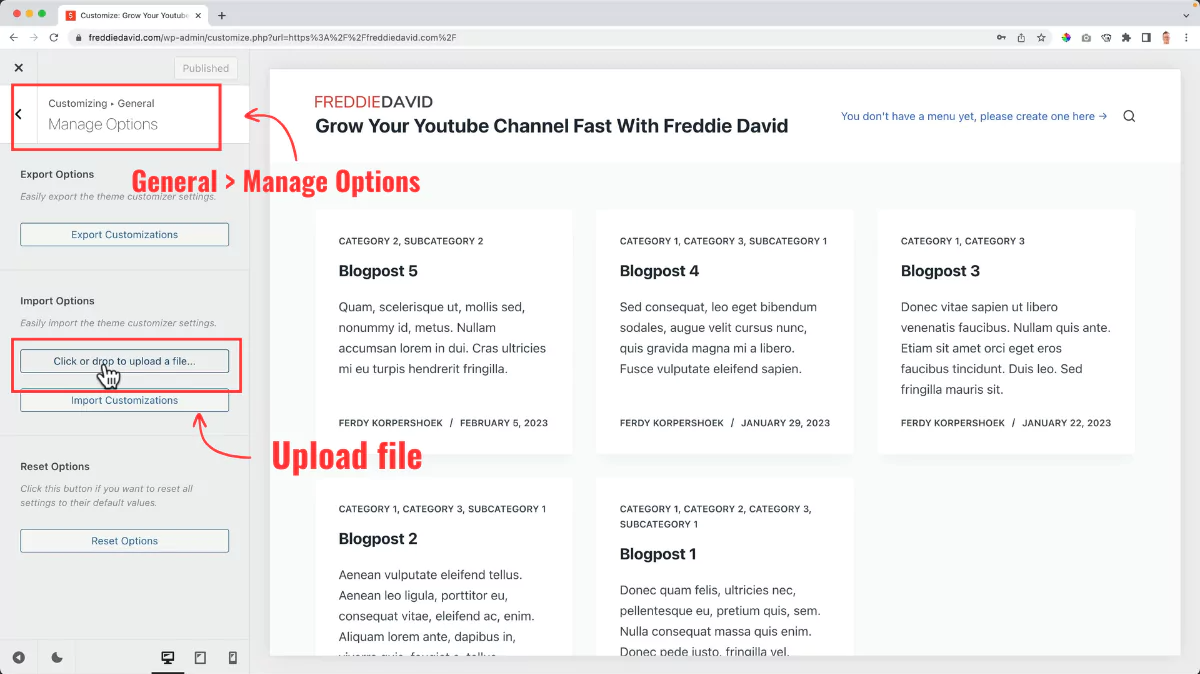
Click General > Manage Options > Import Options > Upload File (Blocksy Settings).
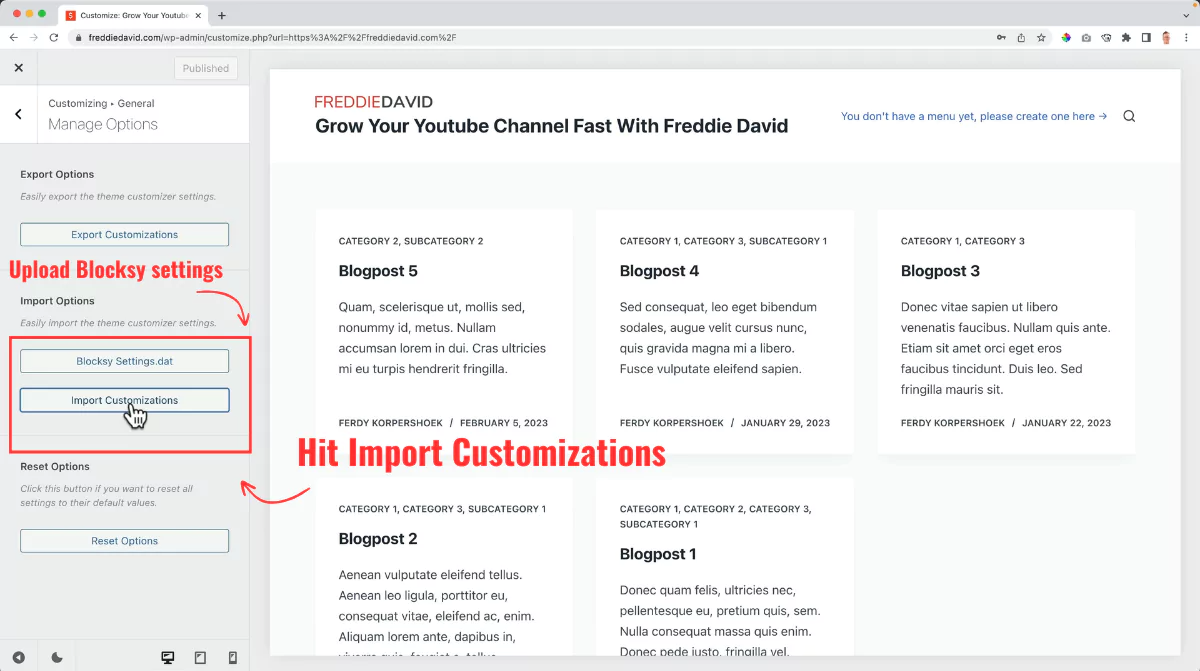
Open > Import Customizations.
Now, let’s move on to improving the site navigation for your website visitors.
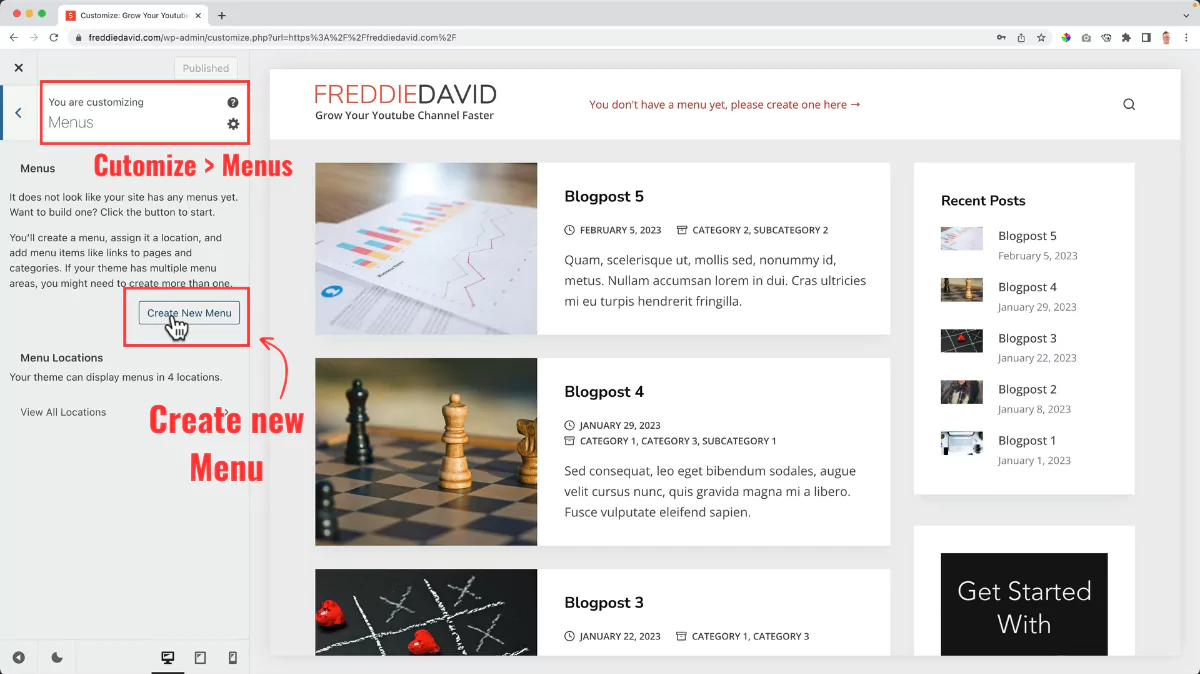
Add a menu: Click Customize > Menus > Create New Menu.
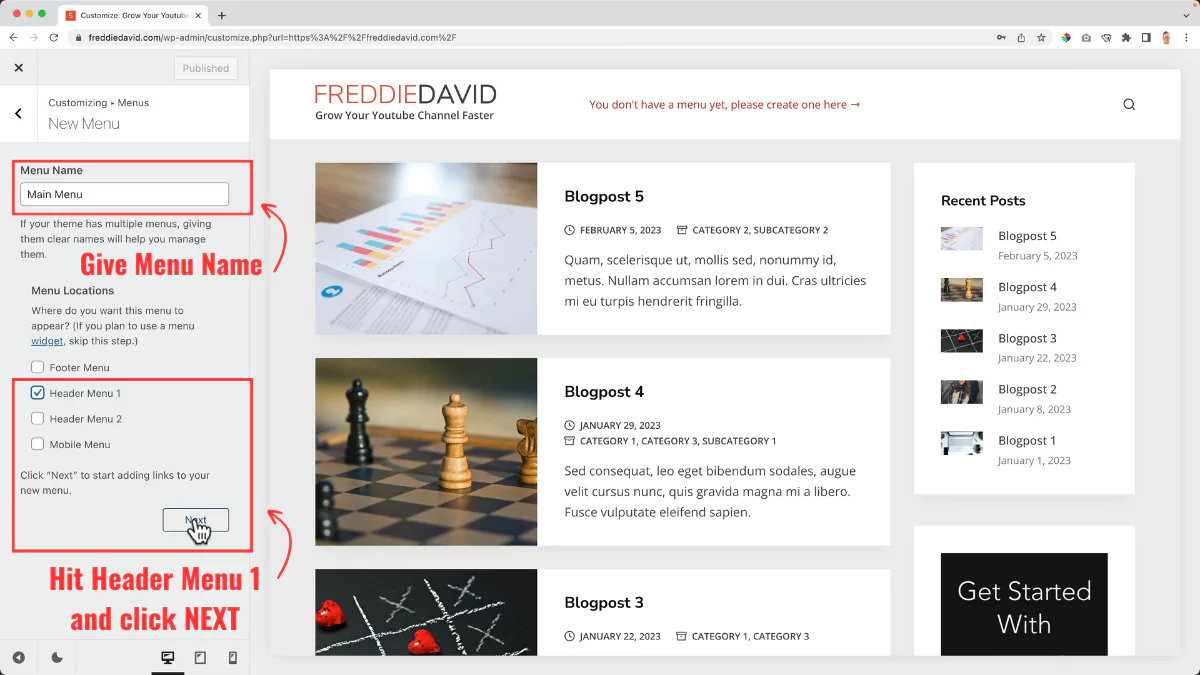
Enter the menu name and click Header Menu 1 > Next.
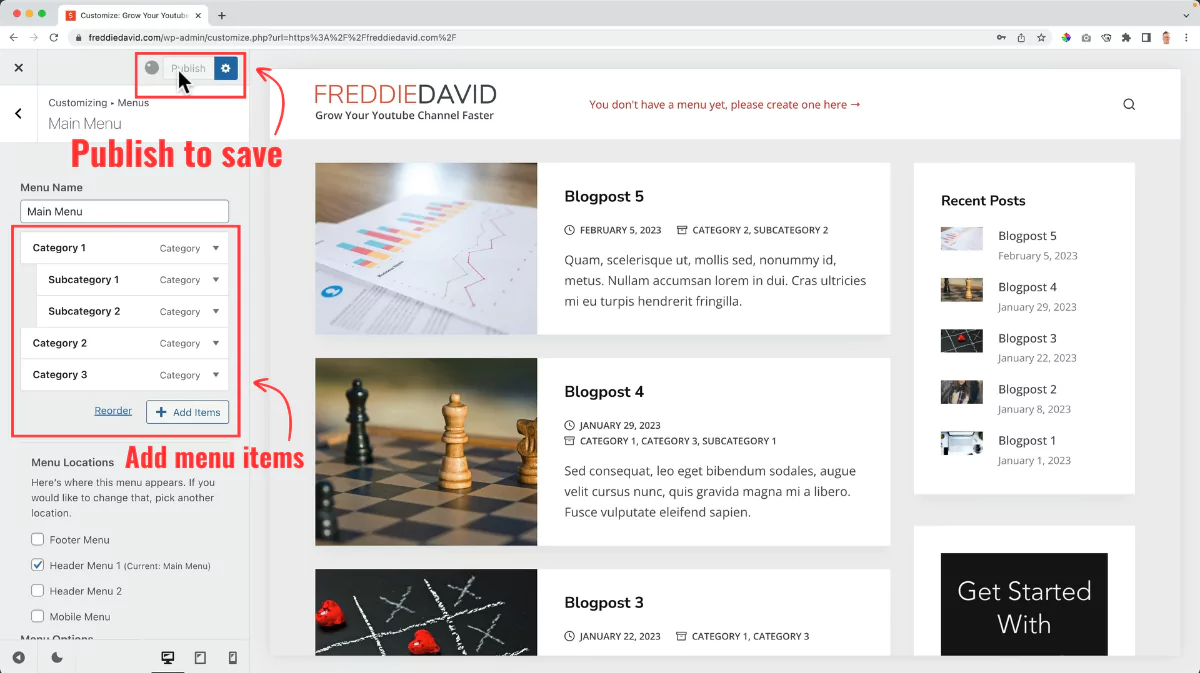
Add menu items > Save Menu.
And that’s it. The foundation of your affiliate website has been laid. Enjoy the new look of your site with all the settings already configured!
3. Set up Google Analytics
While many jump straight into content creation for their website, YouTube channel, or social media platforms, I prefer a more data-driven approach.
Ask yourself: what’s the point of your content if it’s not informed by market research and data analysis?
Google Analytics plays a crucial role here.
Ferdy’s Fundamentals: Why use Google Analytics?
Google Analytics is essential for understanding your audience. It tracks website traffic, user behavior, and engagement, offering invaluable insights to tailor your content effectively and measure its impact.
Here’s how to set up Google Analytics for your affiliate site:
Step 1: Sign up for Google Analytics
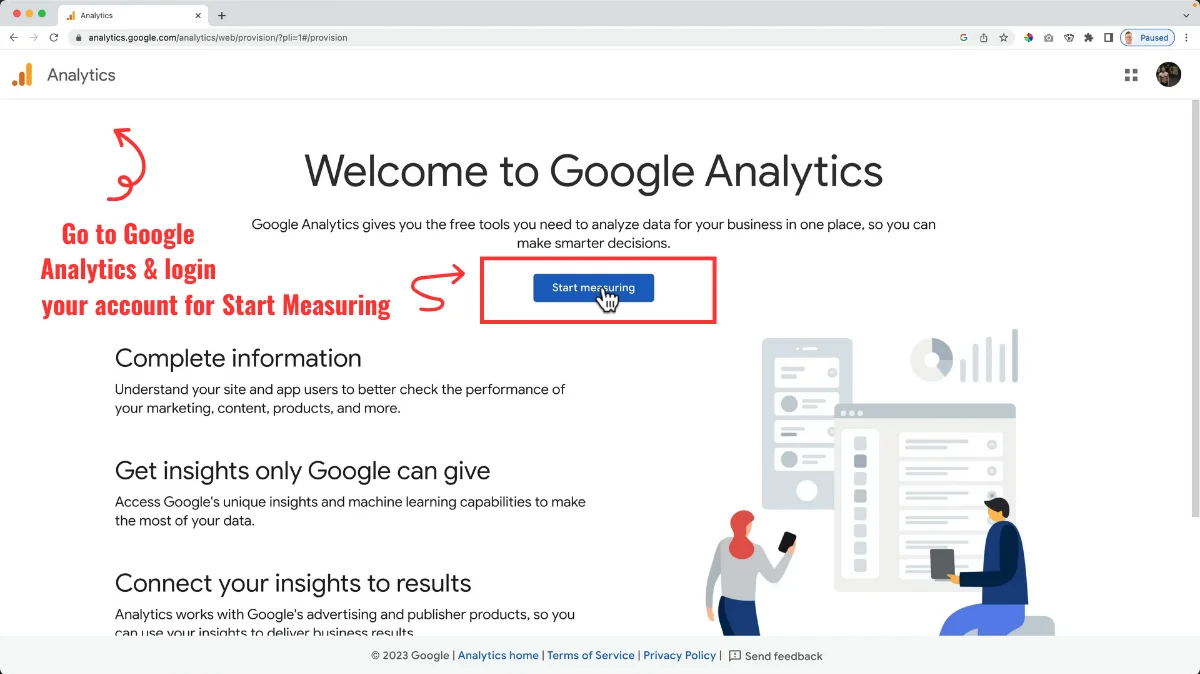
Visit Google Analytics and create an account. Click on the “Start measuring” button.
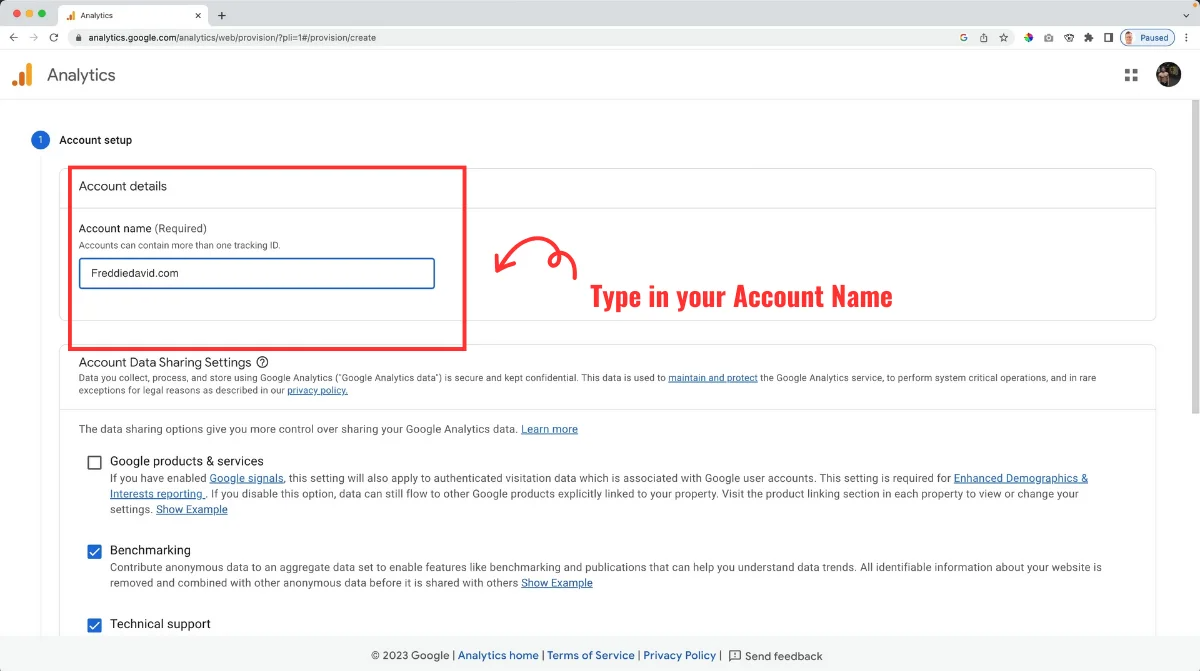
Enter the required information to set up your account.
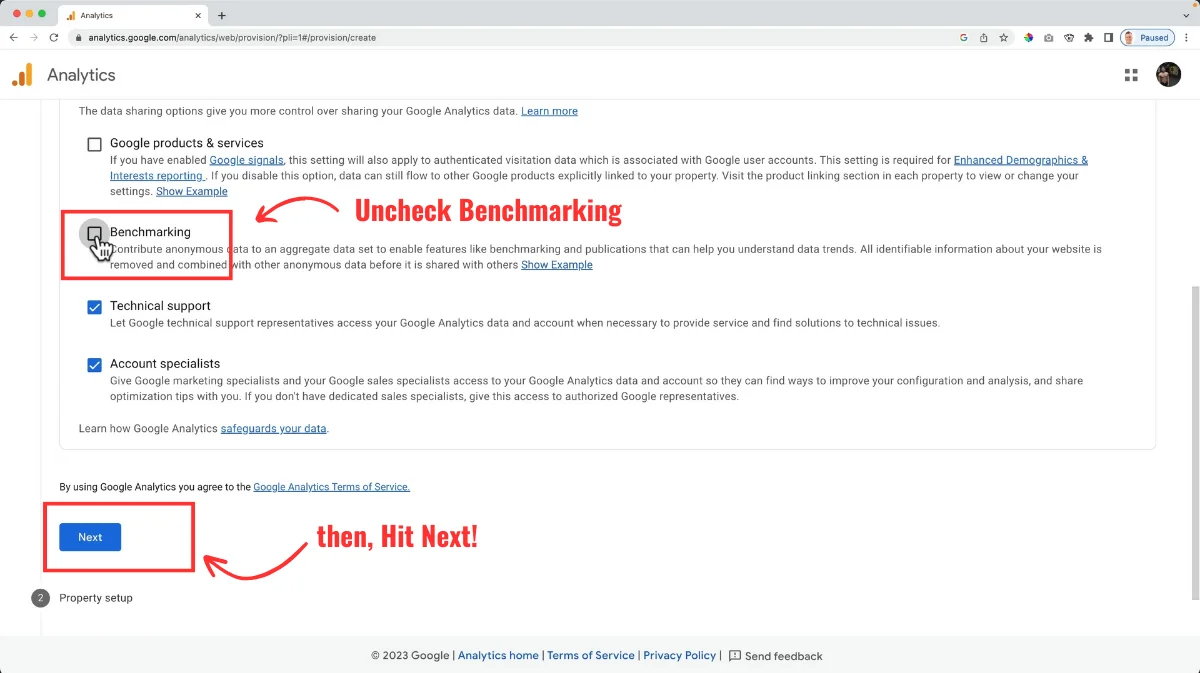
Uncheck “Benchmarking” and click “Next.”
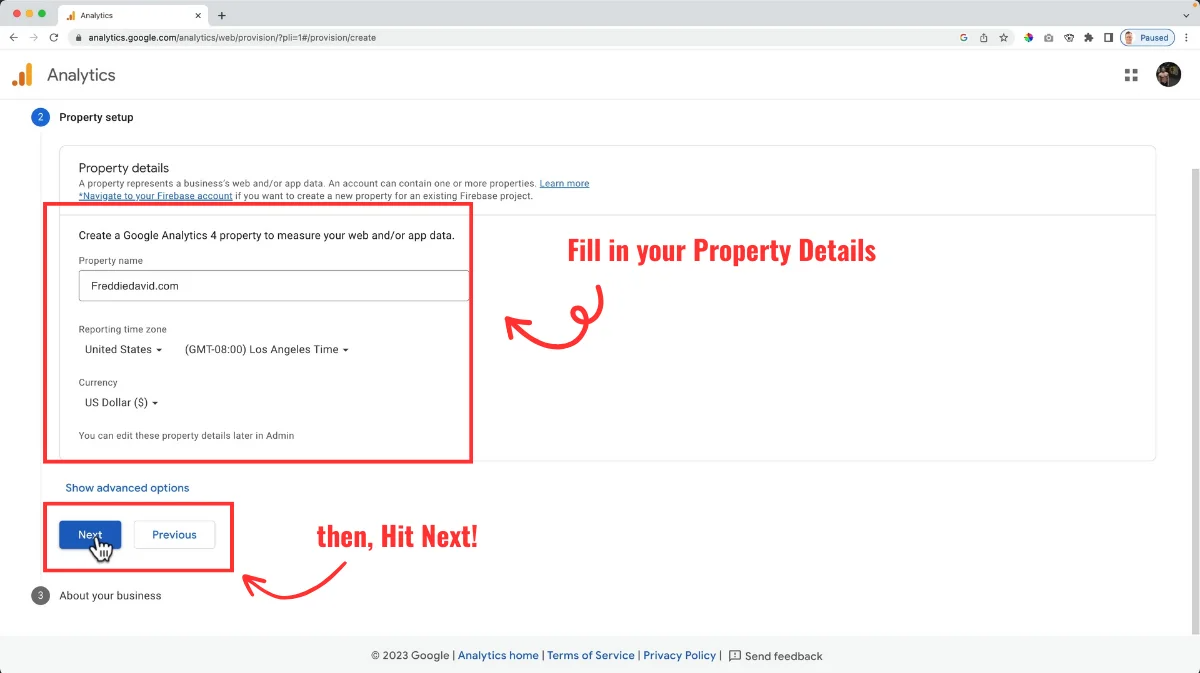
Add information related to “Property name,” “Reporting time zone,” and “Currency” and click “Next.”
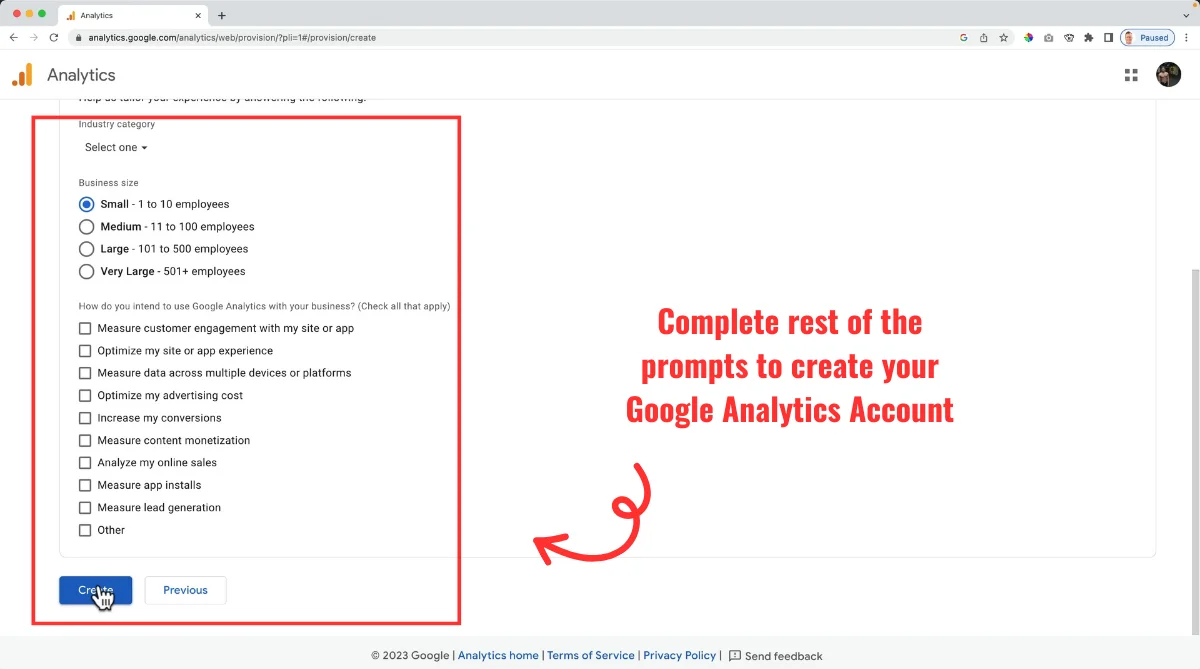
Select the relevant markers and click “Create.” Your Google Analytics account is set up.
Step 2: Add Google Analytics tracking to your website
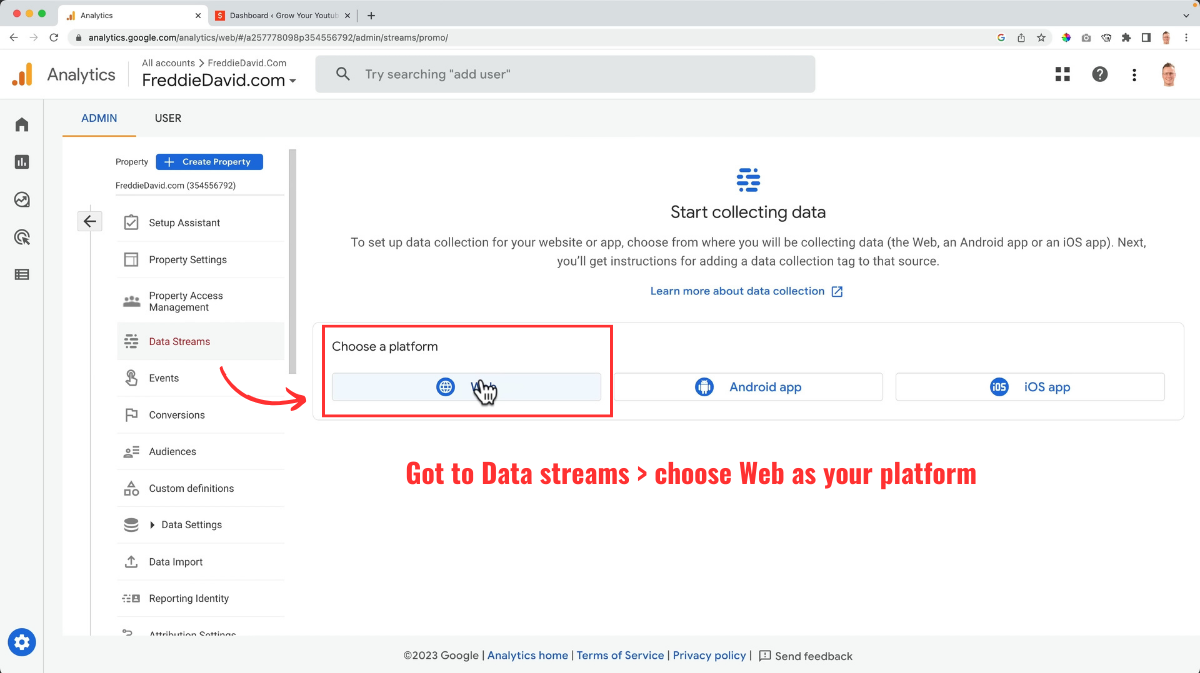
Log in to your Google Analytics account. Under Properties, click Data Streams > Web.

Enter your domain name and click “Create stream.”
Step 3: Install your Google tag
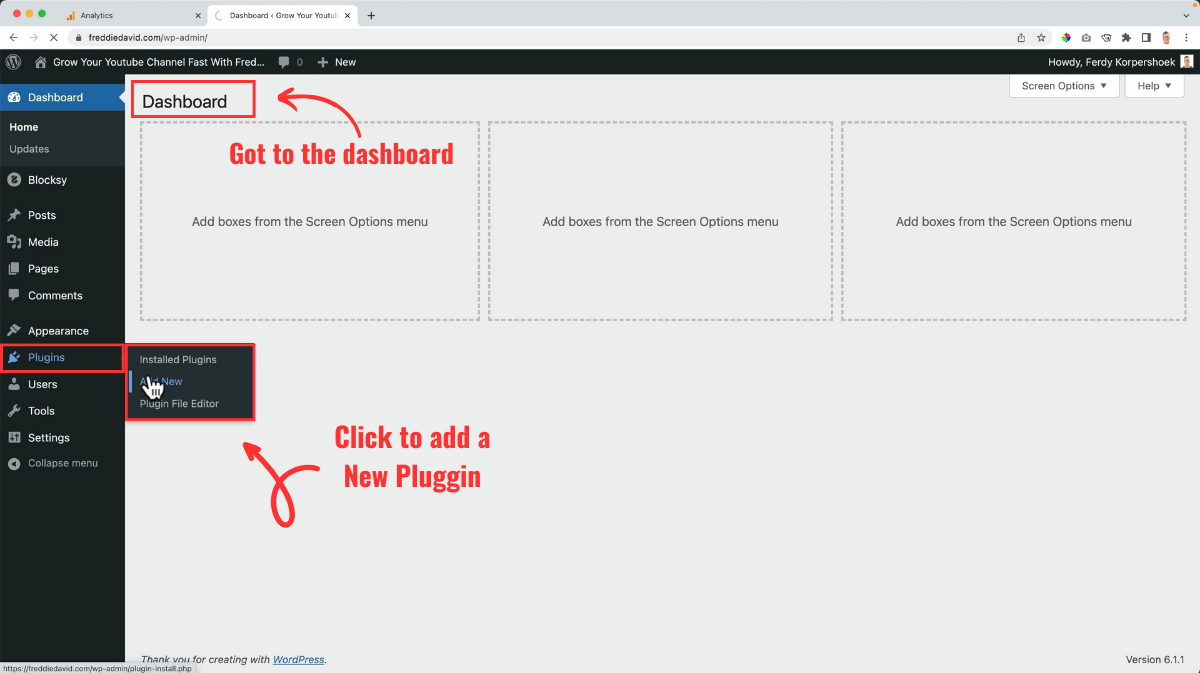
Use the Site Kit plugin for this step. Head back to your WordPress dashboard, click Plugins > Add New.
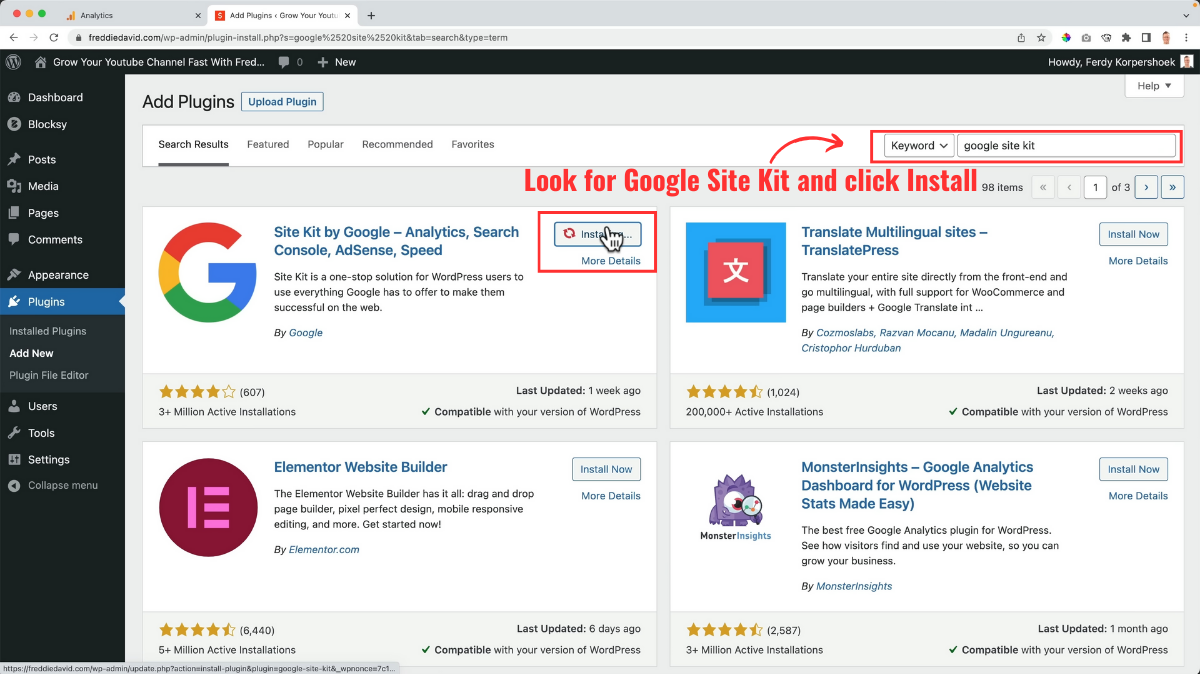
Search for “Google Site Kit” and click Install Now > Activate.
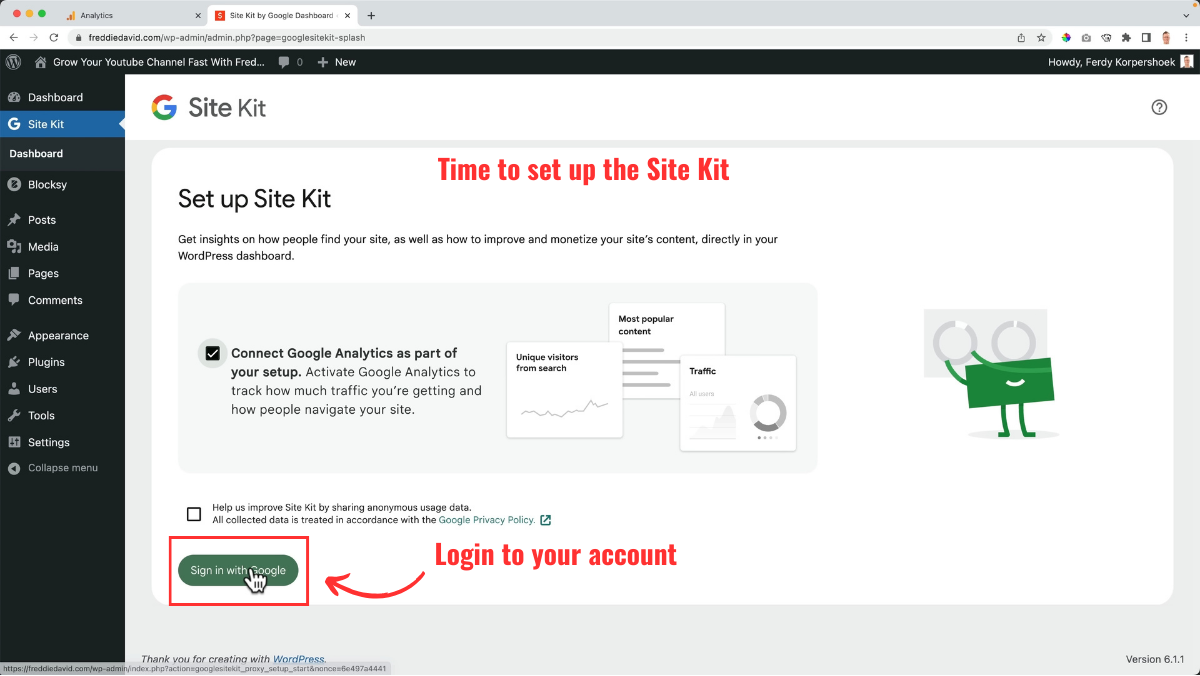
Click Start setup > check the dialog (Connect Google Analytics as part of your setup) > Sign in with Google.
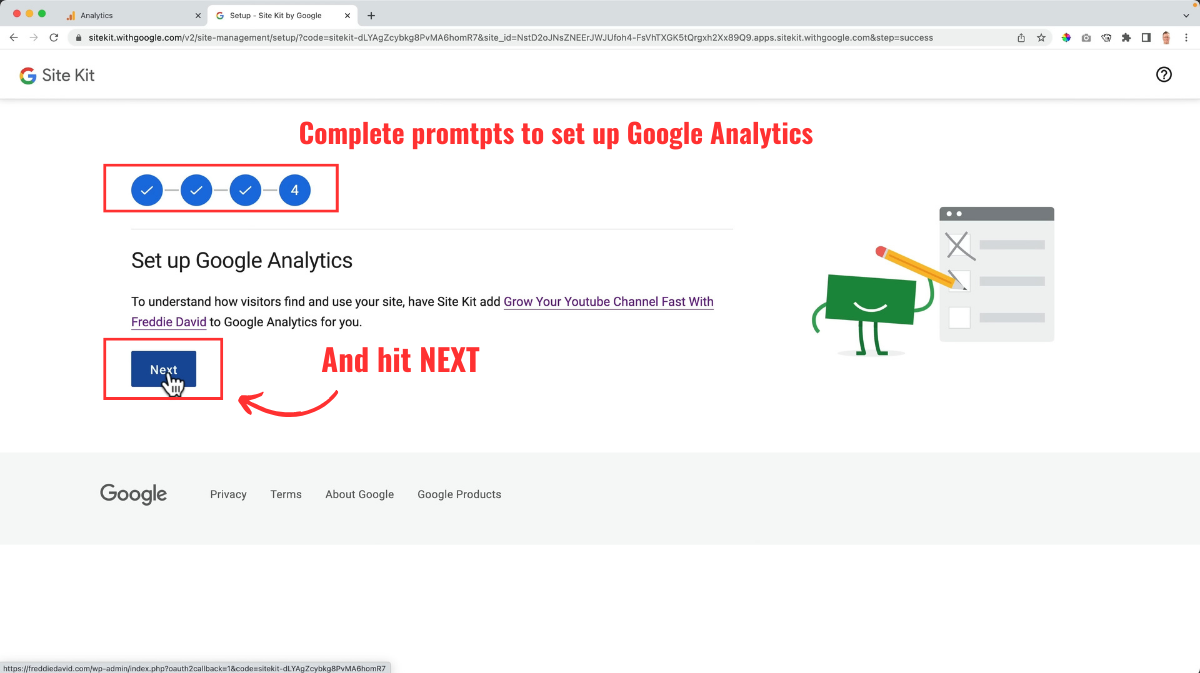
Select your Google Analytics account email and click Continue > Verify > Allow > Setup > Next.
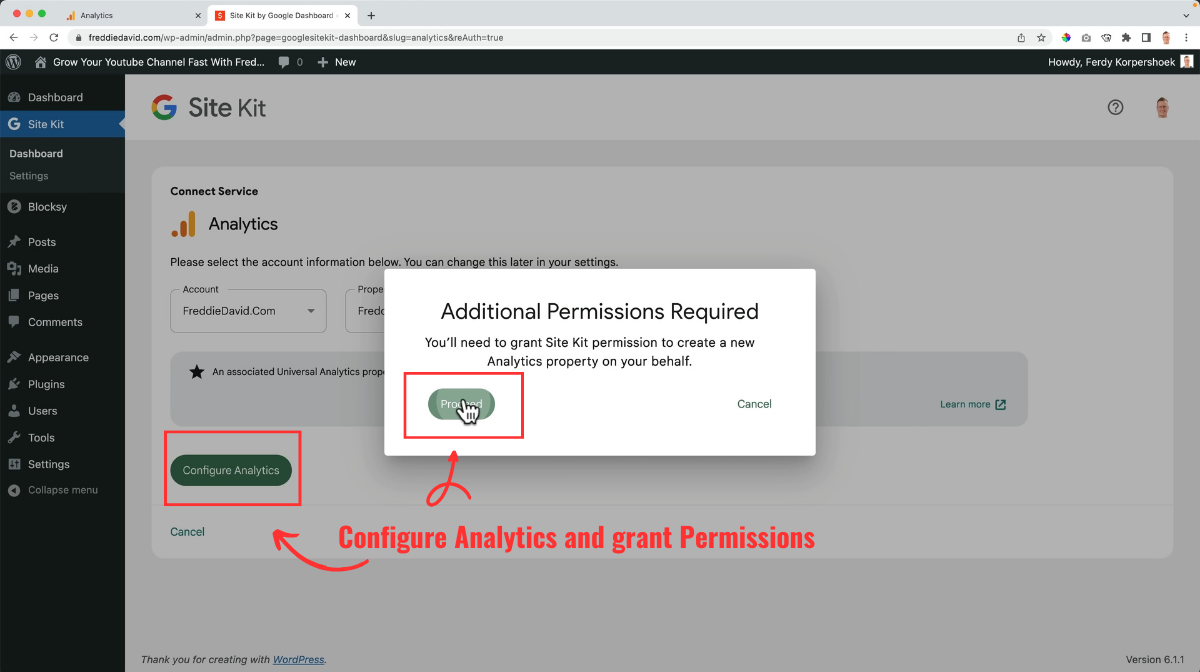
Click “Configure Analytics,” sign in with your Google Analytics email, and Click “Continue.” Your Google Analytics will now track your website data.
4. Set up Google Search Console
The Google Search Console (GSC) is another free website analytics tool perfect for affiliate marketing websites. With this tool, you can monitor your website’s performance on Google Search Engine Ranking Pages (SERPs).
Using GSC, you can:
- Submit your sitemap
- Track specific keyword rankings
- Identify indexing issues
- Receive important notifications from Google about your website
Since you already set up GSC while setting up Google Analytics, you can simply log in and explore its features.
5. Install an SEO plugin
An important part of running an affiliate blog is ensuring your blog posts appear in search results. The higher the visibility, the higher your chances of success.
To achieve this, we use search engine optimization (SEO).
There are many SEO tools you can use, but I recommend RankMath.
Ferdy’s Fundamentals – What is RankMath?
RankMath is an SEO plugin for WordPress that helps optimize your content for search engines. It offers features like keyword analysis, sitemap generation, and SEO performance tracking, making SEO more accessible and effective for bloggers.
To install the RankMath plugin on your WordPress site, follow the instructions below:
Go to the backend of your website, Click Plugins > Add New.
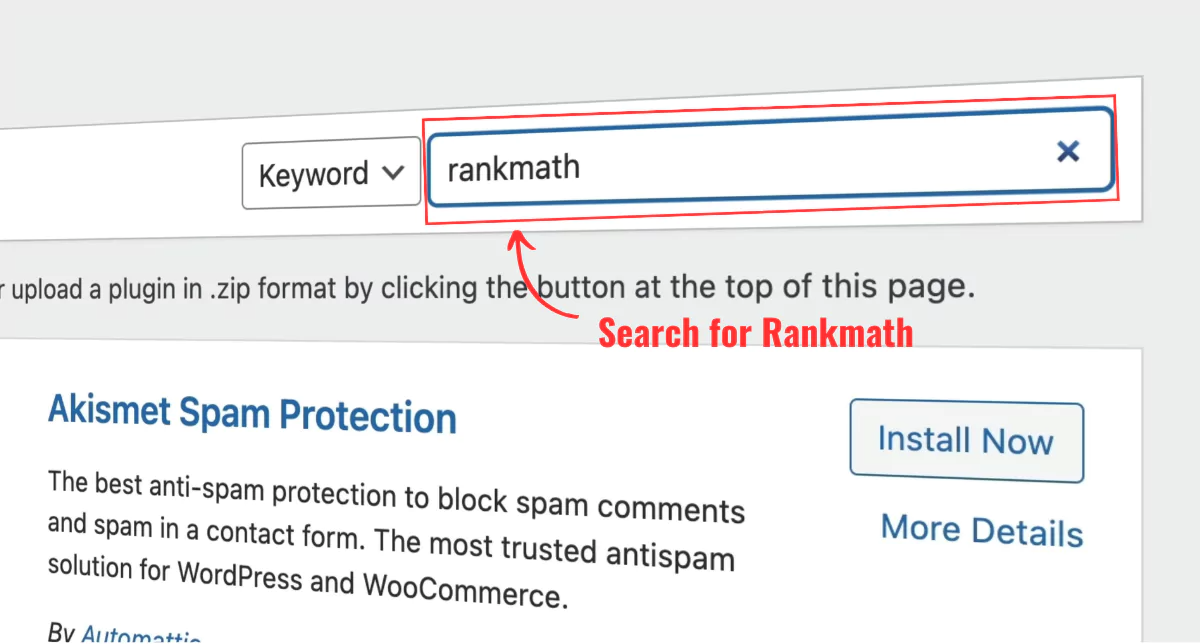
Search for RankMath.
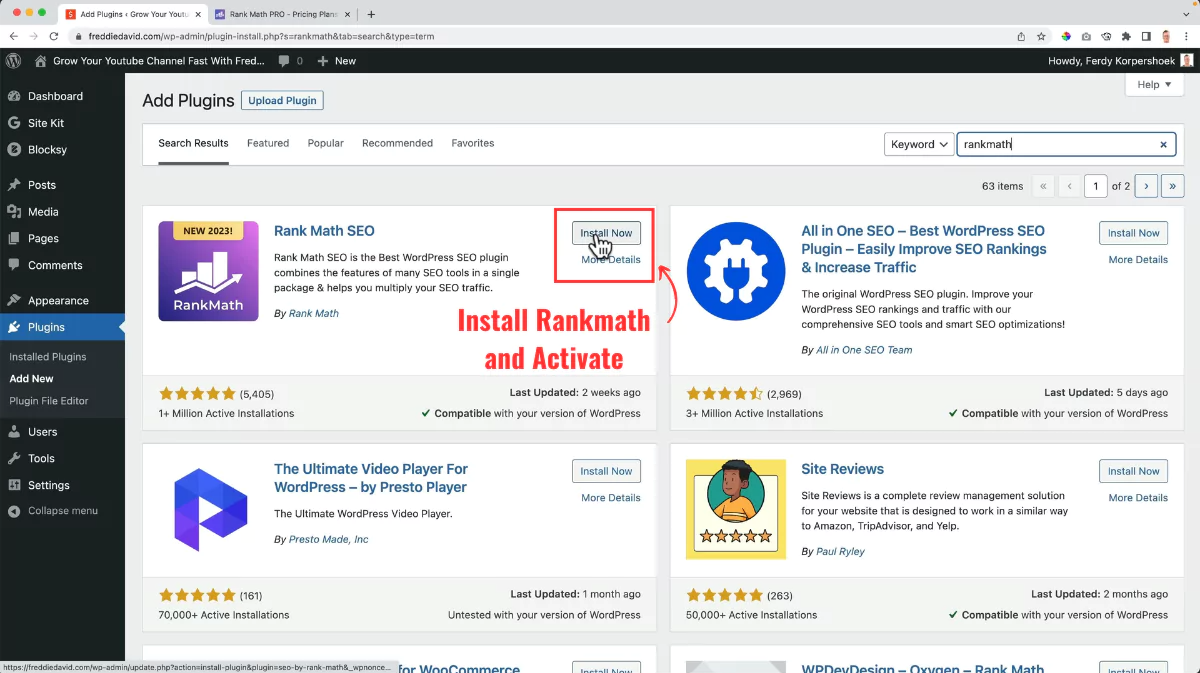
Click Install Now > Activate
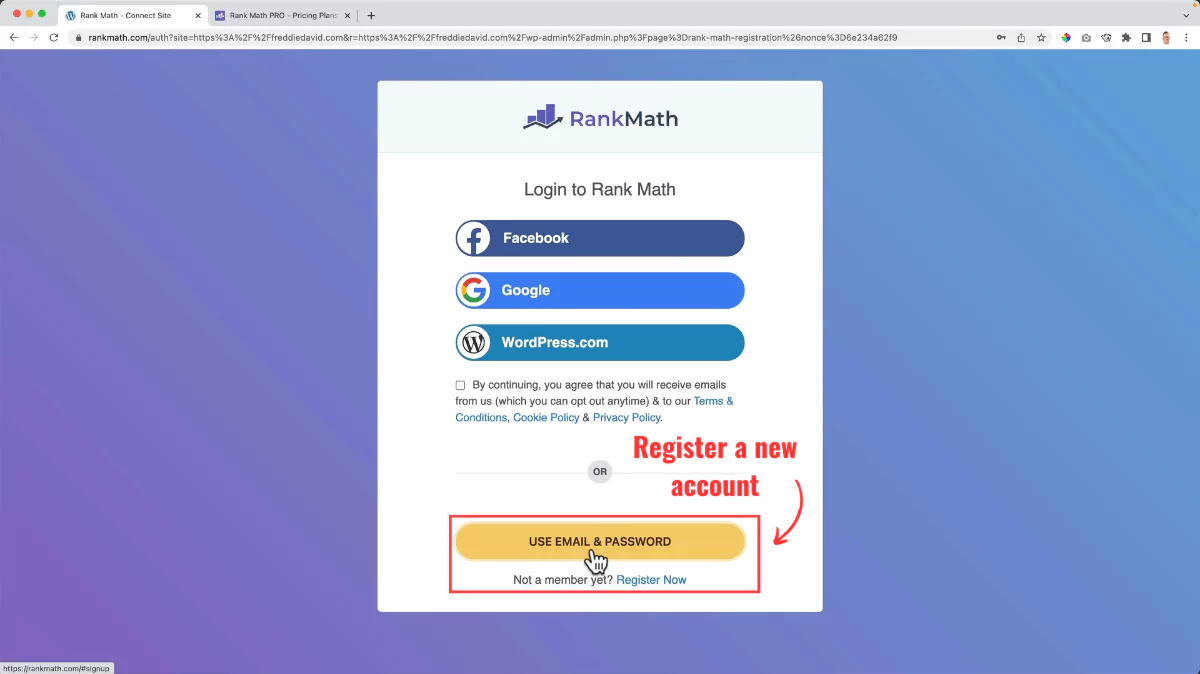
Connect an account or register as a new user
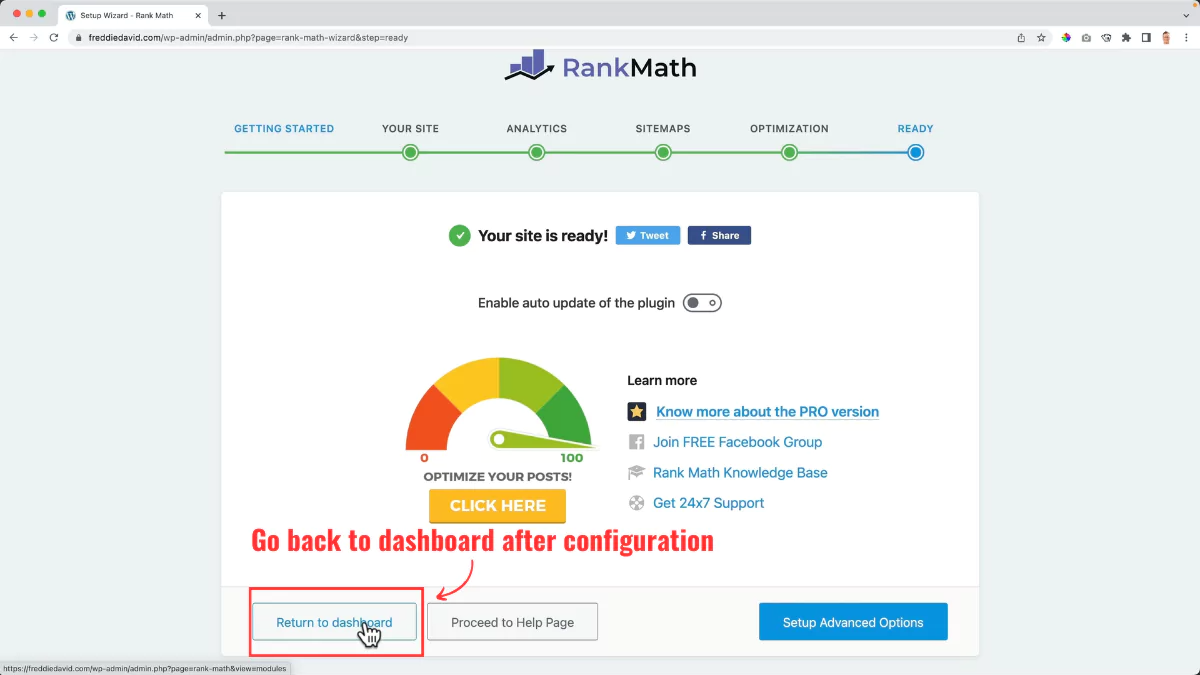
Configure the setup.
To learn more about RankMath and how to use it to optimize your website content, watch my in-depth tutorial below.
6. Do market research
You’re one step closer to starting your content creation journey. However, don’t underestimate the significance of the preparation phase.
Here’s my approach: I love writing about my passions, the things that genuinely excite me. If it were up to me, I’d craft content about Zelda, delving into detailed walkthroughs and strategies for navigating the game’s levels.
But passion is just one part of the equation. It’s equally crucial to gauge public interest in your chosen topics.
Suppose not many people are looking for Zelda walk-through guides. In that case, no matter how good my content is, I might end up wasting my time and effort.
So, the takeaway is: don’t skip market research.
There are many paid and free tools for market research. I will explore three options: SemRush (premium), AnswerThePublic (freemium), and Google (free). Depending on your needs and budget, you can decide which one you’d like to use.
SemRush
Let me walk you through my market research process using SemRush:

Visit SemRush and sign up for the free trial.
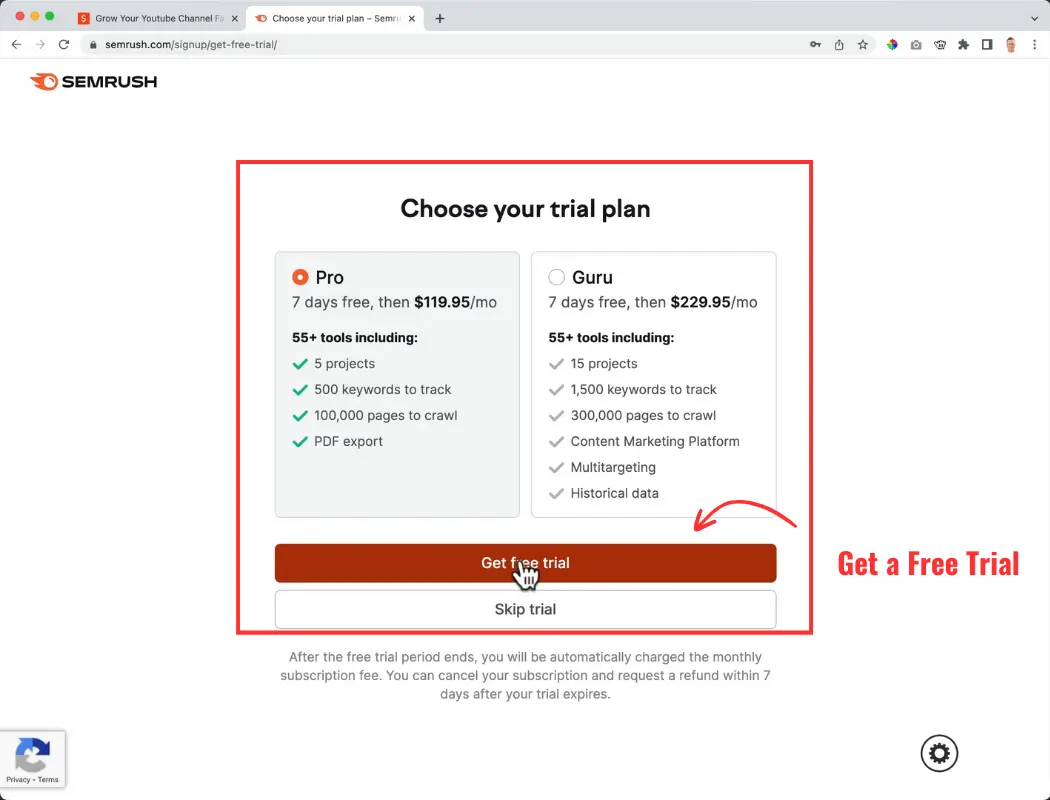
Create an account, answer the start-up prompts, and choose your trial plan.
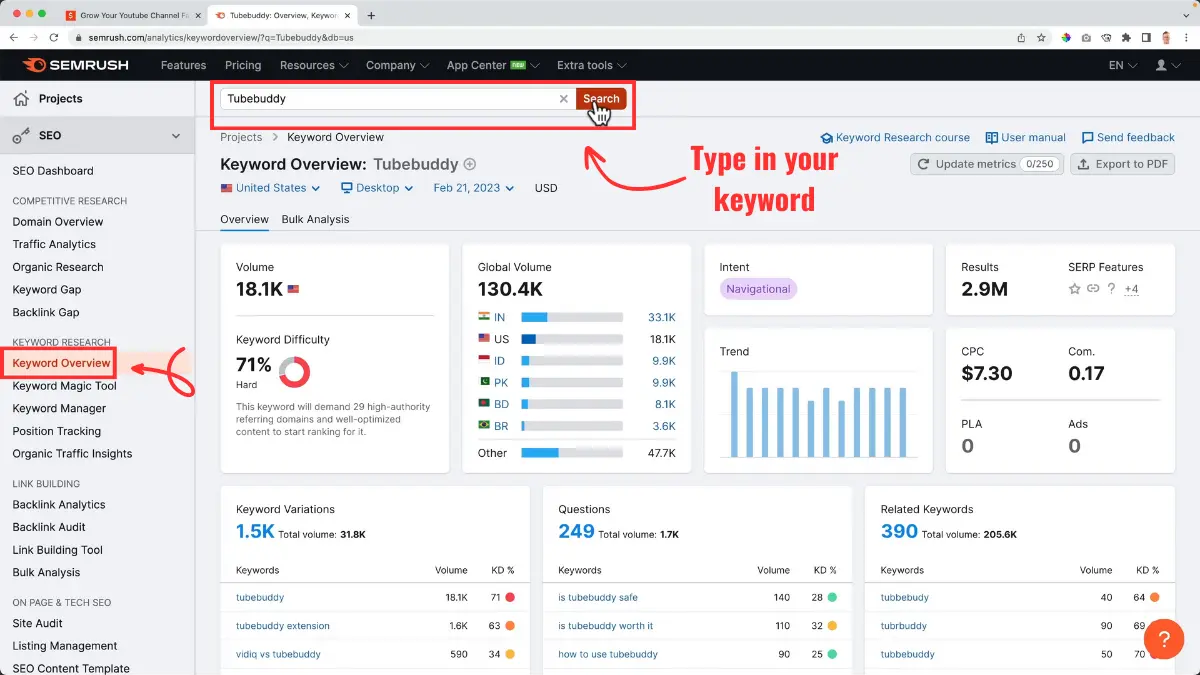
Click “Keyword Overview” on the dashboard. Enter the keyword you want to create content for. In my case, it’s “TubeBuddy.”
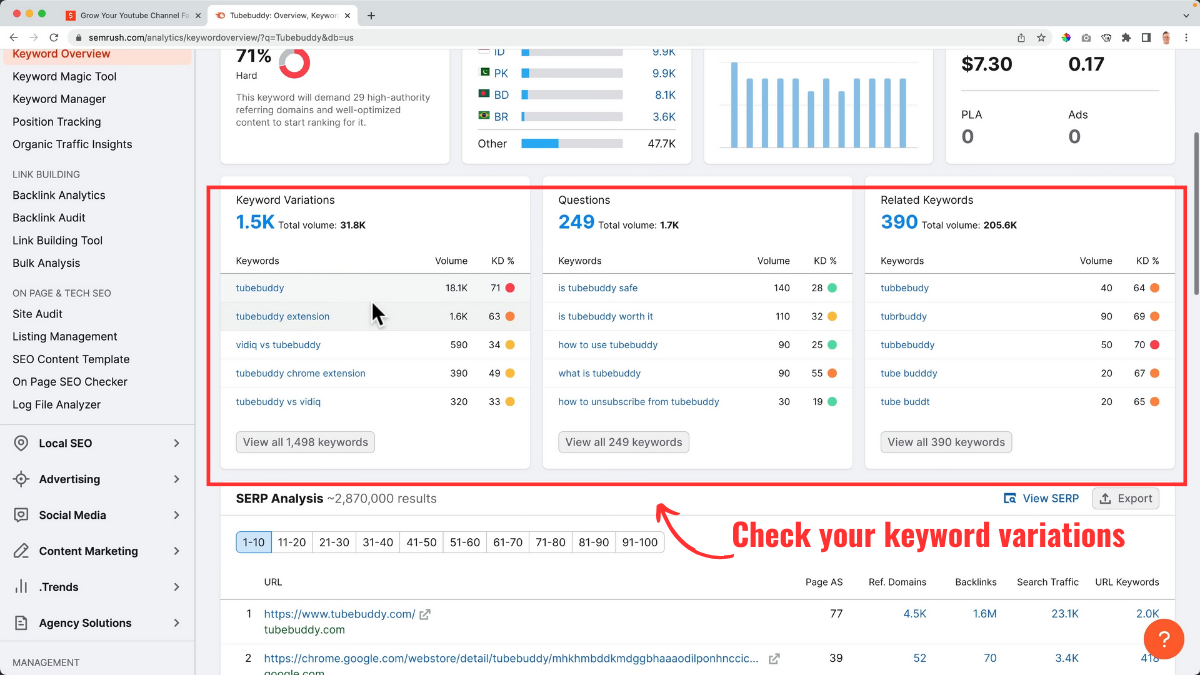
Check out the Keyword Variations data. You can see what people are searching for with the relevant keyword volume, difficulty percentage, and CPC. Pick the ones with high keyword volume and low difficulty percentage.
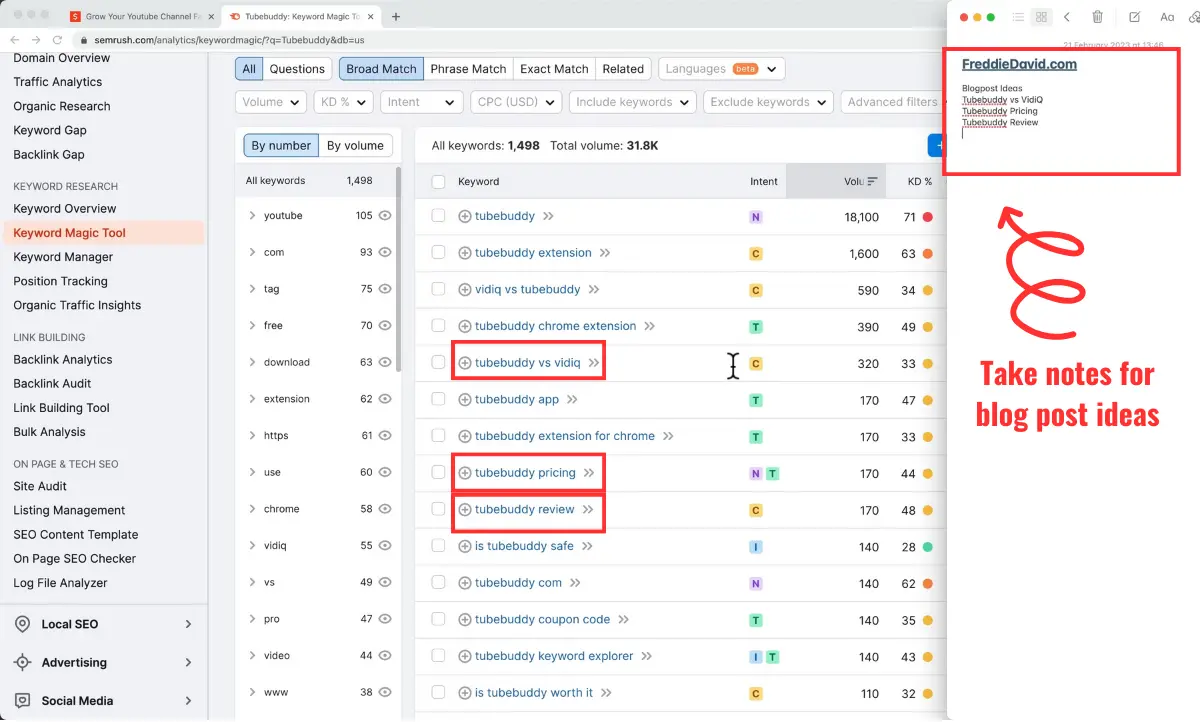
Take notes for blog post ideas and list all the terms you can create content about. I prefer keywords with at least 500 global search volume. Although, sometimes I bend this rule (but that’s me being quirky, haha!).
Pro tip: To maximize your chances of success, pick keywords with low competition. To do this, click the “KD %” filter and add a custom range from “0 to 25”. This will bring up common search terms with the least competition.
AnswerThePublic
Another tool you can use for market research is AnswerThePublic. This one has a free and premium version. It shows you the questions people frequently ask about your product or niche.
The best part about this tool is that it segments the queries into several categories like, what, when, where, etc. This helps a lot in getting blog post ideas.

The free version limits the number of searches you can make and the data you can see. But if you want to make the most of this tool, I recommend purchasing its lifetime deal for $99 (one-time).
If you’re looking for a free market research tool, Google is your best friend.
Type in a phrase that best describes your niche or product. Look at the suggestions under the search bar. These are common search queries that your target audience is already looking for. You can increase your chances of visibility by wiring blog posts that answer these queries.
There’s a section called “People Also Ask.” This section includes the common search queries relevant to your keyword. You can use these to plan your content calendar.
Also, you can look at the top 10 ranking articles on Google SERP for your keyword. Carefully read through them.
Notice details like the topics they cover, article length, headings, subheadings, images, etc. Maybe they are missing a critical decision-making factor. Or maybe their images are outdated. Look for loopholes and address them in your content to beat the competition.
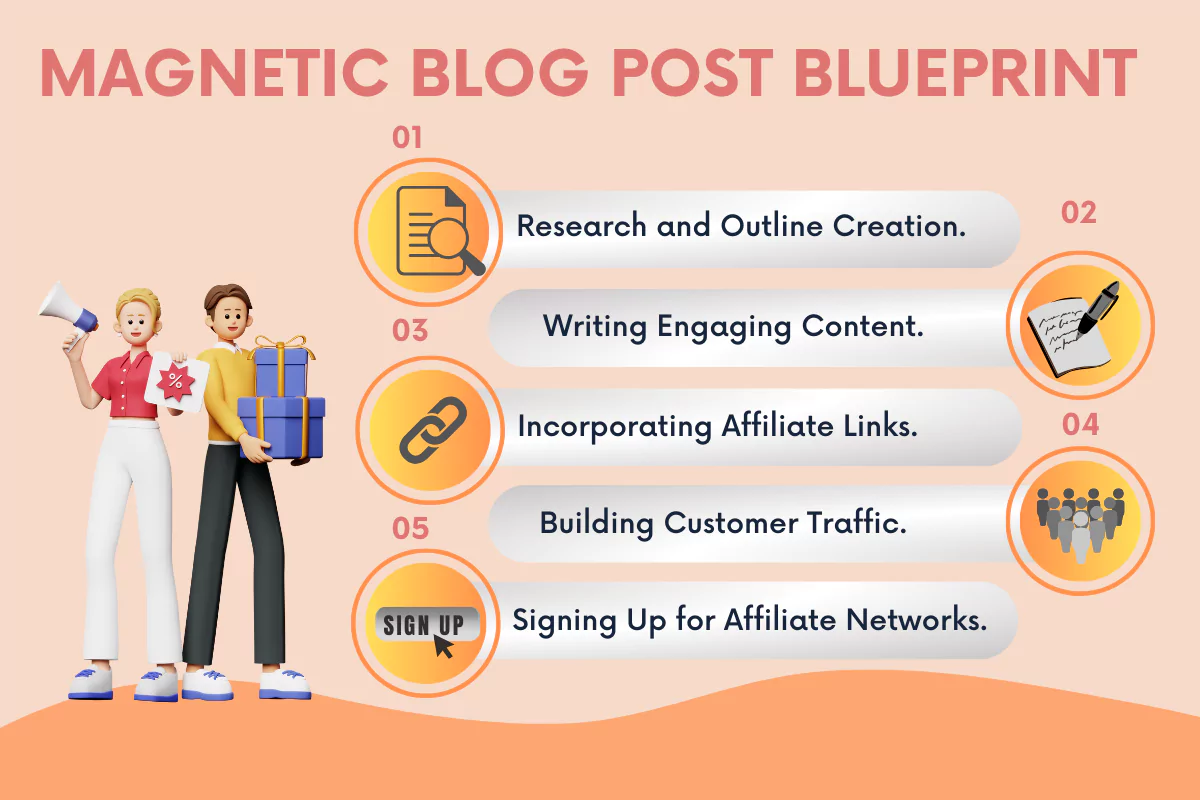
7. Plan and write content for your website
Writing content isn’t easy, especially if you’re doing it for the first time. Even the most experienced writers face a blank page syndrome. But with my step-by-step approach, you can get started.
Start writing your blog post
Blog posts that have valuable content and are SEO optimized are an audience magnet. And more audience means a greater chance of getting affiliate sales!
Use the notes you compiled in step 6 to create a high-level outline with a captivating blog post title and headings for your post. This helps structure the content for your post better.
Start writing content focusing on answering your target audience’s search intent.
Be thorough in your reasoning, include plenty of relevant examples, and share your personal experience wherever you can to add personality to your content.
Try to offer solutions in your content wherever you can. Place your affiliate links as either hyperlinked text or properly formatted CTA buttons.
Note that you won’t be able to sign up for major affiliate networks unless you have a decent amount of website traffic.
At this stage, your primary focus should be to deliver valuable content to your readers first, build a healthy audience, and sign up for affiliate networks.
Add bullet points, descriptive images, and facts and figures to make the content engaging for your readers.
I recommend using Adobe Photoshop to create images. Alternatively, you can also use free image editing software like Zight (formerly CloudApp).
Pro tip: Before uploading your images, compress them using software like tinypng.com so your blog post doesn’t take much time to load. Add Alt Text to every image, increasing your chances of appearing on Google Image search.
Optimize your blog posts using RankMath AI
Optimizing your content for SEO is also an important factor. To do that, activate the RankMath plugin on your WordPress.
You should see a RankMath bar on the right side of your screen. Add your primary and secondary keywords. This will pull up the content’s SEO score and metrics. The score shows how well your content is optimized for the search engine crawlers.
Once you finish the first draft, use RankMath AI to help optimize your content further. It will give you additional keyword suggestions, heading, and word count suggestions to improve your score further
Analyze the areas that need improvement and follow the suggestions to optimize your content.
While writing content, do not focus too much on writing perfect grammar. There are tools like Grammarly that can help you fix writing issues.
It might take you a lot of time to publish your first post. But understand this is normal for beginner affiliate marketers. With practice, writing top-notch blog posts will become second nature to you.
Consistency is key for successful affiliate blogging, so you must post regularly.
Pro tip: After creating content, you can pre-set the publishing date and time for each blog post on your content management system on WordPress to ensure that they go live at the desired time.
8. Sign up as an affiliate
By becoming an affiliate partner, you can earn commissions on affiliate sales of the products or services promoted on your blog.
With a well-thought-out affiliate marketing strategy and valuable blog content, you’ll soon be able to attract decent traffic to your website.
This is when your chances of getting accepted into your target affiliate network or program will be high.
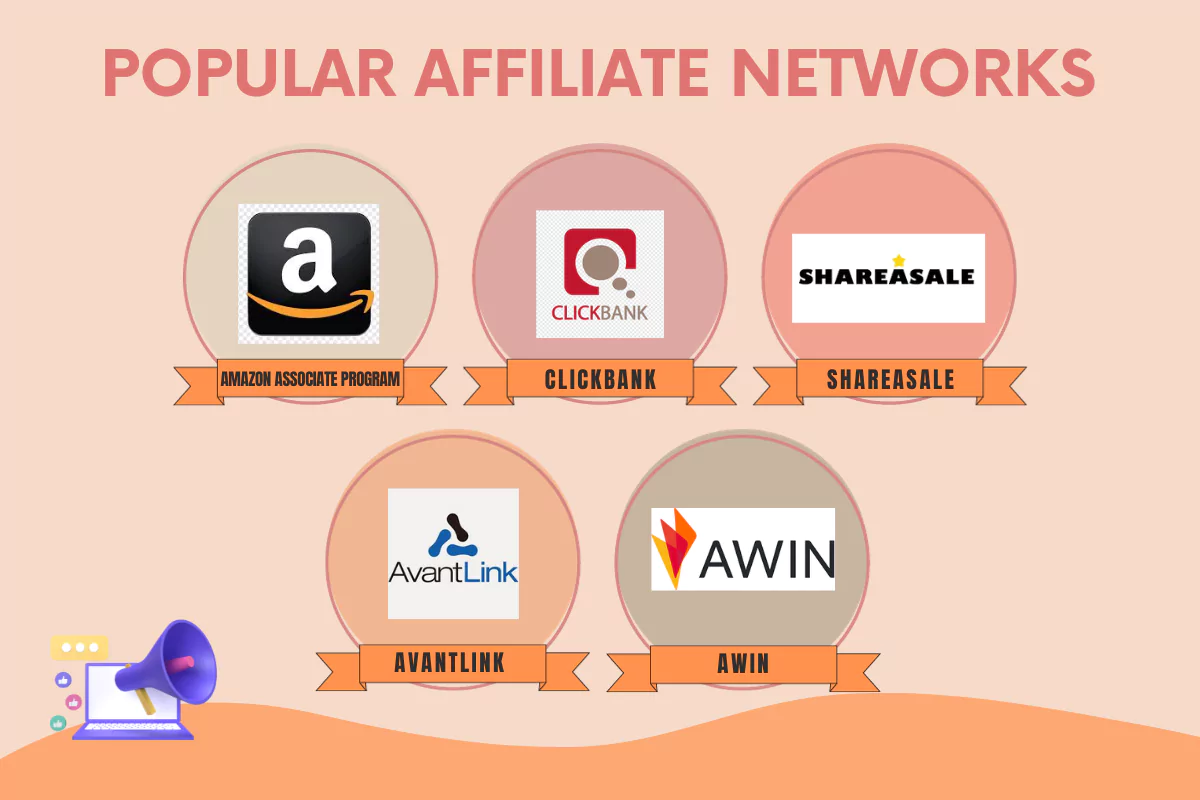
Here are some of the popular affiliate networks you can apply to:
- Amazon Associates Program (best for beginners)
- Clickbank (for advanced-level affiliates)
- ShareASale (ideal for a variety of niches)
- AvantLink (great for data-driven affiliates)
- Awin (suitable for European markets)
However, this list is not comprehensive. You can look for brands in your preferred niche that offer affiliate programs and expand your list.
Read the terms and conditions of the affiliate marketing program to get an idea of the earning potential and understand any requirements and prerequisites before applying.
9. Leverage video content
Affiliate marketing doesn’t have to be limited to blogs and written content. In today’s era, when the audience’s attention span has shortened considerably, videos are an effective communication medium.
You can become a successful affiliate marketer by solely focusing on videos.
Take my example. I started my YouTube channel in 2014 and made my first affiliate sale the same year. Did I write any blog posts? No, I just leveraged the video content I produced for my YouTube channel.
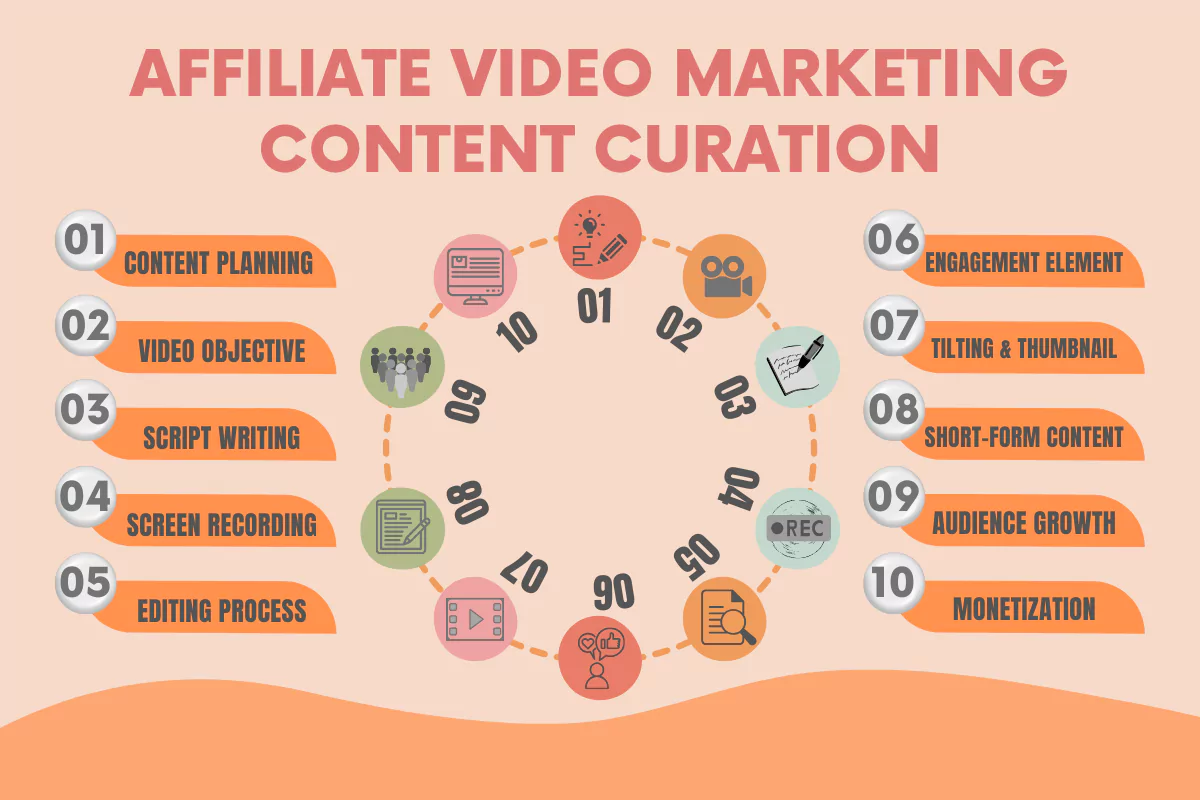
However, not all video content gets views. Just like you need to research in depth before creating blog posts, to create videos that are effective at generating sales, it is crucial to prepare:
- A content plan
- A clear objective of the video
- A script outline
Once you have the plan ready, you can start creating your videos. If your videos include recording your screen, use a tool like Loom.
Next, use Adobe Premiere Pro and Adobe After Effects to add text overlays, special effects, sound effects, and music to make your videos more engaging.
Don’t forget to create crisp titles and attractive thumbnails for your videos. There are tons of free tutorials on YouTube that can help you with that.
And no, you don’t have to create in-depth 7-hour-long tutorials (like me) to start affiliate marketing. Byte-sized informative video content that packs a punch will also do fine.
You can create smaller videos or reels and upload them on social media platforms like TikTok and Instagram.
These value-packed videos are great for building an audience on social media platforms. And remember, whoever has an audience online has money-making potential through affiliate marketing.
Final Words
Becoming an affiliate marketer is not easy, but it certainly is rewarding. Success hinges on finding your niche, creating valuable content, and putting in consistent effort.
Remember, my journey began with small steps and dedication.
Take that bold step today. Define your niche, build your platform, and start affiliate marketing. Your commitment to this path, despite its challenges, will lead to worthwhile rewards. Start now, and remember, persistence is the key to success in affiliate marketing.
If you’ve any questions, feel free to hit me up on Instagram.
For comprehensive video tutorials, visit my YouTube channel and consider subscribing to the latest in affiliate marketing.


Ibidun Mudashiru
I am intrested in Affiliate Marketing. I do not have knowldge on IT