


How to Start an Online Store in 2024 (Step by Step)
Are you ready to take your thriving small business to new heights? Stepping into the world of online retail is your next big move. While the thought of starting an online store might feel overwhelming, it’s absolutely achievable with the right guidance.
To successfully start an online store, start by selecting a domain name and setting up website hosting. Then, focus on designing your website on WooCommerce, uploading products, configuring shipping and tax automation, and establishing payment methods.
Don’t let the fear of the unknown hold you back. With each step carefully explained, you’ll be on your way to establishing a successful, automated online store in no time!
How to create an online store in 2024 – Video tutorial
1. Set up your eCommerce website
Setting up your online store is a thrilling journey, and I’m here to guide you through every step. Let’s kick off by establishing the foundation of your eCommerce business: setting up your web hosting and domain name. Trust me, it’s easier than you think!
Choosing the right web hosting and domain name
First things first, you need a home for your online store. For that, web hosting is essential. In my experience, Hostinger stands out with its stellar reviews and impressive performance.
And hey, don’t just take my word for it. Users globally have been singing praises about Hostinger on platforms like Trustpilot.
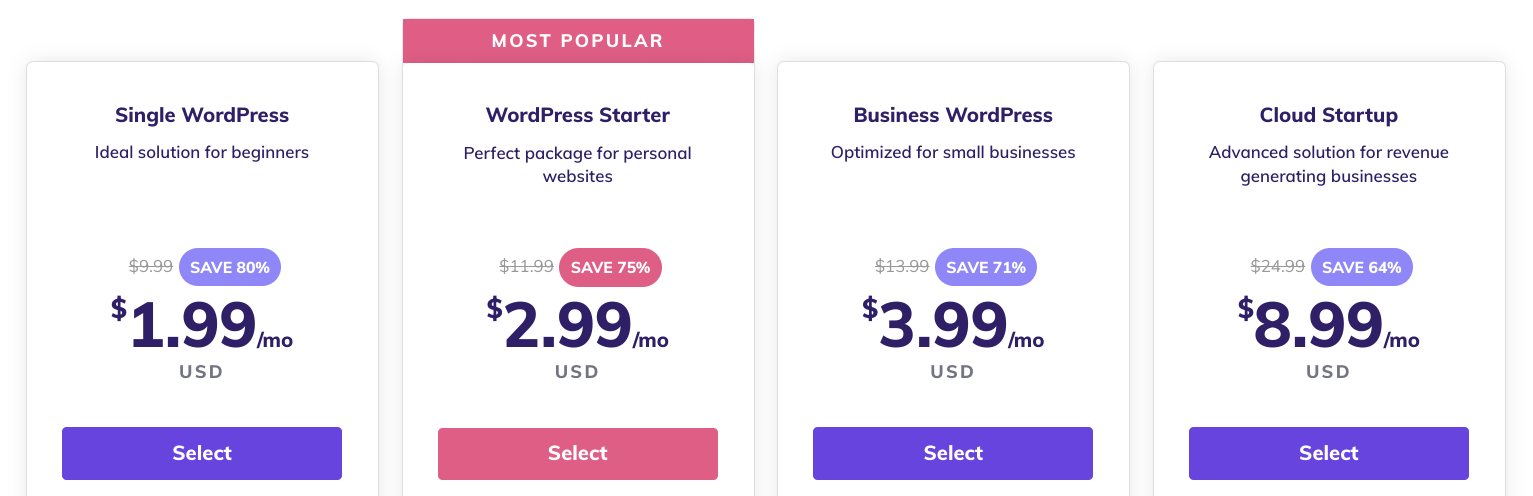
With Hostinger, you’re spoiled for choice with four robust web hosting plans. If you’re just dipping your toes into the eCommerce world, I’d recommend starting with the WordPress Starter plan. Here’s why:
- Affordable pricing: You get fantastic value for your investment.
- Free domain name: Perfect for branding your online store.
- 100 GB SSD storage: More than enough room for your store’s data.
- Unlimited bandwidth: No worries about traffic spikes.
Reached 25,000 monthly visits? No problem, you can easily upgrade to the Business WordPress plan. But for starters, the WordPress Starter Plan has got you covered.
Special discount: Use the code “FERDY” during checkout for an additional 10% discount on all payment plans. It’s a little thank you from me to you!
Setting up WordPress and selecting your domain
Once you’ve picked your plan, it’s time to set up your WordPress account and choose your domain name.
You’ll encounter prompts to download WooCommerce and other plugins, but let’s hold off on that for now. I’ll walk you through the WooCommerce setup later in this tutorial. Also, skip the themes for the moment. We’ll get to that soon enough.
Here’s where things get exciting – choosing your domain name.
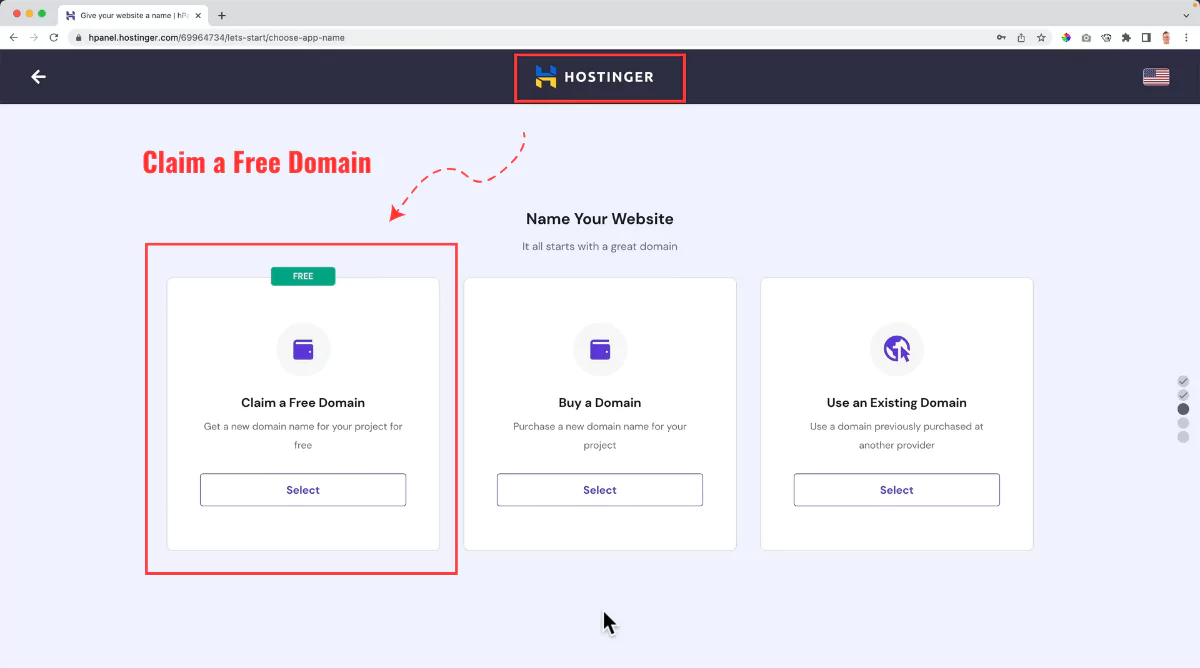
If you choose the WordPress Starter plan or higher for web hosting, you can claim a free domain name.
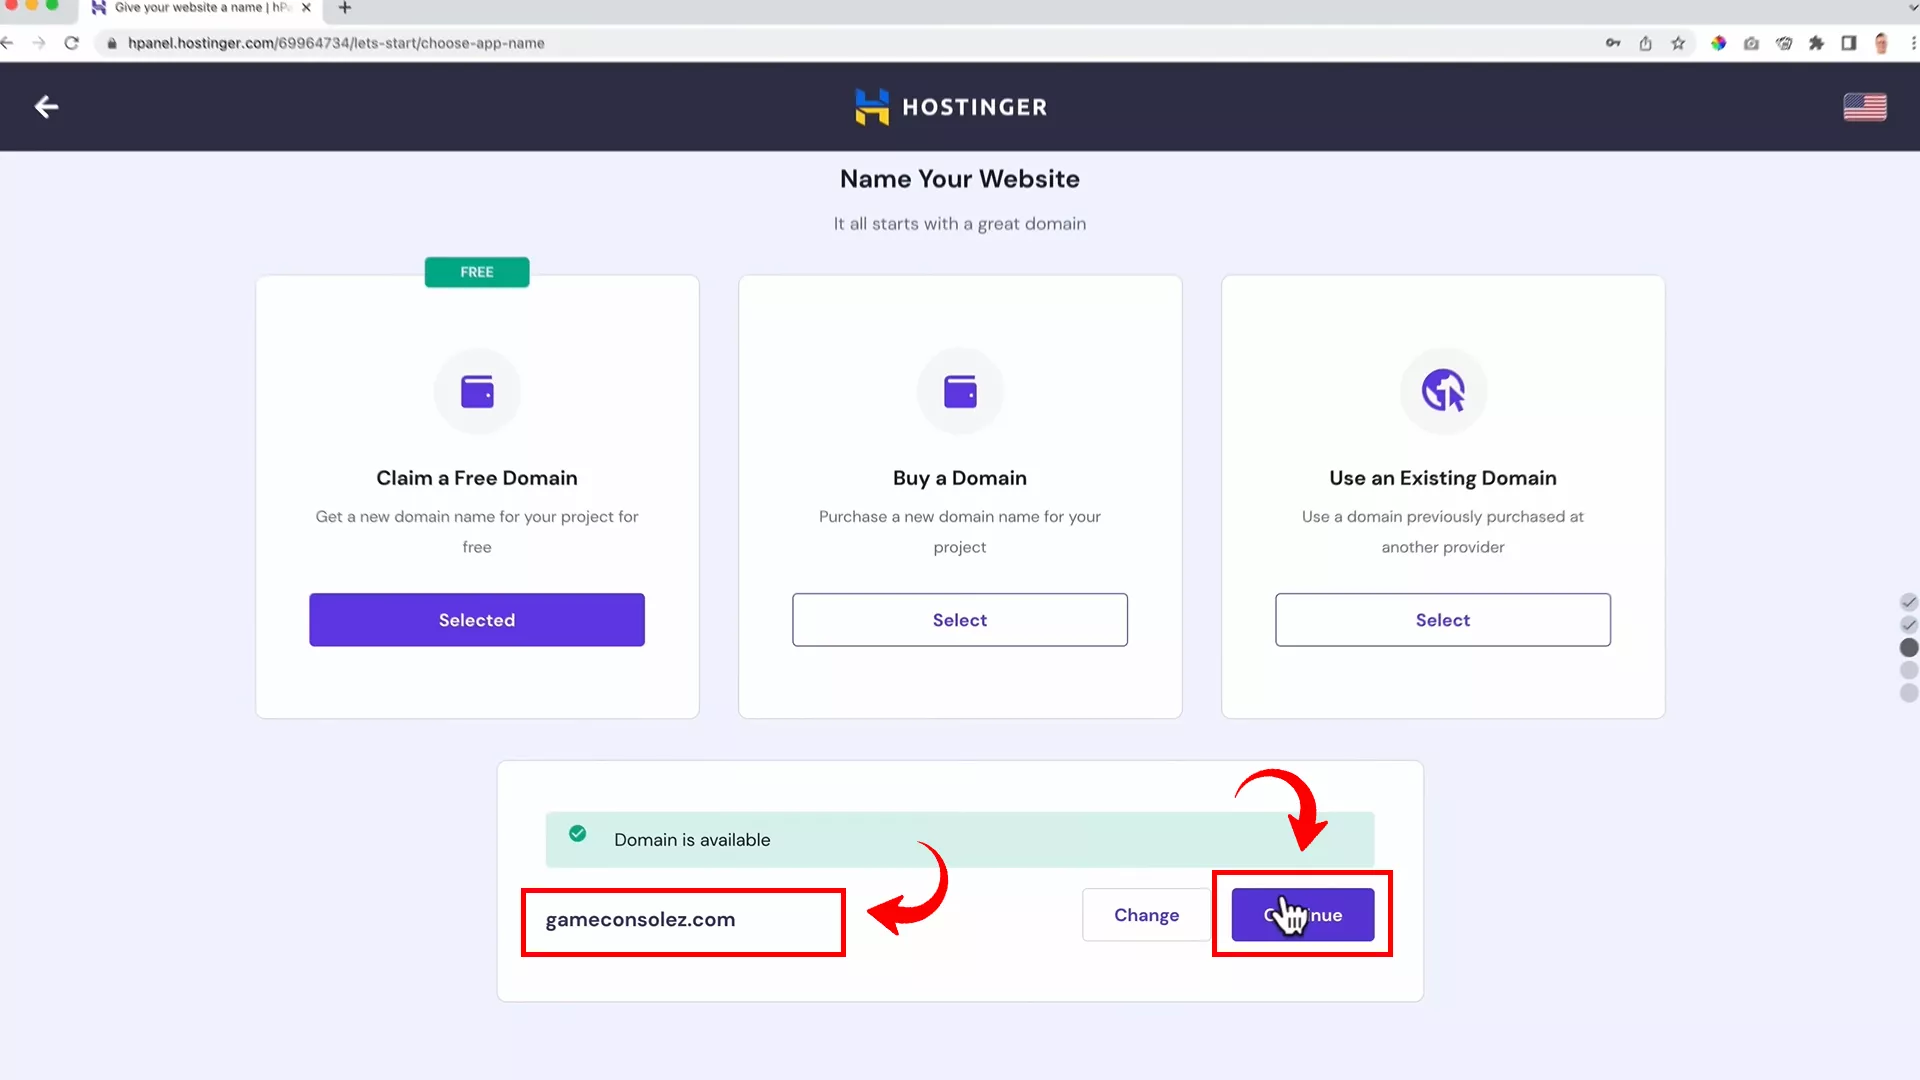
For my demo, I’m going with ‘gameconsolez.com.’
Why? Because it perfectly captures the essence of my store’s target audience, gamers. Take your time to pick a domain name that resonates with your niche.
Once you nail the perfect domain name and it’s available, Hostinger will guide you through a smooth registration process. And just like that, you’re ready to roll!
Securing your website with SSL
Before diving into website design and product uploads, there’s one crucial step – securing your site with SSL. It’s a non-negotiable aspect (especially for online stores).
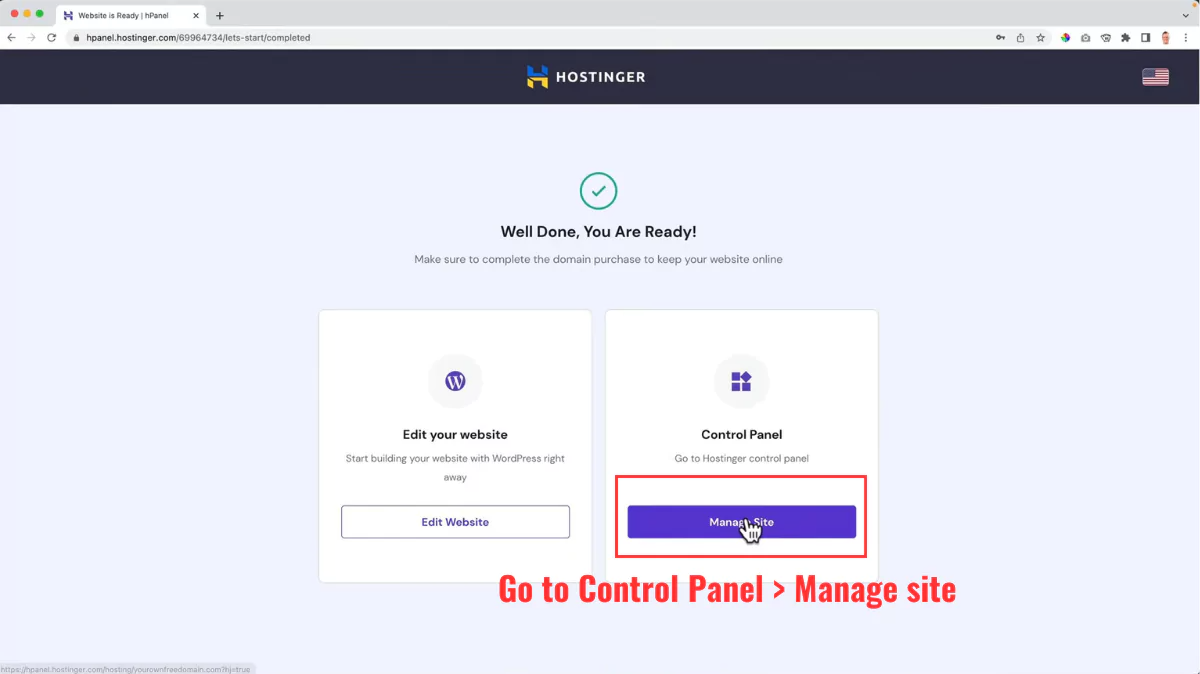
Head over to your Hostinger control panel and access the WordPress dashboard.
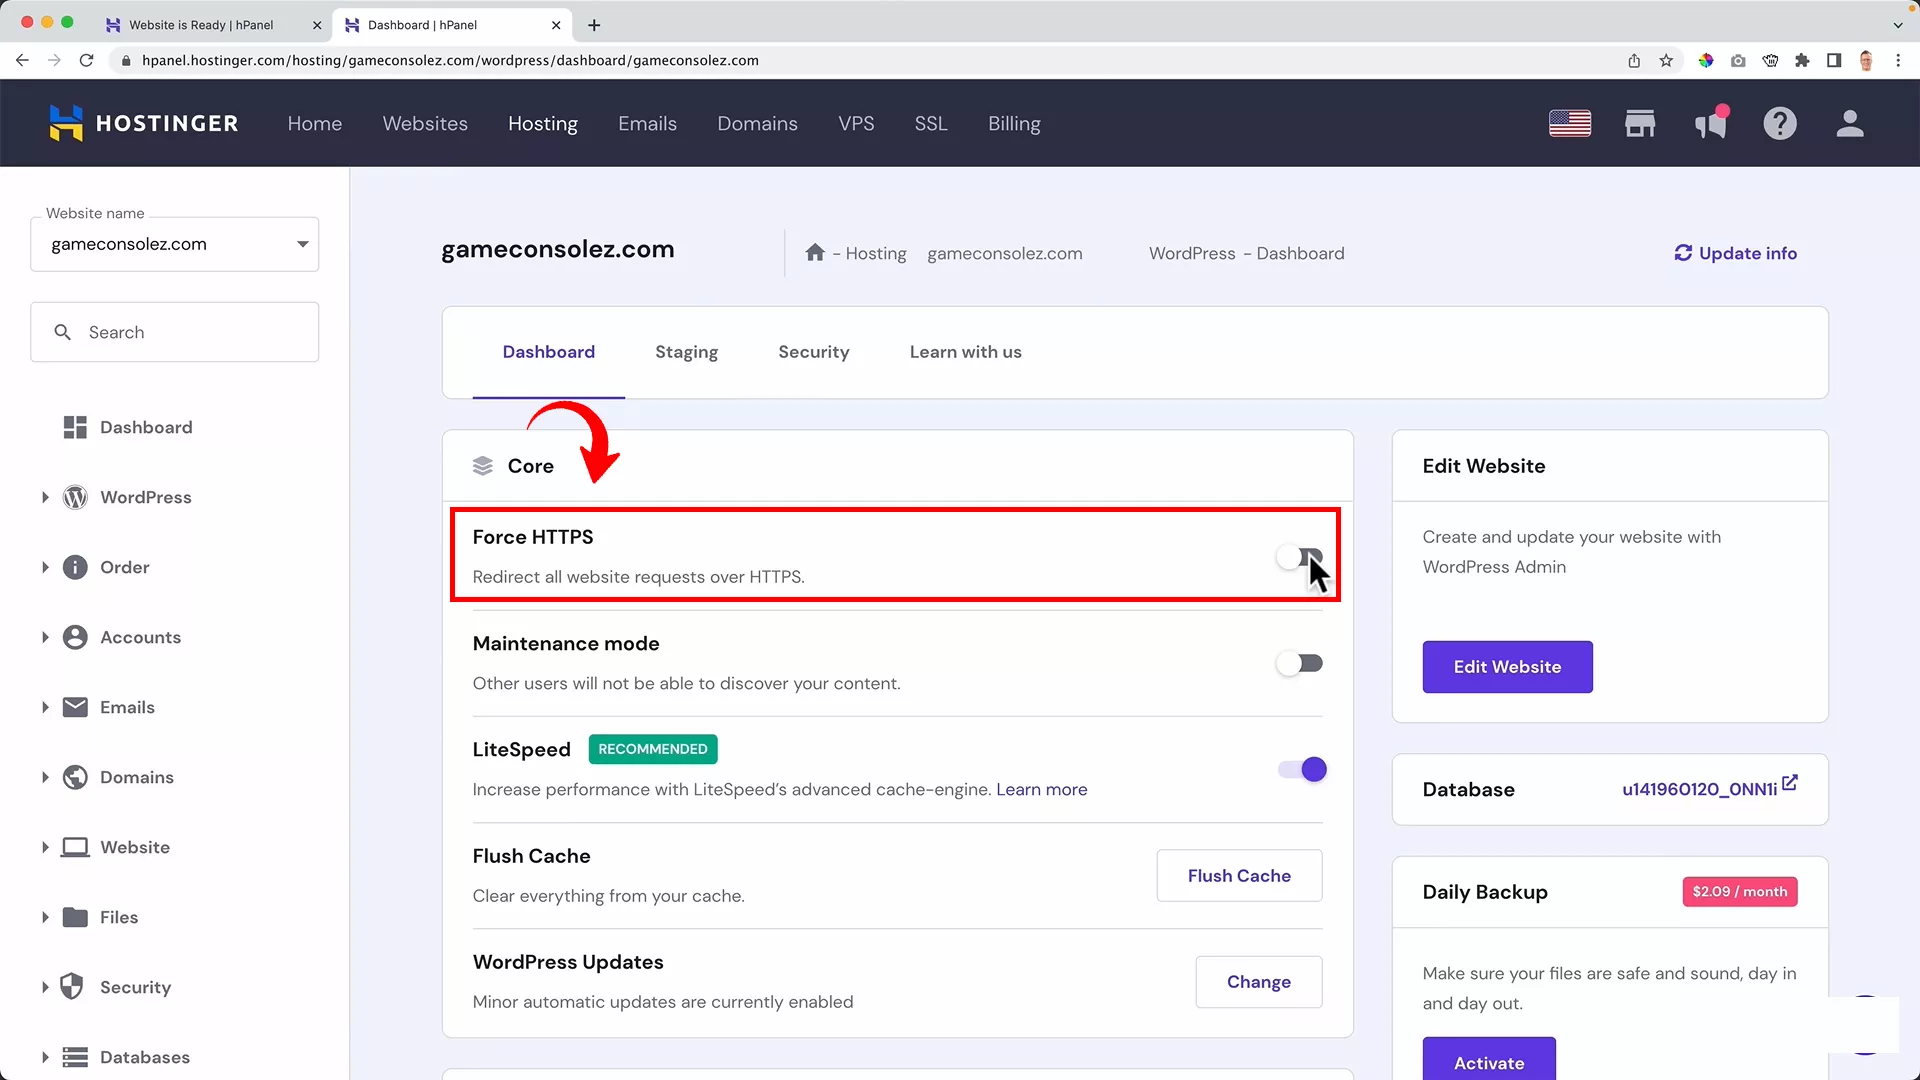
Here, make sure to enable the Force HTTPS toggle on your domain.
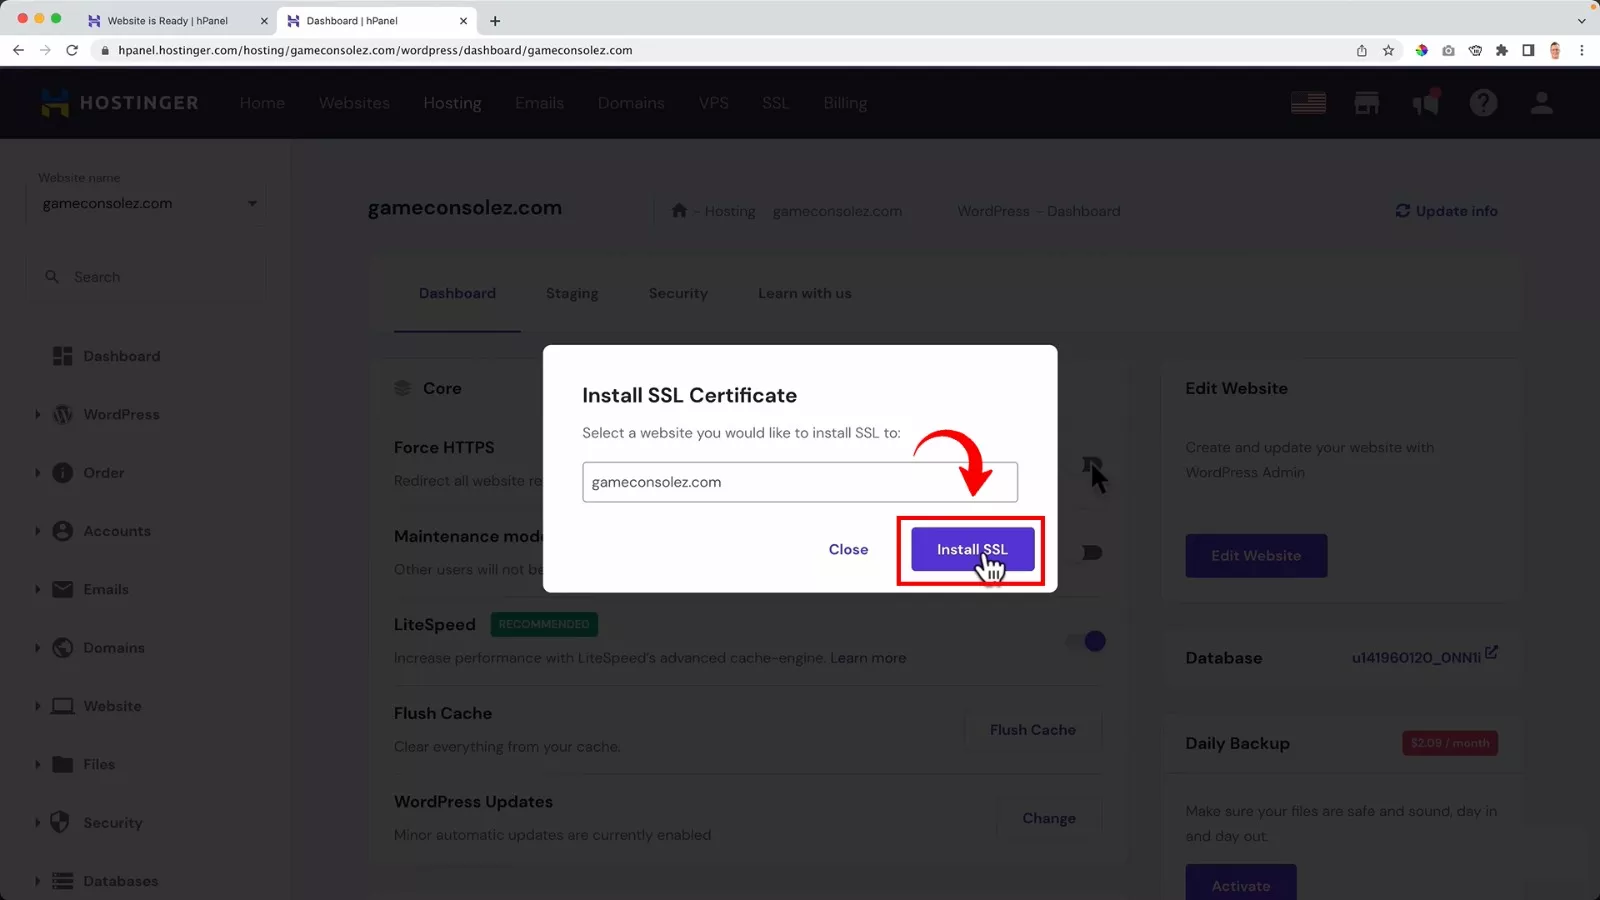
This will prompt a dialog asking you to install SSL on your website. Go ahead and click the Install SSL button.
This step is pivotal for data security and boosting your website’s credibility, not to mention its importance for search engine indexing.
2. Configure your website settings
Great, you’ve secured your website with SSL, and now it’s time to dive into the WordPress dashboard to configure your site settings. Let’s streamline your workspace and set up the essentials for a smooth-sailing online store.
Clear your WordPress dashboard
Start by cleaning up your WordPress dashboard and plugins tab. I always work in a clean environment because it makes me productive and my workflow efficient.
Although many of these pre-installed plugins would be quite useful for your website, you’d want to install them when you need them. Knowing which plugin serves what purpose will allow you to navigate through them when needed and without any confusion.
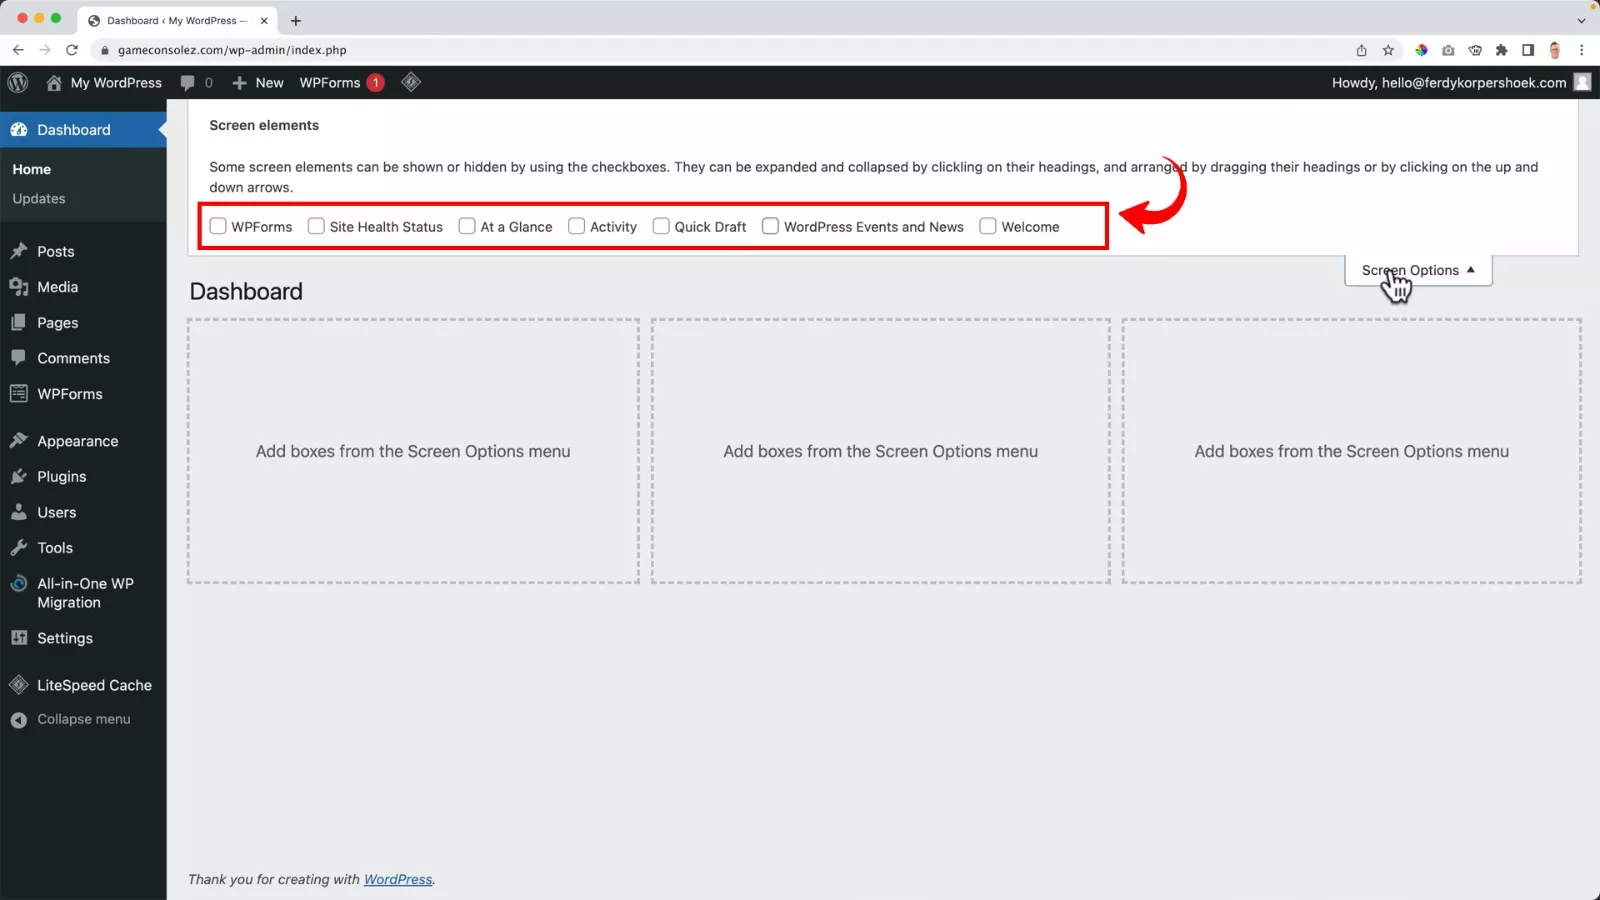
To clear your WordPress dashboard, go to ‘Screen Options’ and uncheck all the boxes to remove the unnecessary widgets.

Next, go to ‘Plugins’, select all, and use ‘Bulk Actions’ to deactivate and delete them.
This ensures you’re starting fresh, without any unnecessary or conflicting plugins.
Change the permalink structure and add a profile
Permalinks play a crucial role in your site’s SEO and user experience. WordPress defaults to a plain permalink structure, which isn’t SEO-friendly.
For example, my website’s permalink structure appears like this:
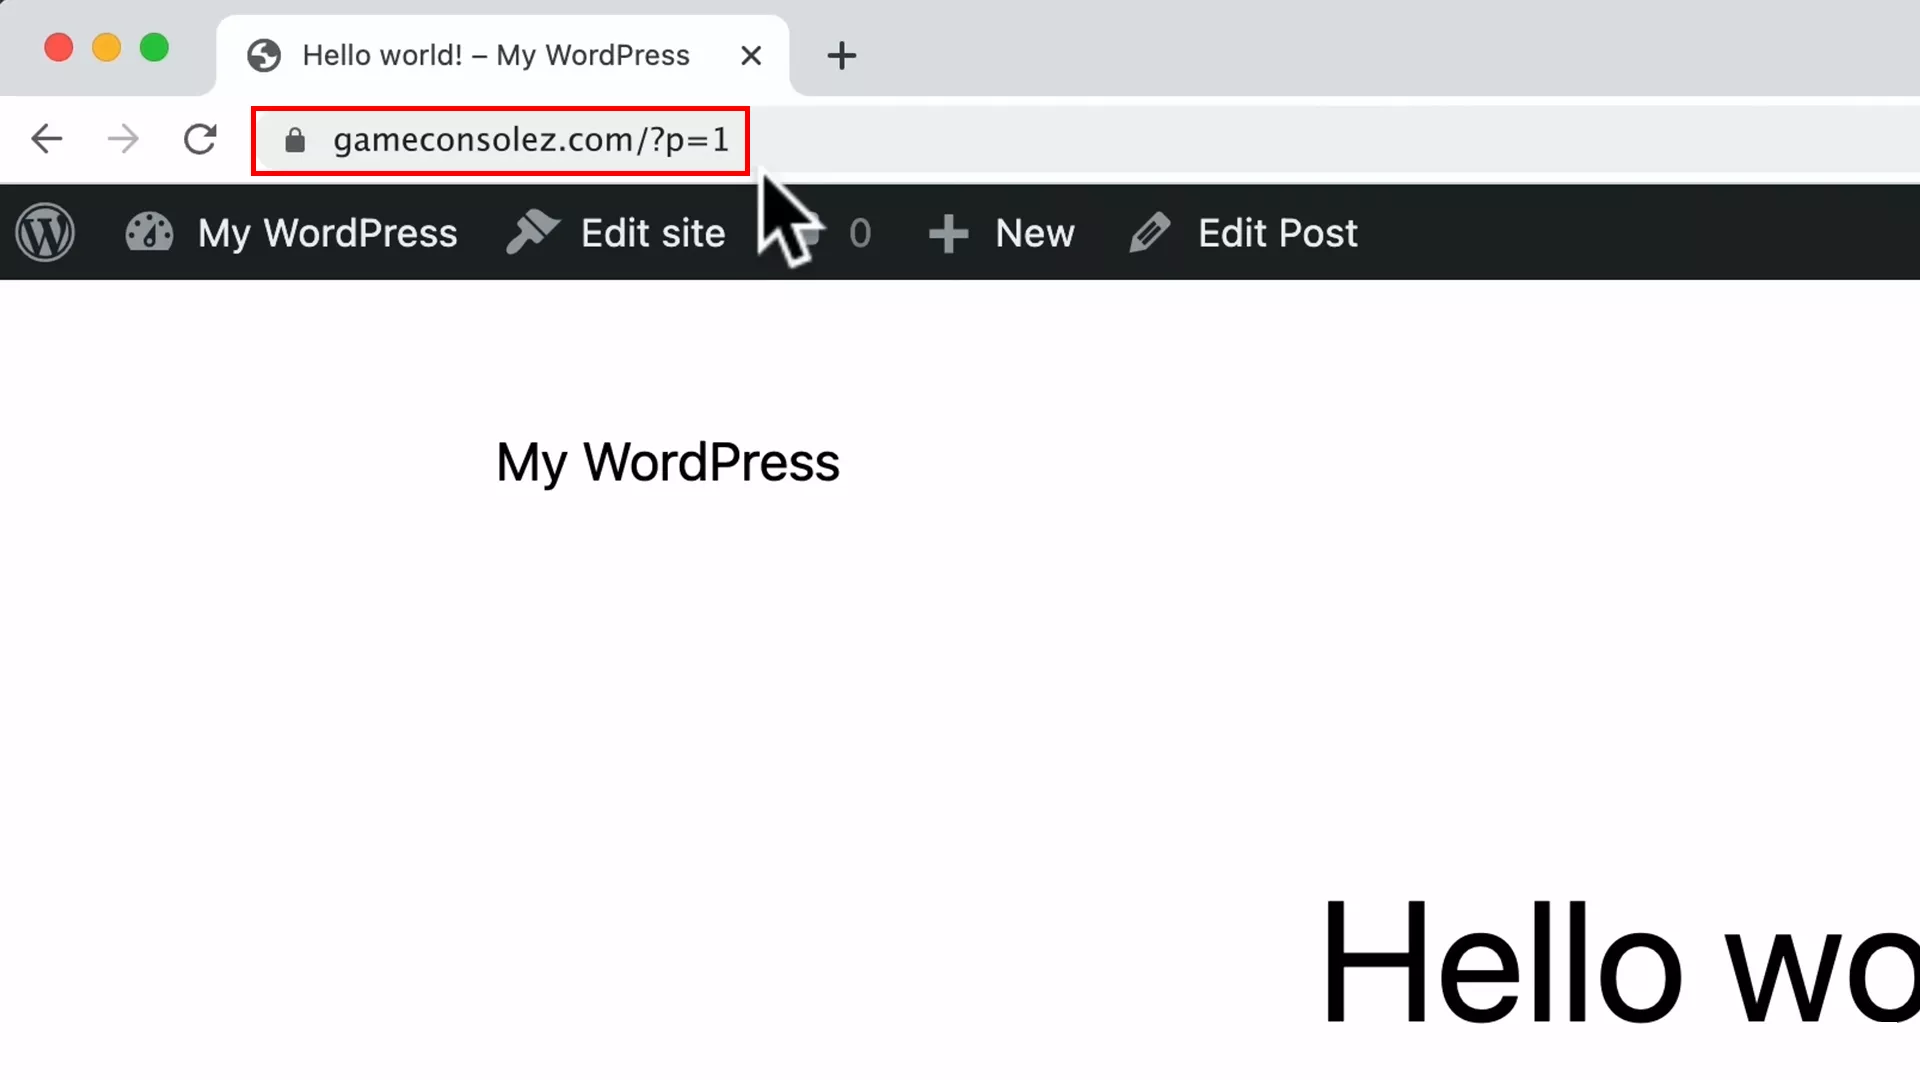
Not appealing, right? Google’s crawlers don’t like that either.
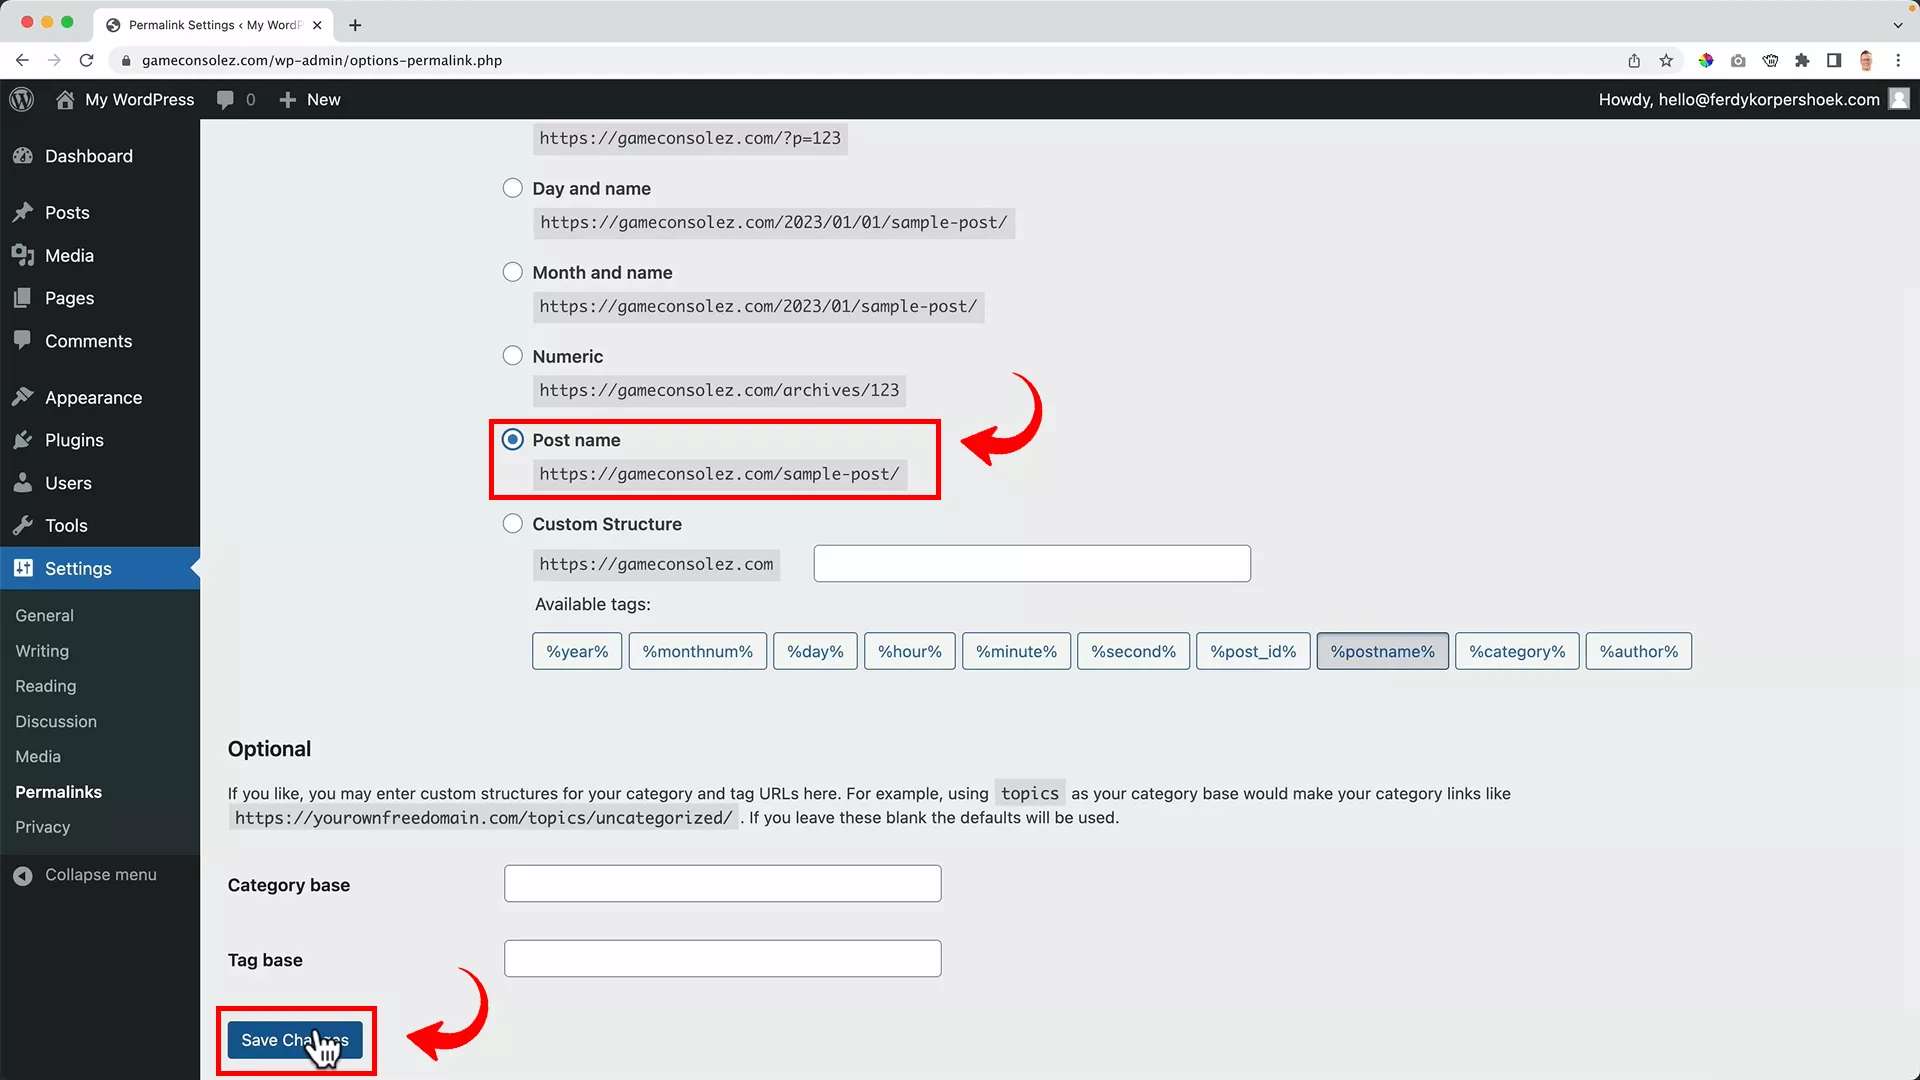
To change this, navigate to ‘Settings’ > ‘Permalinks’ and switch from the default ‘Plain’ to ‘Post name’. This makes your URLs more readable and SEO-friendly.
There is still one small change you must make to get this page ready for publishing.
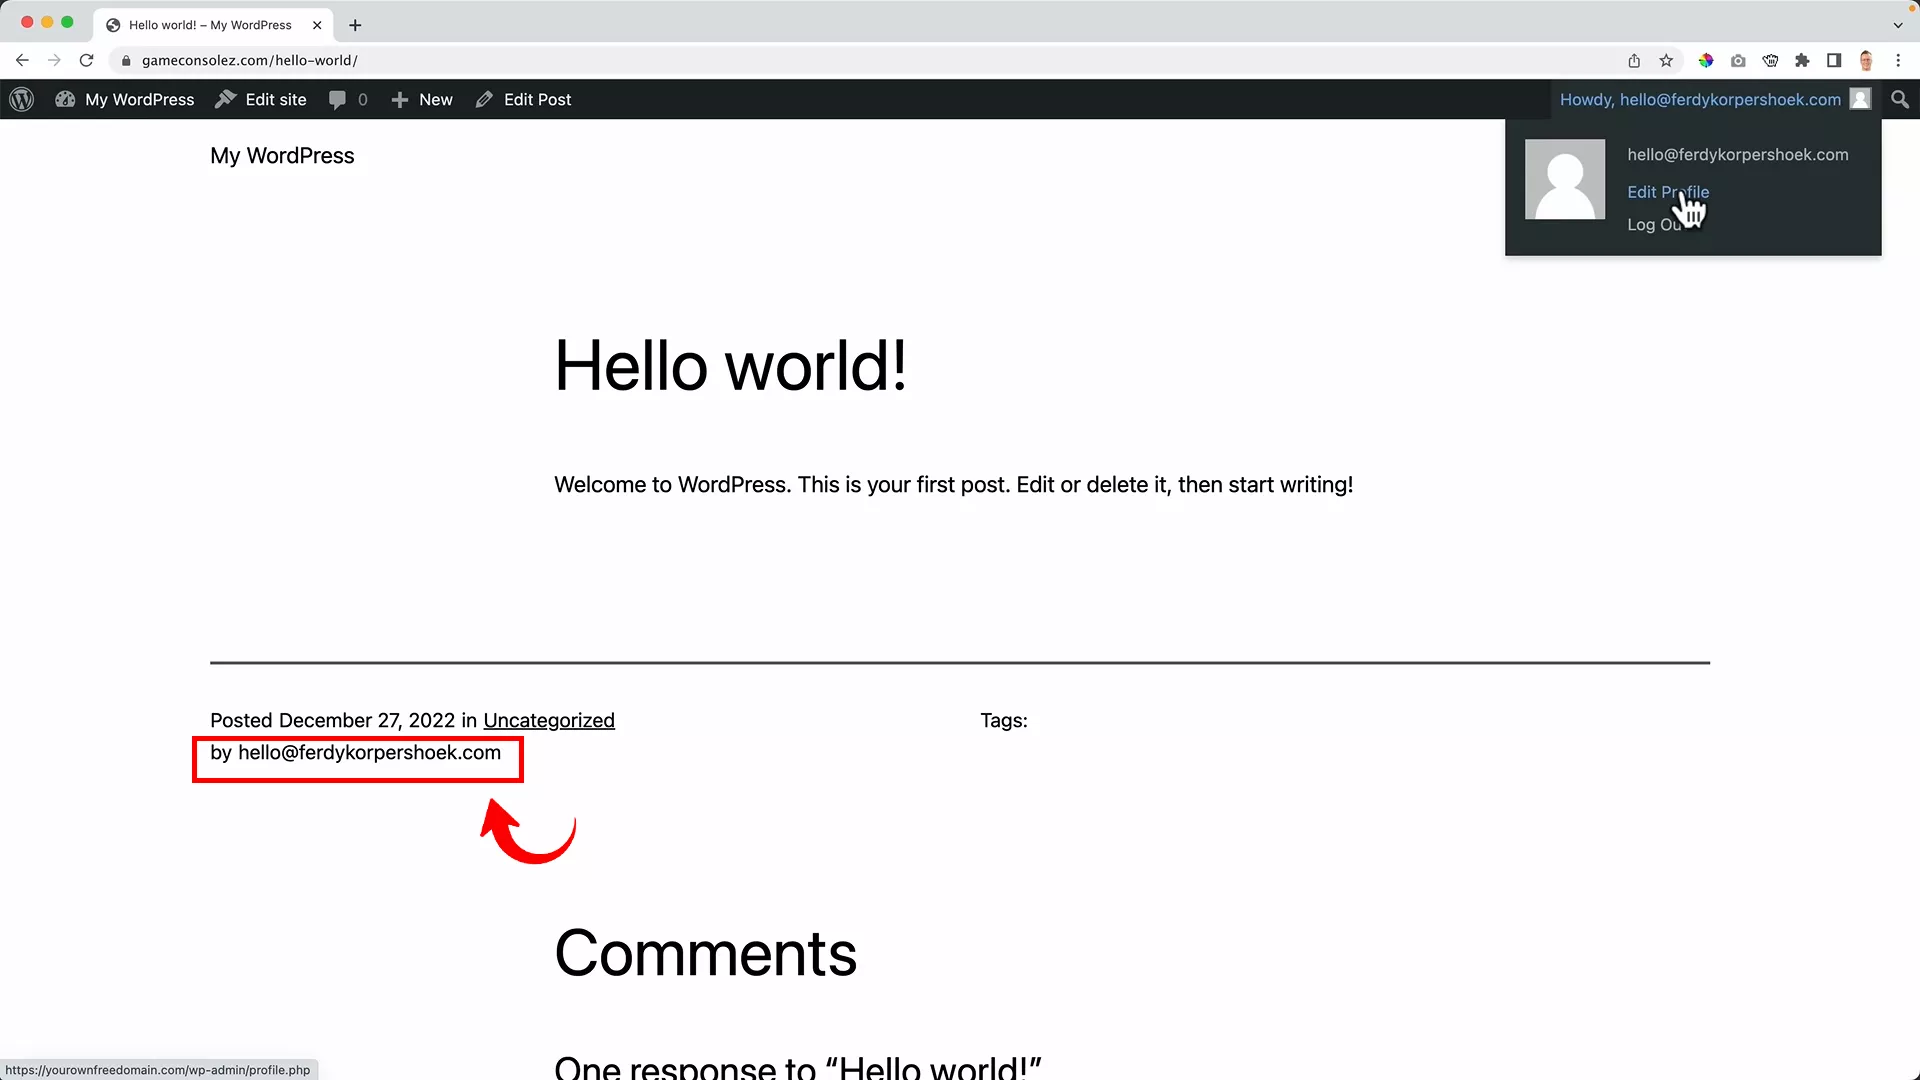
Right now, you’ll notice that your email address appears as the publisher of the blog.
To change this, head to your profile on the toolbar at the top and click ‘Edit Profile’.
From here, you can upload your details, including your first and last name, and add a picture to finalize your profile.
Finally, head to the settings again, and set up your site title, tagline, timezone, the start of your weekday, and your site language from ‘General settings’.
Ferdy’s Fundamentals: What is a site title?
A site title is the identity of your website. It’s what appears in search engine results and browser tabs. It should be descriptive, SEO-friendly, and reflective of your brand and the products you’re selling. Think of it as the first impression you make on your potential customers.
Get a theme for your website
Alright, let’s talk about making your website look stunning. The theme you choose is crucial because it dictates the look and feel of your site.
WordPress comes with some default themes, but if you want more pizzazz and functionality, you might be tempted to go for a premium theme.
However, I’ve got a fantastic tip for you – a theme that offers premium features for free!
Meet Blocksy – a theme that stands out with its premium-like features, all available in its free version. It’s a game-changer, especially if you’re just stepping into the world of web design.
What makes Blocksy so great? Well, it’s similar to some paid themes like Divi, known for their user-friendly drag-and-drop functionality.
For beginners, Blocksy is a no-brainer. It simplifies creating a professional-looking website without overwhelming you with complexities.
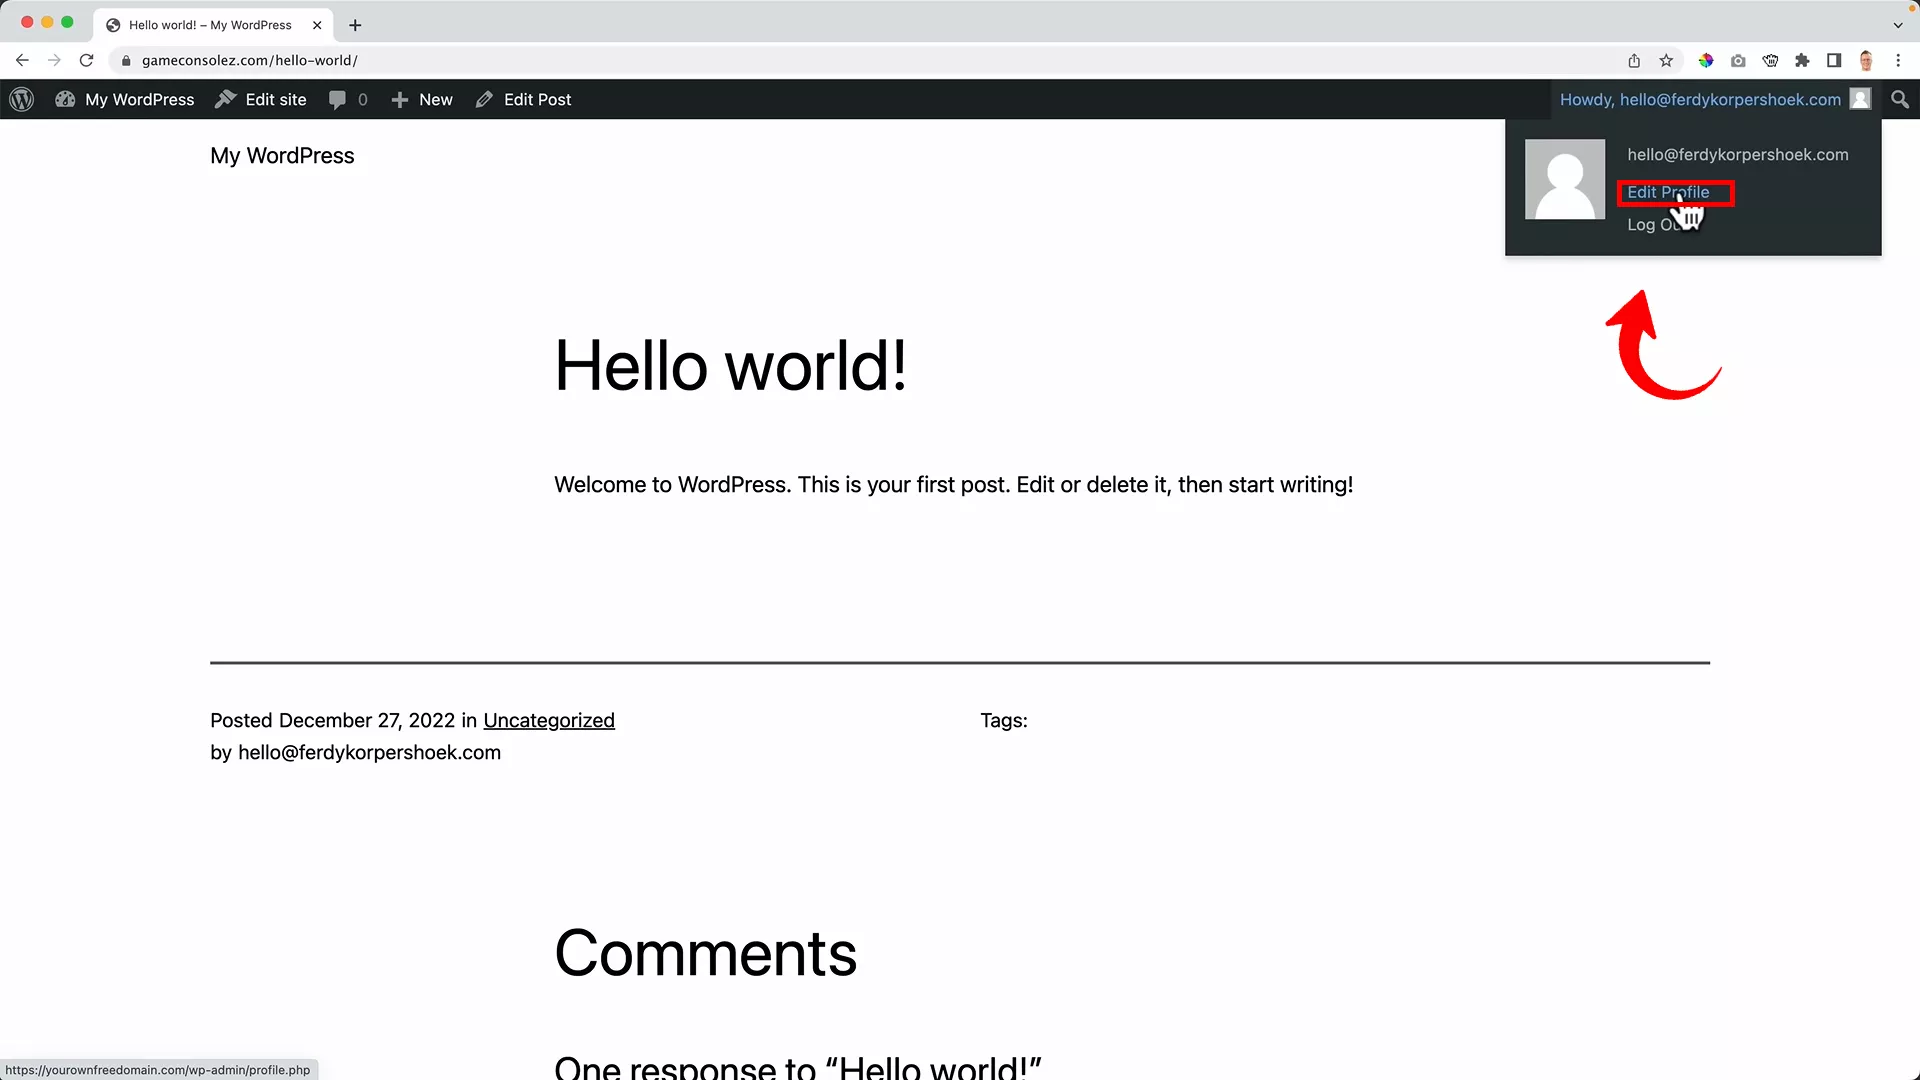
Getting Blocksy set up on your site is a breeze. Here’s how you do it:
From your WordPress dashboard, navigate to the left panel, click ‘Appearance,’ and then ‘Themes.’ Click ‘Add New’ at the top and search ‘Blocksy’.
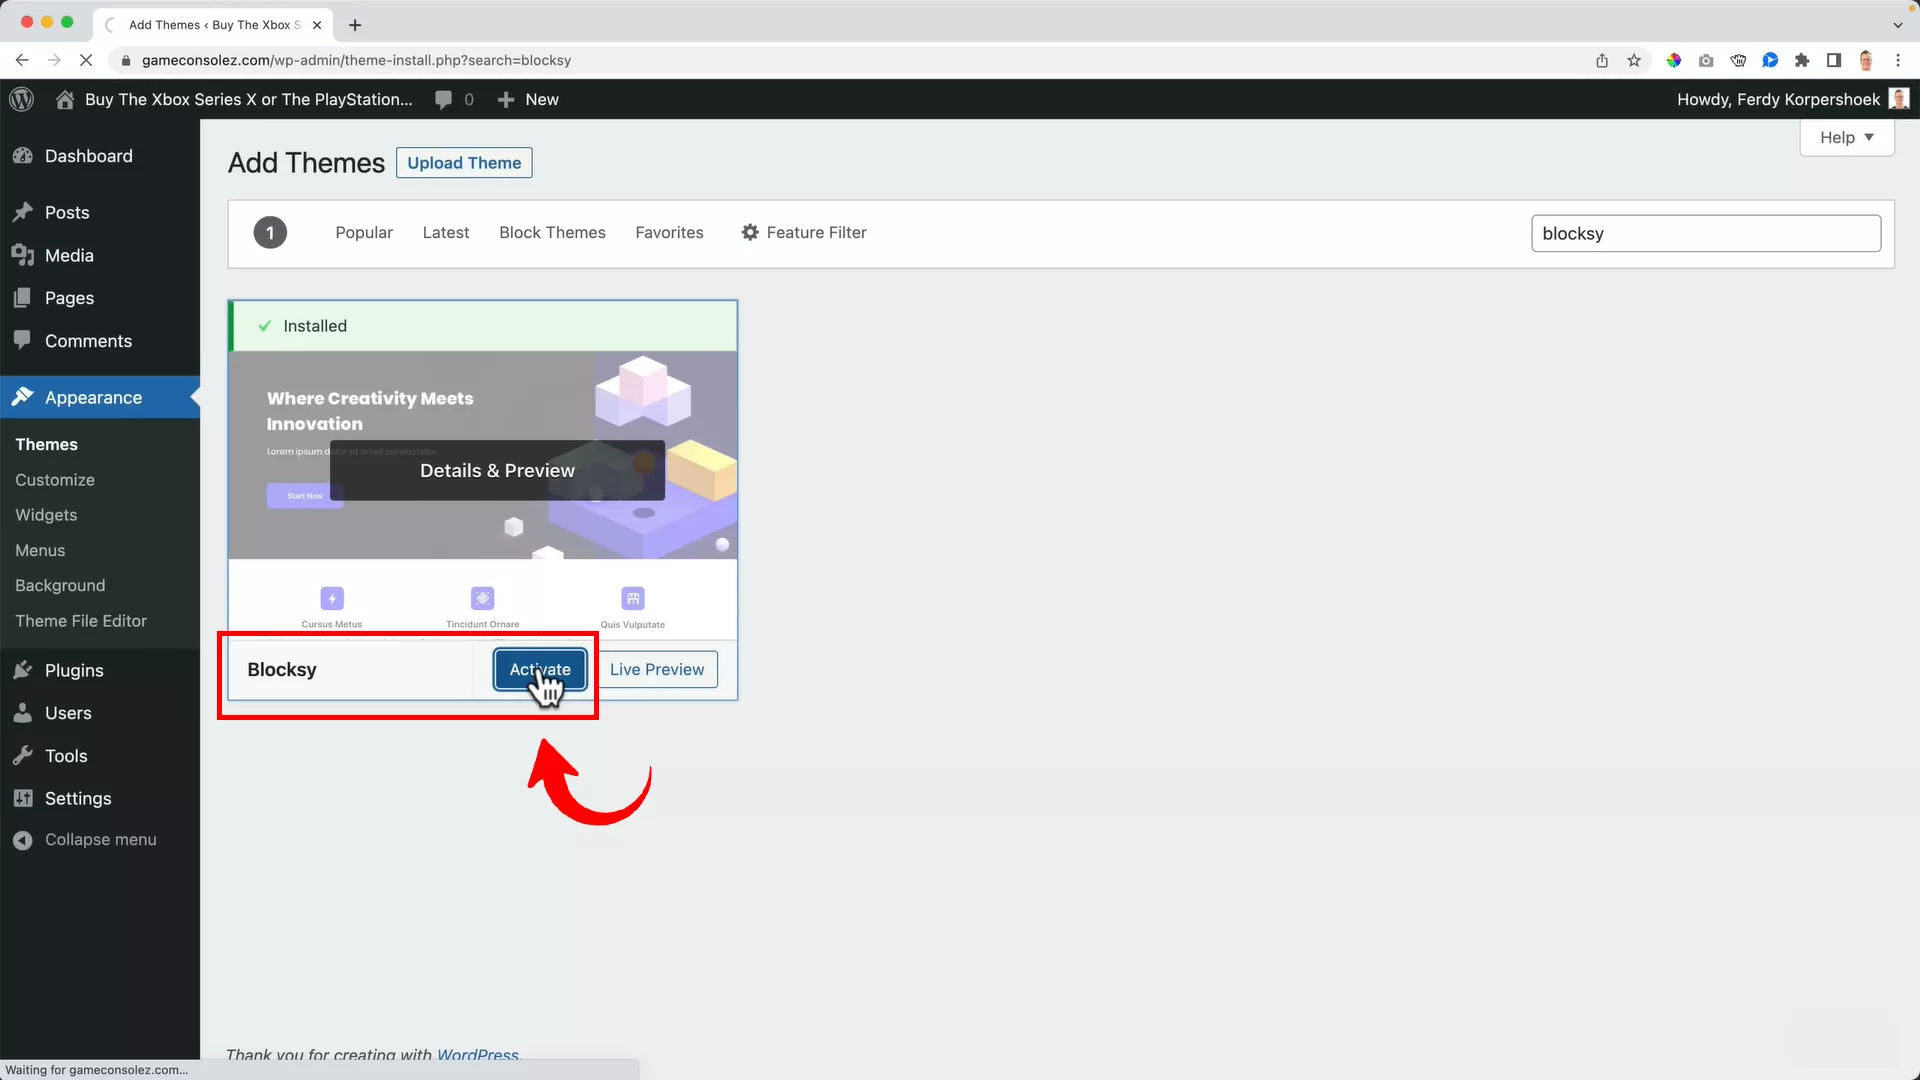
You’ll see Blocksy in the search results. Go ahead and click ‘Install’ and then ‘Activate’.
Once activated, Blocksy adds a companion button to your left panel, opening up a world of design possibilities. I recommend installing that too. It’s like getting a premium theme experience without spending a dime.
Now, when you visit your site with Blocksy activated, you’ll notice a difference right away. Check out how it looks for my demo website:
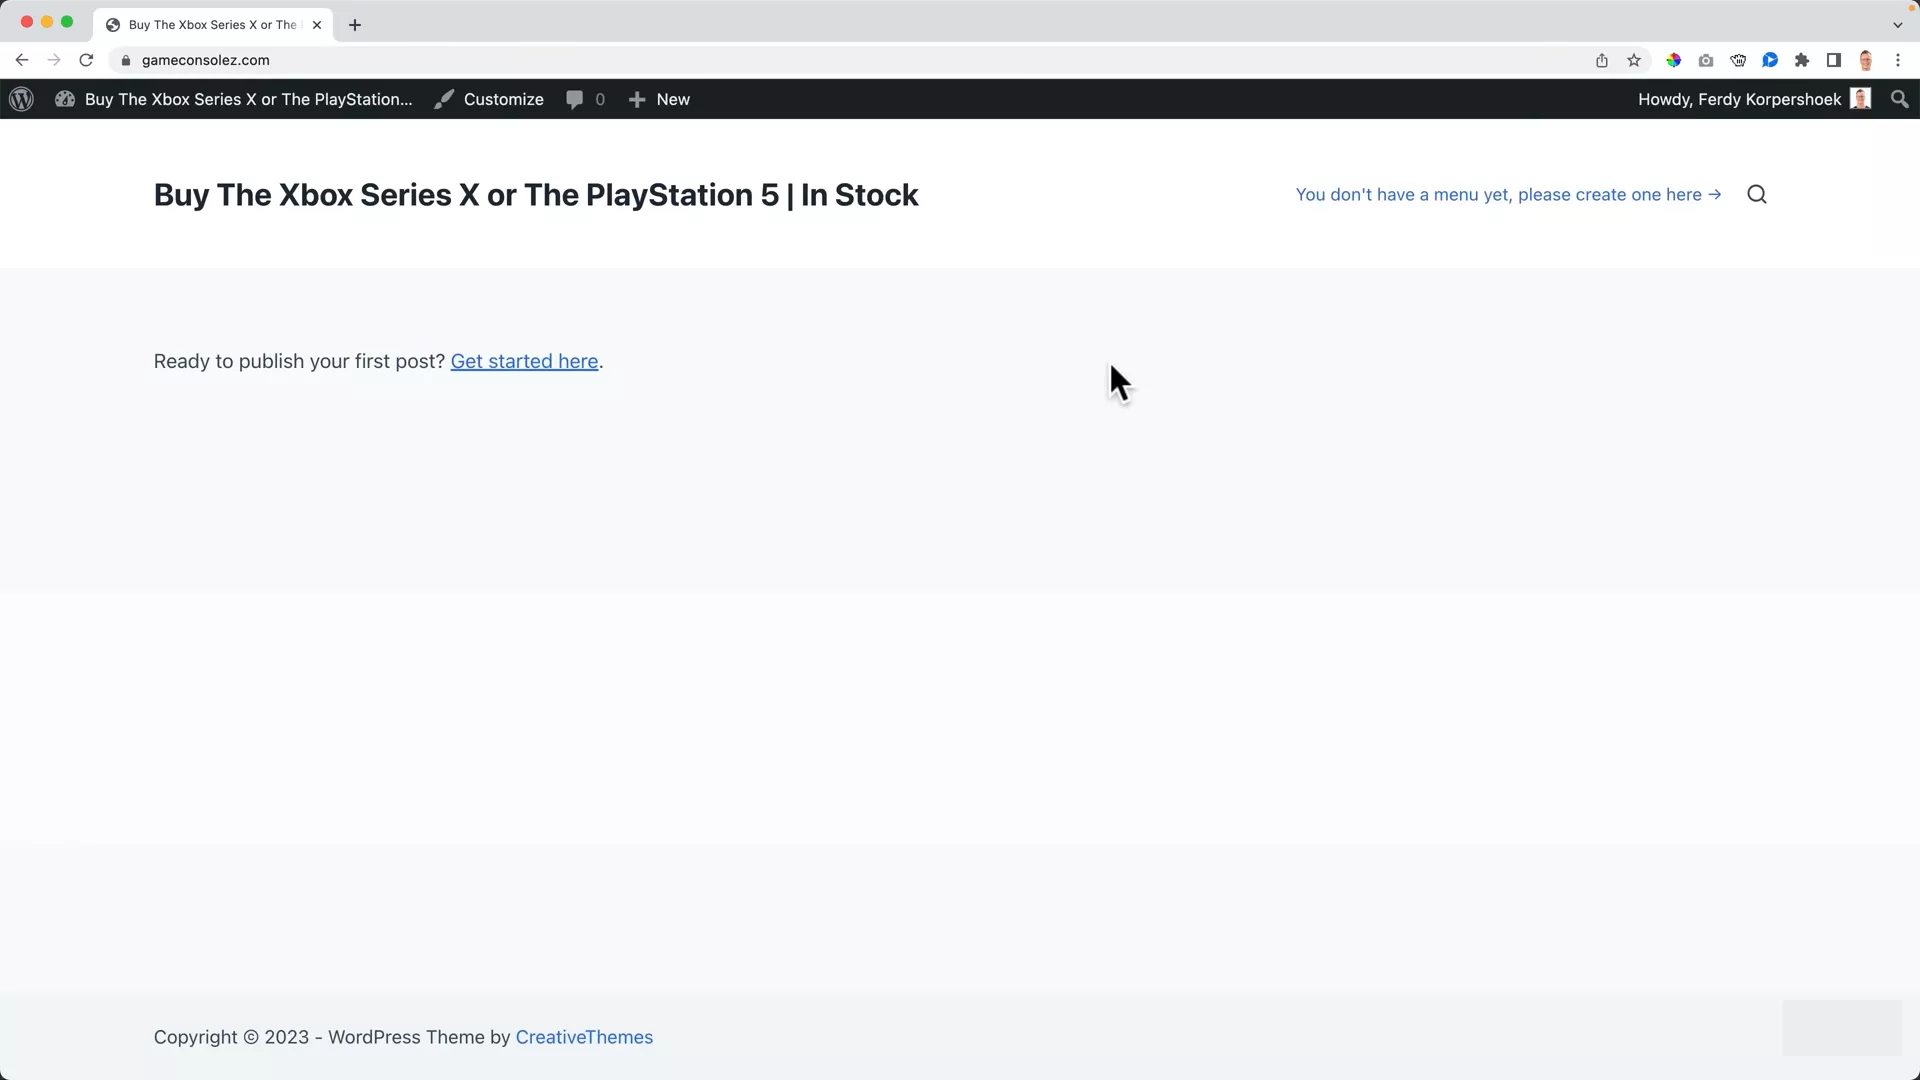
It might not be the final look you aim for, but it’s a solid and more appealing starting point than the standard WordPress themes.
3. Establish your brand identity
Great! You’ve got your site set up and a theme ready. Now, it’s time to dive into the branding phase, where you’ll give your online store its unique brand identity. This step is crucial in differentiating your store from competitors and making it resonate with your target audience.
Upload your logo and favicon
Your logo is the face of your brand, so let’s start there. Don’t have a logo yet? No worries! You can create one easily using free tools like Canva or professional tools like Photoshop.
Check out my YouTube tutorial below for a step-by-step guide on designing a logo.
Whether you choose a simple text-based logo or something more intricate, ensure it reflects your store’s essence.
Once your logo and favicon (the small icon that appears on browser tabs) are ready, it’s time to upload them to your website.
In WordPress, go to the toolbar and click on ‘Customize’.
This will open the Blocksy editor. Here, click on the three dots next to your site title to access the header settings. From this panel, you can upload your logo, adjust its size, and even remove the site title for a cleaner look.
Pro tip: Don’t forget to upload your favicon under ‘Site Identity’ for that extra touch of professionalism.
Select the right color palette
The color scheme of your website is a big part of your brand identity. Most online stores opt for a minimalist design with a white background, but your choices may vary depending on your niche.
For example, I am creating an online store in the gaming niche. Gaming stores often use dark themes with complementary accent colors.
Before finalizing your colors, I recommend doing some competitor research. See what works in your industry and think about how you can make your store stand out.
To select your color palette, you can use a handy free Chrome extension called ColorPick Eyedropper to match colors perfectly.
For my demo site, I used the colors from my logo as the primary colors for my website.
You can set these in Blocksy’s ‘Colors’ section, accessible from the left panel in the Blocksy editor.
Your store’s design is more than just aesthetics. It’s about creating an enjoyable shopping experience for your customers. So take your time with this step, and make sure every design choice aligns with your brand and customers’ expectations.
4. Install and configure WooCommerce
Now that your website’s aesthetics are in place, it’s time for the exciting part – turning your website into a fully functional webshop. This transformation is made possible with the WooCommerce plugin, renowned for its robustness and popularity in the eCommerce space.
Let’s walk through the installation and configuration process.
On your WordPress dashboard, go to the ‘Plugins’ section and click ‘Add New’.
In the search bar, type in ‘WooCommerce’. You’ll notice this plugin has a significant number of installations and positive reviews, a testament to its reliability.
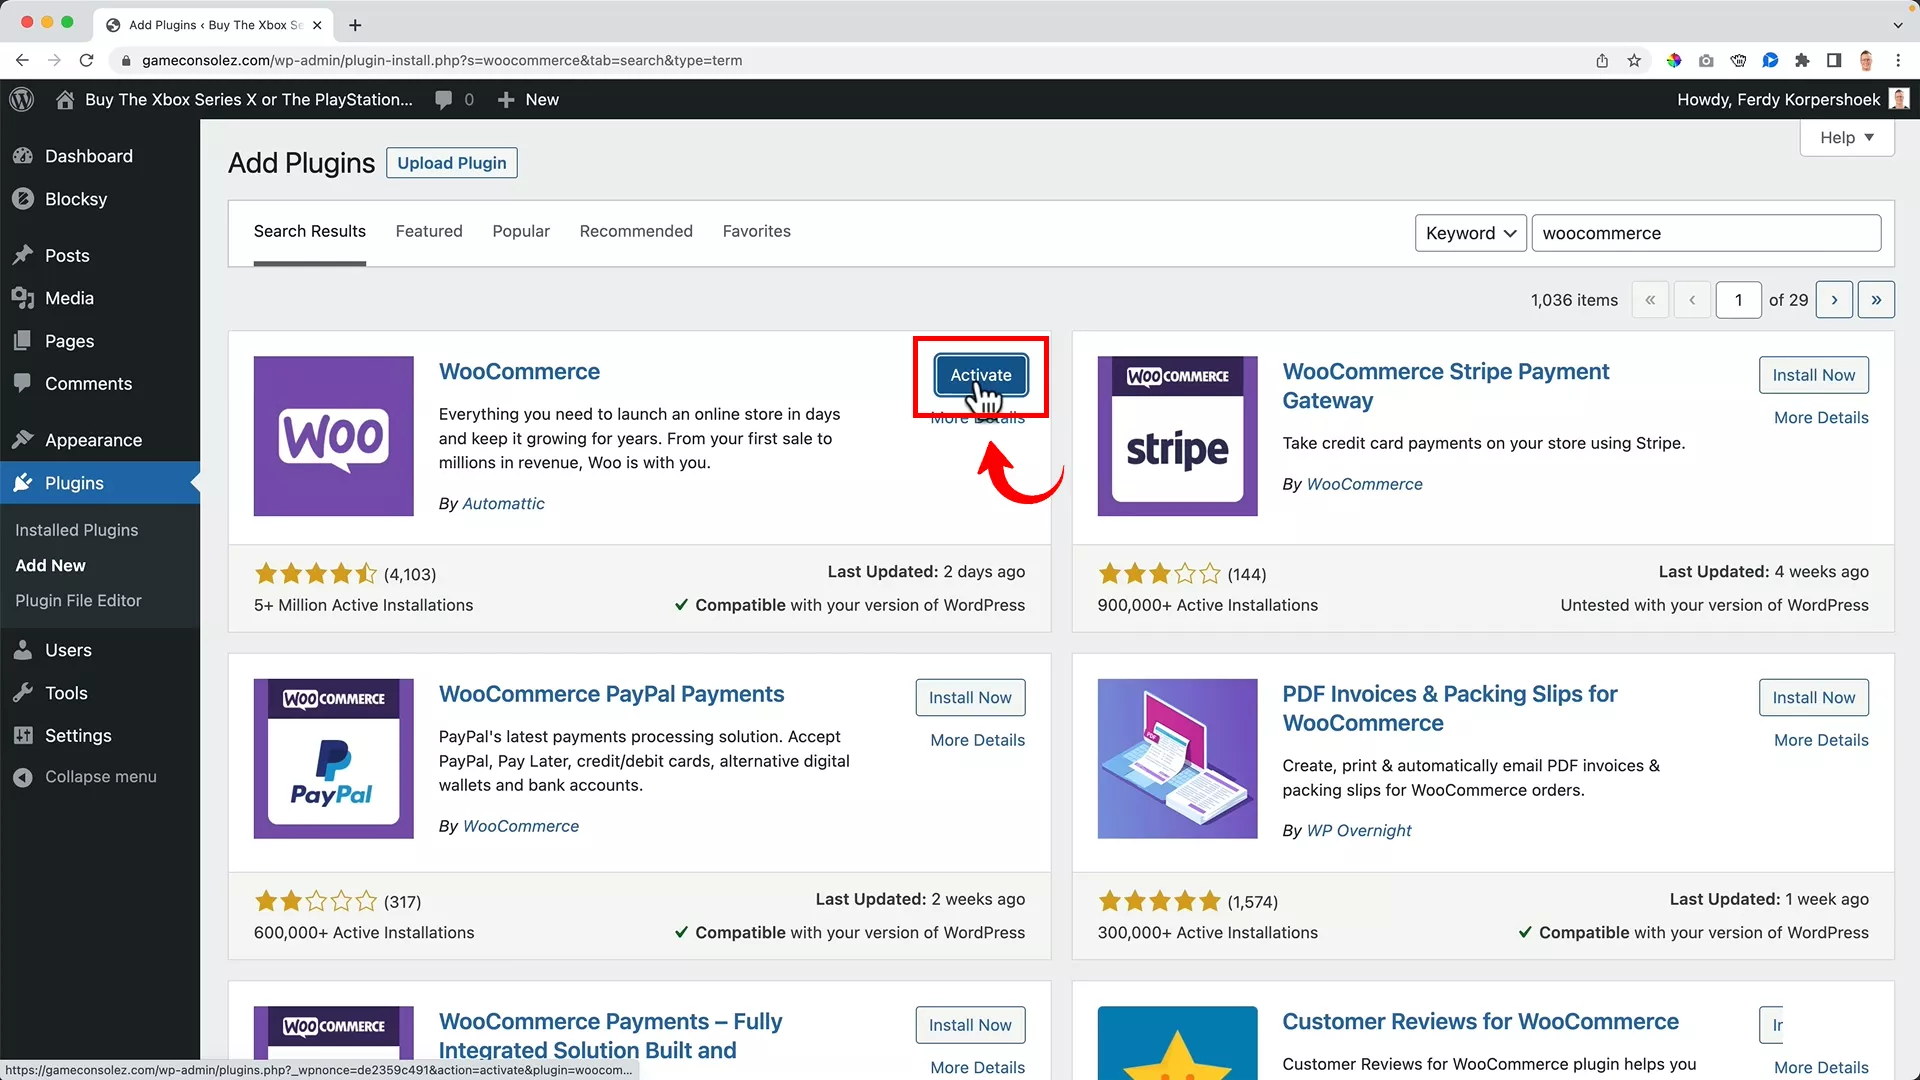
Click ‘Install Now’ followed by ‘Activate’.
Once activated, WooCommerce will prompt you to fill in details about your business.
In case you don’t see the setup form immediately:
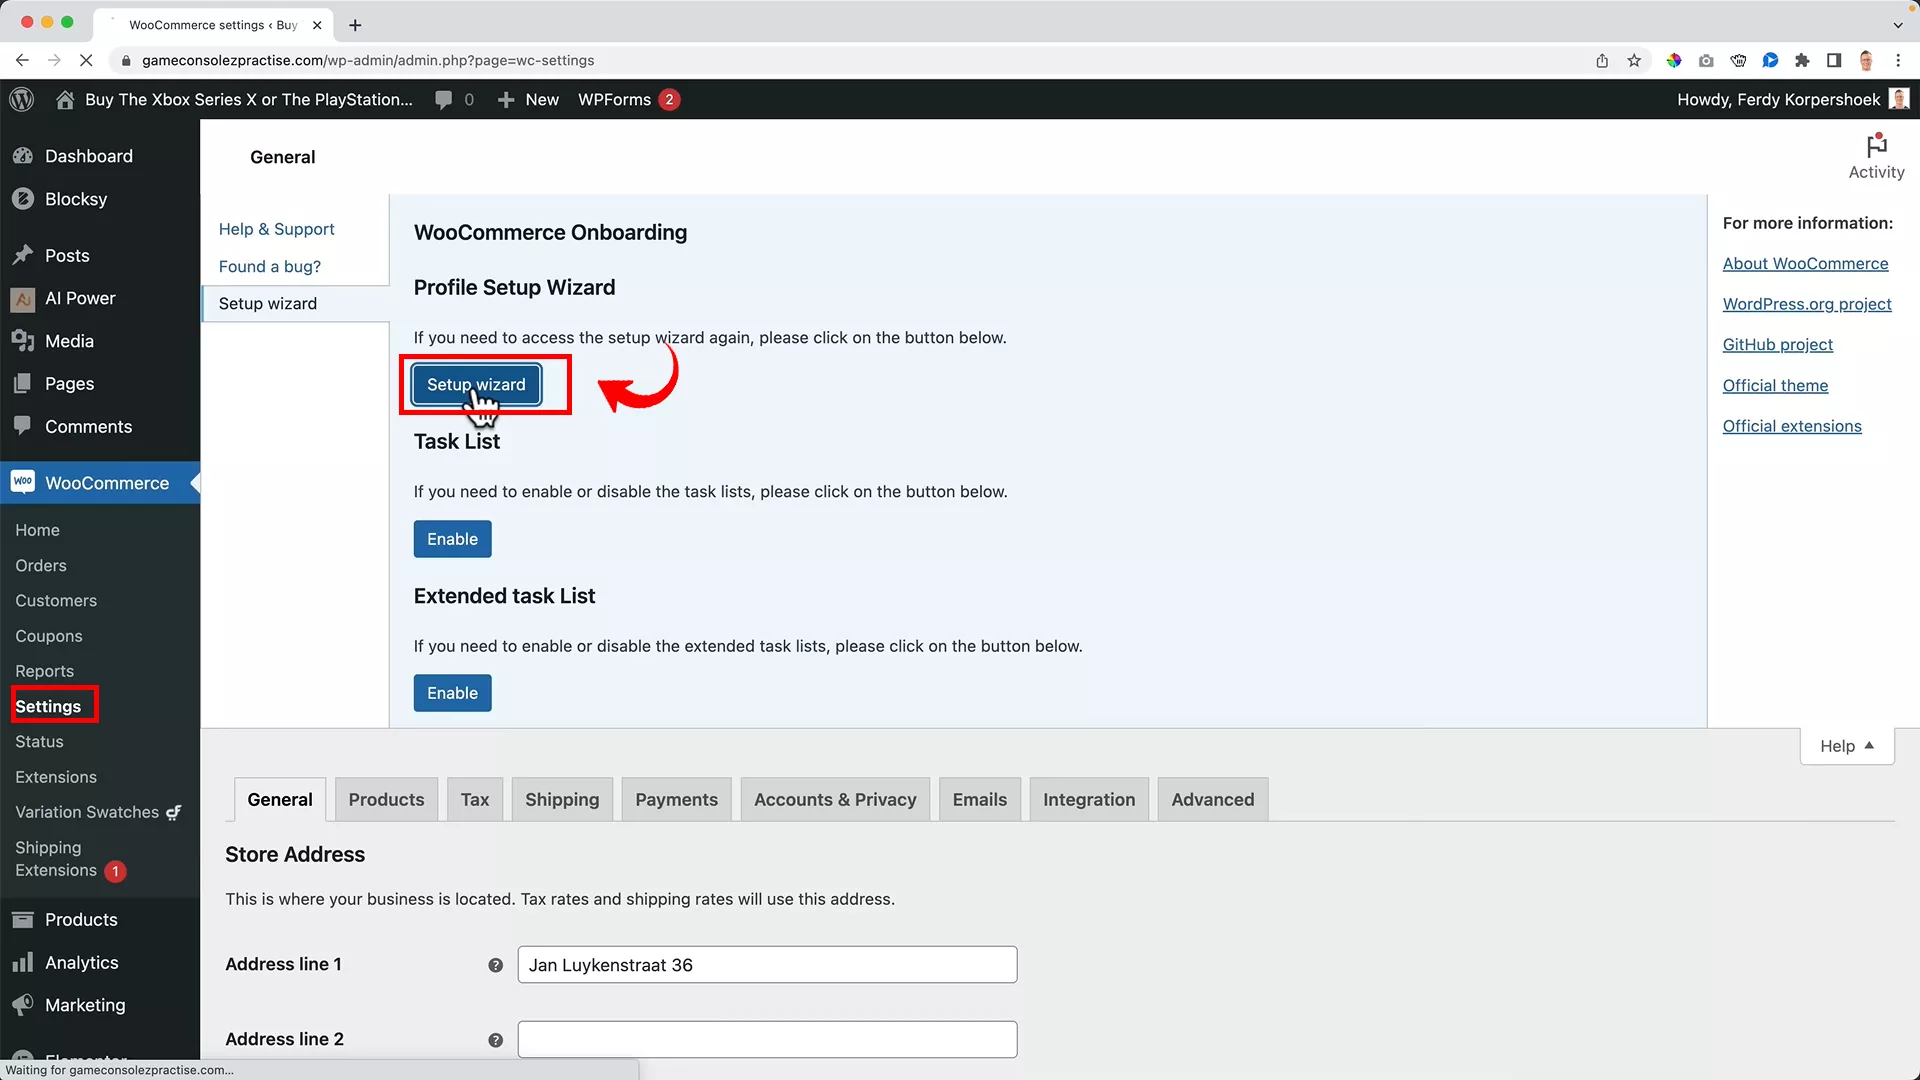
Go to ‘Settings’, navigate to the ‘Help & Support’ section, then click the ‘Setup wizard’ button to run the setup.
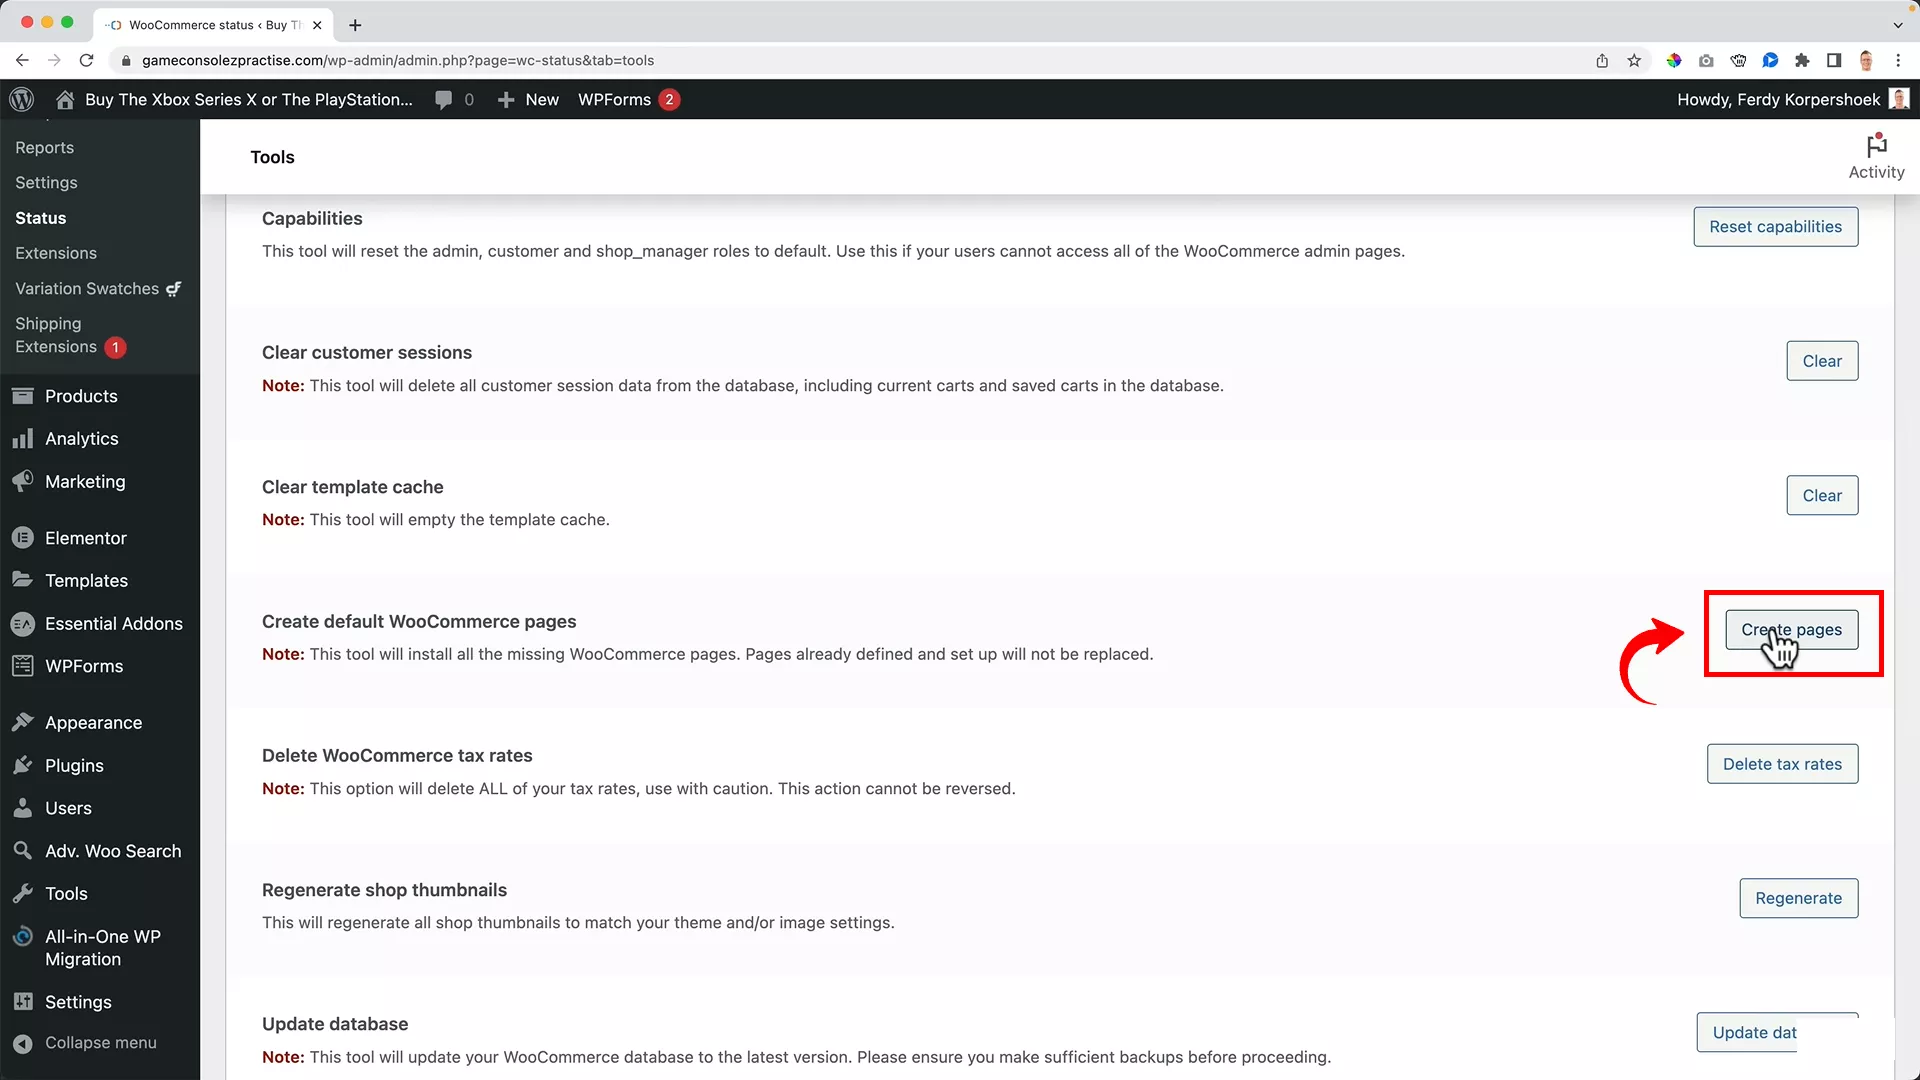
Navigate to ‘WooCommerce’ > ‘Status’ > ‘Tools’ tab. Scroll down and click on the ‘Create pages’ button next to the ‘Create default WooCommerce pages’ option.
This action automatically adds essential pages to your site, including Cart, Checkout, My Account, and Shop.
It’s best to skip the option to add recommended business features, as I’ll guide you through adding them manually later.
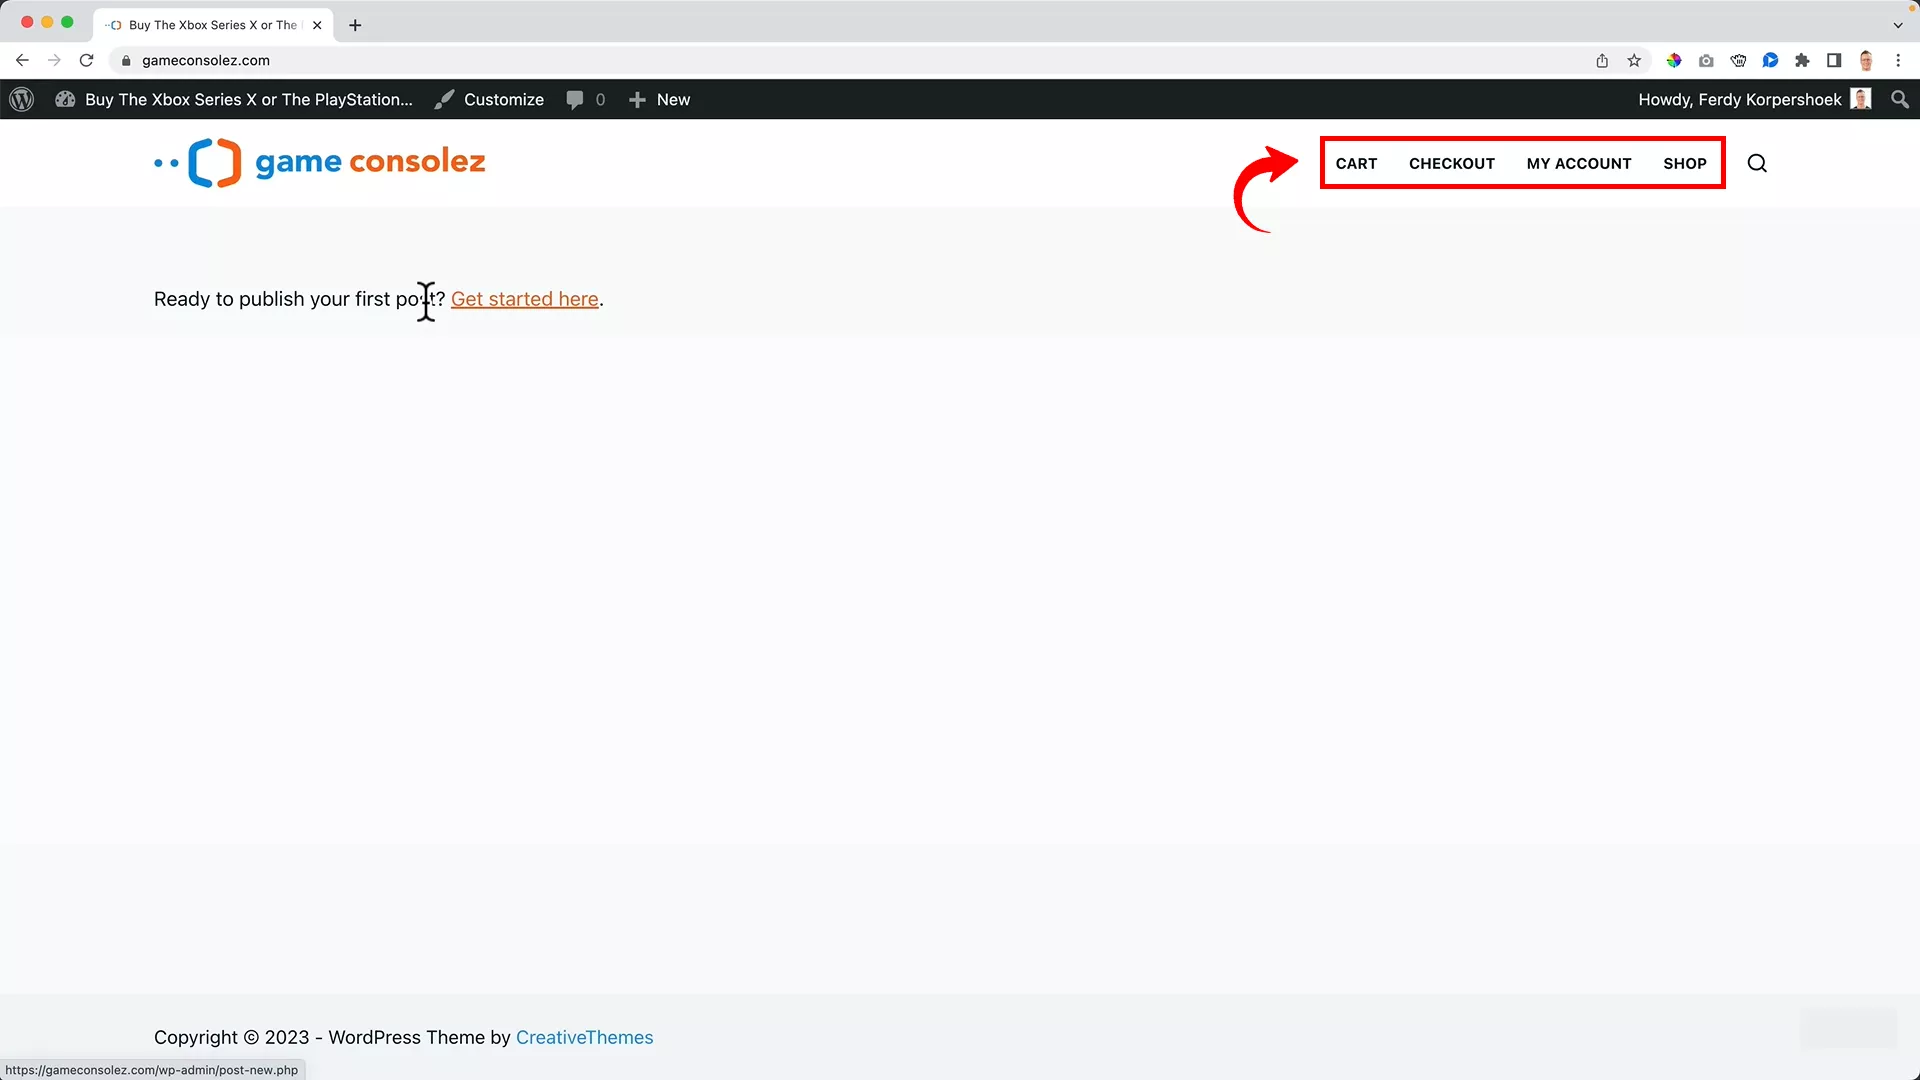
Set your homepage to display your shop
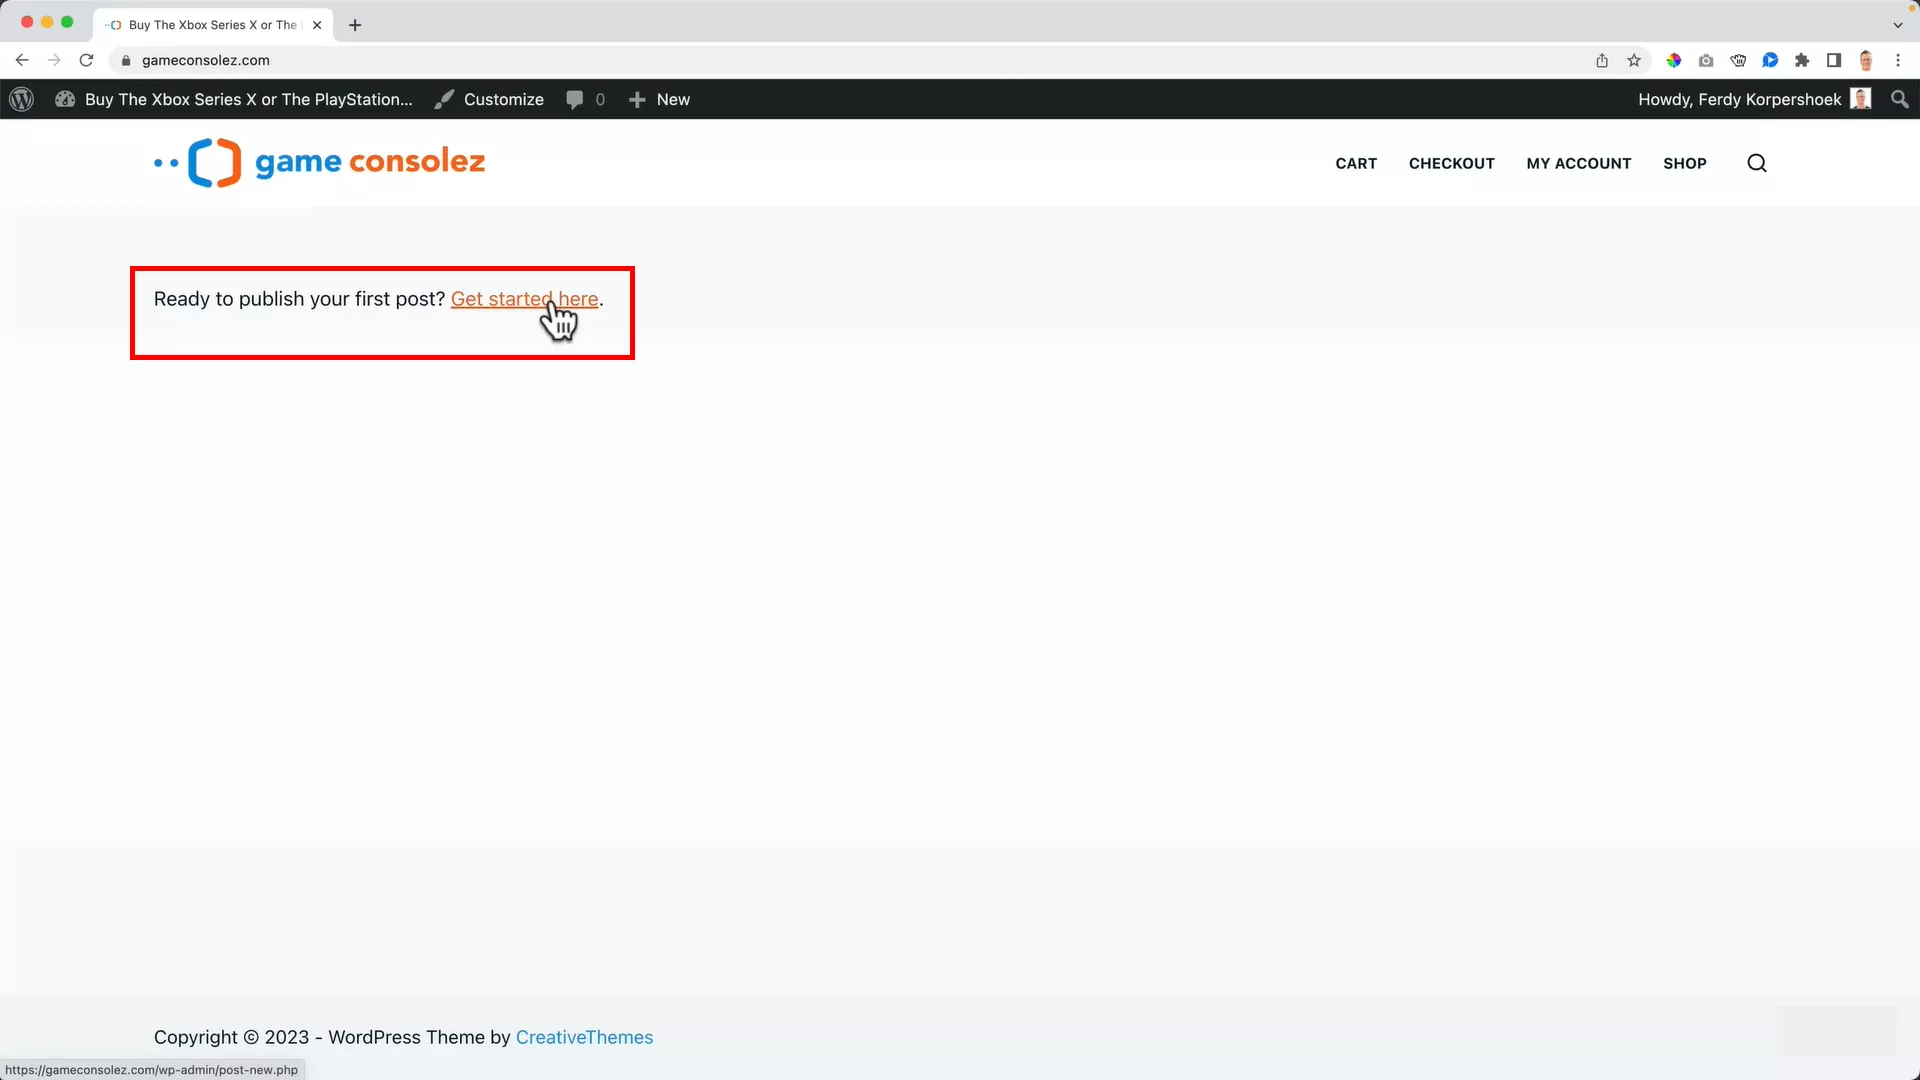
Your homepage should ideally showcase your shop. Since WordPress was built for content management, the homepage is set to display your latest posts (see the image above).
Let’s change that:
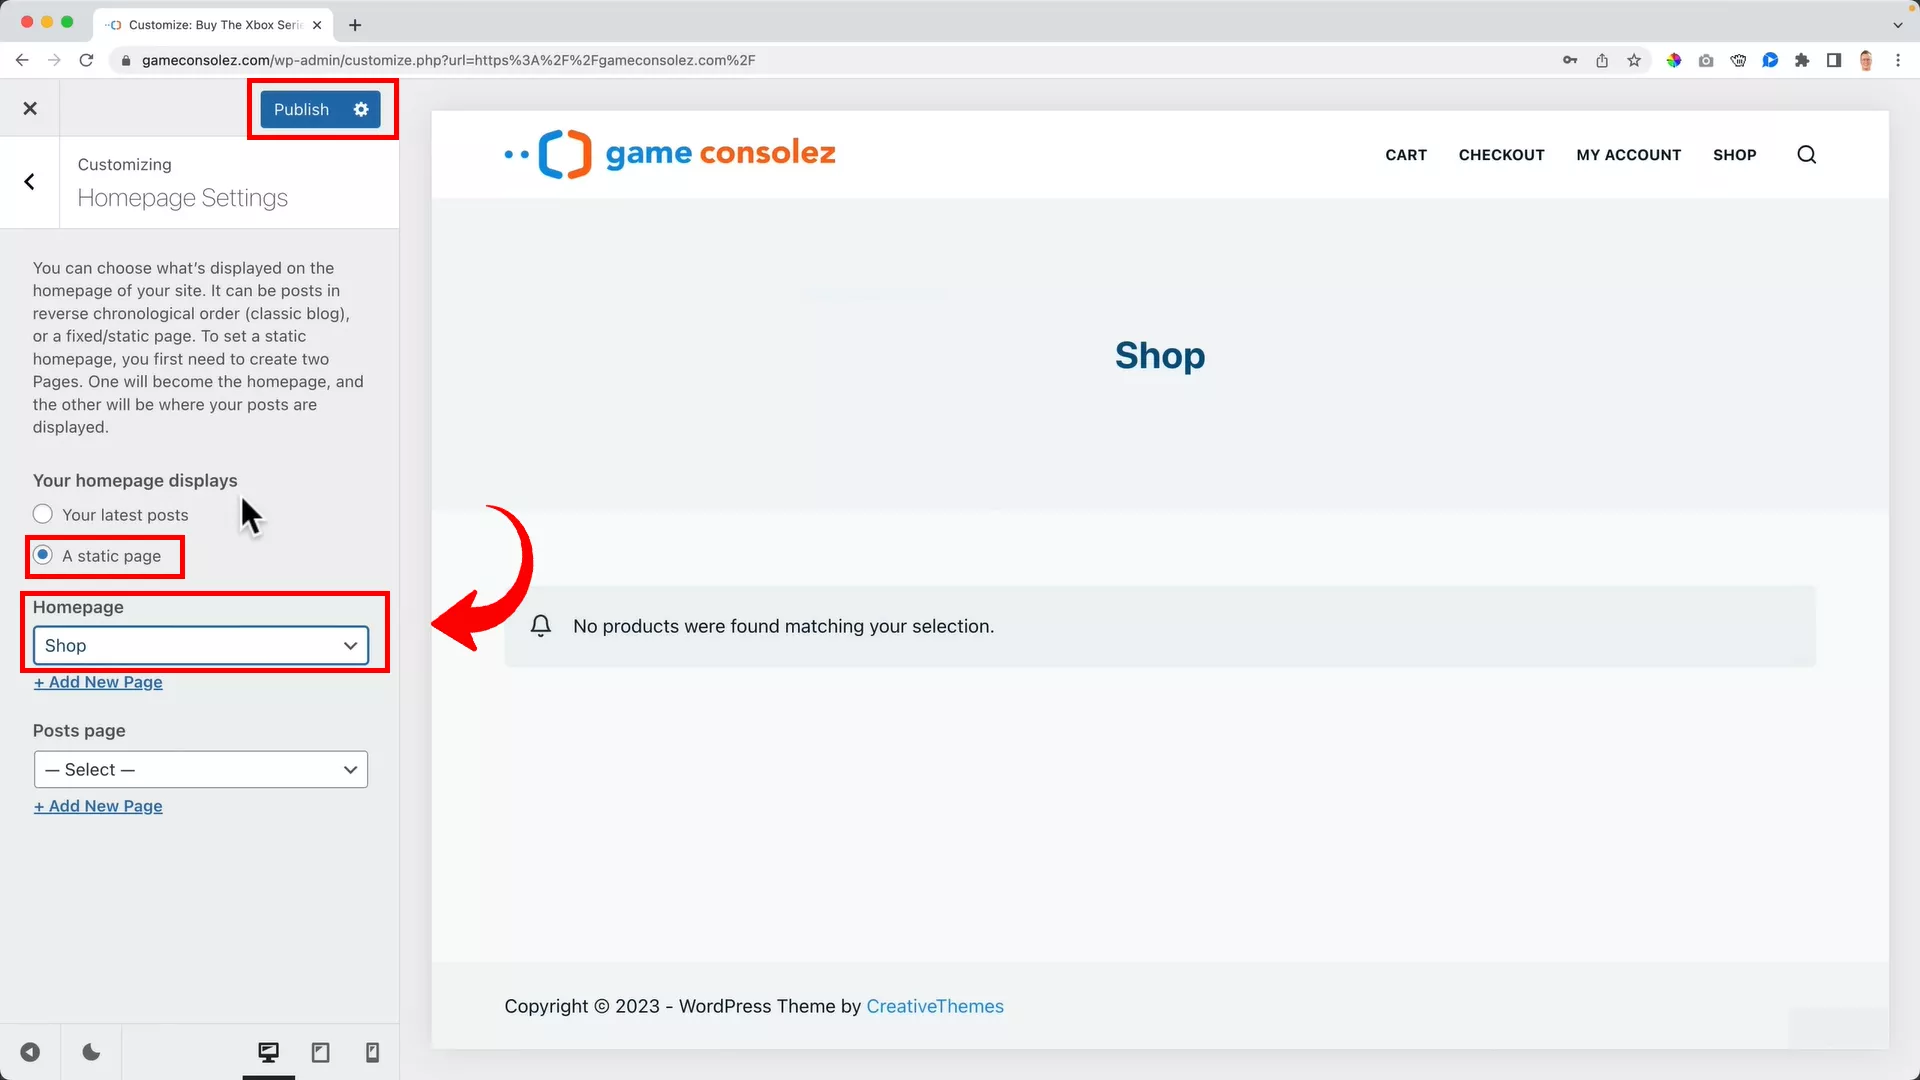
Click ‘Customize’ on the toolbar at the top of your screen. Under ‘Homepage Settings’, change the setting from ‘Your latest posts’ to ‘A static page’. In the dropdown menu that appears, select ‘Shop’ as your homepage. Save the settings by hitting ‘Publish’.
Since you haven’t added any products yet, your homepage will currently display only the header and the title ‘Shop’.
5. Understand the product editor
Now that your online store is ready, it’s time to add products.
But let’s not rush. I’ll guide you step-by-step through everything from navigating the product editor to uploading various types of products, including digital ones.
Configure the product editor
Accessing the product editor is straightforward, and you’ve got a few different ways to do it:
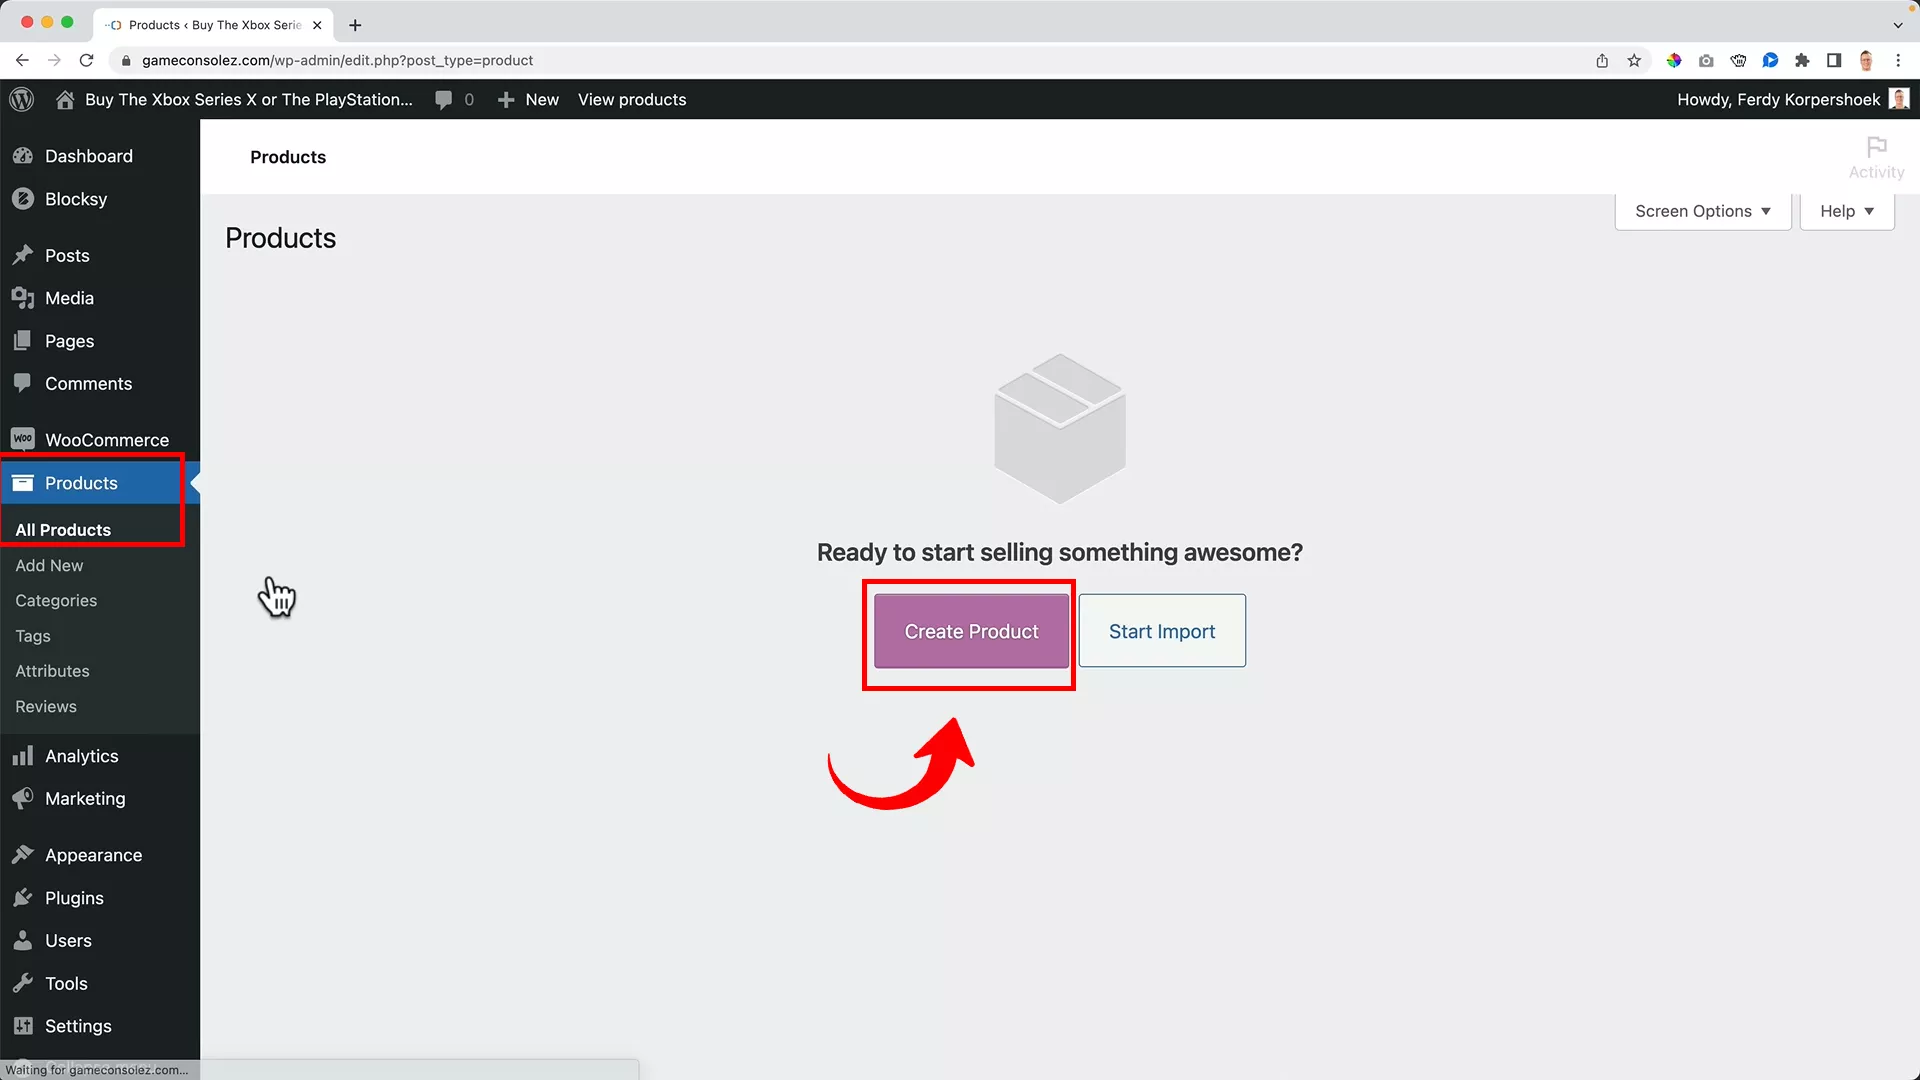
From the dashboard: Go to Product > All Products > Create Product. This route is great if you’re looking to get an overview of your existing products before adding a new one.

Direct access: For quicker access, you can go directly to Product > Add New.
Using the toolbar: A handy shortcut is to hover over ‘New’ in the black ribbon at the top of your WordPress dashboard and then select ‘Product’. This is what I prefer.
All these methods bring you to the product editor, the hub where you’ll bring your products to life on your site.
One thing to note is that WordPress often experiments with different versions of its product editor. This means you might encounter a product editor that looks different from the one I use in my tutorials. But don’t worry, it’s easy to switch to the classic editor if you prefer.
To use the same product editor as me:
From your dashboard, navigate to ‘WooCommerce’ > ‘Settings’.
Click on the ‘Advanced’ tab at the top.
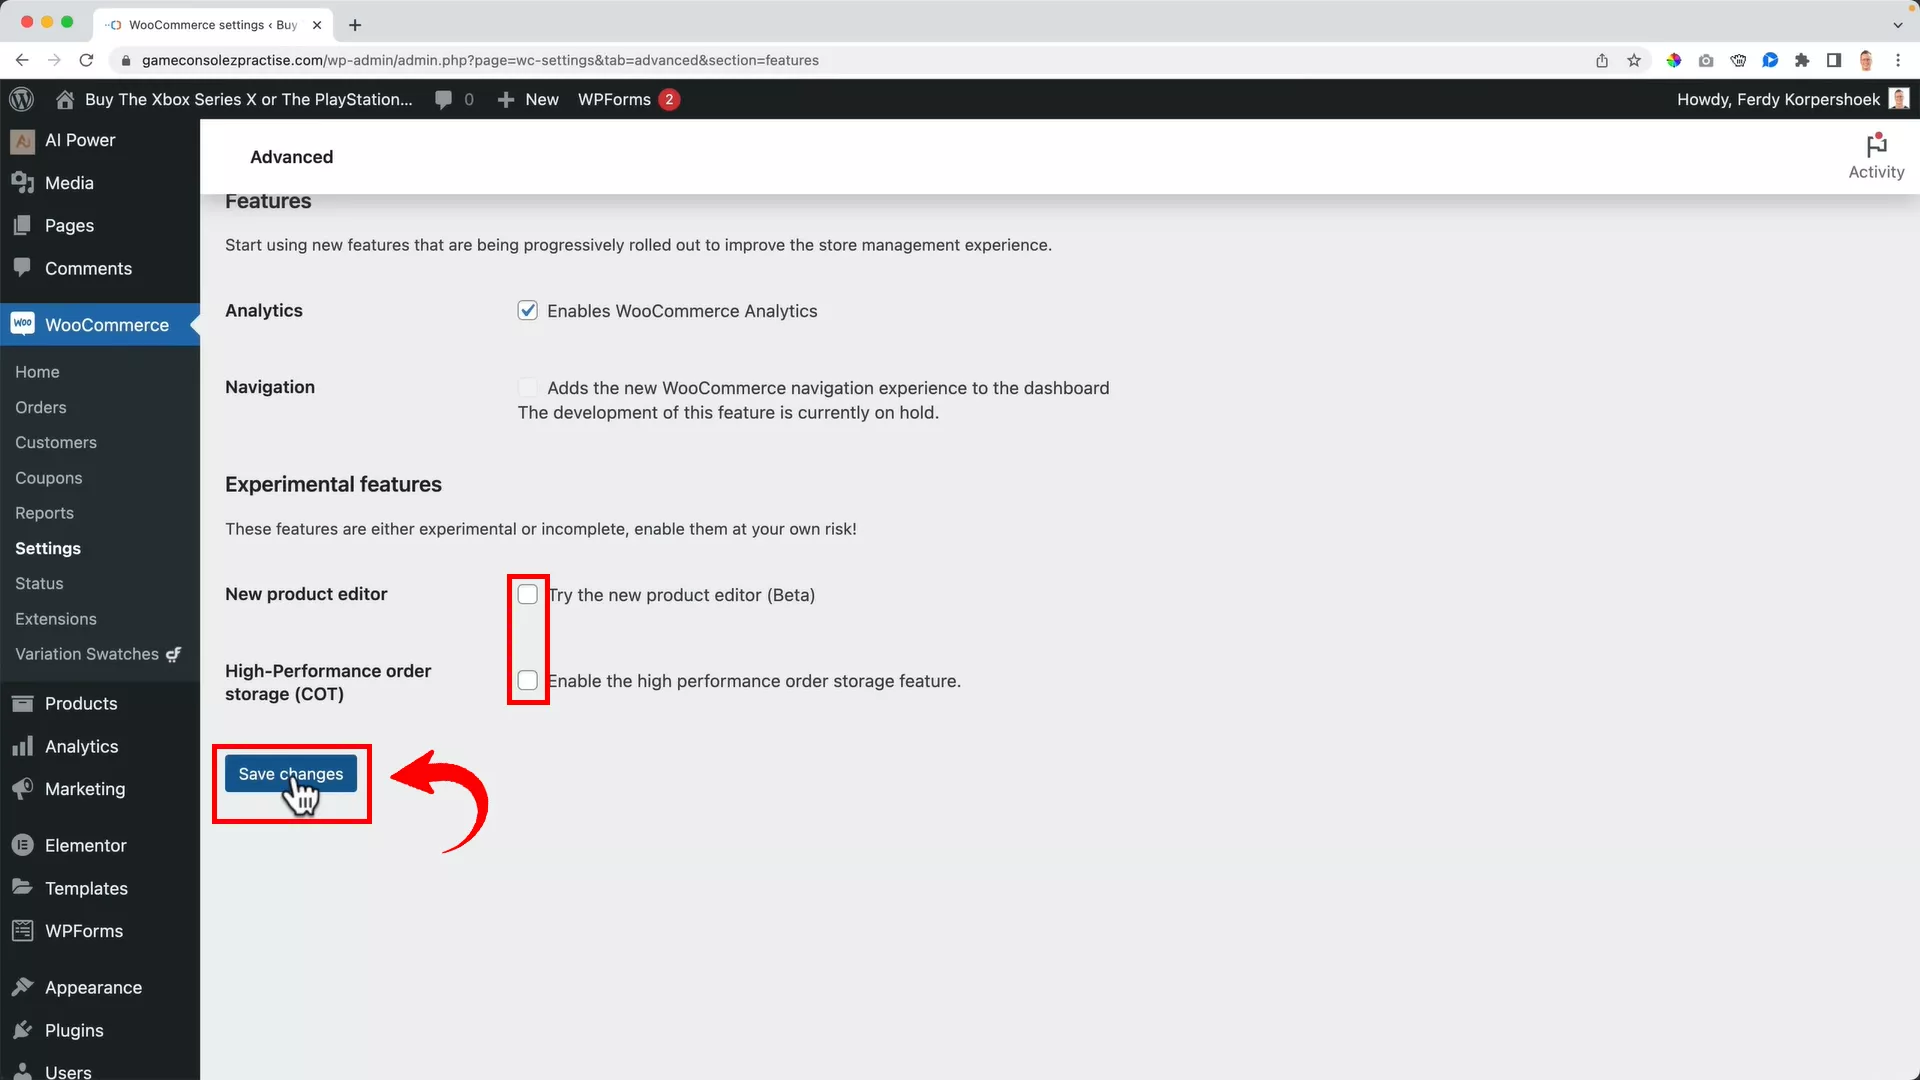
In the ‘Features’ section, you’ll see several options. Uncheck both the options under the ‘Experimental features’ as illustrated above.
This action will revert your product editor to the classic version, the one I use.
Product editor features and uploading a simple product
Great, your product editor is now ready to go! Before uploading your first product, let’s familiarize you with the product editor’s features. Understanding these will make adding products a breeze.
Product name

The product name is crucial. It’s more than just a label. Your product’s name should highlight its key features. When I was adding a Nike hoodie to my demo site, I did a competitor analysis to see how they named similar products.
Here’s what I noticed:
- Material: What is the product made of?
- Type: For clothing, this could be the style like zip, pullover, or crew neck. For tech products, mention the model and specifications.
- Target Audience: Is it for men, women, or unisex?
The specifics will vary based on what you’re selling, but the goal is to be descriptive and informative.
For example, if you’re adding a tech product, you must add its model name and specifications in the title.
Product description (long)
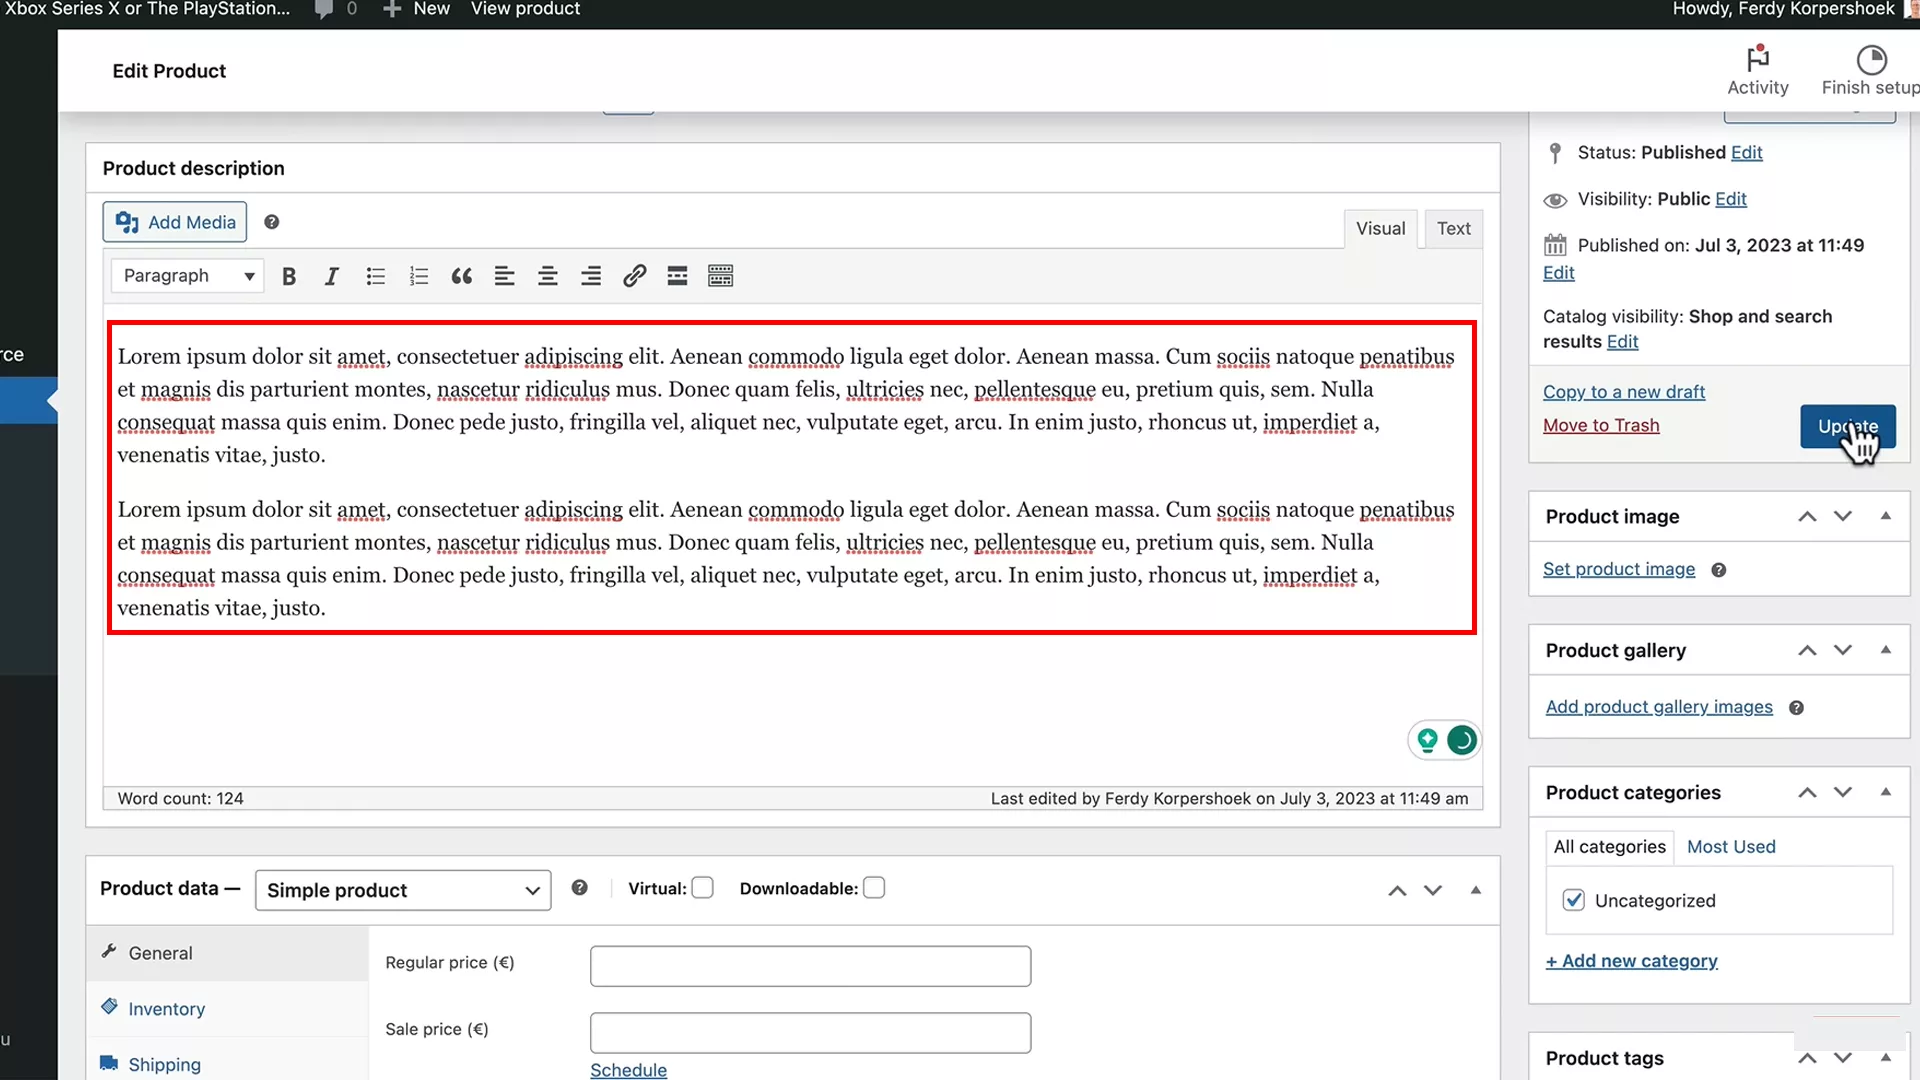
Right after the title, you’ll find the space for the product description. This appears below the product title, images, and short description on the product page.
Here’s where you can dive deep into your product’s uses, benefits, and any other compelling details.
Pro tip: Enhance your long description with high-definition media. You can easily embed images and short videos using the button beneath the product name. Remember, quality visuals can significantly impact a customer’s purchase decision.
Product short description
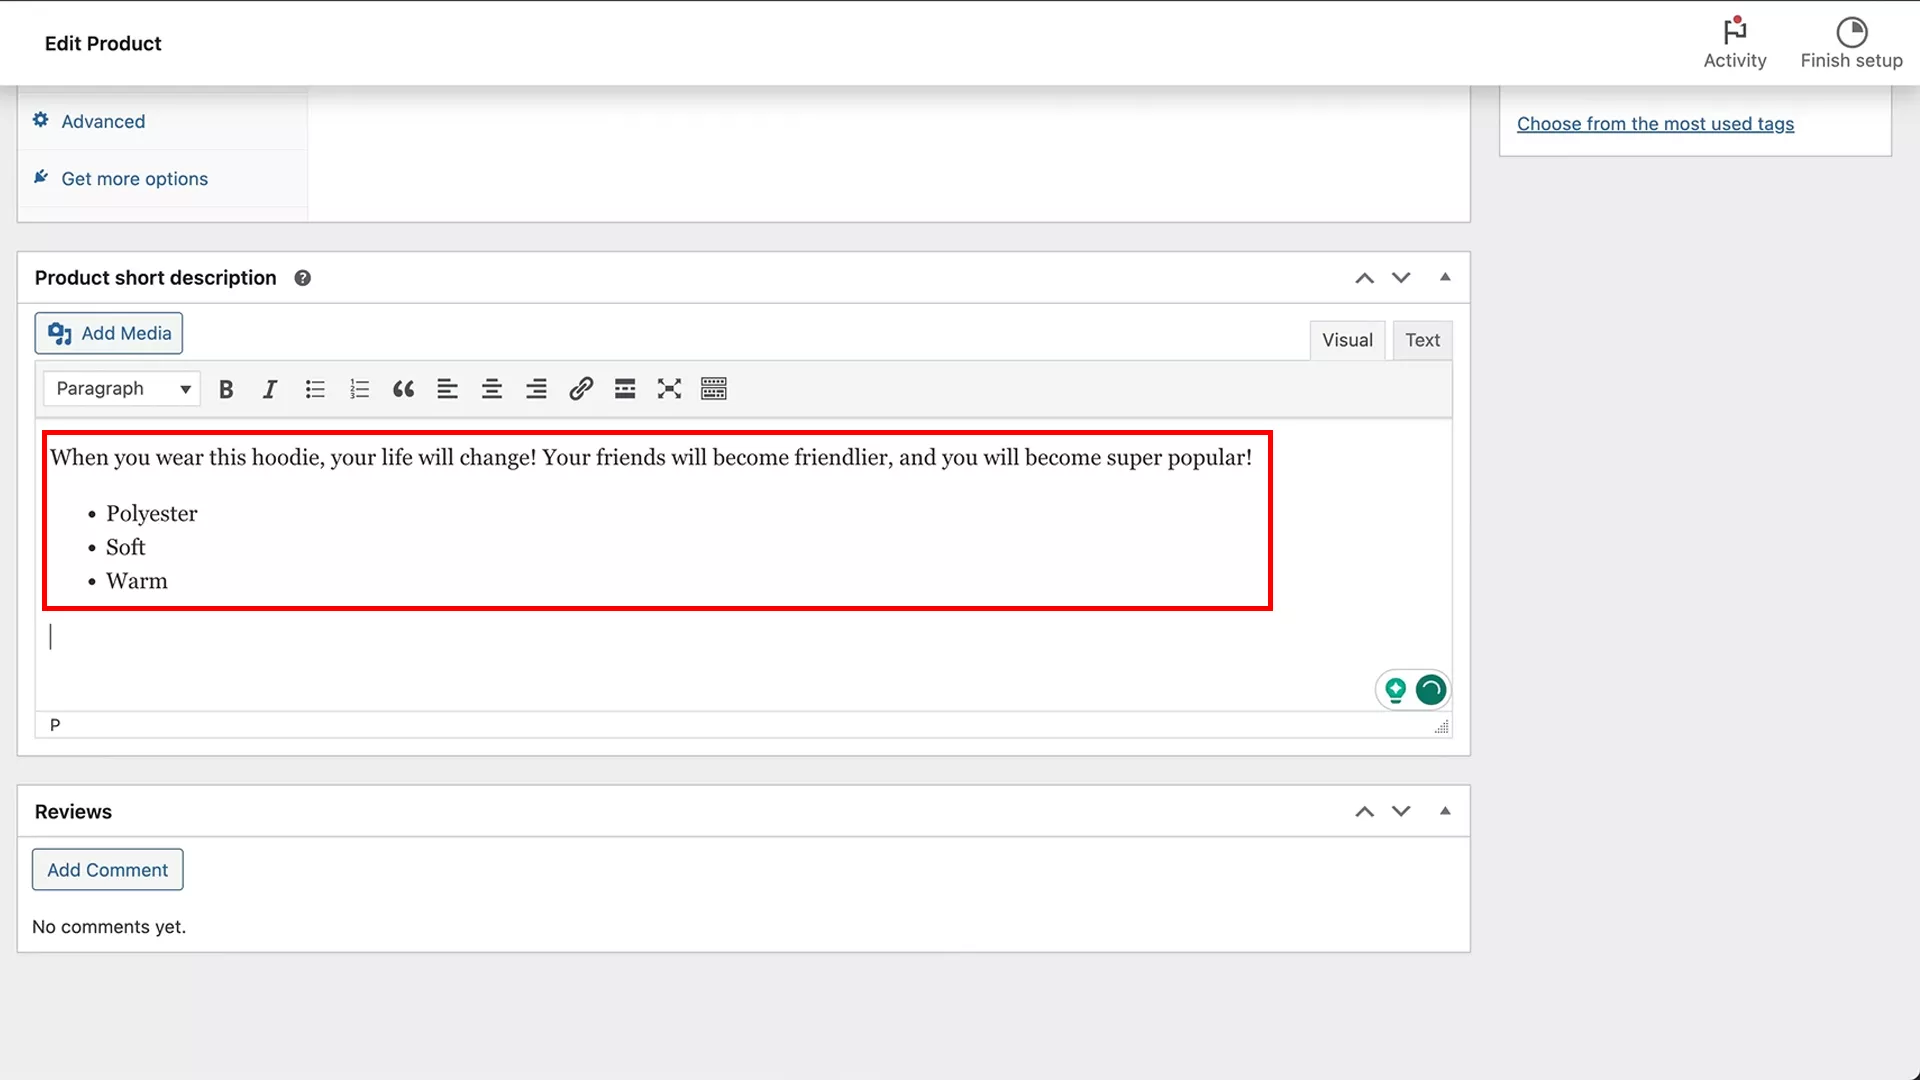
This is where you highlight the key selling points of your product. The short description is immediately visible to customers, so make it count.
Pro tip: Use bullet points or a list format for easy readability. Customers often scan through this section, so presenting the information clearly and concisely can help nudge them towards making a purchase.
Publish
The ‘Publish’ section on the right side of your product editor is where you control how and when your product appears on your site.
You get the following saving and publishing options:

Save drafts: Ideal for when you’re not ready to publish immediately. You can save your product descriptions as drafts.

Pending review: If you work with a team, they can add products and mark them as pending review. This allows you, the admin, to give the final approval before publishing.

Password protection and private publishing: For exclusive products, you might want to password-protect them or publish them privately.

Schedule your product: Decide when your product goes live by setting the publish date and time. This feature is perfect for coordinating product launches with your marketing efforts.
Product image and gallery
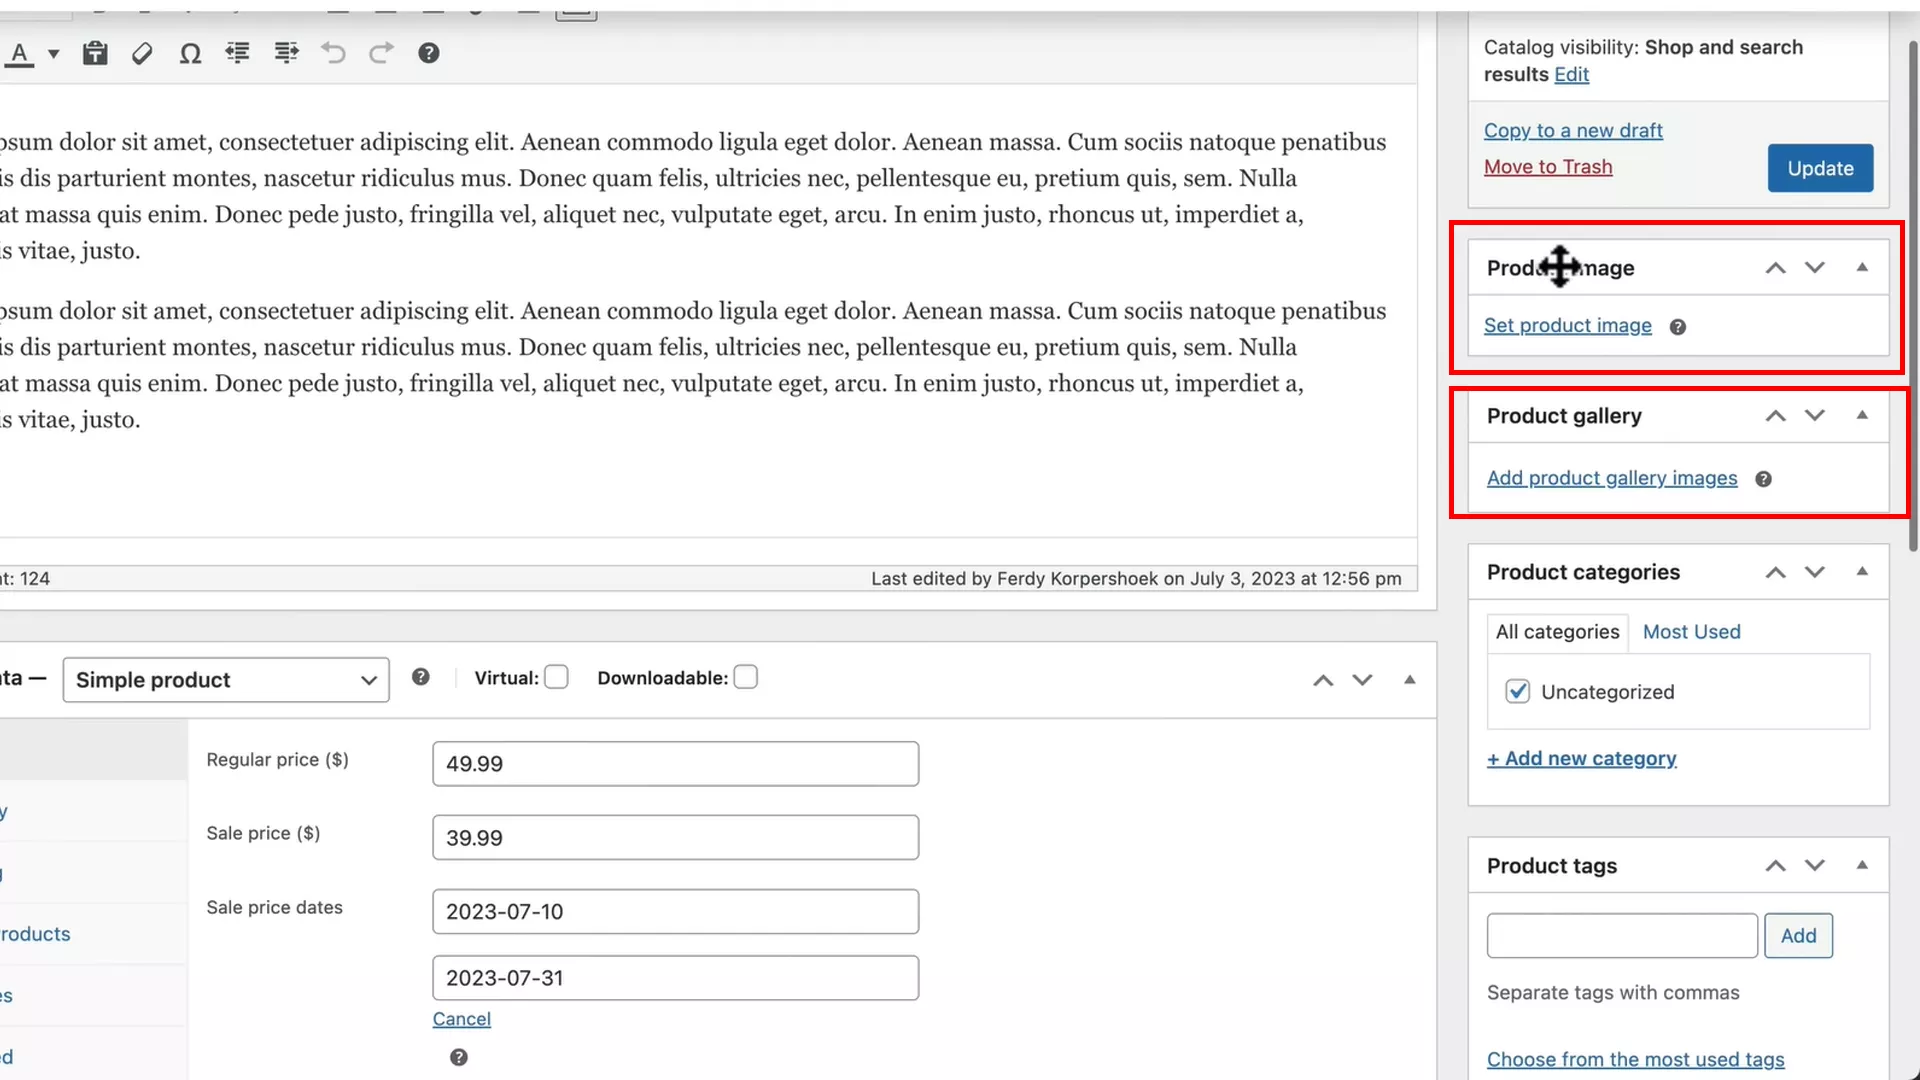
Under the publish window, there’s a section for adding the main product image. This is the primary image that appears in your shop and at the top of your product gallery.
Speaking of product gallery, this is where you can add multiple images showing different angles and details of your product.
Pro tip: Remember to add Alt text and descriptions for each image for better SEO and accessibility.
Product categories and tags
Organizing your products into categories and sub-categories is crucial for a user-friendly shopping experience.
In the WooCommerce product editor, you’ll find an option to categorize your products right below the image and gallery sections. By default, products are ‘Uncategorized’.
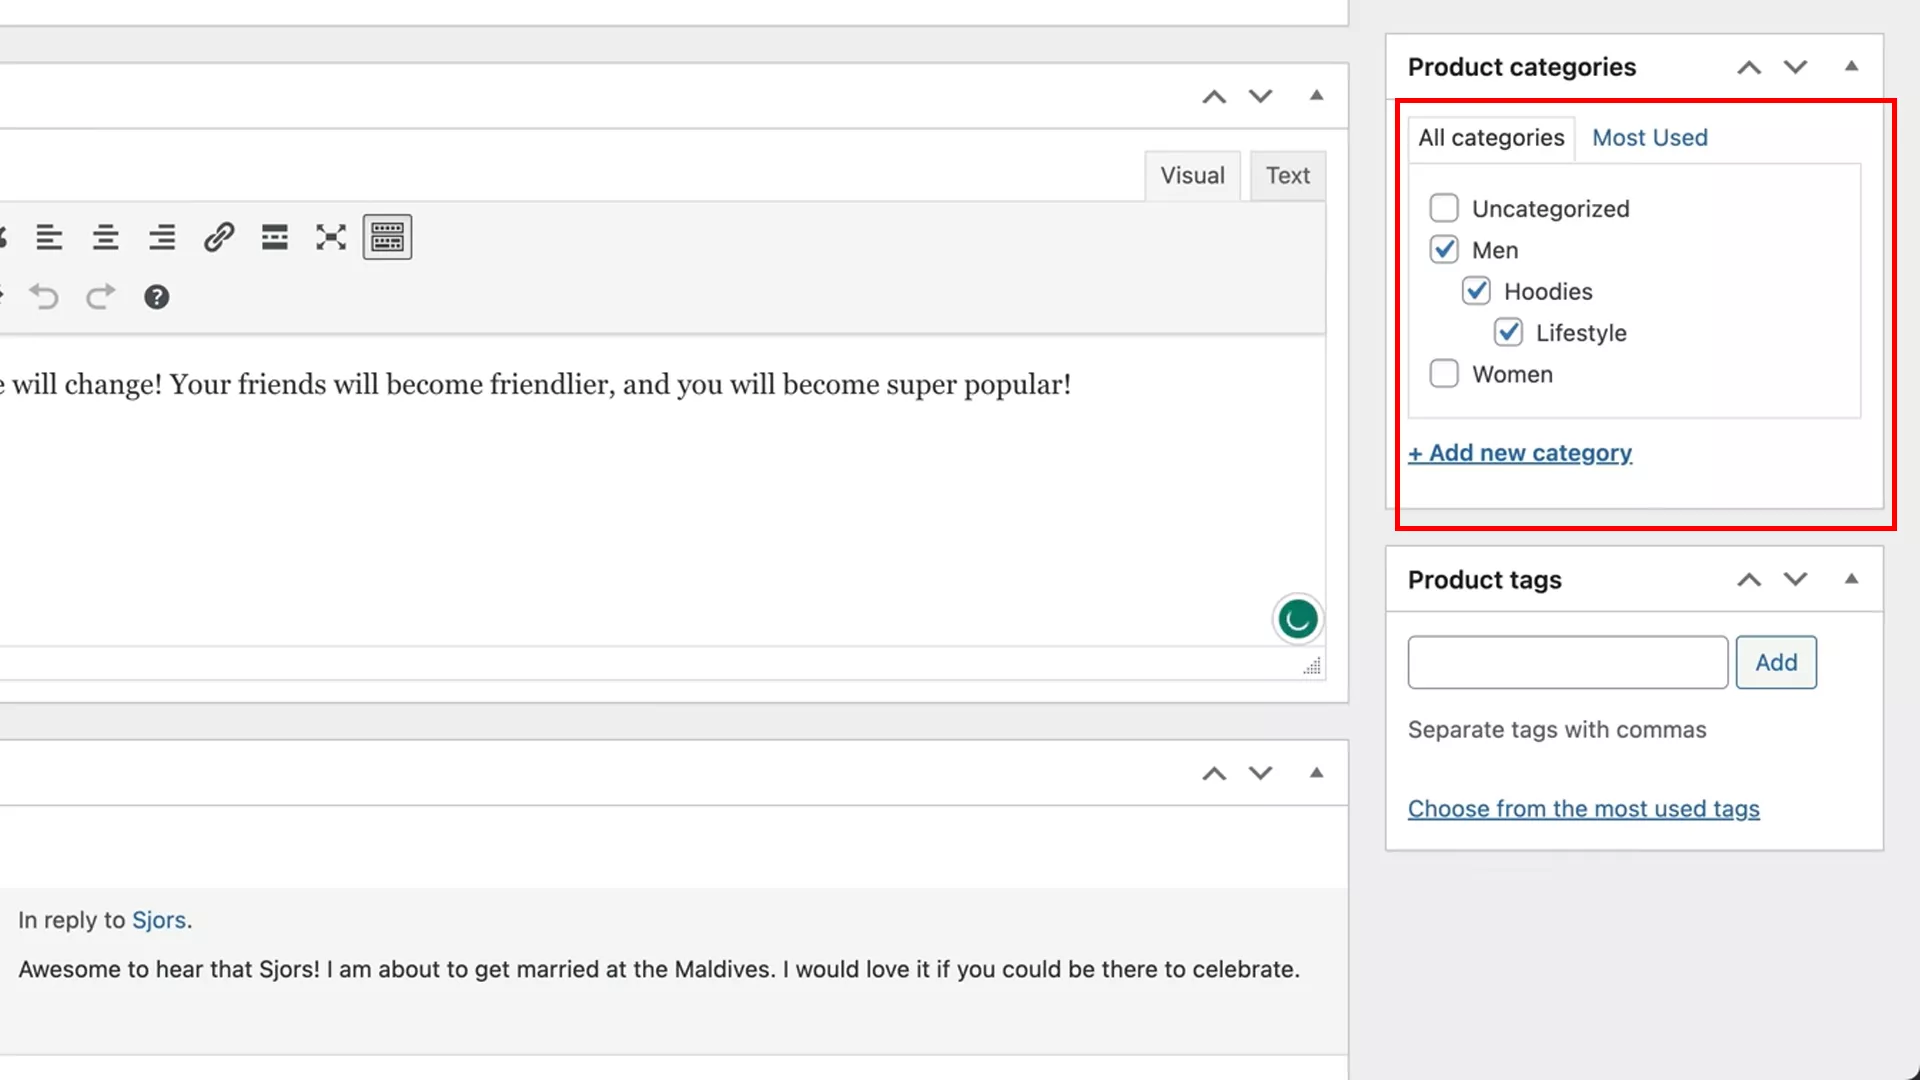
To keep your store organized, add parent categories and sub-categories. For example, in my Nike hoodie demo, I categorized it under ‘Men’ (parent category) and ‘Hoodies’ (sub-category).
Apart from categories, another way to classify your products is through product tags.
While tags are similar to categories, they are less structured and can be used more flexibly.
You can tag your products based on color, fabric, type, and more. Tags are especially useful for customers who are looking for specific attributes in a product.
Pro tip: While adding categories and tags, think about your prospect’s shopping behavior. How would they search for a product like yours? The more intuitive your categorization and tagging, the easier it is for customers to find what they’re looking for.
Permalink
Your product’s permalink is an essential element for SEO and user navigation. It’s usually automatically generated based on your product name.
However, if needed, you can edit the permalink directly in the product editor. This is useful if you want to optimize it for better SEO or for easier recall by customers.
While customizing permalinks, ensure they are clear, concise, and reflective of the product.
Product data
The Product Data section in the WooCommerce product editor is where you’ll specify important details about your products.
This section is extensive and covers various aspects of your product, from pricing to shipping. Let’s delve into the key options available.
Product Type
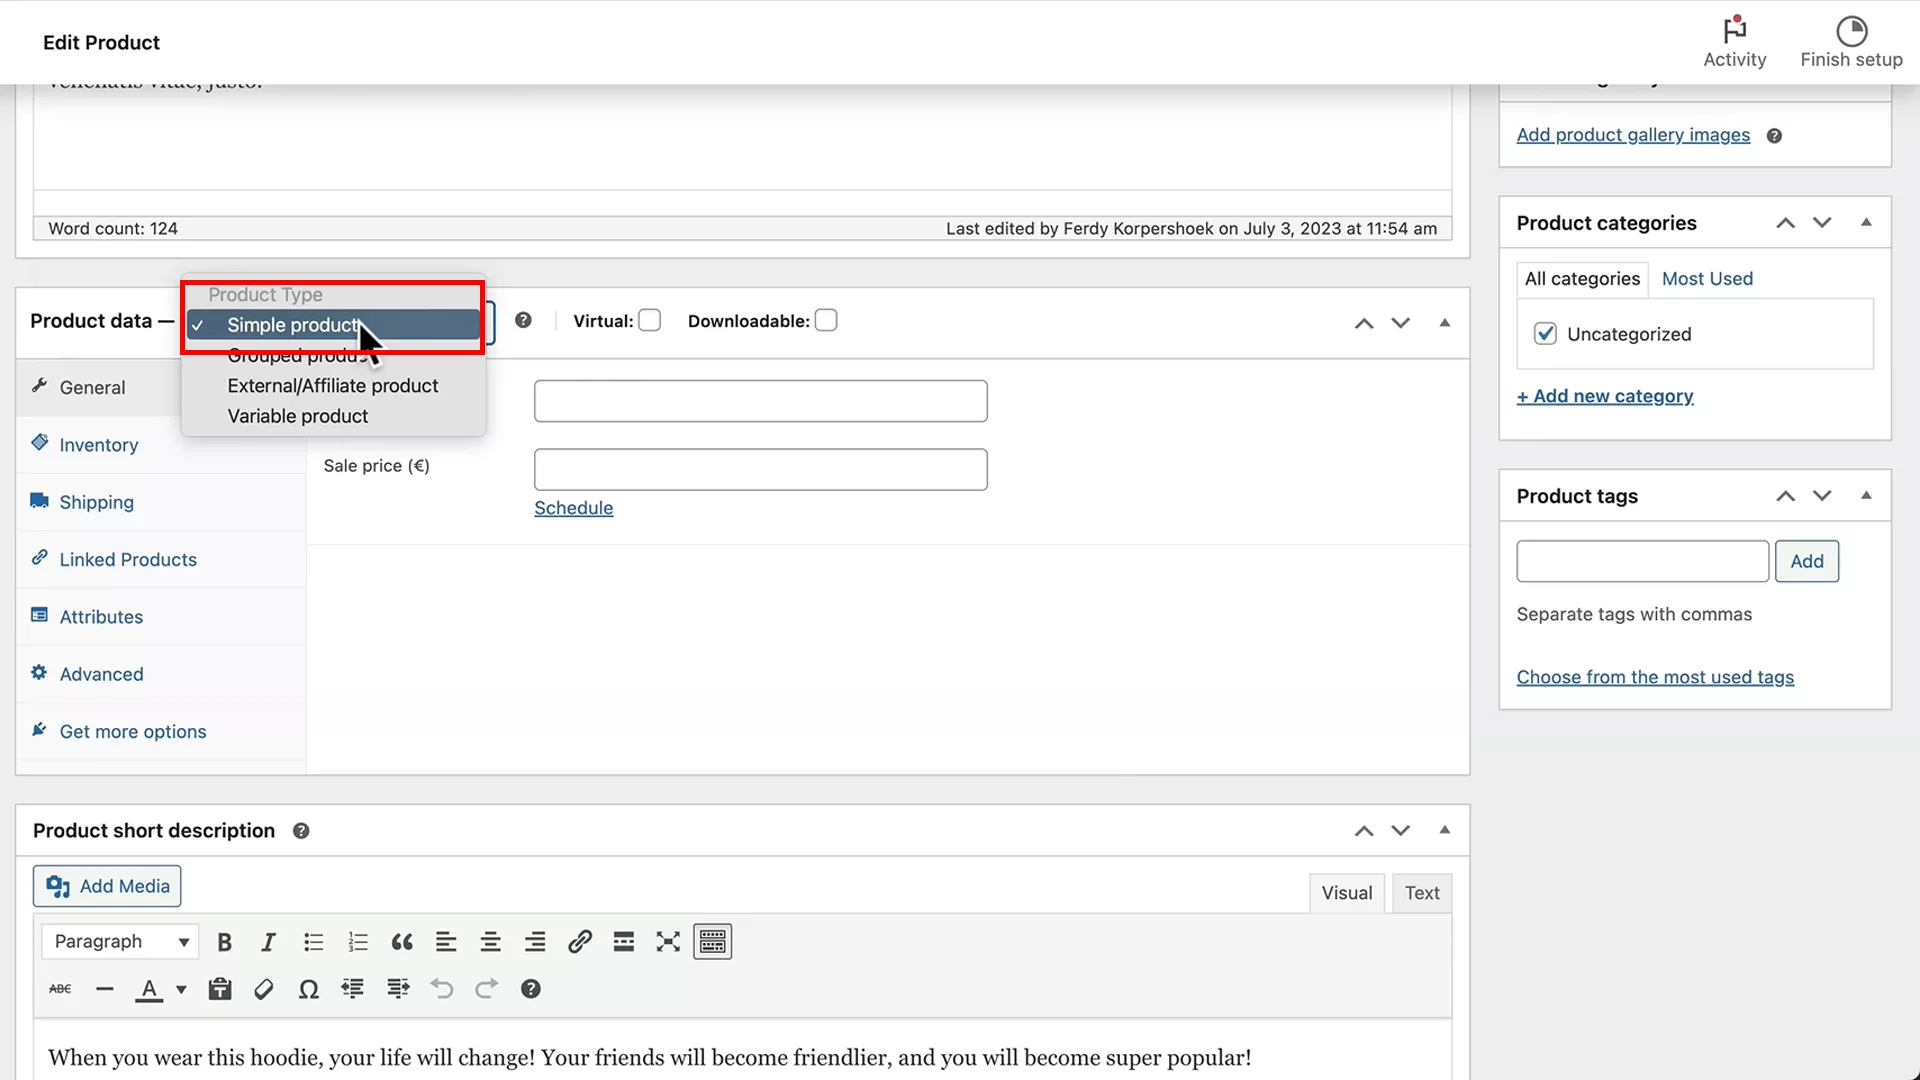
Here, you can define the type of product you’re uploading. For starters, like my example with a simple Nike hoodie, choose ‘Simple product’ from the dropdown menu. This is ideal for products without variants like size or color.
General
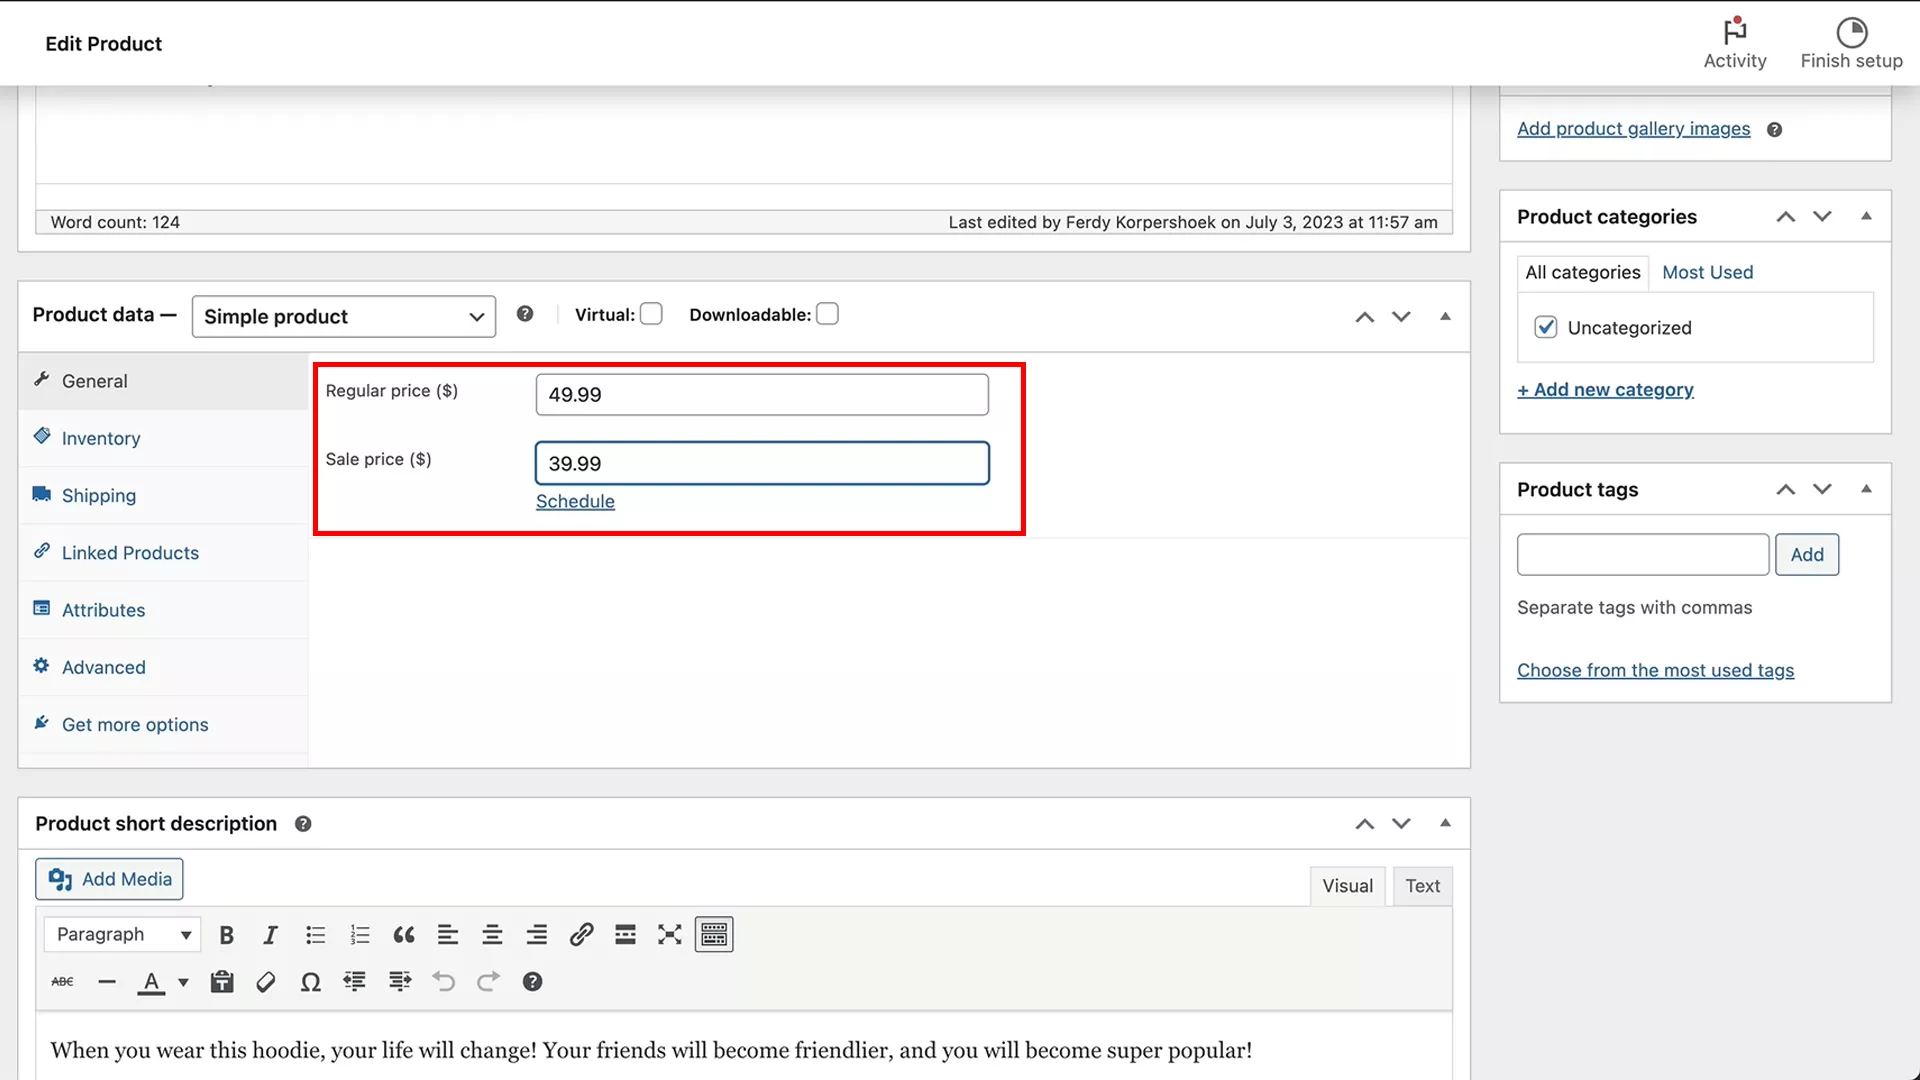
In the General tab, input your product’s regular and sale prices. This is where you set the cost customers will see in your store.
You also have the option to schedule sale prices, which is perfect for timed promotions or seasonal sales. Set a start and end date for the sale to adjust the product’s price automatically.
If you need to change the currency displayed, go to WooCommerce settings from the left panel in WordPress and adjust it accordingly.
Inventory
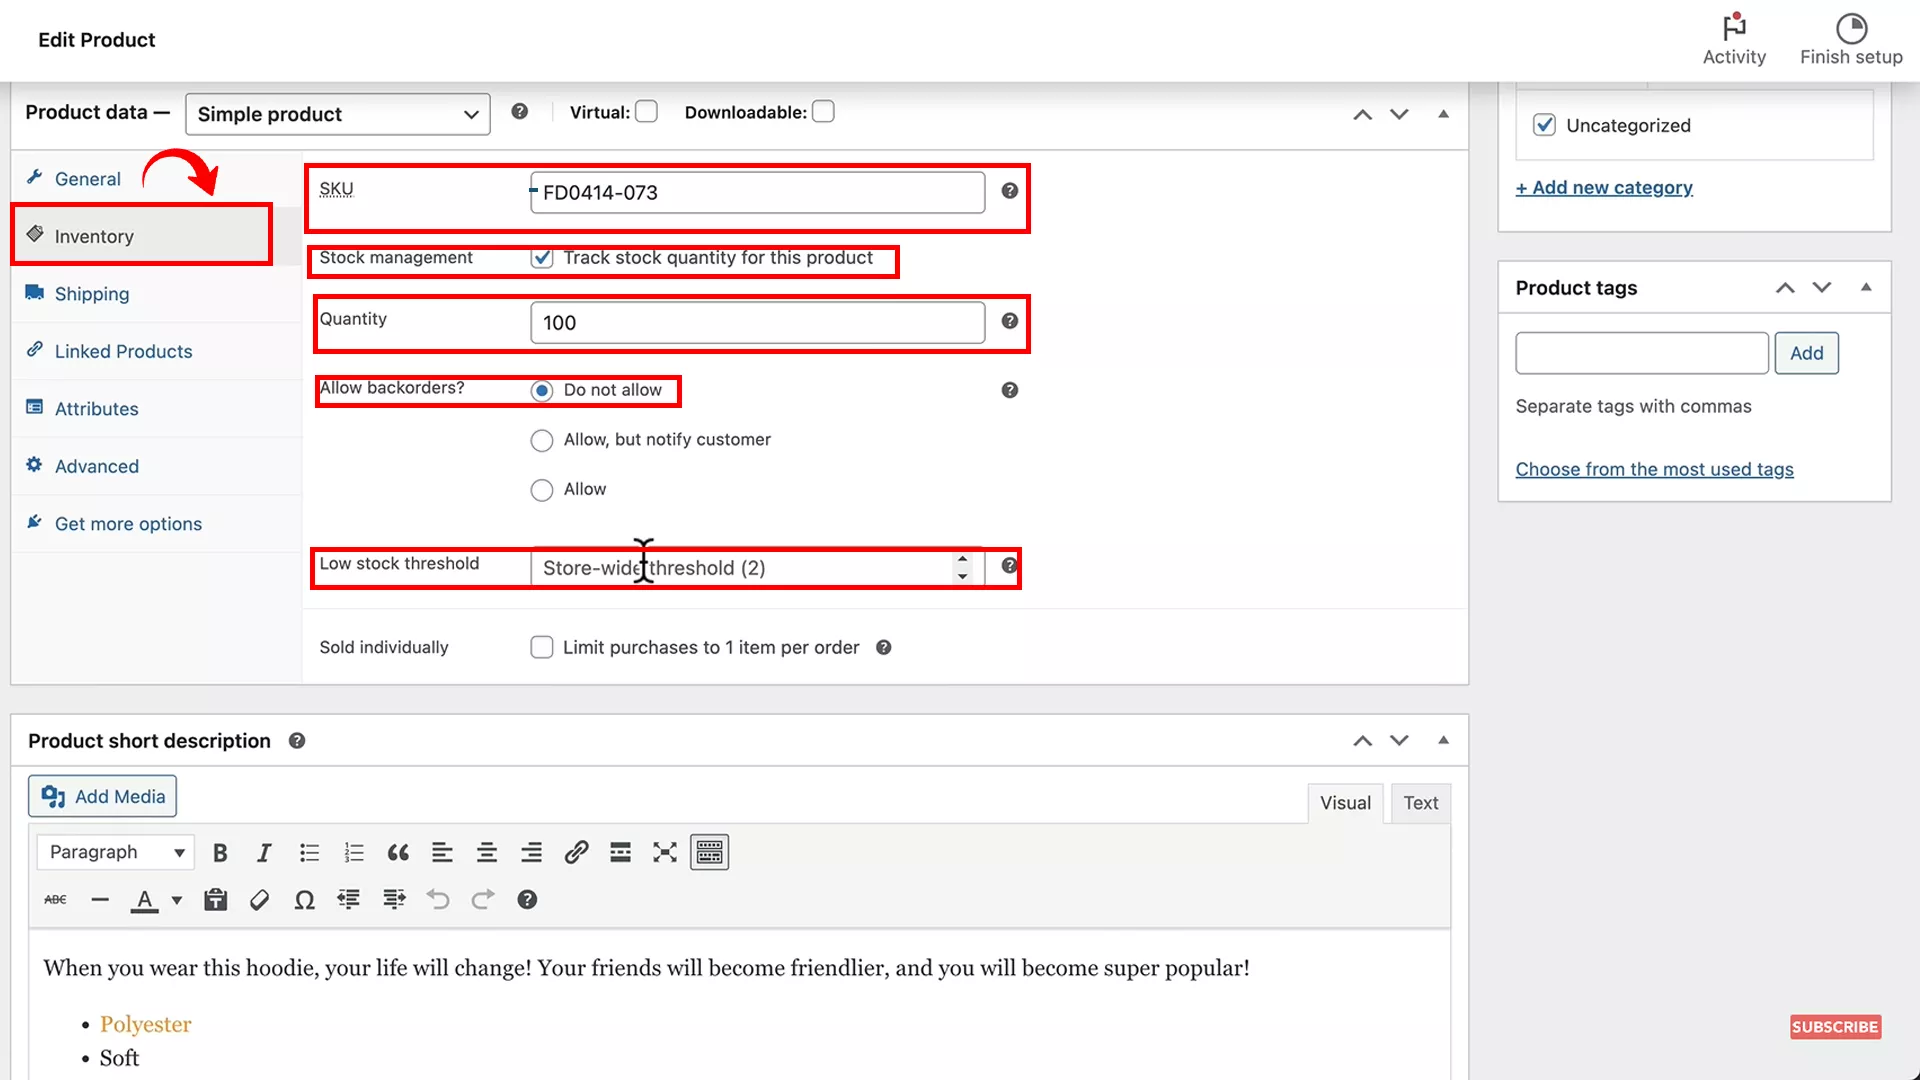
The Inventory tab is crucial for keeping track of your stock levels. You can add your product’s Stock Keeping Unit (SKU) here.
For resold products from known manufacturers like Nike, using the official SKU can help your product appear in searches for that specific SKU.
If your product is unique to your brand, create and use a distinctive SKU code. This helps in managing inventory and makes your product easily identifiable.
Pro tip: Your SKU should be a unique identifier that’s helpful for inventory management and easy for you to recognize and track. It could be a combination of product-related codes and numbers that make sense for your business. For example, GCZ-0001.
Another thing you can do here is choose if you want to allow backorders for your product. This option allows customers to order products even when they’re out of stock.
You can also set the low stock threshold to get notified when your stock runs low.
However, instead of setting a separate low stock threshold for each product, I suggest you go to WooCommerce > Settings > Products tab > Inventory and set the low stock threshold. This will be automatically applied to all the products in your store.
Shipping
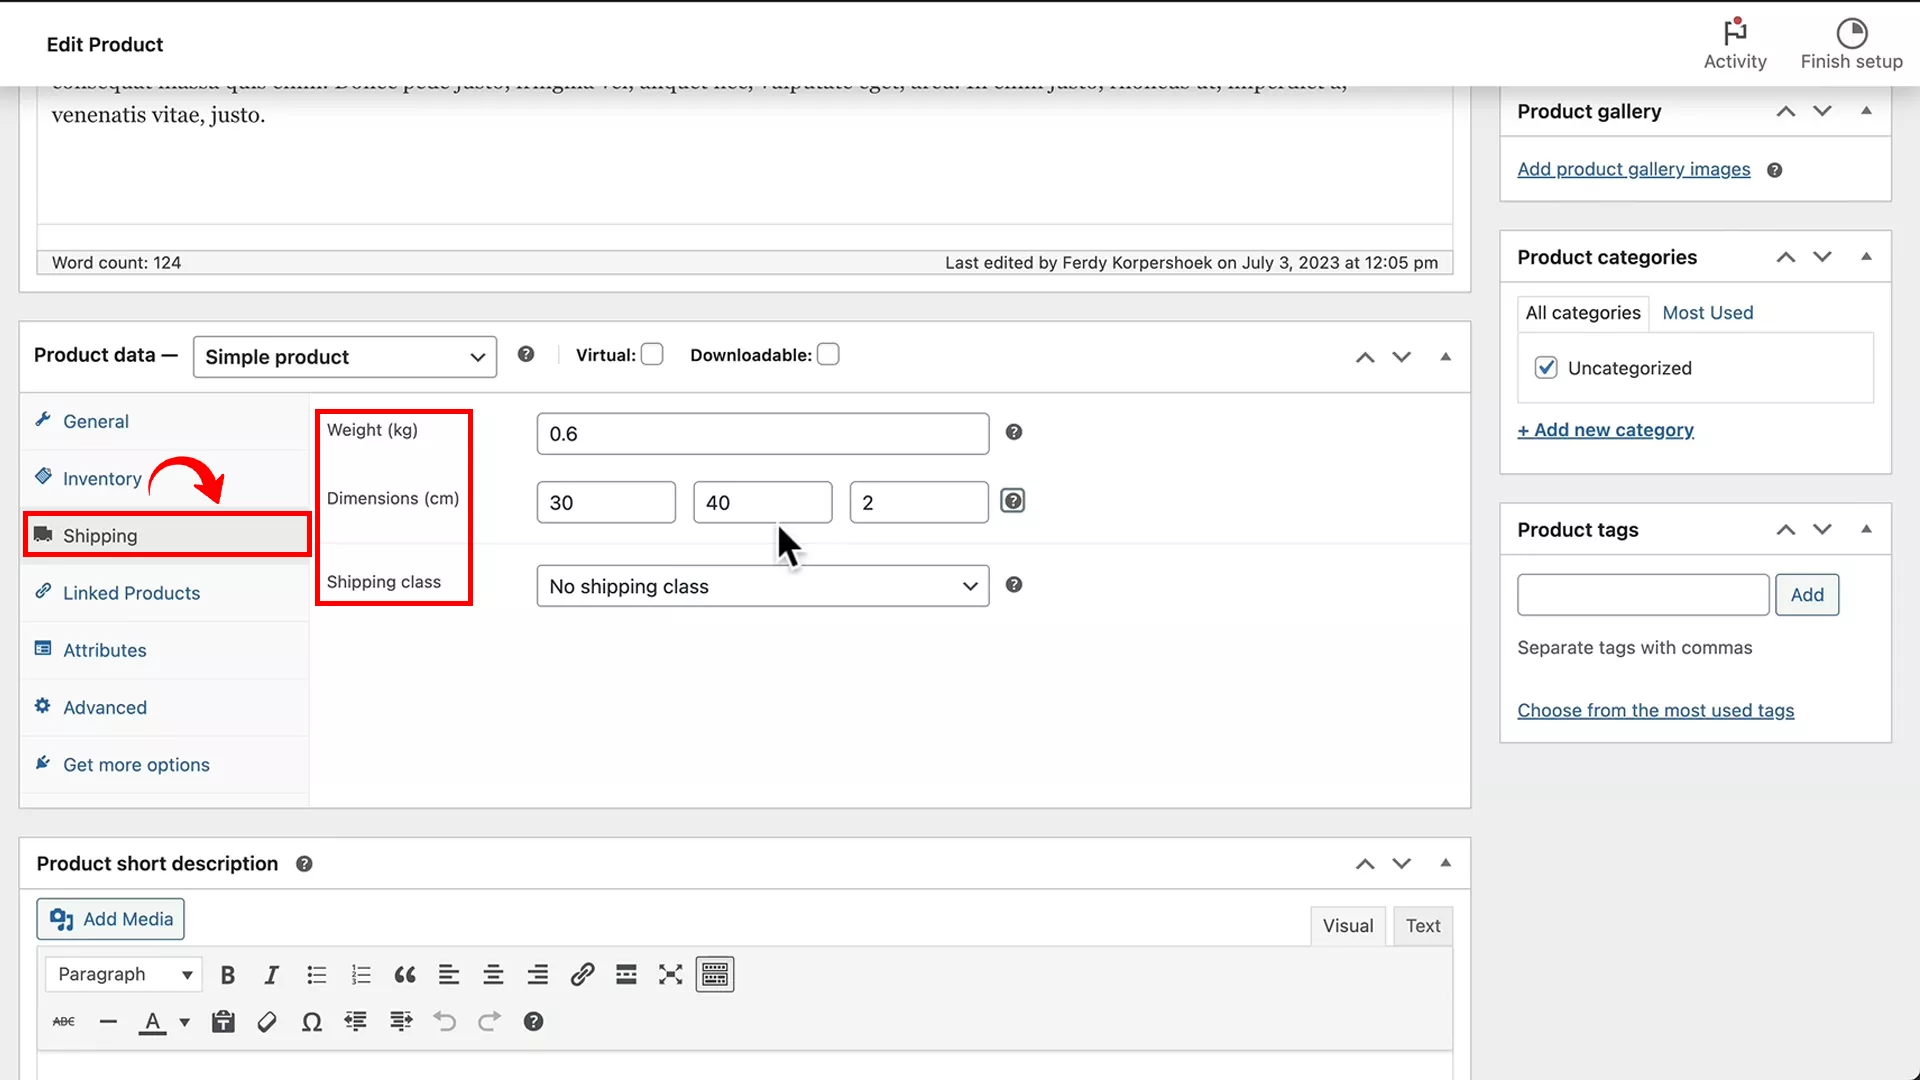
The Shipping section in the WooCommerce product editor plays a crucial role, especially if your store involves physical goods.
- Start by adding the weight and dimensions of your product. These details are important for accurately calculating shipping costs.
- Assign a shipping class to your product, if applicable. This can be used to group similar products for shipping purposes.
- To change the unit measurements for weight and dimensions, go to WooCommerce > Settings > Products tab.
The shipping information you provide will be displayed under the ‘Additional Information’ tab on the product page, adjacent to the long description. This is how it looks on my demo site:
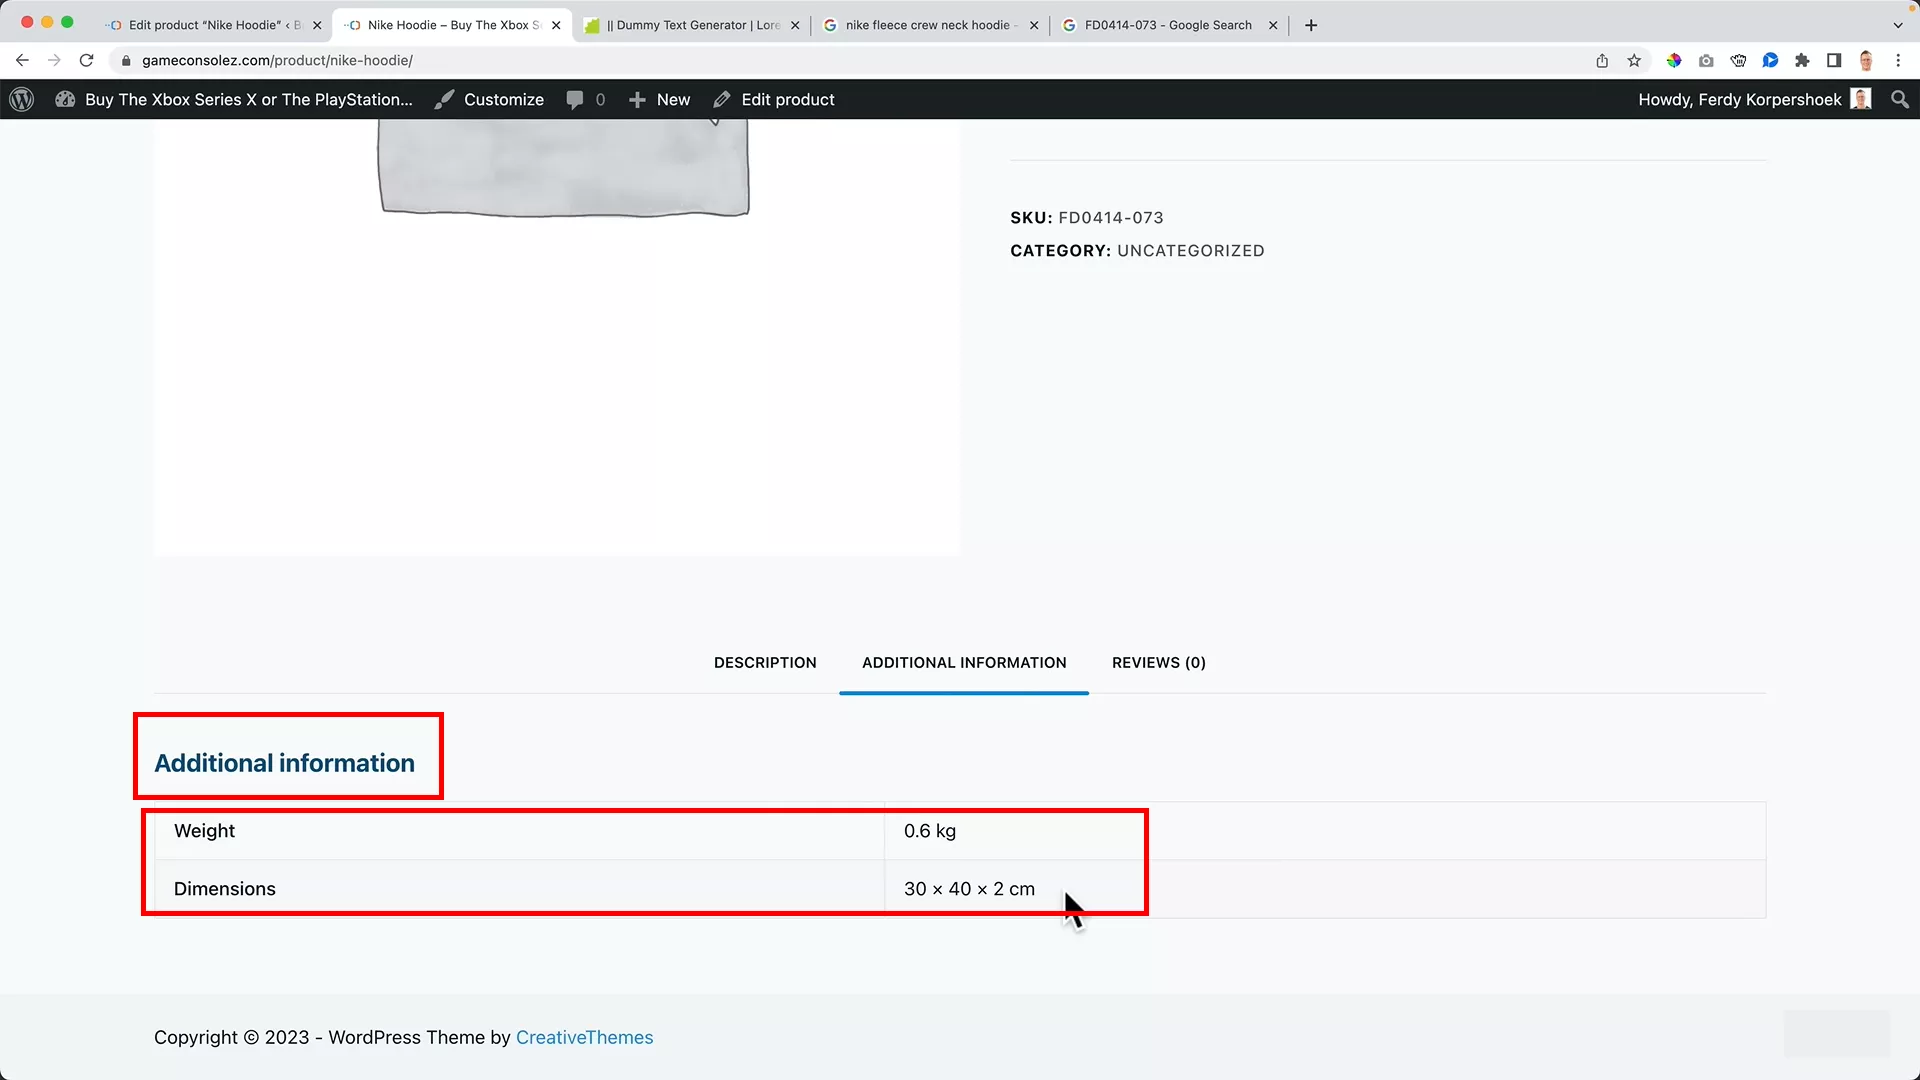
If you don’t enter shipping details, the ‘Additional Information’ tab won’t appear for that product.
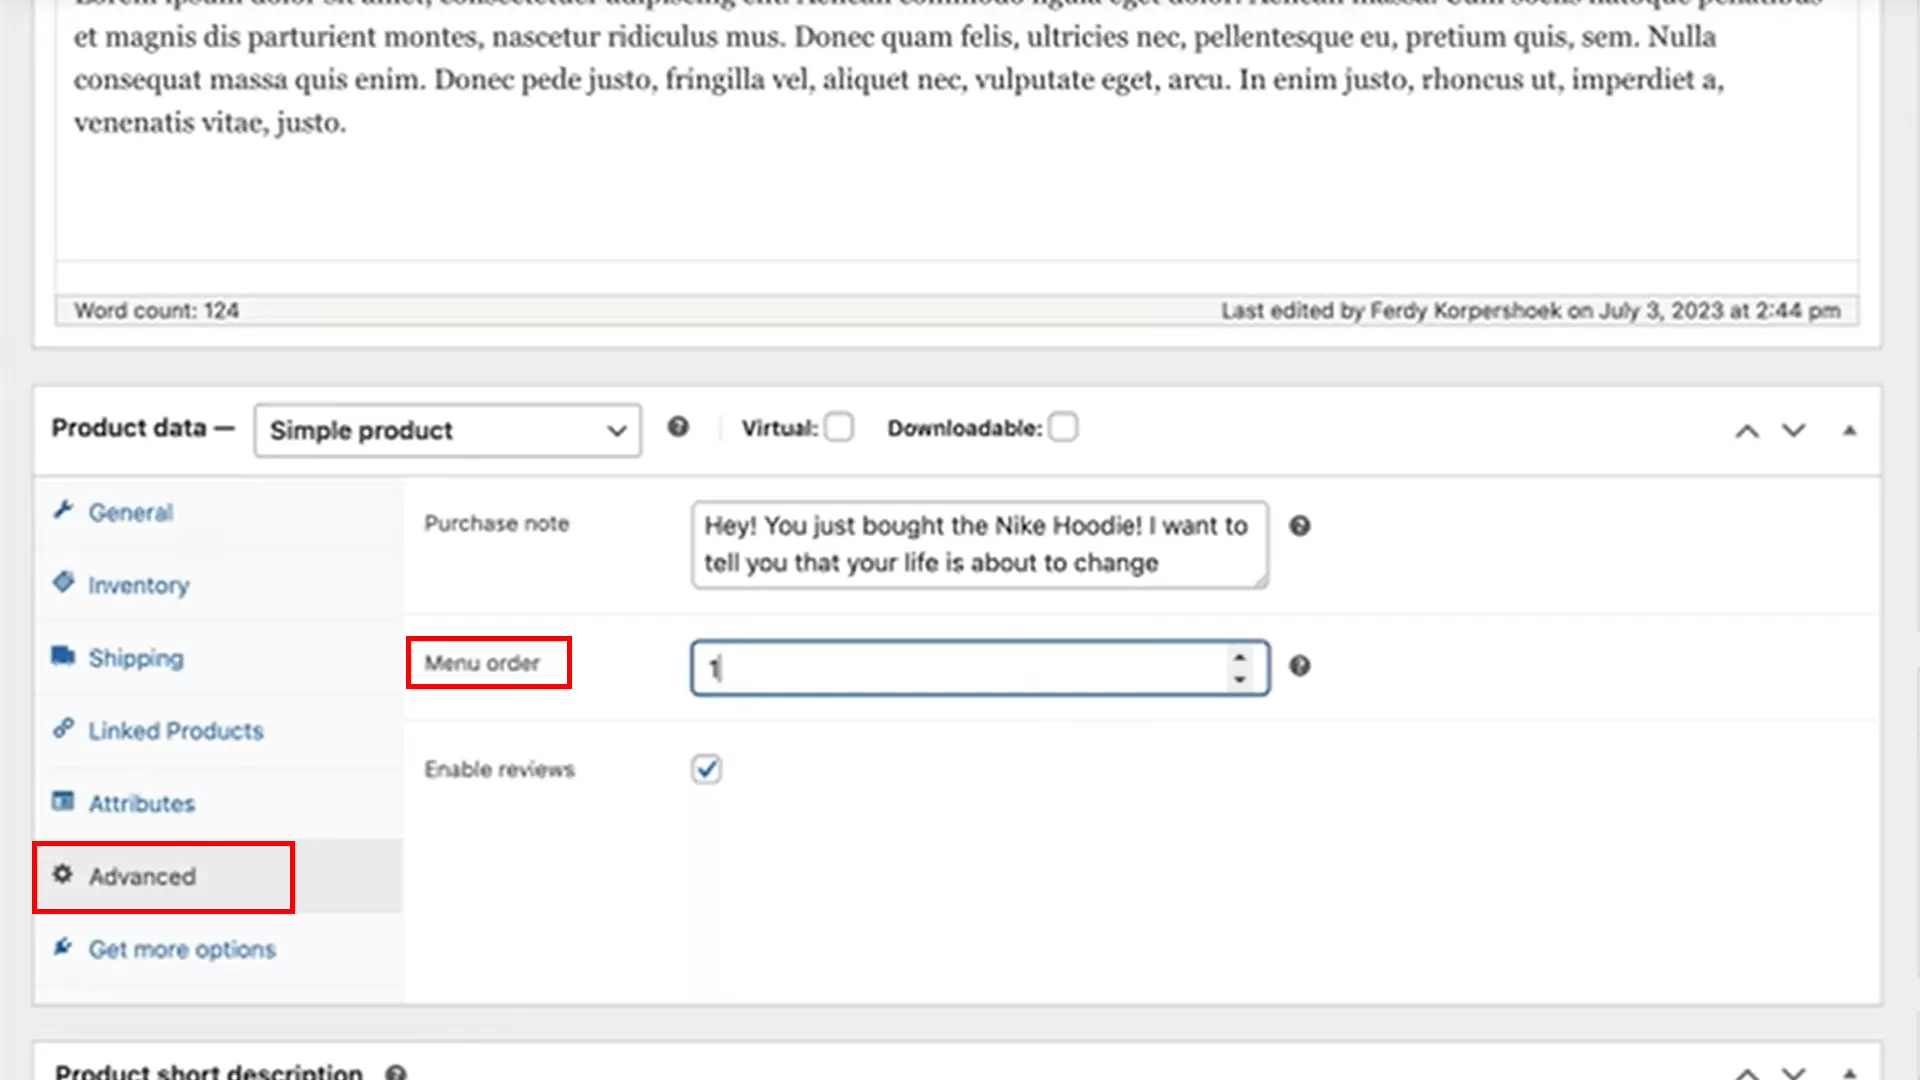
Advanced
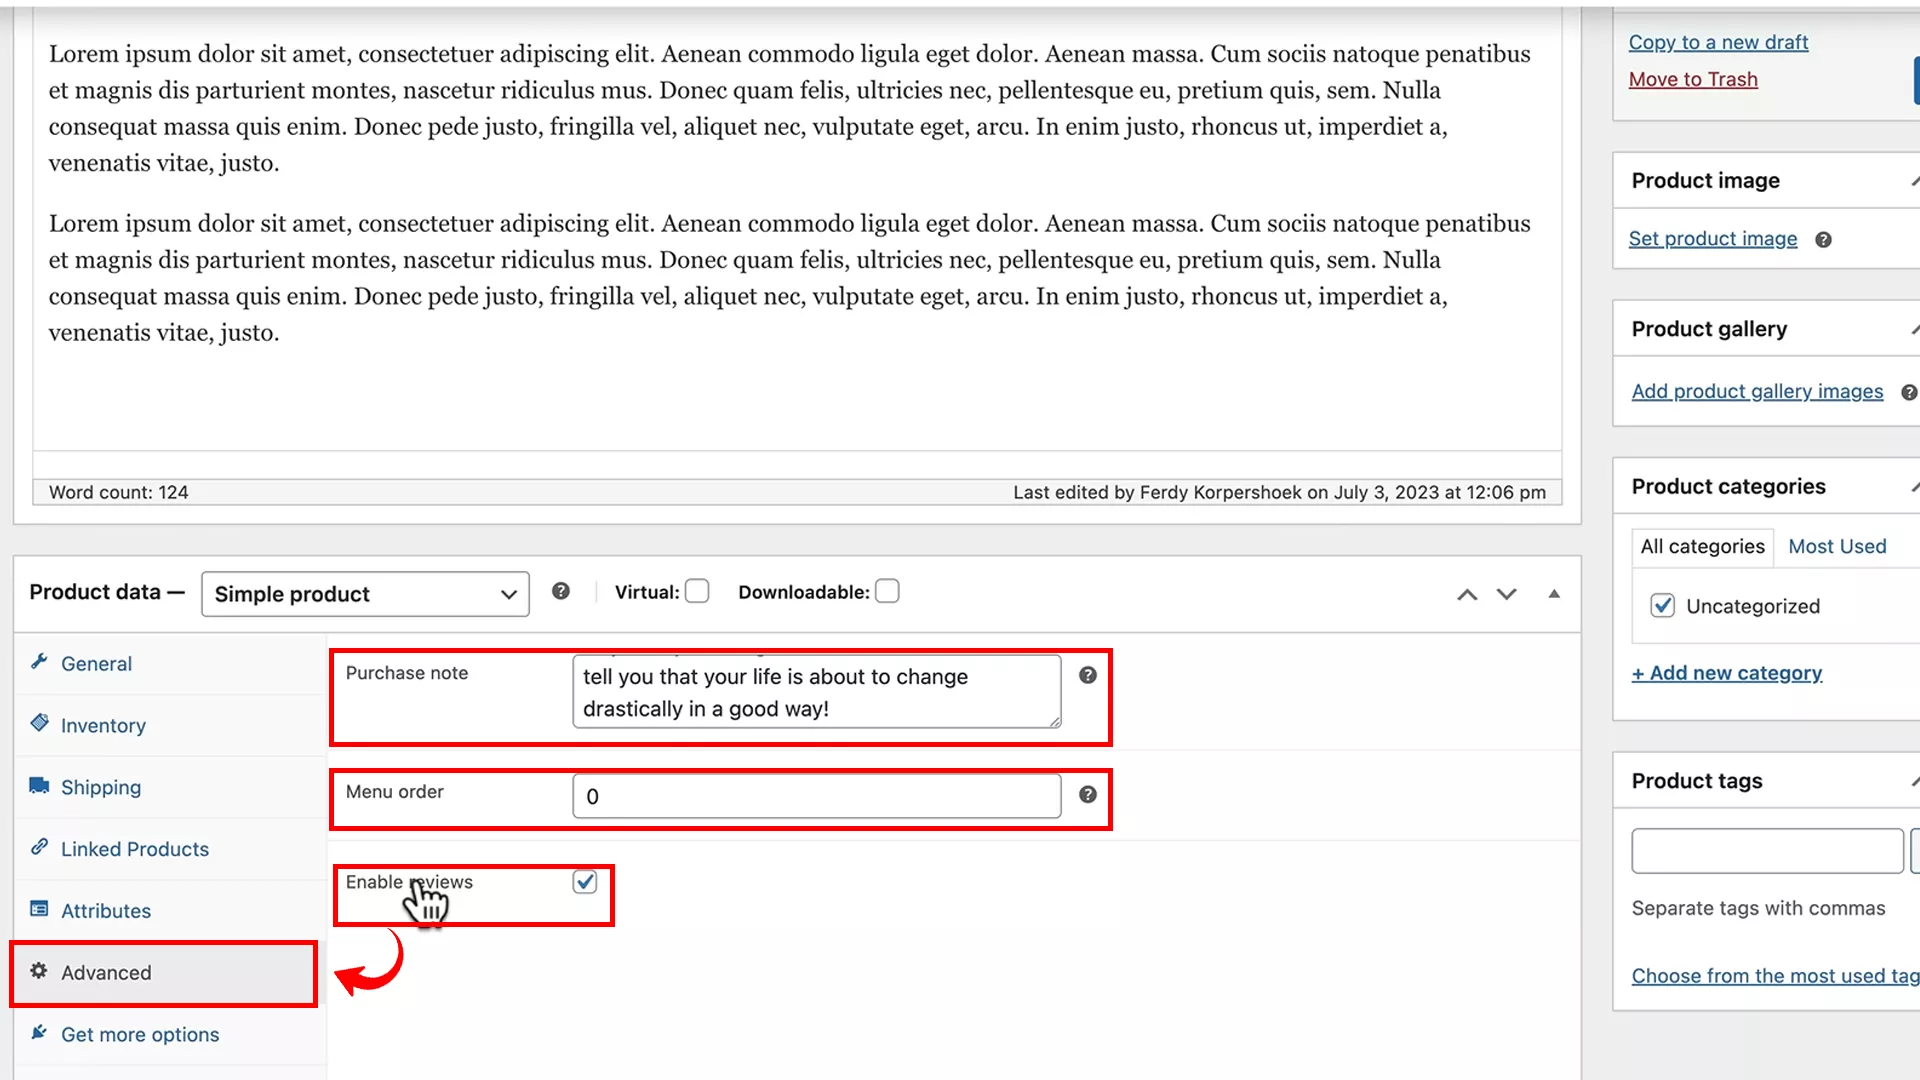
In the ‘Advanced’ section of the product editor, you have options to customize your product’s settings further:
- Reviews: You can choose to enable or disable customer reviews for each product.
- Purchase note: Add a note that will be sent to customers after they purchase the product.
- Menu order: Adjust the display order of the product on the Shop page under the default settings.
Get more options
This tab includes numerous options that might be overwhelming for beginners.
As someone who’s navigated these waters for a while, I generally leave these settings as they are.
Unless you have a specific need to tweak these, it’s best to focus on the core aspects of your product setup.
Adding a variable product to WooCommerce
When your online store features products with variations like different sizes or colors, you’ll need to familiarize yourself with the ‘Attributes’ section in WooCommerce. Let’s dive into how you can add these variable products to your store.
Setting up a variable product
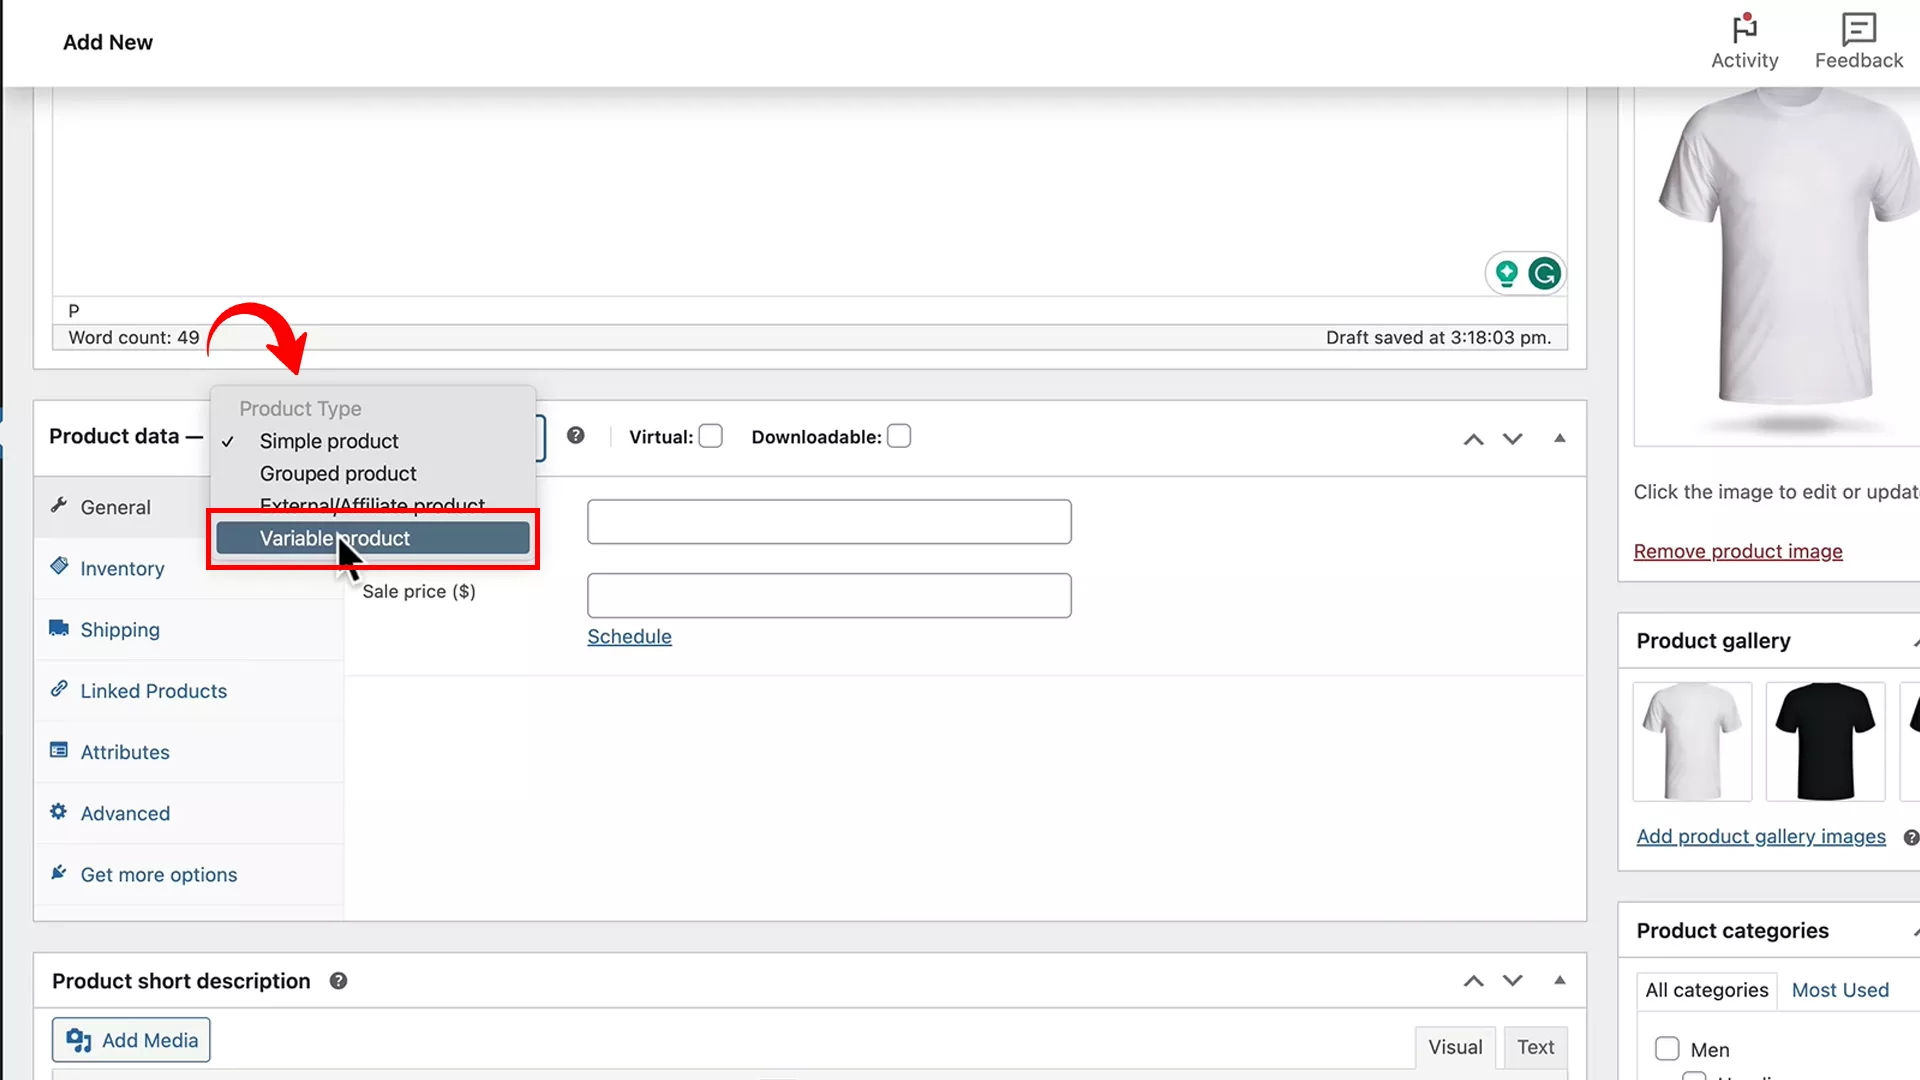
Step 1: In the ‘Product Data’ section, change the product type to ‘Variable product’.
Step 2: Navigate to the ‘Attributes’ tab within ‘Product Data’. Here, you’ll define the different aspects of your product that can vary, like size or color.
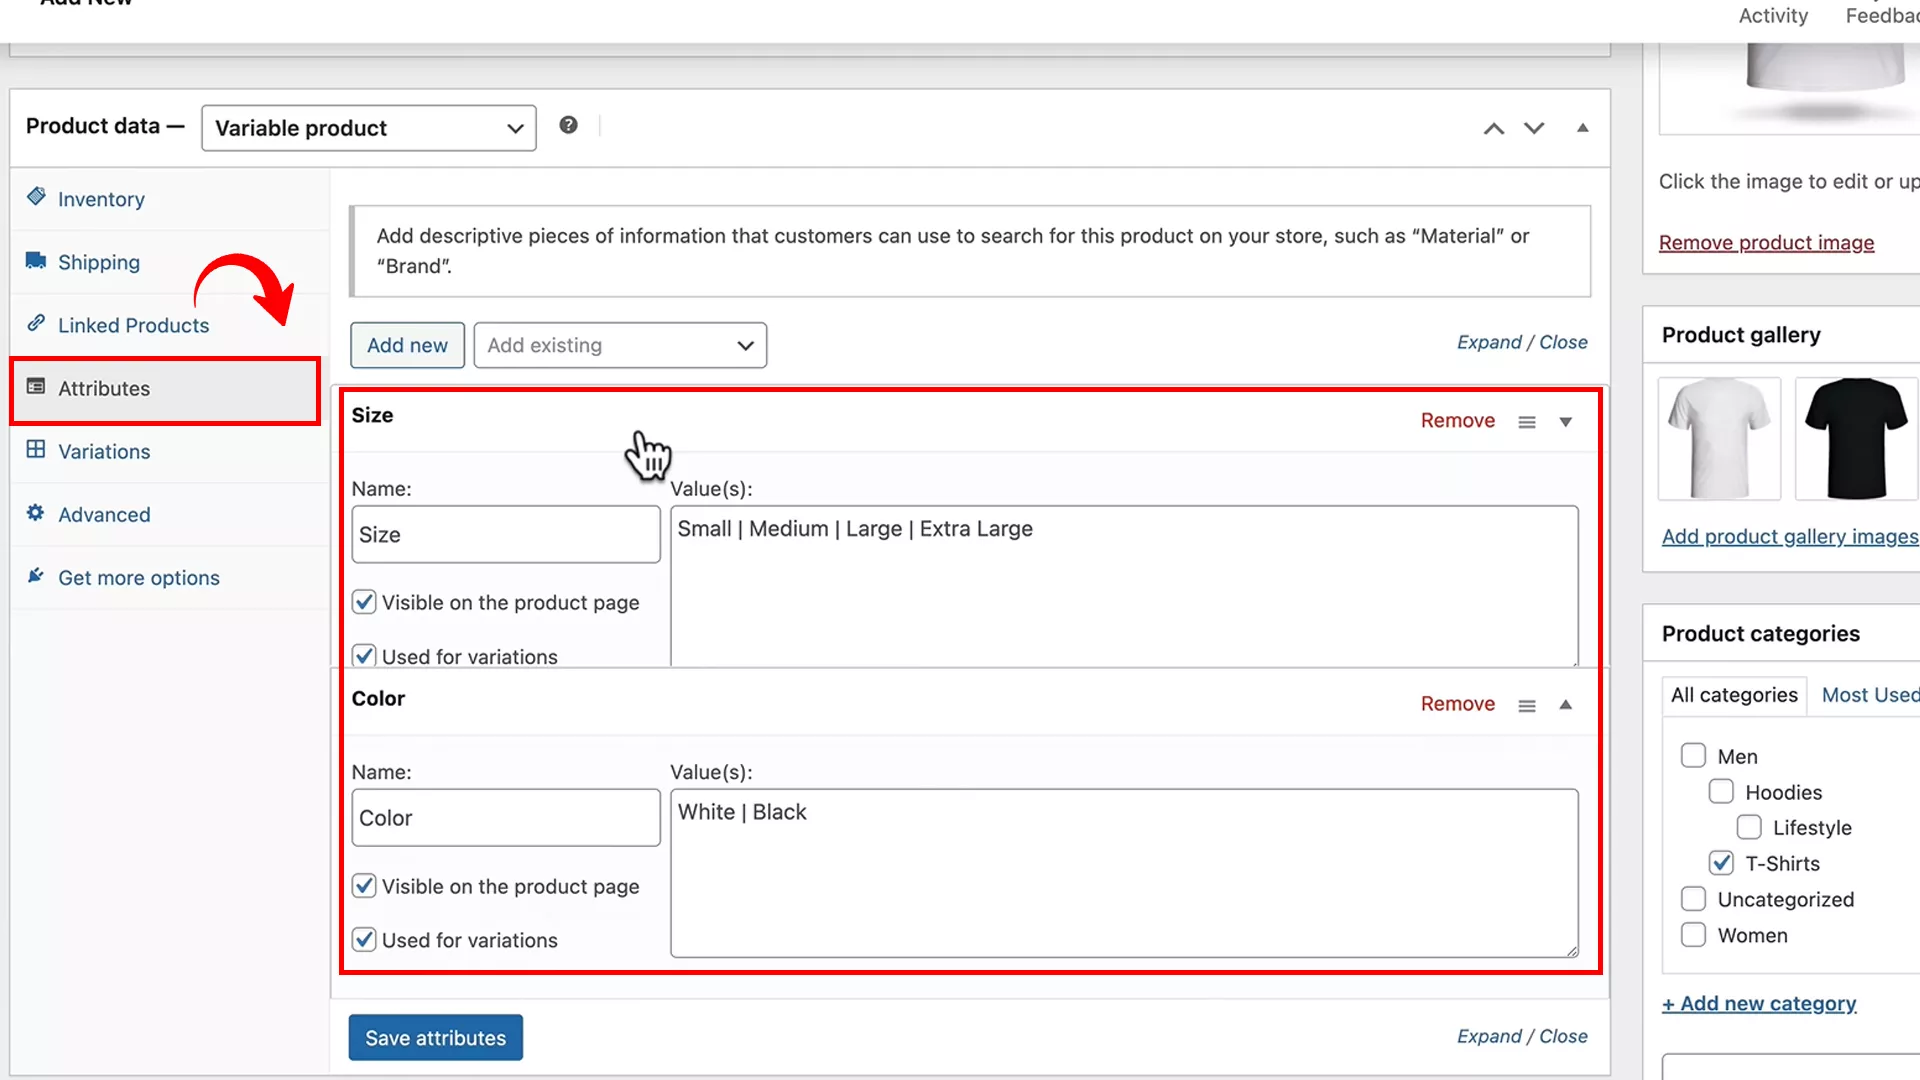
Step 3: Specify the variable name (e.g., ‘Size’) and then add the different options (e.g., Small | Medium | Large) using the “|” symbol to separate each variant.
Step 4: To add a new attribute, click the ‘Add New’ button. For my t-shirt product, I added ‘Size’ as the first attribute and ‘Color’ as the second. Once you’ve added all your attributes and their respective options, save them.
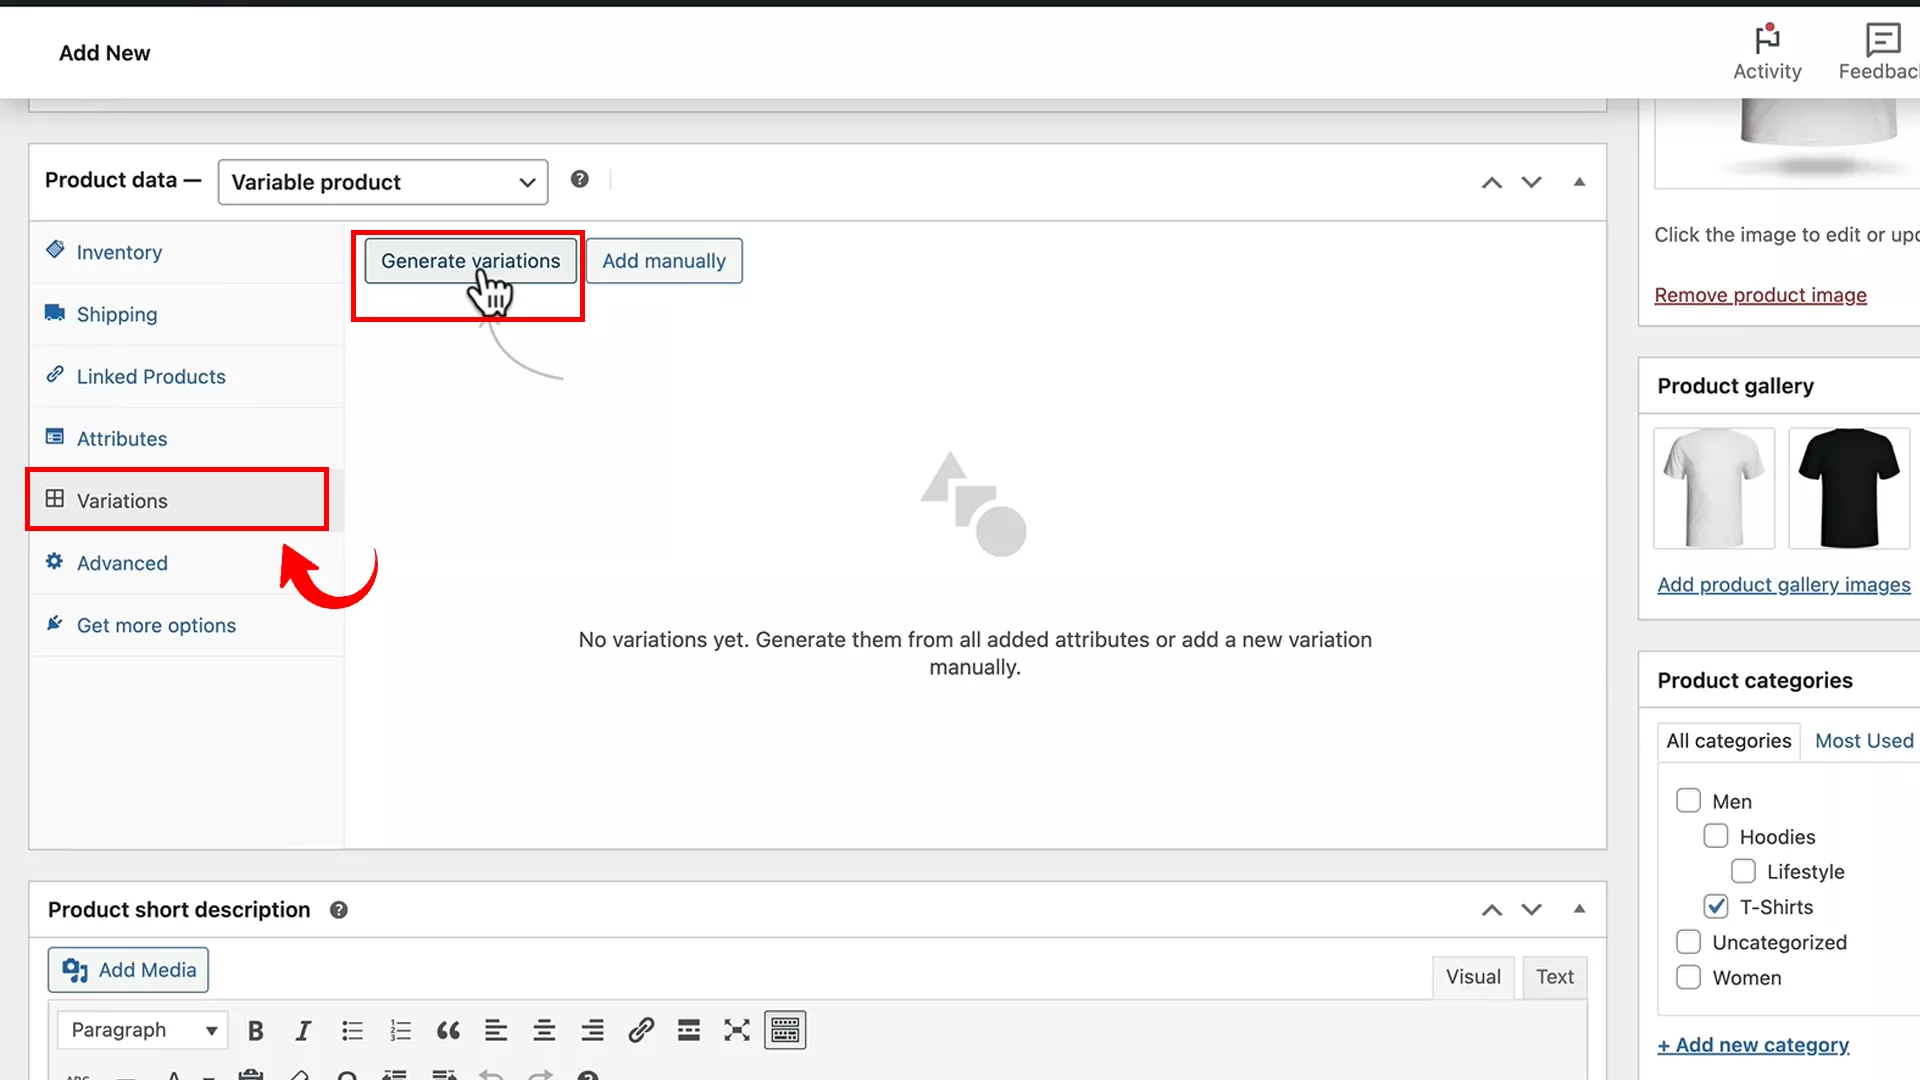
Step 5: Move to the ‘Variations’ tab and click ‘Generate variations’. This will automatically create combinations based on your specified attributes.
Pricing and inventory for each variant
While you can set a general price for all variants, you also have the option to assign different prices to each one. This is useful if you want to charge more for certain variants, like printed designs.
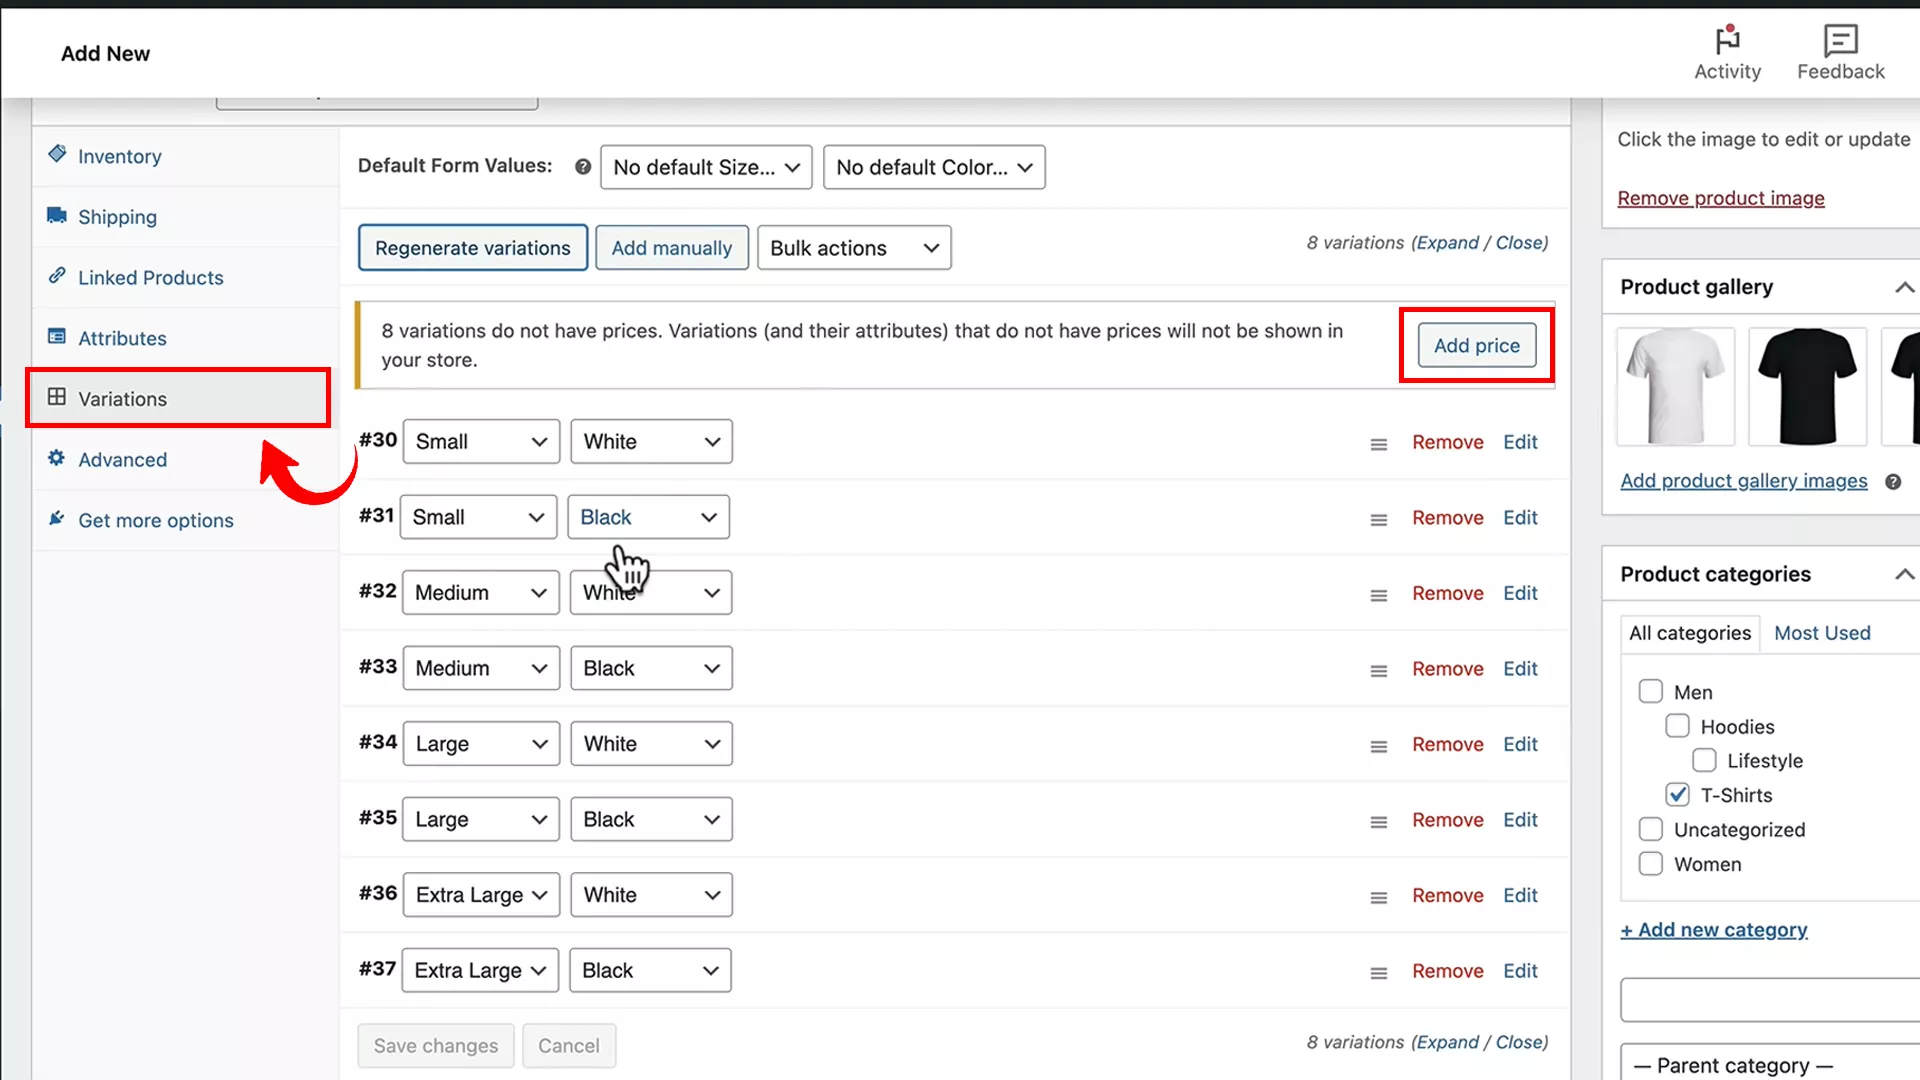
To set a general price, click on the ‘Add price’ button and enter the price you want to set for all the variations.
To set a unique price for each variant, click ‘Expand’ on the top right of the ‘Variations’ tab. Here, you can specify unique prices, weights, and dimensions for each variant.
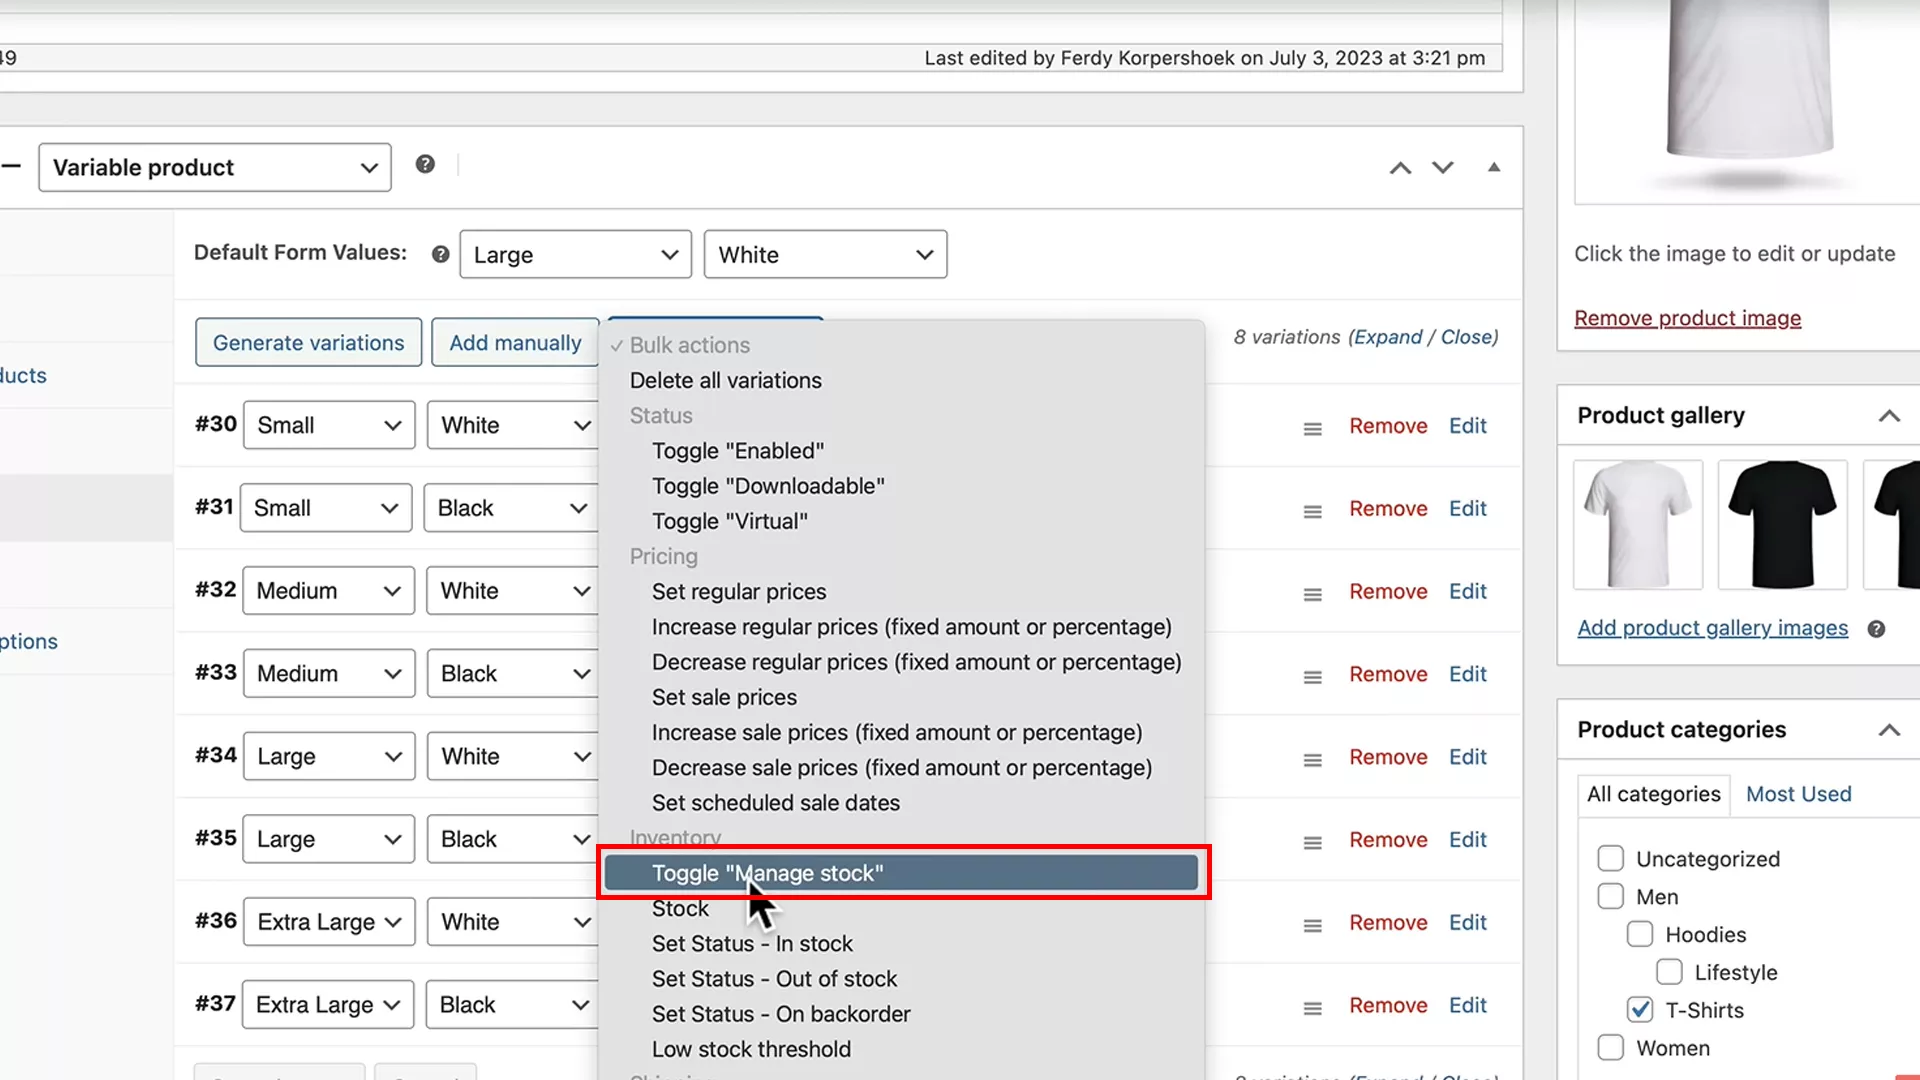
You can also manage stock levels for each variant. To do this, go to the ‘Bulk actions’ dropdown and toggle ‘Manage stock’ option for each variant in the expanded mode.
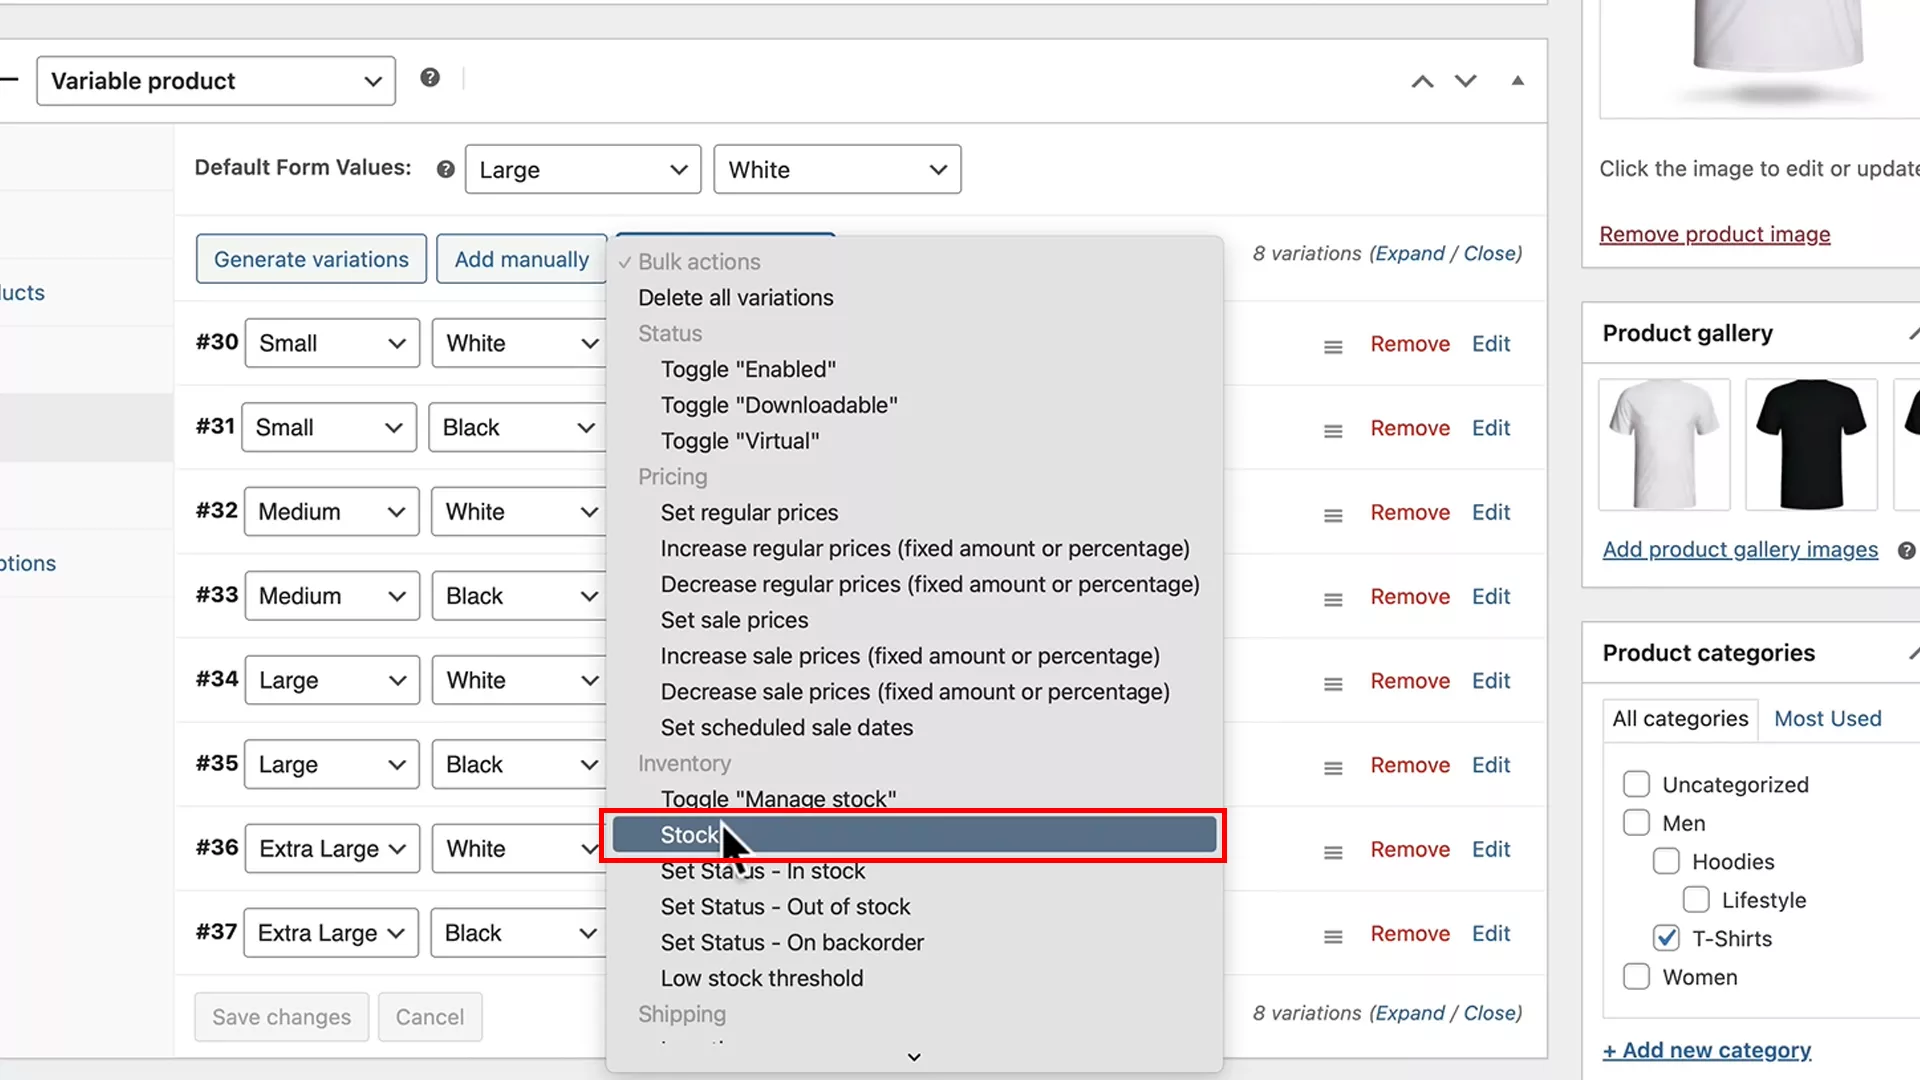
Next, add the stock quantity that you want for each variant. If you wish to add the same stock quantity to all variants, choose ‘Stock’ from the bulk actions and enter the desired stock value in the pop-up window.
Specifying the default variant
In an online store, especially during sales or busy shopping periods, minimizing customer effort is key to enhancing sales.
One way to achieve this is by setting a default variant for your products with variations, ensuring a smoother shopping experience for your customers.
In the ‘Variations’ section of your product editor, you’ll find an option for “Default form values.”
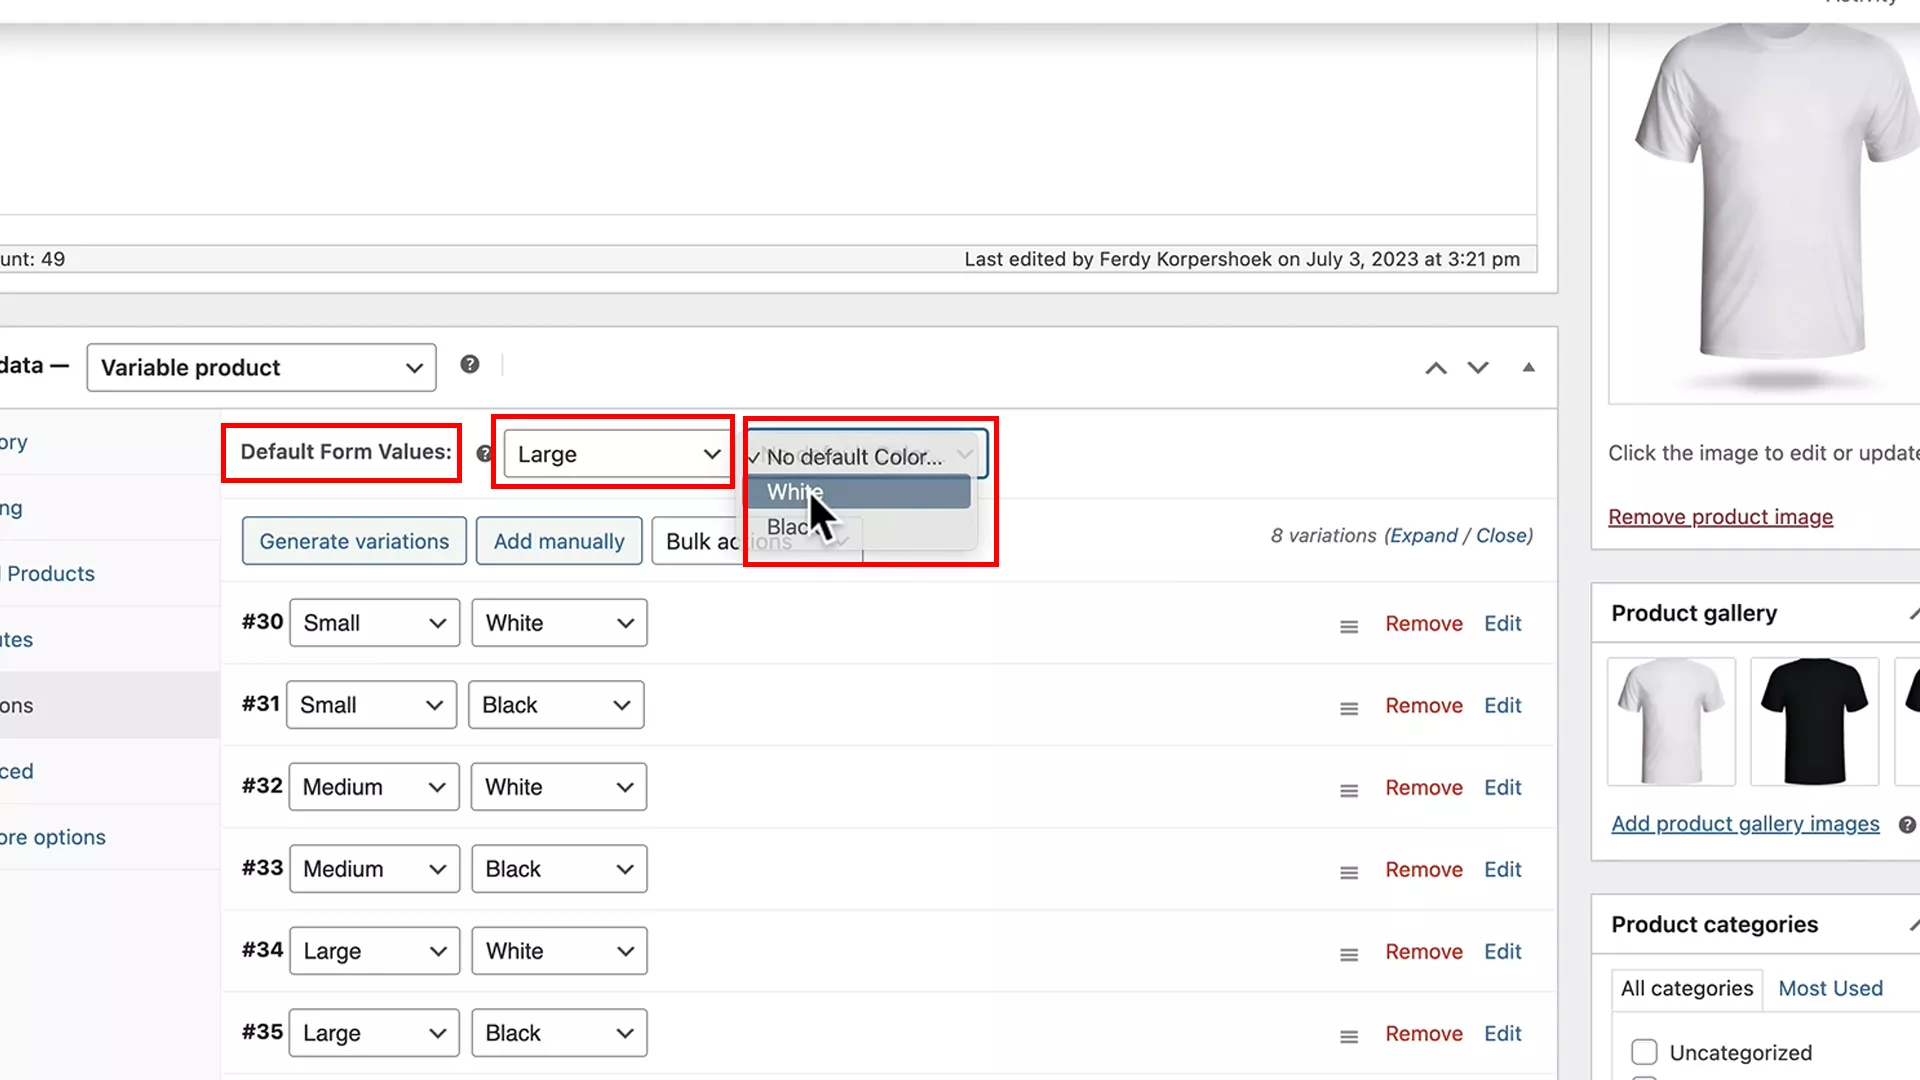
Select a variant commonly sold or preferred by most customers as the default. This pre-selection means the customer can quickly add the product to their cart without needing to choose variants, streamlining their shopping process.
For example, in my case, a white, large-sized T-shirt would be a good variant to set as default.
Adding images for each variant
For products with visual variations (like different colors or patterns), it’s important to have distinct images for each variant. This not only helps customers see what they are selecting but also enhances the overall appeal of your product pages.
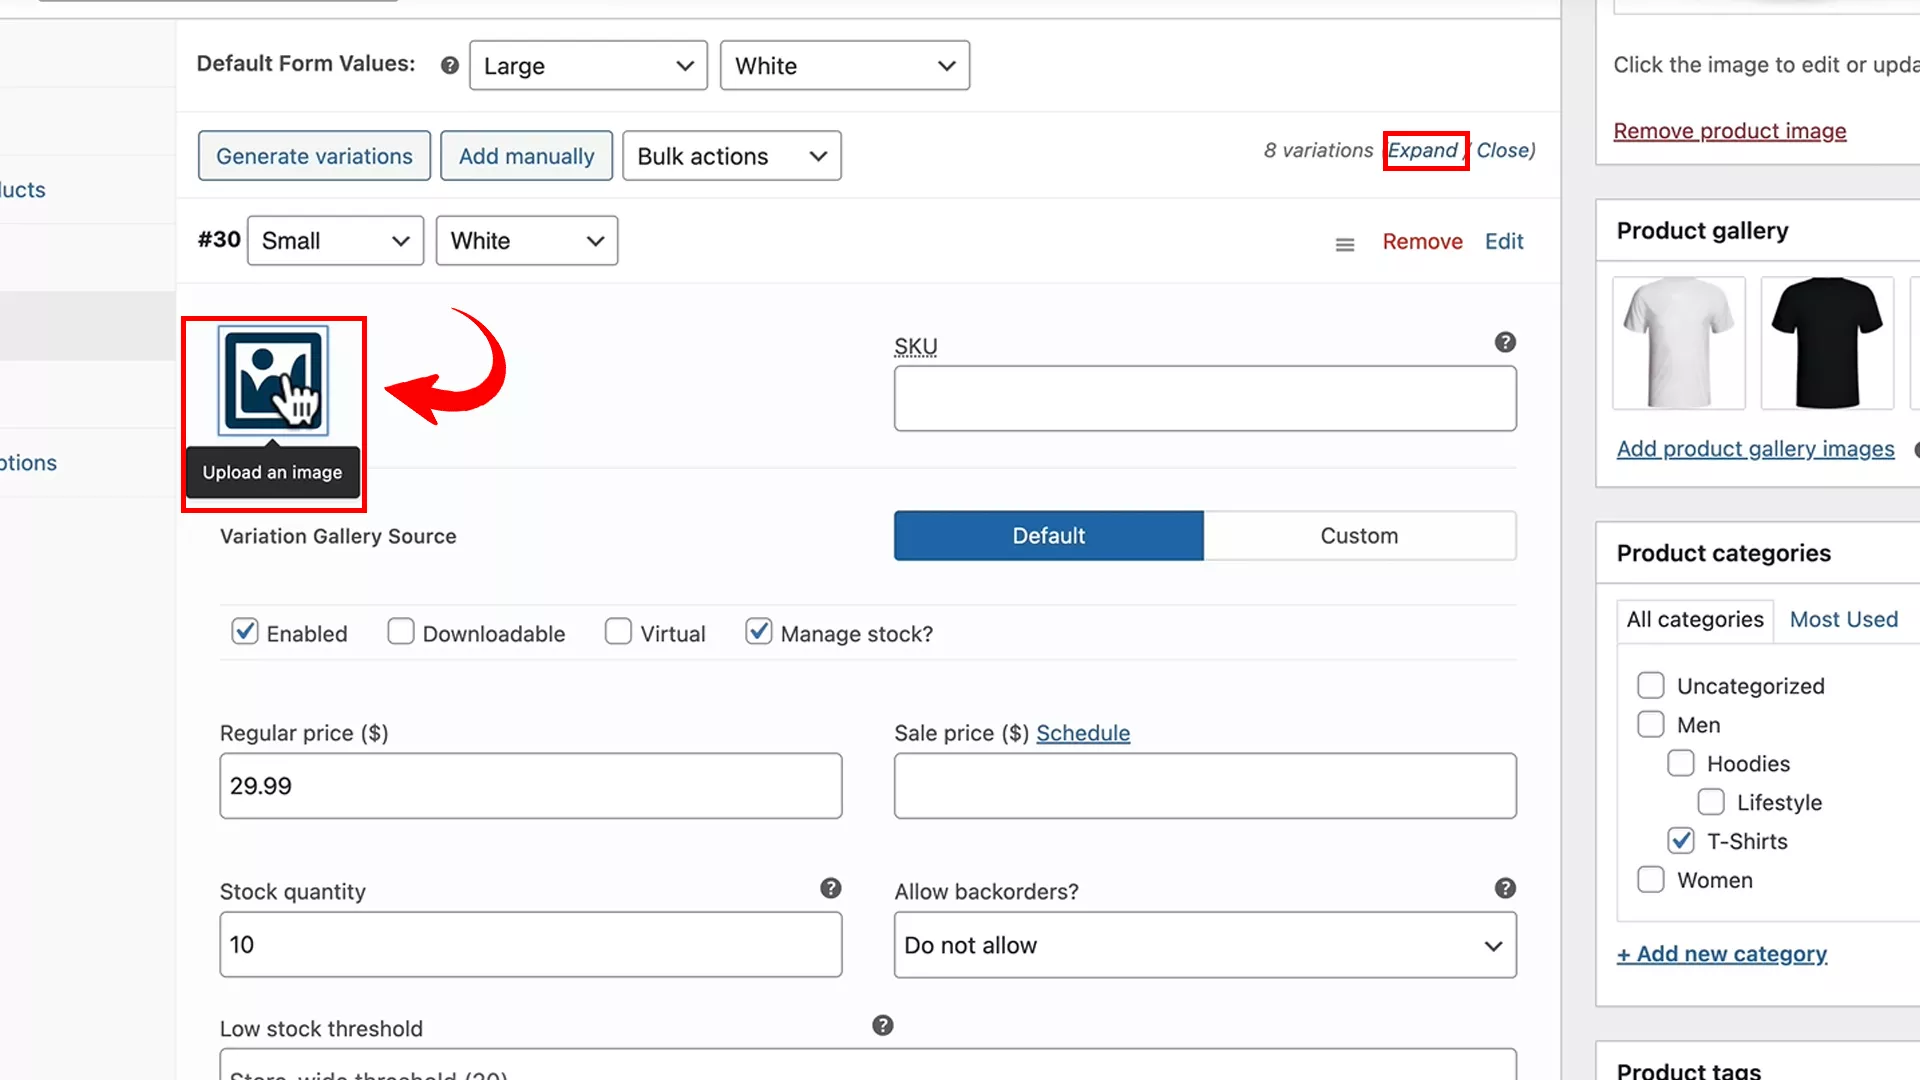
In the expanded mode of the ‘Variations’ section, you will see an image icon for each variant. Click on the icon corresponding to each variant and upload the image accordingly.
Adding permanent attributes
As we dive deeper into setting up your online store on WooCommerce, let’s think about enhancing the buyer’s experience.
You know, when I was setting up my webshop, a thought struck me – what if we could showcase product options with images, colors, and labels instead of just plain text options?
This kind of dynamic display not only makes it easier for visitors to choose but also significantly enhances the overall shopping experience.
And let’s be honest, our ultimate goal is to make sales, right? So, let me show you a much more effective way to display your product variants.
Using variation swatches for enhanced variant display
To transform your variant selections into more intuitive swatches or buttons, there’s a handy plugin called “Variation Swatches for WooCommerce by CartFlows.” Here’s how to set it up:
In your WordPress dashboard, navigate to ‘Plugins’ and click ‘Add New’. Search for “Variation Swatches for WooCommerce.” You’ll find multiple results but go for the one by CartFlows and install it.

Before proceeding, remove any attributes you’ve previously added to your products.
Next, head over to ‘Products’ > ‘Attributes’ from the admin panel on the left. Here, you’ll add common attributes like size and color.
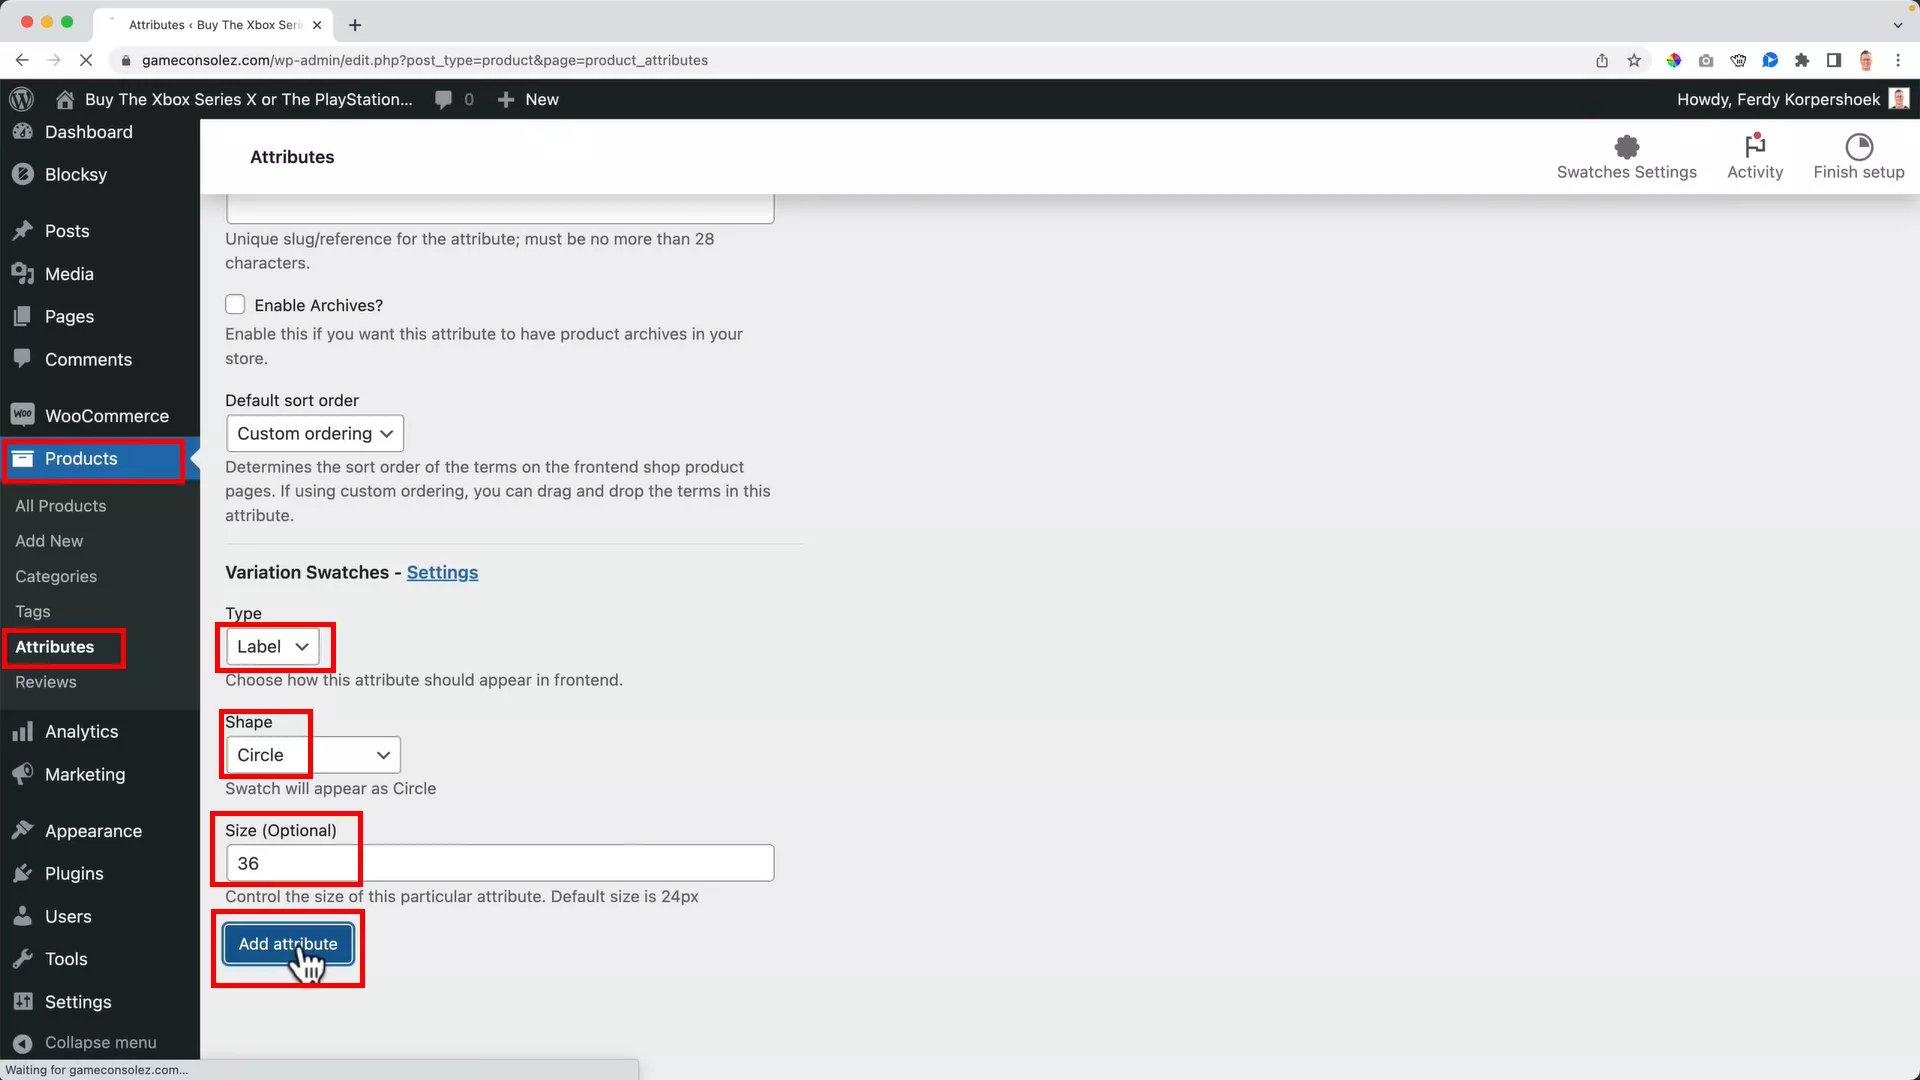
When adding an attribute, fill in details such as the attribute’s name, type, shape, and size. For example, I used “Size” as the attribute name, choose “Label” as the type, and select “Circle” as the shape.

After adding an attribute, click “Configure terms.” This allows you to define specific sizes available for your products.
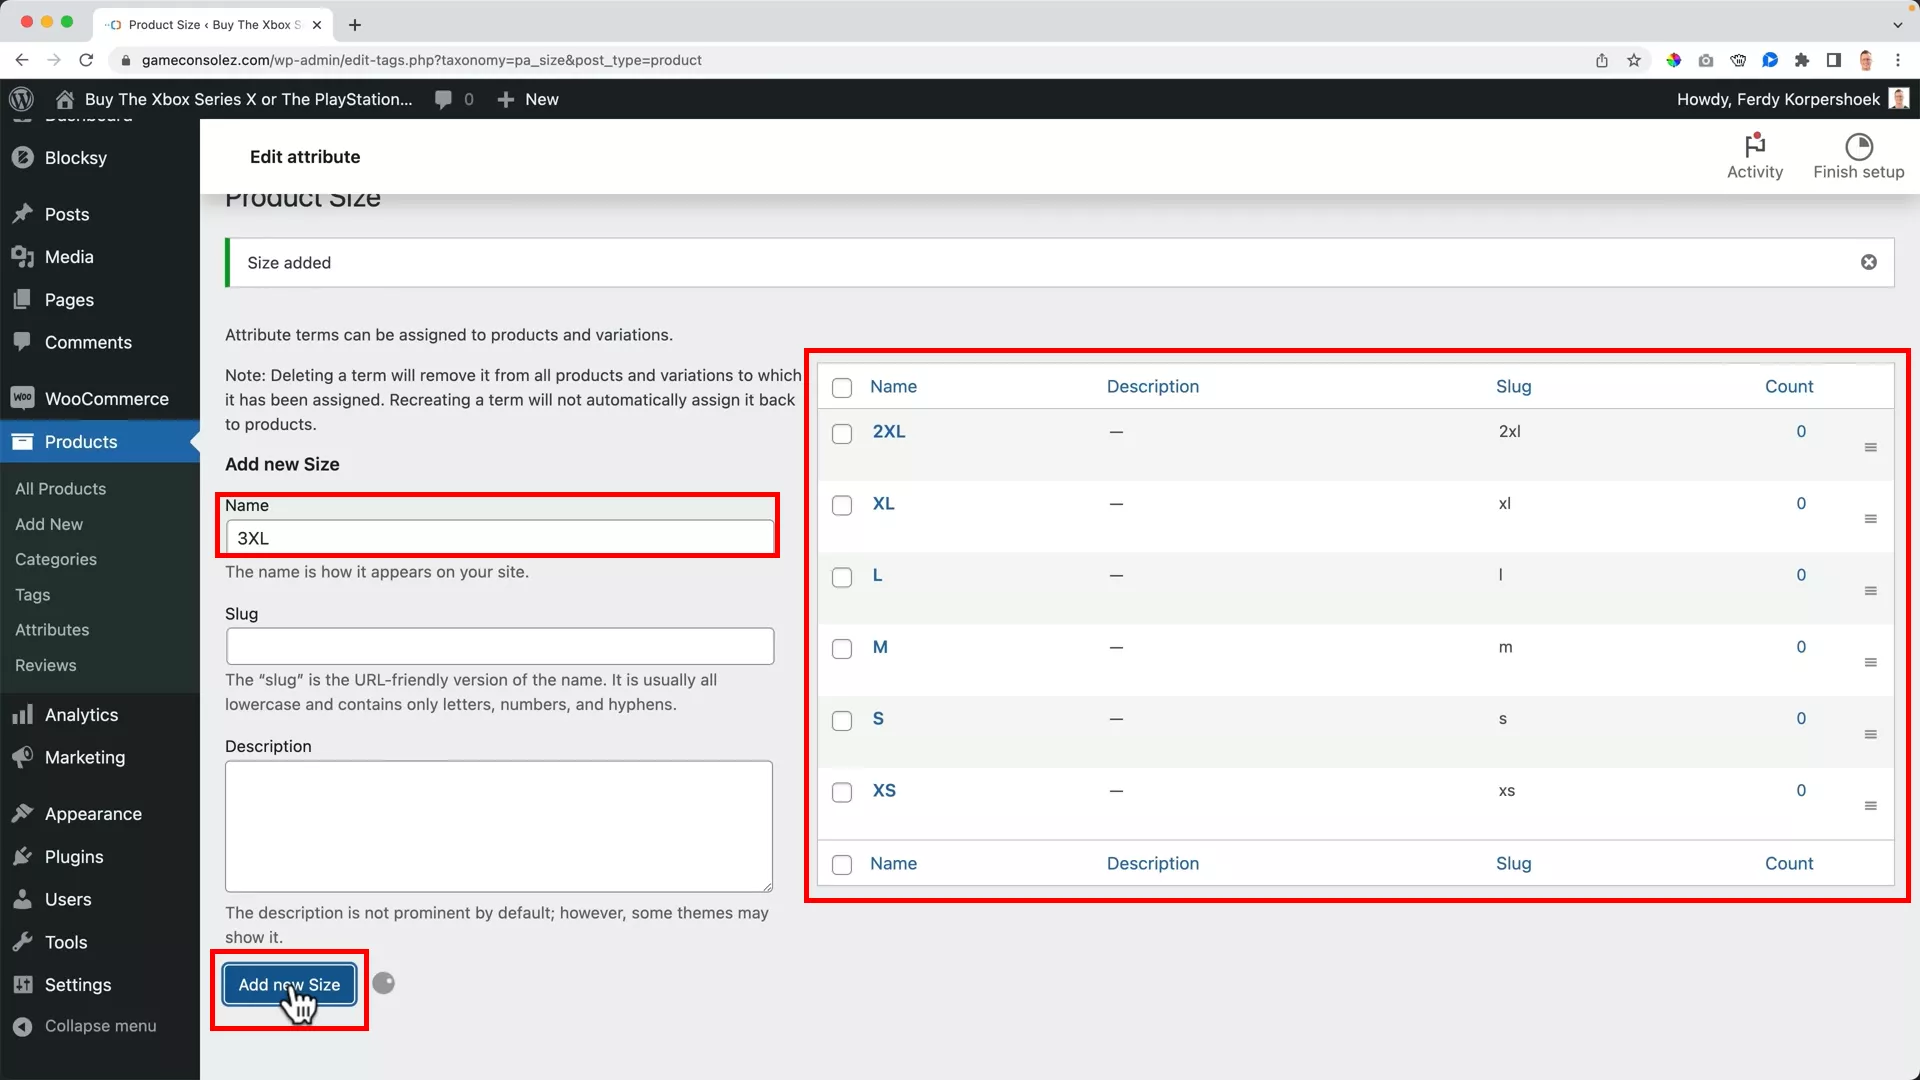
Enter the sizes in the “Name” field and save them without any description. Remember to arrange the sizes in the order you want them displayed on the product page.
To add another attribute, like color, return to ‘Attributes’ under ‘Products’ and create a new attribute. Choose ‘Color’ as the type for color attributes. In “Configure terms”, you can select the specific colors that will show up on the product page. The process is the same as above.
If your products vary by pattern or you wish to use images for variants, add “Image” as an attribute type. I demonstrated this by using black and white t-shirts as image variants.
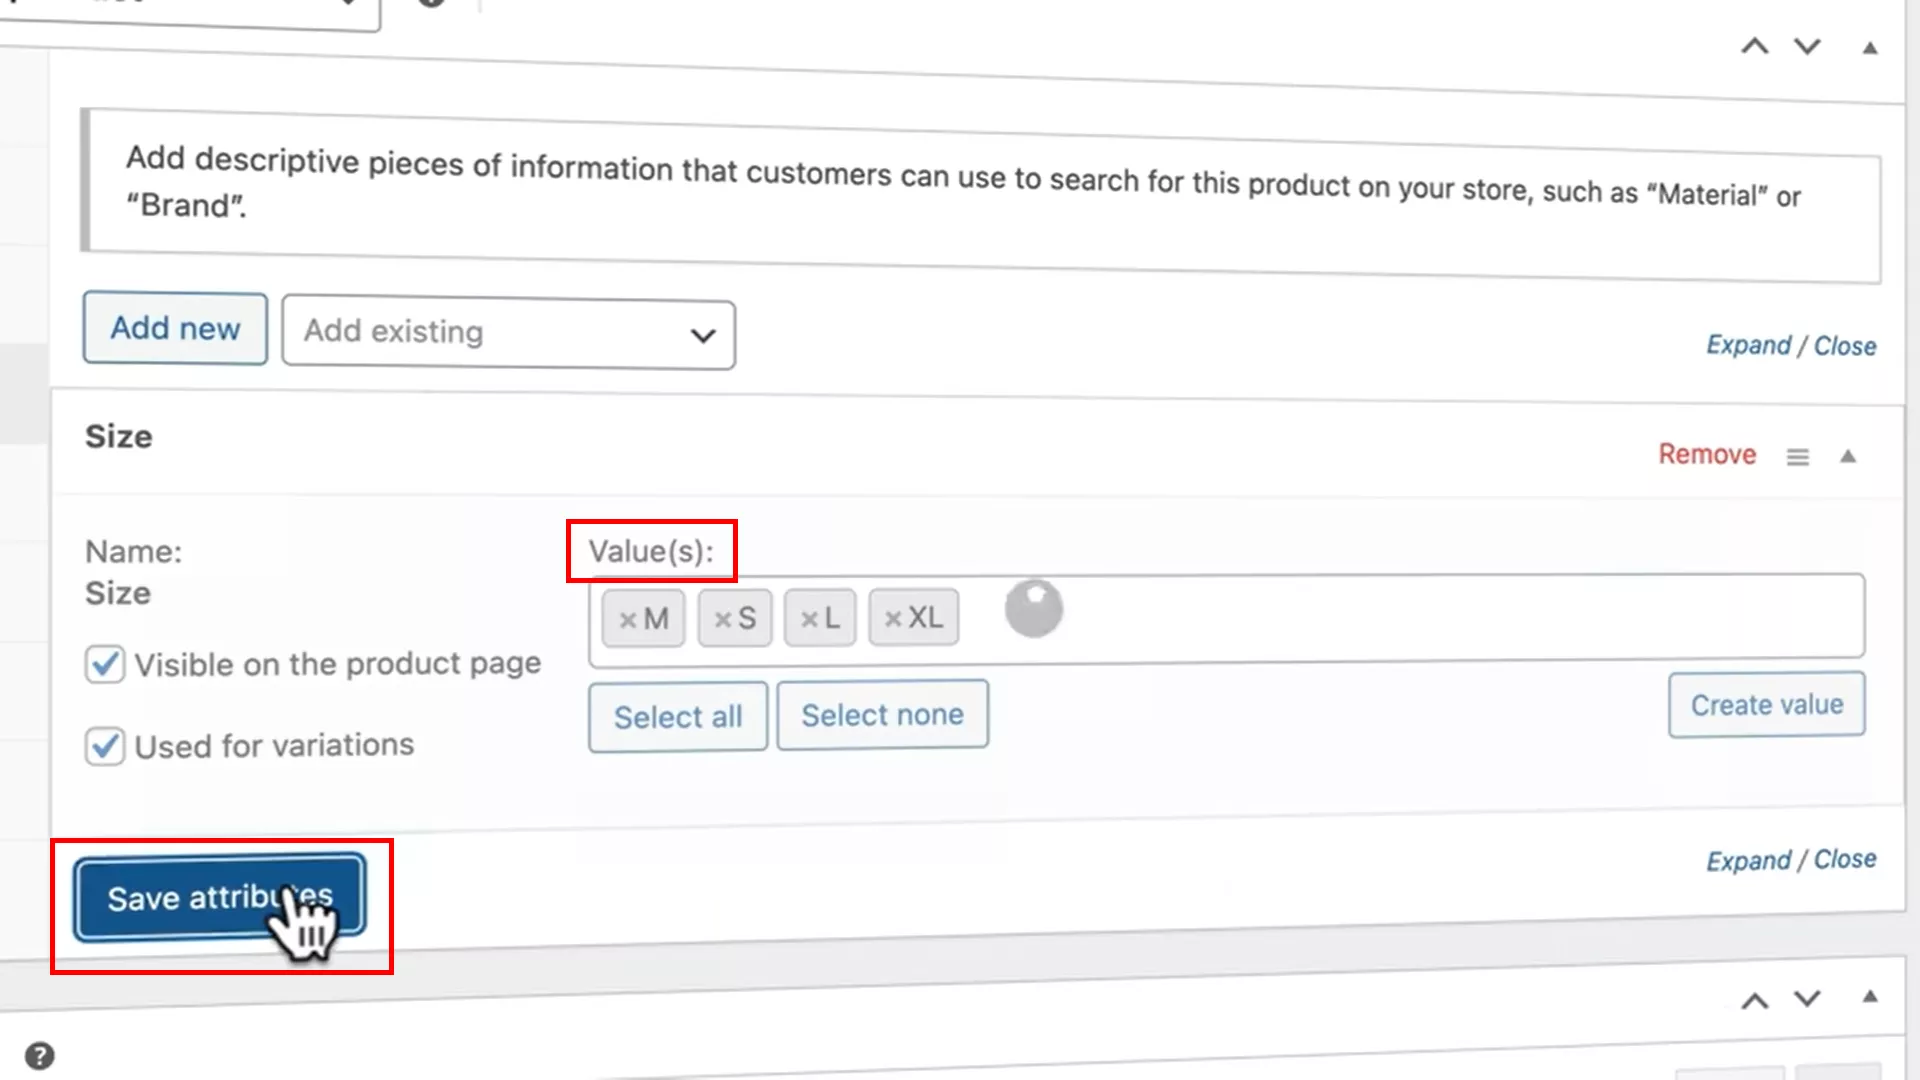
Finally, when you’re editing the attributes of a product, you can either add a new attribute or choose from the existing ones. Under ‘Value’, select all the attribute values that apply to the product.
6. Add Different Types of Products
Expanding your webshop with various product types can significantly enhance your customer’s shopping experience and potentially boost your sales. WooCommerce offers several product types beyond the simple and variable ones. Let’s explore four additional types you can integrate into your store.
Affiliate products
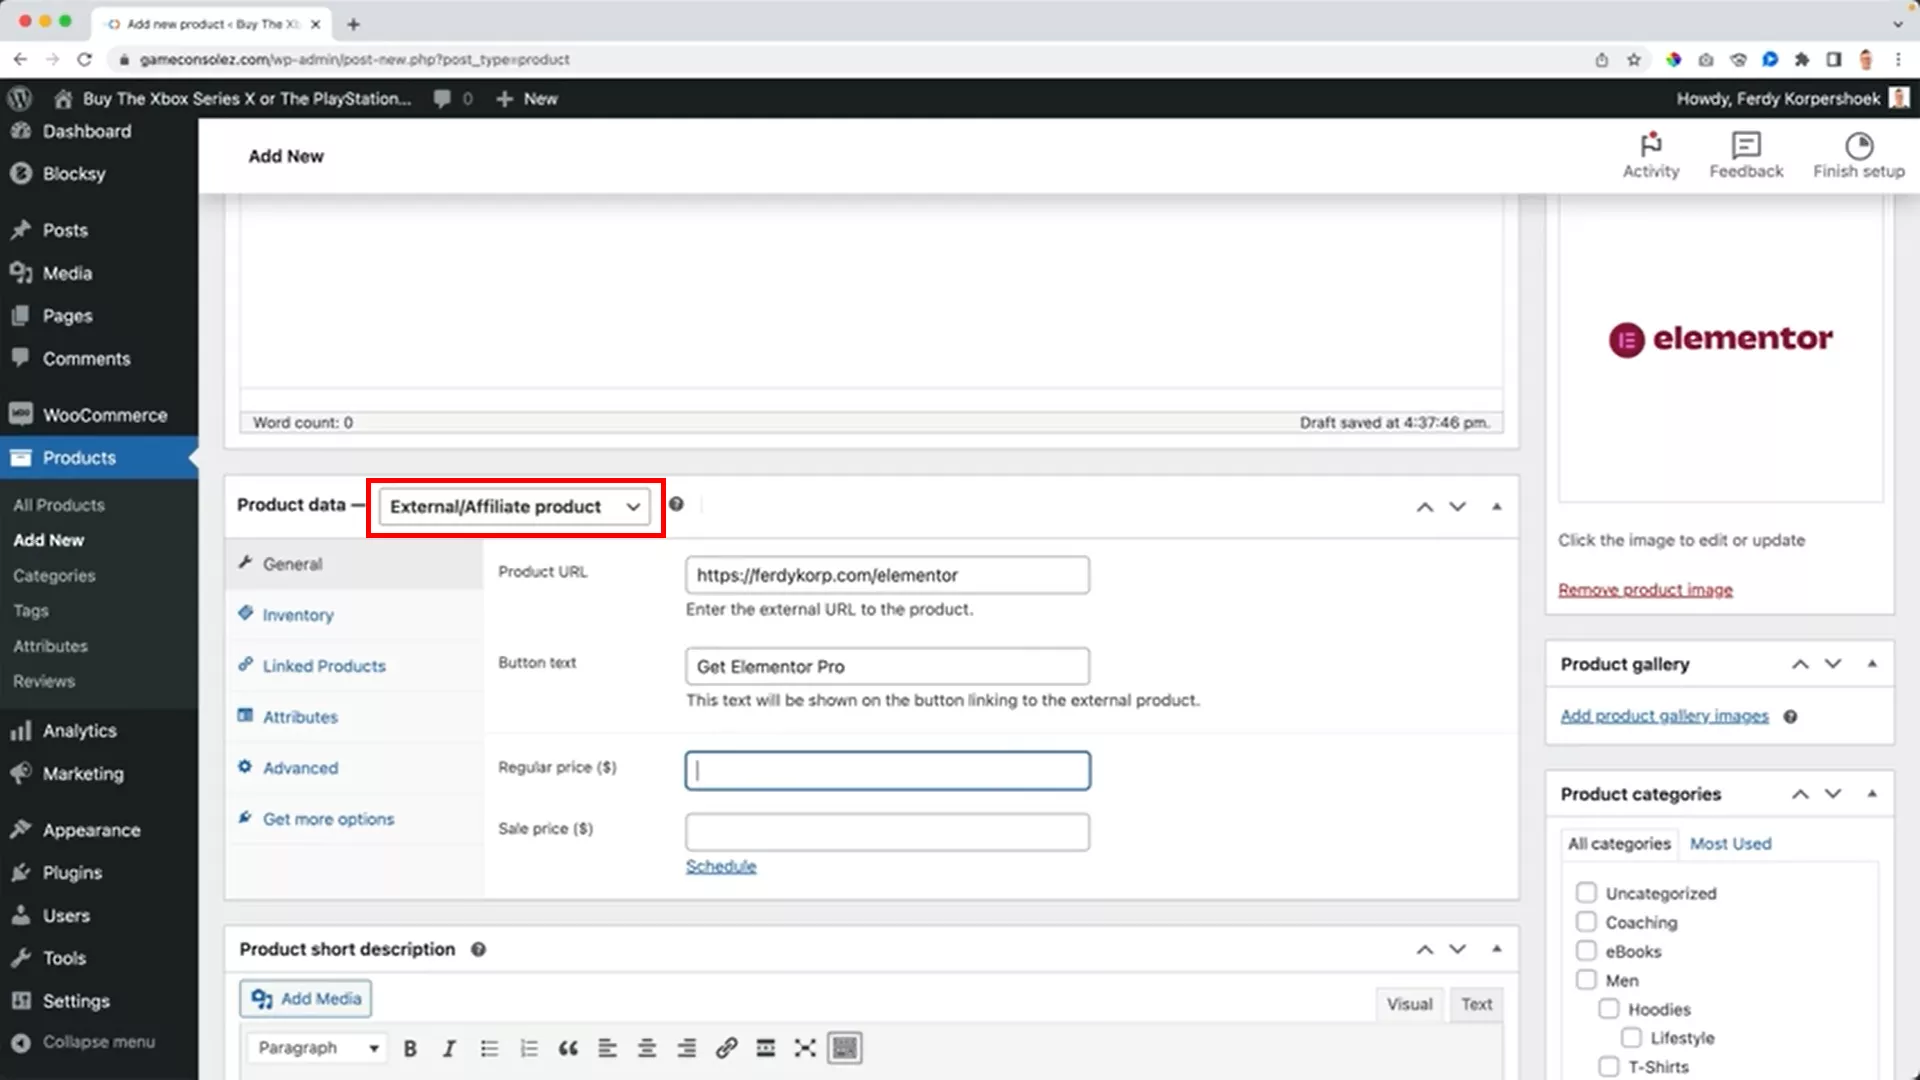
Do you want to include products from other websites and earn commissions? Choose the “External product” option from the dropdown menu in the Product Data section.
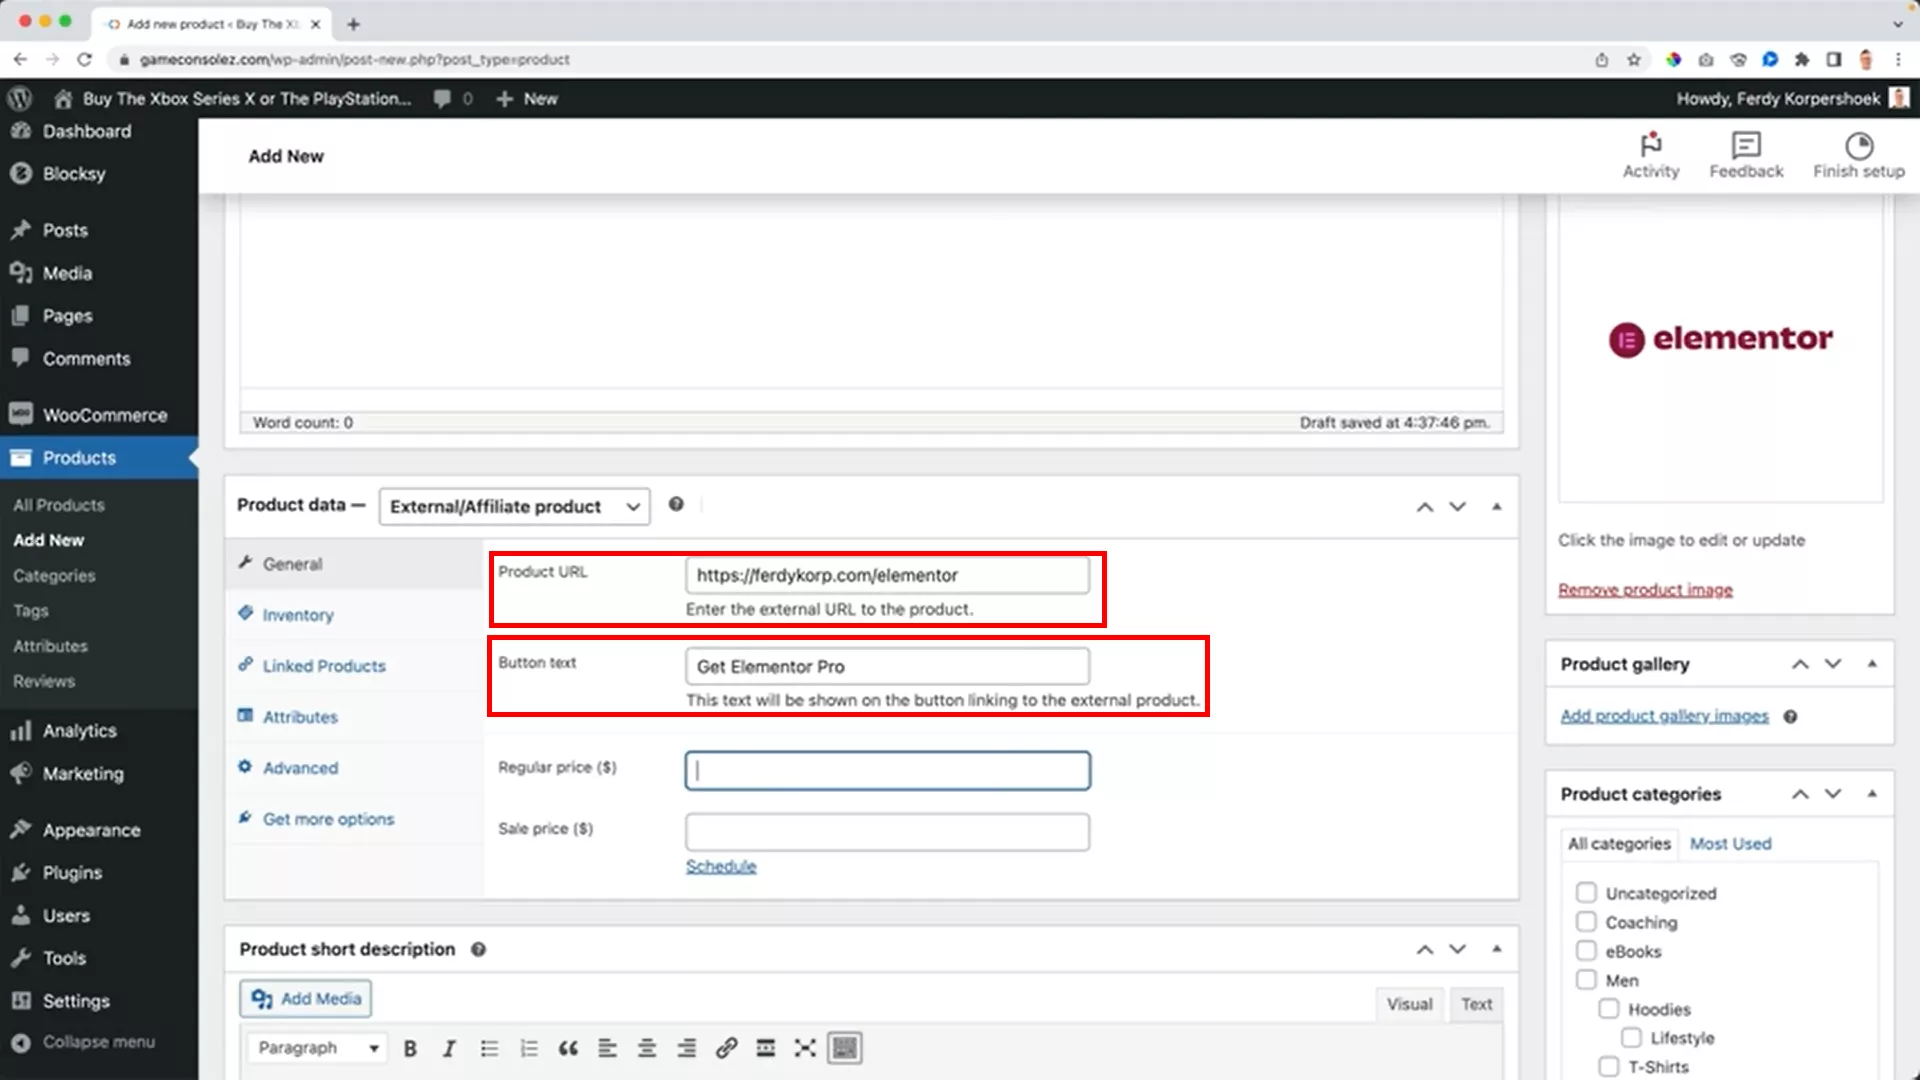
For example, I added my Elementor affiliate link as a product on my site. When customers click the “Get Elementor” button, they’re redirected to my affiliate link to purchase Elementor, and I earn a commission.
It’s a straightforward way to monetize your website with products you endorse.
Digital or downloadable products
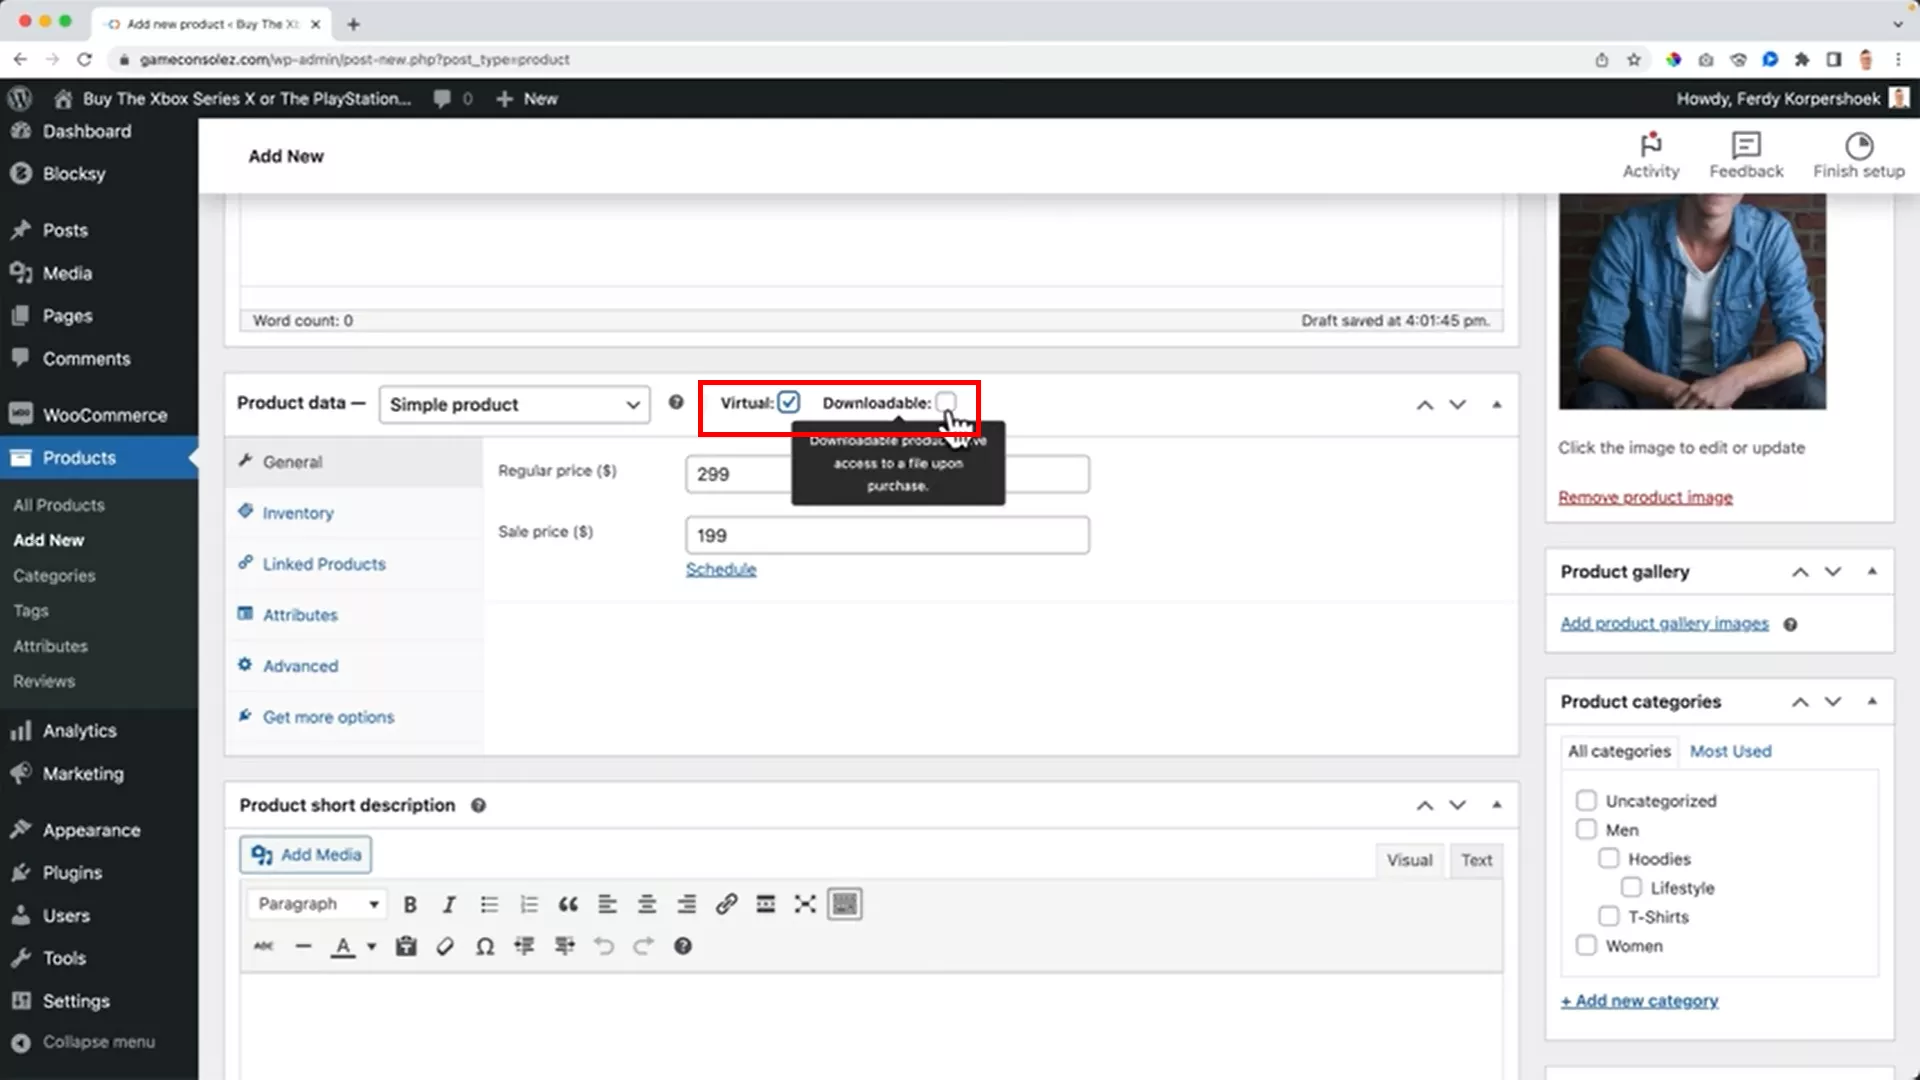
If you’re selling digital goods like eBooks or offering services like consultation calls, mark your product as virtual or downloadable under the simple product category.
- For an eBook, tick both ‘Virtual’ and ‘Downloadable’ since it’s a digital file customers can download.
- For services like a consultation call, choose ‘Virtual’ only. Include instructions for scheduling the call in the purchase note. Also, consider setting the purchase limit to one to prevent double bookings or overbooking.
Grouped products
Grouped products allow you to sell multiple items on a single product page. This is great for bundling related products.
Start by adding each product you want to group as drafts.
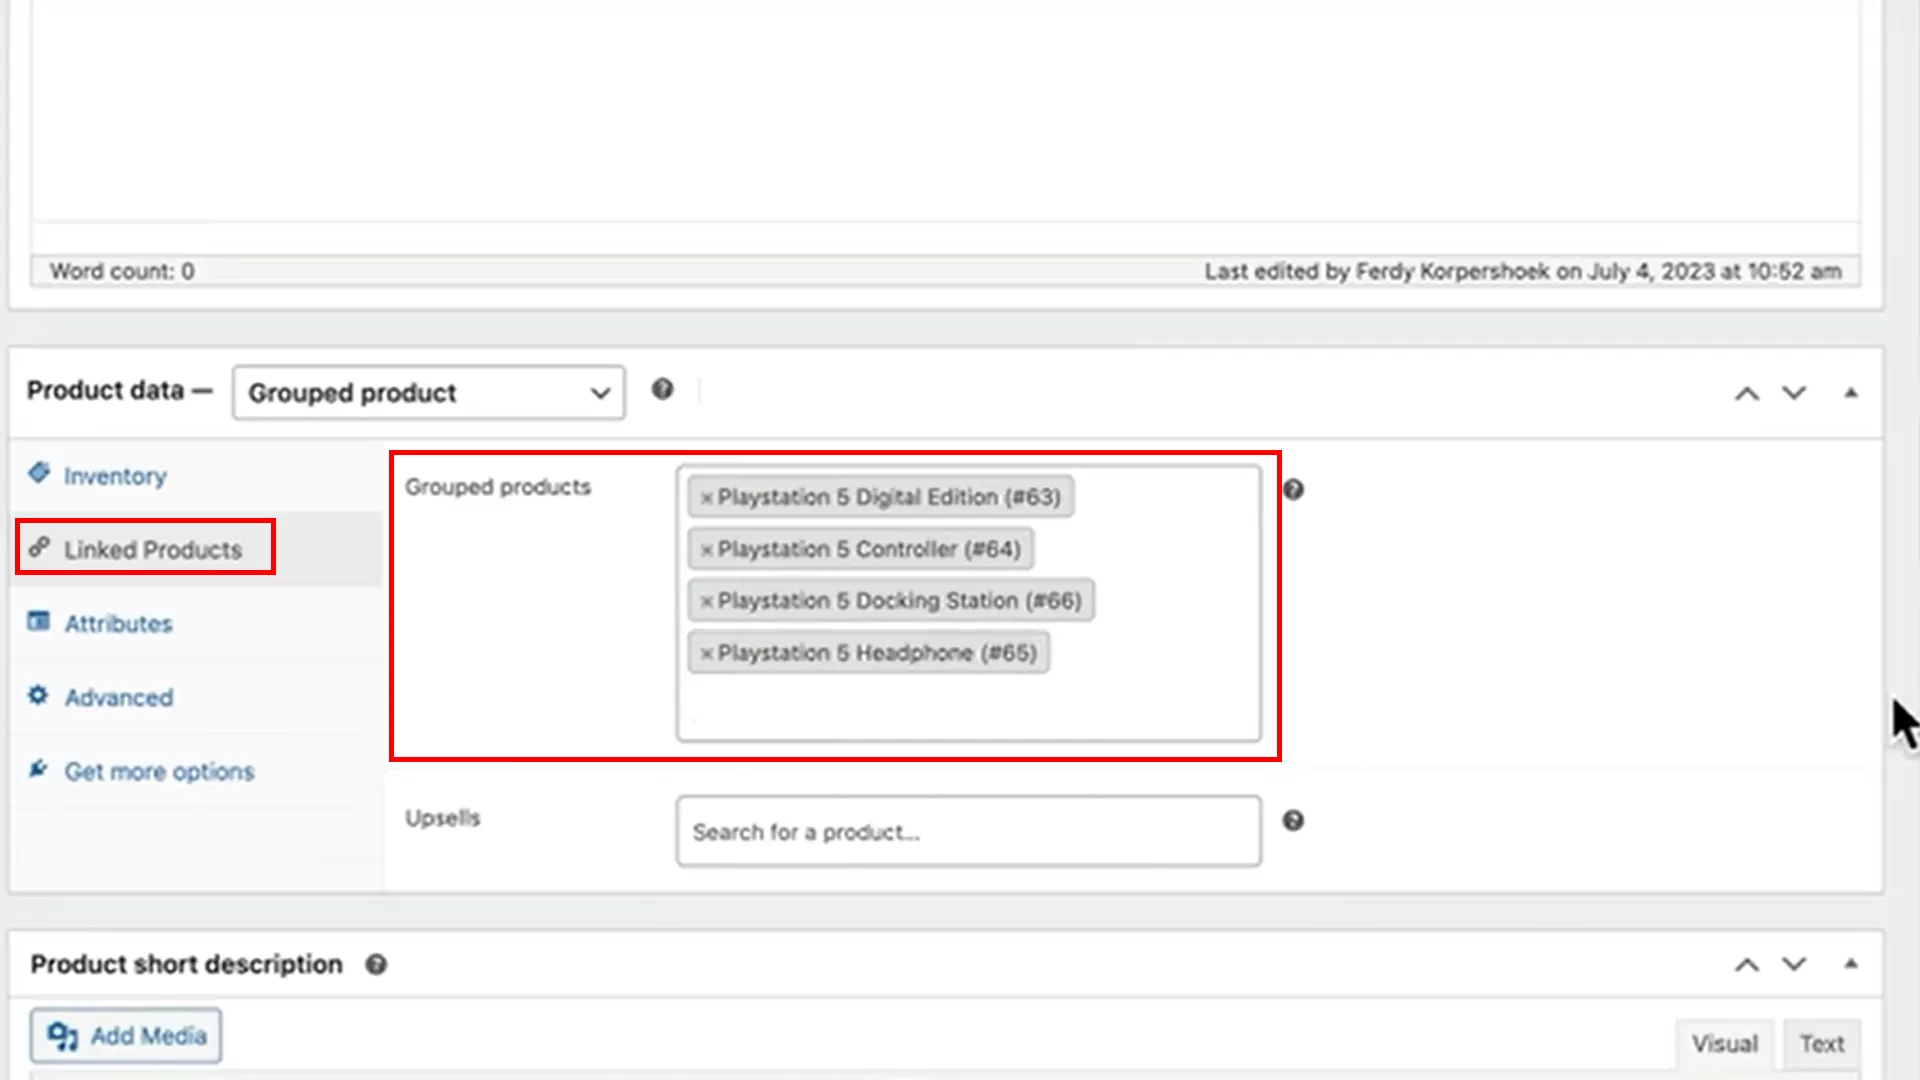
To create the grouped product, go to “Linked Products” under Product Data and add these products.
In my YouTube video tutorial, I show you exactly how to group a PlayStation, controller, docking station, and headphones. Here’s how it looks on the product page of my demo site:
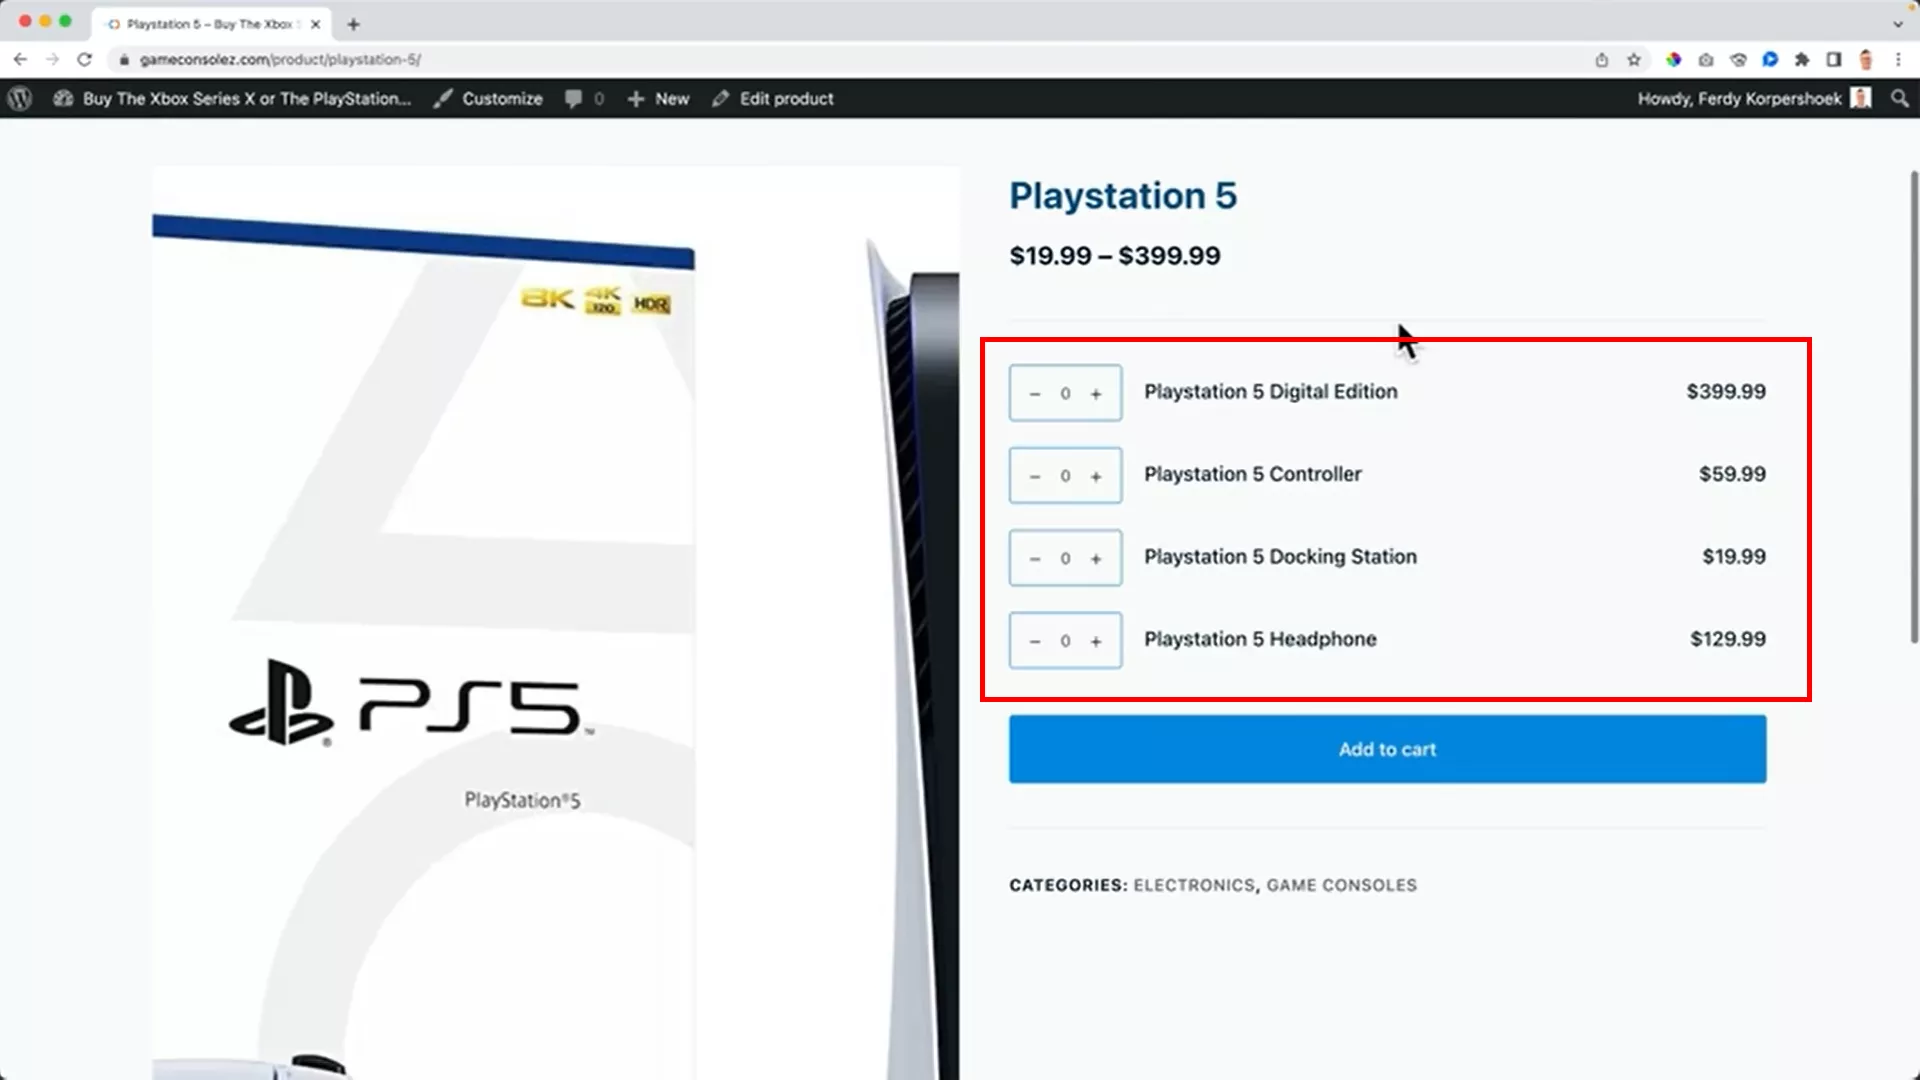
On the product page, customers can see and select the quantities of each product in the group.
On a sidenote, I don’t use this feature on any of my or my clients’ websites. This is just to show you what’s possible with WooCommerce.
Upselling and cross-selling products
We’ve got different types of products shining on our webshop. It’s the perfect time to jazz things up with upsells and cross-sells. These are nifty little tricks that can significantly boost your sales. So, let’s dive into how you can implement them on your WooCommerce site.
Imagine your prospect is checking out a product on your site. Right now, there’s no upsell. But what if, while viewing a product like the PlayStation 5, your prospect also sees suggestions for the controller or a video game? That’s upselling!
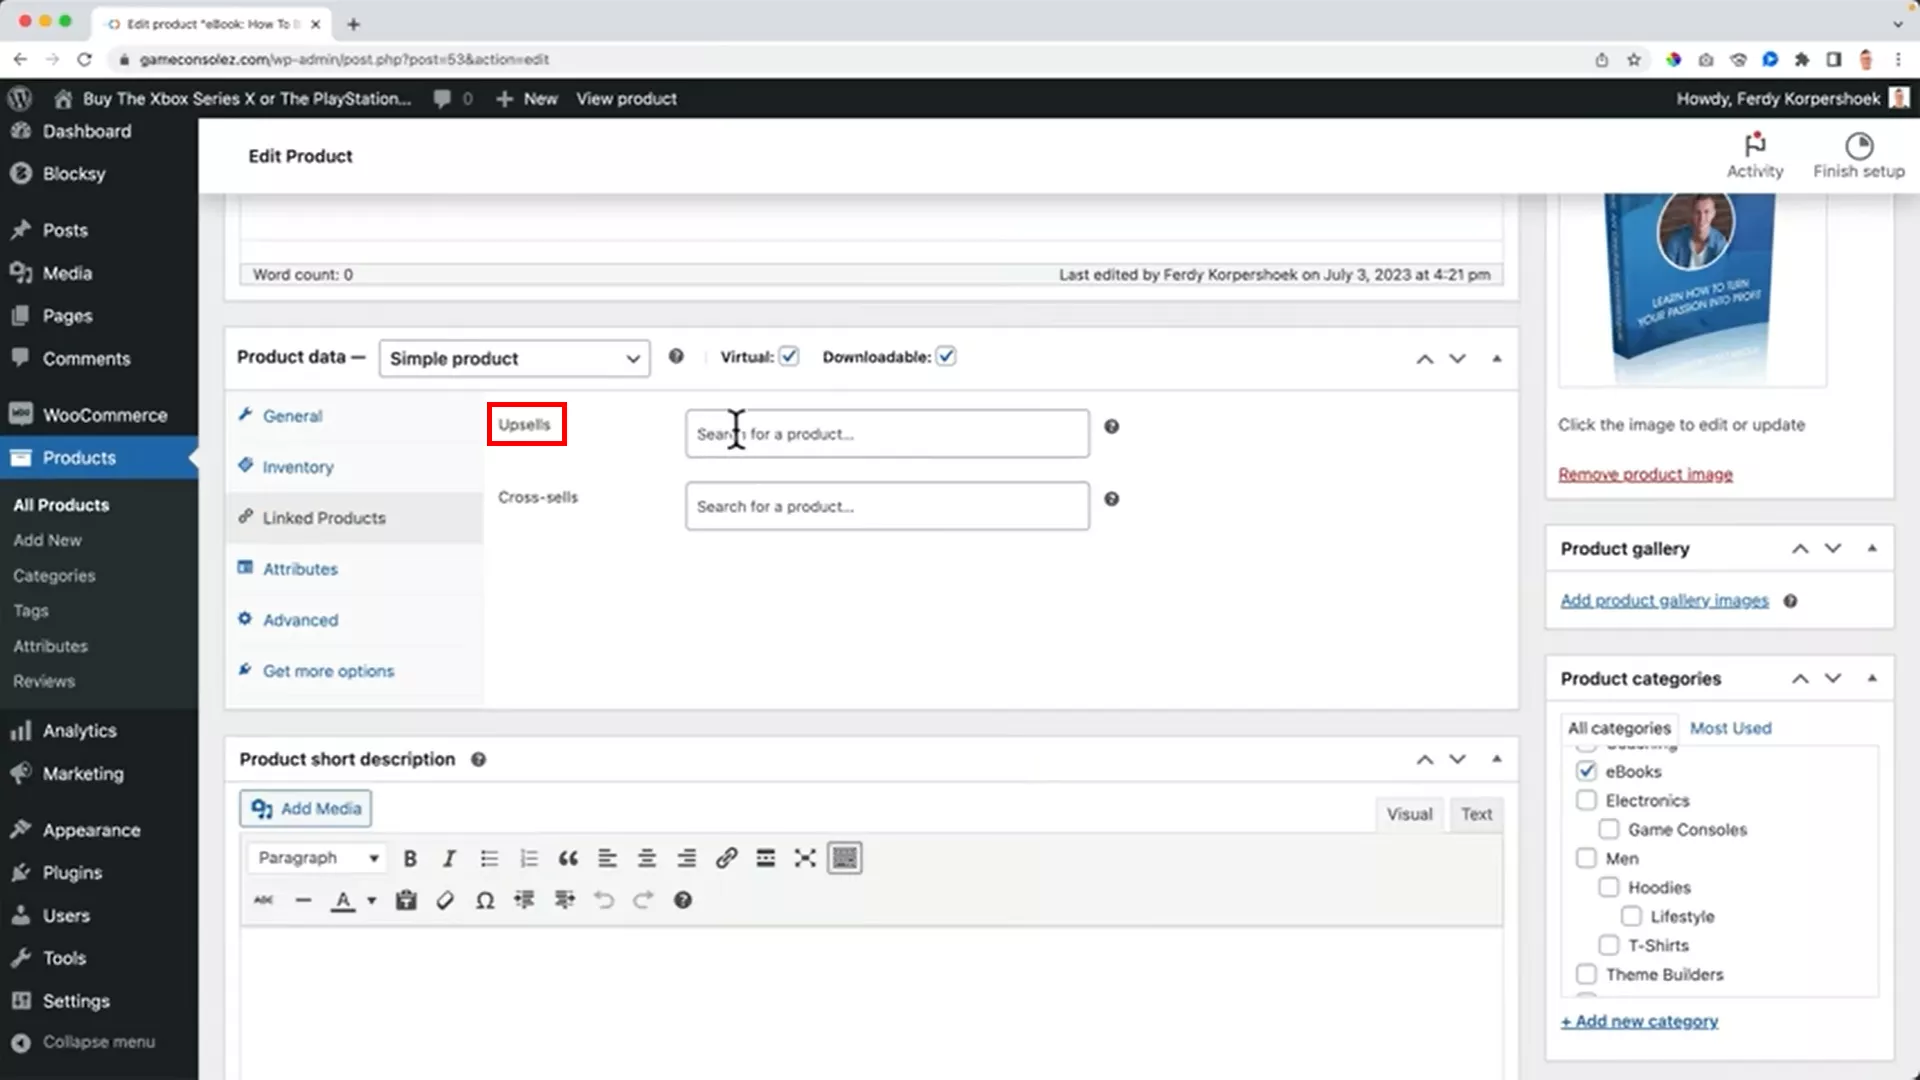
Here’s how to set it up:
- Go to the product you want to add an upsell to and click on ‘Edit Product’.
- Scroll to ‘Product Data’ and then to ‘Linked Products’. Here, you’ll find the upsell option.
- Enter the products that you think complement the primary product.
After updating, when customers scroll down on the product page, they’ll see these additional product suggestions. Pretty neat, right?
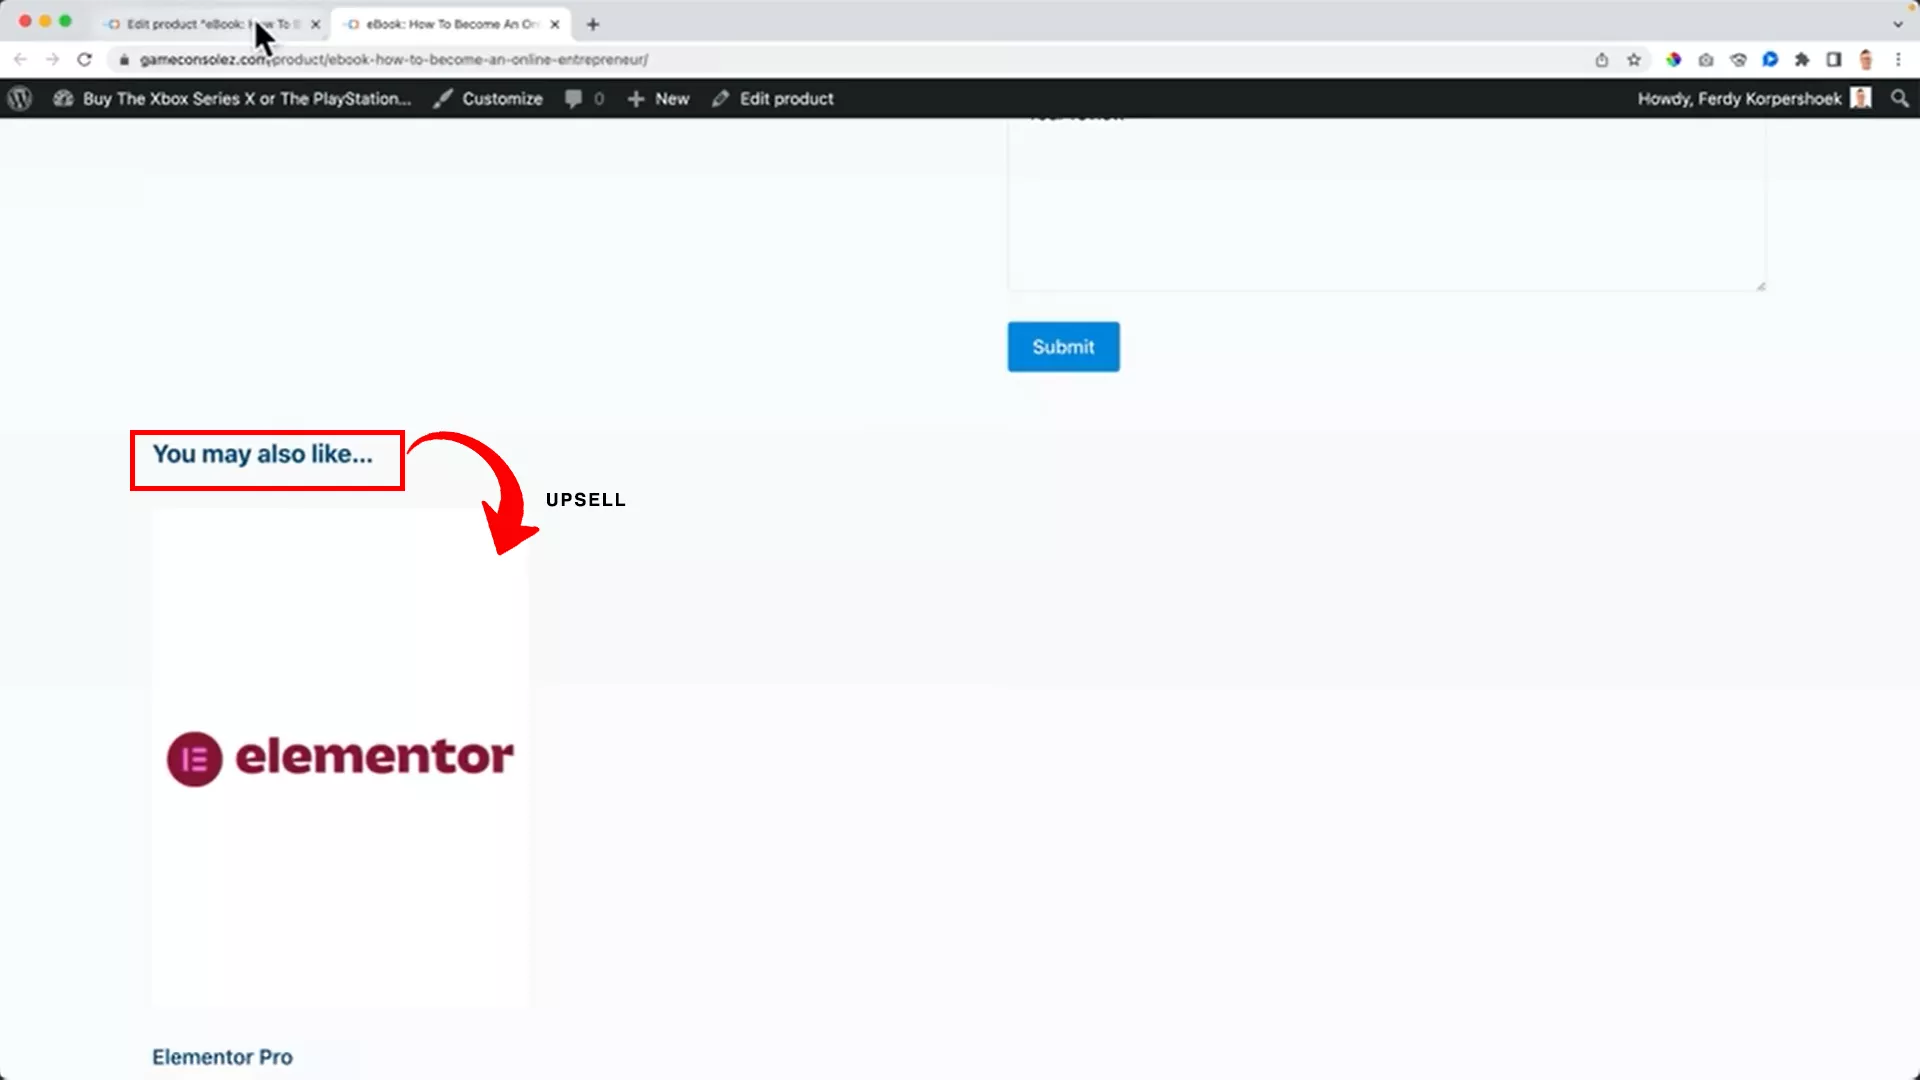
Cross-sells play a different yet equally important role. These are products that appear on the cart page based on what’s already in there.

To add cross-sells:
Under ‘Linked Products’ in ‘Product Data’, you can link products that appear as cross-sells.
For example, I linked Elementor Pro to an eBook like “How to Become an Online Entrepreneur” on my demo site.
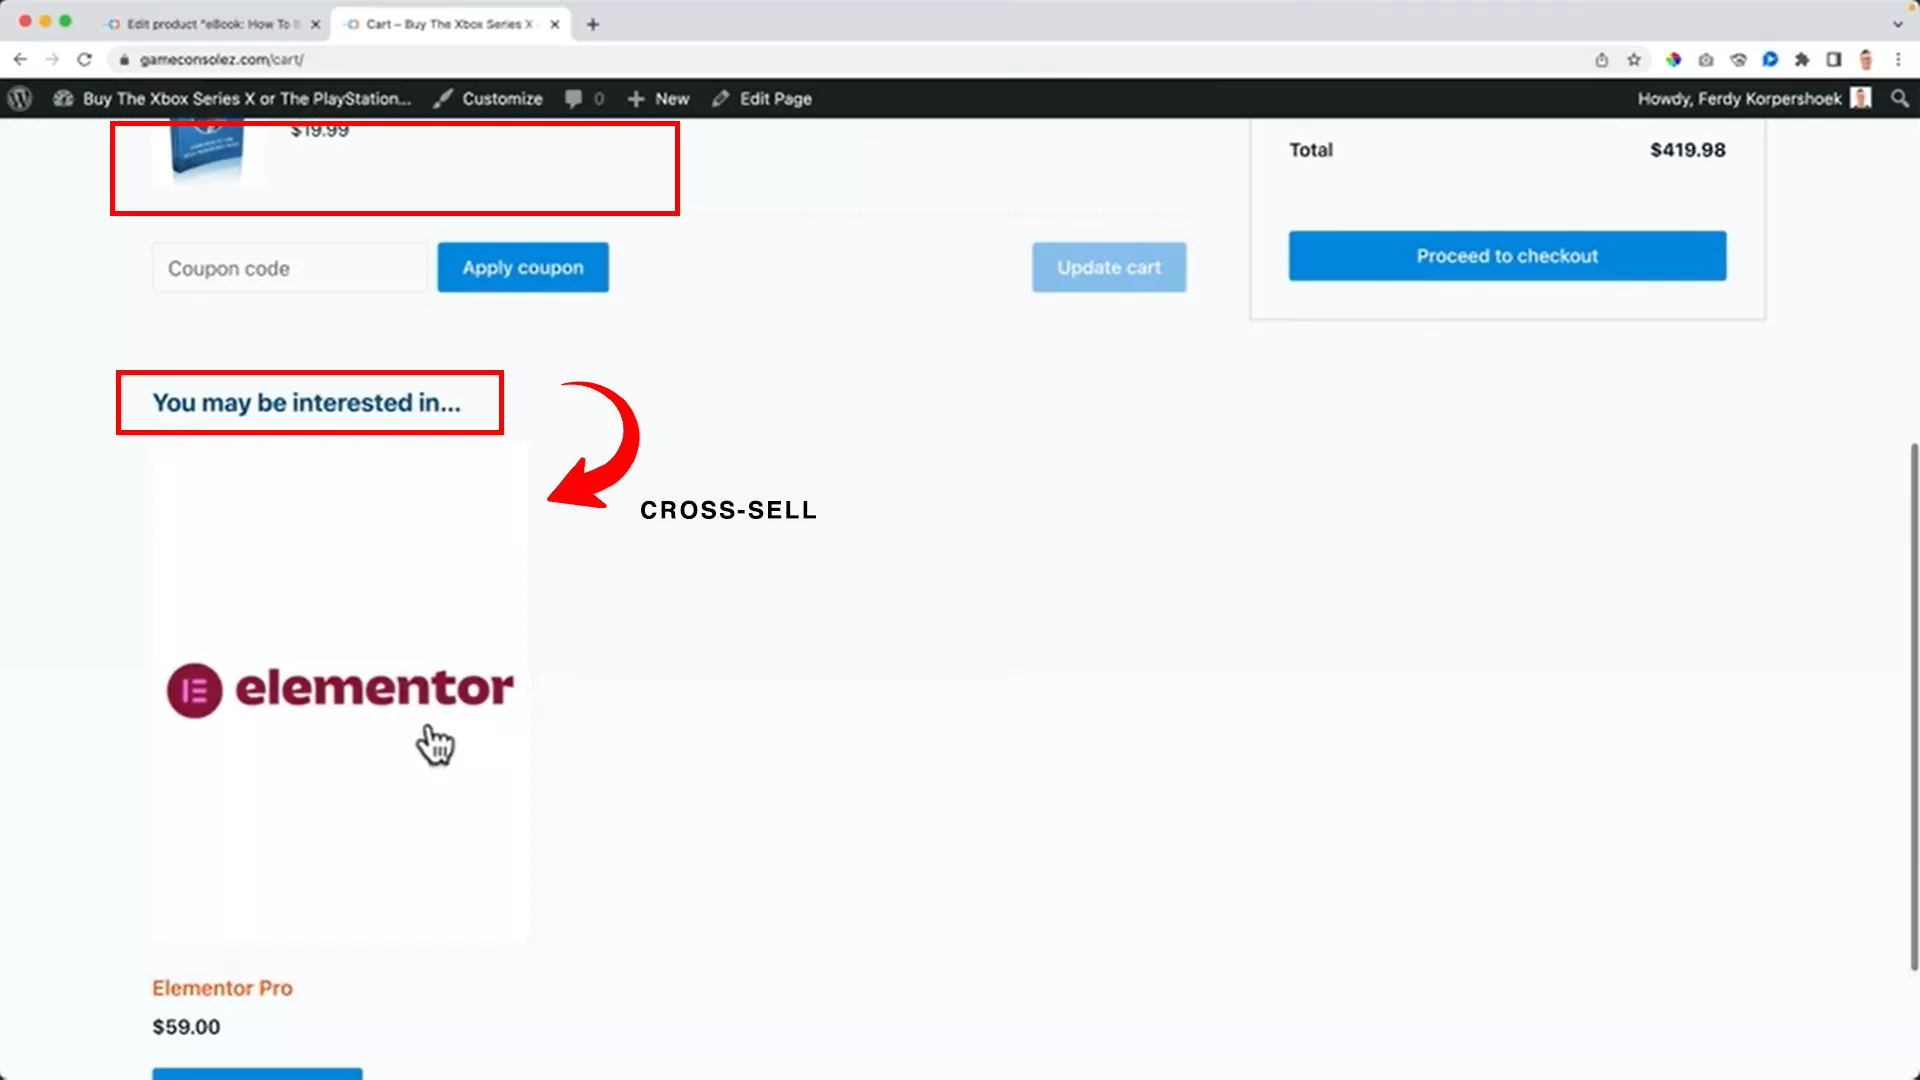
When the eBook is added to the cart, Elementor Pro will appear as a suggestion on the cart page (see the image above).
This method targets customers who are already interested in purchasing and gently nudges them towards more products.
Customizing the product display order
And hey, there’s more! You know the default sorting on your shop page? You can actually customize the order of how products appear.
To do this:
- Go to any product and under ‘Advanced’, you can set a custom order number.
- The lower the number (you can even go negative), the higher the product appears on the list.

For example, the Nike hoodie product on my website was 4th. I assigned ‘-3’ to the hoodie to make it the top product. This way, you can control which products grab the attention first.
7. Configure your product catalog
Once you have a few products in your shop, you will be better positioned to configure more design elements on your website.
I didn’t introduce this at the start of the tutorial because you wouldn’t have any products to check what your product catalog looks like.
To change the look of your catalog, go to the ‘Customize’ option from the toolbar on the top. This will take you to the Blocksy editor.
Click on the three blue dots icon on the top right corner next to your menu items. Go to the design and general tab.
From here, you can change the following design elements:
- Font
- Font colors
- Margins
- Font size
- Line height
- Letter spacing
- Add to cart button
I suggest you explore this a bit and figure out what looks best for your website.
Pro tip: One thing I recommend doing is visiting your competitors and noticing the colors and design elements they have used. This way, you’ll get a good idea of what works in your niche.

While configuring the product catalog for gameconsolez.com, I noticed that one of my competitors uses a green “Add to cart” button which I replicated on my site.
You can also change the swatch alignment on your product catalog by going to WooCommerce > Variation swatches > Shop page styling.
I also configured single product pages by going to the page and customizing the look using the same Blocksy editor.

You can customize single product pages and the checkout page using the same ‘Customize’ option. For these pages, too, I suggest visiting your competitors and leading eCommerce sites like Amazon to get inspired.
Pro tip: For your checkout page, add a “Privacy Policy” and a “Terms and Conditions” page to maintain transparency with your website customers.
8. Adjust the menu
By default, WordPress will add all new pages to your menu display on the top of the home page.

To customize your menu, you’d want to head to ‘Menus’ on the ‘Customize’ panel. Click on the “Create New Menu” button.

Next, name your menu and connect it to the header menu. I named my menu “Main Menu” and connected it to the header menu on the top.
When you click the “Add Items” button, you will get a list of pages and categories you have on your site. Add the pages you want to be displayed on the menu.
Here, I suggest adding parent product categories to your main menu so your customers can easily navigate through the different product categories you offer.

You can also add sub-categories under parent categories by slightly dragging the subcategories to the right.
9. Import products to WooCommerce
While you can add products manually, there is an easier and quicker way to add products to your online store.
For learners, feel free to use the CSV product file I used in this tutorial via this link. You can also use this file to create your own CSV product file to upload on WooCommerce.

Once the file is ready, go to ‘Products’ from the left panel on WordPress. Select All Products > Import and upload the file.
While this will create multiple product pages, you will still have to upload the images manually.
To save time, you can download the images from the source link and upload them to your media library. Add a link to the images in your CSV file for the importer to upload the images automatically.
10. Create a WooCommerce sidebar
Now that you’ve got tons of products on your website, you’d want to add something your customers can use to navigate through your website.
I am talking about the sidebar that appears on the right or left panel of your eCommerce site with a search bar and product categories.

To add this sidebar, go to Customize > Core > Widgets > WooCommerce Sidebar.

Add a block to add a widget. You will have a lot of widget options here. I prefer having a search bar or a price filter on top and product categories beneath it.
There are other widget options, too, and you are free to explore and add anything that suits your needs.
Adjust the look and feel of the sidebar
Once you have added the sidebar, you also get the option to customize its look and feel under the ‘Customize’ option.
Here, you can activate the sidebar’s sticky functionality so it doesn’t move up when the buyer scrolls down to browse products.
You can learn how to create even more advanced filters by following my tutorial on Crocoblock below.
Get creative with the cart
In my demonstration, I added the cart on the sidebar, beneath the price filter so the customer can keep track. You can also add the cart to the menu so the customer can check their cart by just hovering over the cart button.
To do this, go to Customize > Header and drag ‘Cart’ between your site’s menu and search.
By default, the cart’s total will be displayed on the cart icon. From a marketer’s perspective, this is not a good strategy as it will allow the customer to keep track of their cart’s total while shopping.
To change this, go to the Customizer, select the cart option, and customize the look.
11. Create coupon codes
With coupon codes, you can take your online store’s marketing and promotions to another level.
You can give away coupon codes through your email list to your loyal customers and activate them during the sale seasons.

To create coupon codes, go to Marketing > Coupons from the left panel on WordPress.

Generate a coupon code and add the coupon data, which includes:
- Discount type
- Coupon amount
- Coupon expiry
You can also define the usage restriction here, including the:
- Minimum spend
- Maximum spend
- Exclude sale items
- Exclude products
- Use in conjunction with other coupons
If any buyer uses the coupon when not applicable, a message will be automatically displayed on their checkout page.
You can change the color of this message to make it more visible from Customize > General > Messages.
You can also define the usage limits for the coupon code. For instance, you can allow the first 100 individuals to use the coupon or allow individuals to use the coupon code once or twice.
If you add a percentage discount on the coupon, you also get the option to define the number of qualifying items in the cart.
12. Set up shipping on WooCommerce
Before you figure out the shipping costs, you want to specify the locations you want to sell to.
To do this, head to WooCommerce > Settings > General tab and add your selling locations.
You can sell globally or to specific countries or select all countries and exclude some from your list.

For the sake of this tutorial, I chose two selling locations – the USA and Netherlands.
Select “Ship to all countries you sell to” and save changes.
Before proceeding to the shipping tab to set up shipping zones and methods, you need to install and activate a plugin called “Table rate shipping method for WooCommerce” by Octolize.
This handy plugin helps you to calculate the shipping rate based on the price, weight, and delivery location of the order.
Set your shipping zone

Once you have installed and activated this plugin, head to the shipping tab from WooCommerce > Settings. Select “Add shipping zone” and fill in the details.
Next, name the zone, select the regions in the zone, and select a shipping method. The regions in a single zone will have the exact shipping rate, only differing based on the weight and price of the package.
For this demonstration, I set my first zone to the USA as I intend to use UPS as the delivery service, which charges the same rate all over the USA.

There are three shipping methods available on WooCommerce, but thanks to the plugin, we have an extra, ‘Flexible’ shipping method. We now have four shipping methods to choose from:
- A flat rate
- Free delivery
- Local pickup
- Flexible shipping
Flexible shipping
I selected flexible shipping for the USA zone and clicked on flexible shipping to rename it to UPS for clarity.
Next, you must first define the free shipping threshold and the shipping rates.

I set $200 as the free shipping threshold. Then, I defined four shipping calculation rules, all based on the price of the package rather than the weight.
While you can define the calculation rules based on the weight of the package, the common practice is to charge shipping based on the package cost.

Three of the rules were defined for a package price under $200. The fourth rule was a reiteration of the free shipping rule.
Use the free shipping note to prompt more purchases
Tell me, how many times have you spent extra to avoid paying for shipping? Happens with all of us all the time.
Similarly, you can also check the “Display the amount left for free shipping” option to encourage buyers to purchase more items from your online store. On WooCommerce, this is called the LFFS.
You can customize the LFFS notice text according to your liking.
First-timers can get confused by the message: The “%1$s” placeholder displays the numeric value of the amount left for free shipping.

You are supposed to enter this placeholder in your message like I did:
“You only need %1$s more to get free shipping!”
13. Automate taxes
When you start running your online store, taxes will trouble you a lot. Taxes are applicable on every single order you deliver.
While manual tax calculation can work for a few orders, it will quickly become unmanageable when your sales volume increases.
WooCommerce comes with an automatic tax calculator. However, you will need to configure it to calculate the correct amount.

To start, go to WooCommerce > Settings and check the “Enable tax rates and calculations” option.
This action will create a new tab on WooCommerce settings named ‘Tax’.
Here, you can define the tax classes. Usually, there are three tax classes:
- Reduced rates – for specific products like books
- Zero rates – for tax-free products like medicines
- Standard rates – for all other products
Since I don’t have medicines or other tax-free products on my webshop, I only entered ‘Reduced’ in the Additional tax classes section.
This will create separate tax rate pages within the tax tab. You go to each page and define tax rates based on the location.
I defined tax rates for the Netherlands and the USA since the webshop was intended to ship to both of these locations.
You will have to look up the tax rates for your specific location and products before you define the tax rates on your online store.
Including/excluding taxes
If you sell to corporate clients or companies, you can enter product prices with taxes excluded. On checkout, the taxes will be added separately, which the companies can claim when they file their taxes.
But if you sell to regular customers, I recommend including the tax in the displayed price and not calculated separately at checkout.
If you don’t include taxes in the price, you will have a high cart abandonment rate when customers see the huge tax amount at checkout.
The settings on the tax tab under WooCommerce settings can allow you to make these configurations.
After enabling tax calculations, you will also see a tax option within ‘Product Data’ when editing or adding products. You can edit the product price and tax separately here.
14. Configure payment methods
We’re almost at the end of this guide as I teach you how to add different payment methods to your online store.
In my demonstration, I enabled two types of payment methods: Stripe and PayPal.
Enable Stripe on your store
Stripe allows customers to pay through their credit cards.
To set up this payment method, you first need to register for Stripe. You can follow my short tutorial on the sign-up process too.
After signing up, install and activate the plugin on WooCommerce called “Stripe payments for WooCommerce”.
After activation, you will be prompted to connect your WooCommerce store to Stripe.

Enable the payment gateways you want to add to your eCommerce website.
You can also enable these payment gateways later from the settings.

You will notice a unique webhook URL during the setup.

Copy and paste this URL into the ‘Endpoint URL’ field on the Stripe events page in your account.

On the Stripe events page, enable all events under “Charge”.

Upon adding the event, you will receive a key. Paste this key into WooCommerce.
From WooCommerce > Settings > Payments tab you can configure the payment settings, including the payment button label and express checkout.
Enable PayPal on your store
While Stripe allows multiple payment options, PayPal is also a widely used payment method.
The setup is quite easy, but you need to have a PayPal method for accepting payments from your store.

To set up PayPal on WooCommere, search for “WooCommerce PayPal” from the plugins. Install it and connect it to your PayPal account.
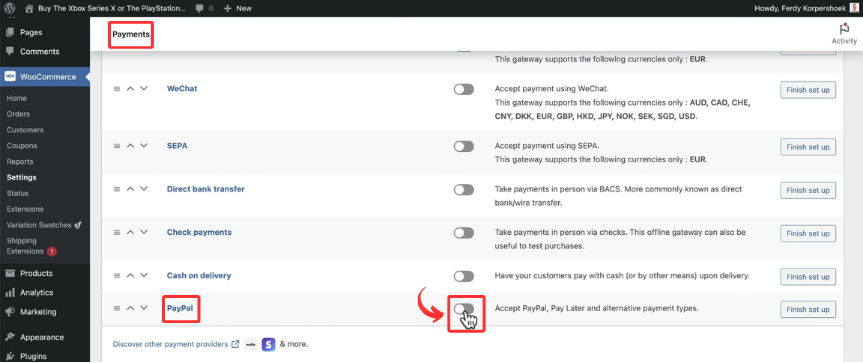
To activate it, go to WooCommerce > Settings > Payments and toggle on PayPal from the list of available payment methods.
15. Add a search bar
The header and footer section of a webshop contains the most important elements. I am inspired by Amazon and its amazing search bar on the header.
To make my header look the same, I have found a great advanced search tool. You can get this tool from the plugins library.

Just search for “Advanced Woo Search”, install, and activate it.
While you cannot add an advanced search bar using the drag-and-drop Blocksy editor, the process is still pretty much simple.
Go to ‘Advanced Woo Search’ plugin from the left control panel on WordPress and head to ‘Settings’.

From the general tab, grab the shortcode and paste it as an HTML block on the header of your store.
I prefer placing the advanced search bar on the top row so it’s visible to the visitors.

Before checking out your new search bar, go to the plugin settings again and click the ‘Reindex table’ button. This will create a search bar on your website.
This is how it looks on my demo site:

You can leave it as is or customize it as you like.
16. Customize your online store
Your online store is now ready for customers! But there are still some changes that you could make so your store looks professional and builds trust with the audience.
I suggest:
- Create legal pages for your website, including cookie policy, disclaimer policy, affiliate disclaimer, privacy policy, terms and conditions, and return policy.
- Customize your automated emails from WooCommerce > Settings > Emails
- Optimize your ecommerce site for all devices by going to Customize > Header or Customize > Footer and configuring by clicking the tablet and mobile icons on the bottom.
- Make your header sticky so visitors can find the search bar even when they scroll down.
- On the footer, add your logo, categories, legal pages, and contact information.
18. Backup your website
Hey there, awesome people! We’ve reached the grand finale of our web store creation journey – backing up your website. If you’ve been following along with my tutorial, chances are you’ve poured hours into crafting your online store.
Now, let’s make sure all that effort stays secure. Backing up your website is not just important; it’s essential.
All-in-One WP Migration
First up, we have the All-in-One WP Migration plugin. This handy tool lets you save a complete website copy, right on your device.
Simply install and activate the plugin.
To create a backup, head over to the plugin, click ‘Export’ > ‘To File’, and then save that precious copy onto your device. It’s like keeping a digital twin of your website!
WPvivid
Another great option is WPvivid – it’s like a digital vault for your website.
After installing and activating it, just hit “Backup Now”.
Give it a few moments to wrap things up, and then you can download the backup to your system. Think of it as a safety net for your online presence.
Hostinger
Now, let’s talk about Hostinger. With Hostinger, your backup lives online, like in a cloud.
Log into your Hostinger account and navigate to the ‘Website’ tab. Select your site and hit “Manage”.
In your website’s Hostinger dashboard, go to ‘Files’ > ‘Backups’. Here, you can generate a new backup.
It might take a few hours, but having a backup with Hostinger is like having a plan B in your back pocket.
Remember, in the digital world, it’s always better to be safe than sorry. Regular backups are your safety net, ensuring that your hard work is preserved, no matter what. So, take these final steps and secure your online store’s future. You’ve built something amazing – let’s keep it that way!
Final Words
Launching an online store is quite the feat – managing products, pricing, and shipping, all while crafting a visually appealing site. But fear not! With user-friendly themes like Blocksy and page builders like Elementor, it’s a breeze, especially with the right guidance.
I’ve designed this tutorial to be straightforward, but if you have any questions, don’t hesitate to check out my other YouTube tutorials or reach out on Instagram. You’re not just starting a store; you’re embarking on an exciting journey. Here’s to your success in the digital marketplace!


0 thoughts on “How to Start an Online Store in 2024 (Step by Step)”